Japeatr's pics of Powell PCV System install on TVS LSJ
 10-27-2013, 02:43 AM
#1

Japeatr's pics of Powell PCV System install on TVS LSJ
First off: Appreciate John Powell and Gloria's help on helping me get all the parts i was after. You still owe me a picture of you two wearing our team shirts btw.
OK. so my car is in pieces at the moment while installing Powells custom fuel system and a deluxe nitrous express setup, as well as flipping the heat exchanger with the AC condenser, new gauges, wiring some other goodies, roll cage modification etc. SO you will see things like wires and various components removed that are not necessary for the installation of this setup.
I did the entire install of the system with TVS and Alternator in place in order to facillitate a plug and play outcome. there are easier ways to do this! I wanted to offer value where possible
John powder coated me a valvecover in the exact same color as the Harrop TVS. This cover is tapped and threaded for NPT with a AN-6 fitting installed.

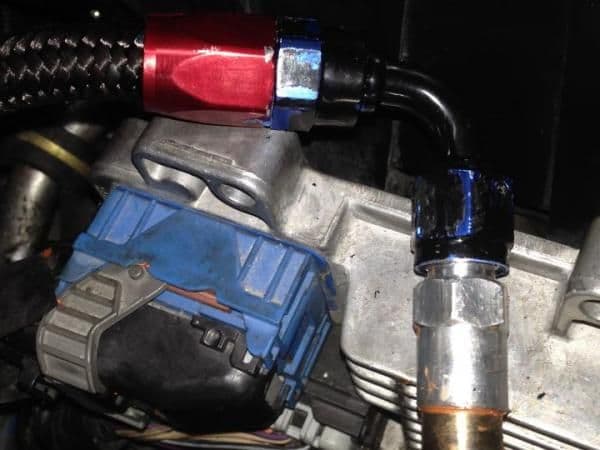
here is a picture of the seperator and PCV hoses installed. I cut off about an inch and a half of the supplied bracket to nest it into the spot it is in. there is a factory drilled hole next to the passanger headlight bracket that the seperator bracket bolt fastens thru. I took the advice from John and used a M4 nutsert that i "riveted" in place so there is now a permanent threaded hole in that location. Care should be taken to ensure the lines from the PCV to the air intake do not touch the valvecover and potentially rub the powder coating off.

now that the seperator and dash 6 lines are run, on to the connection to the air intake. I am running the ZZP 3" stainless steel intake which has less than steller PCV nipple placement. Tim/Matt/Ryan/Zoom, if you read this, the PCV fitting barely clears the PCM with the factory line, let alone and AN6 fitting. it needs to be located 1" clockwise from the blower end.
ill get to more on this in a sec. The method of connection from the air intake to the supplied hoses is a custom fitting that is "pressed" onto the PCV nipple and epoxyed. I had correspondance with JP prior to the fabrication of this fitting for my setup and gave him my PCV nipple OD. John bored the female end a few thousands over for a snug fit.
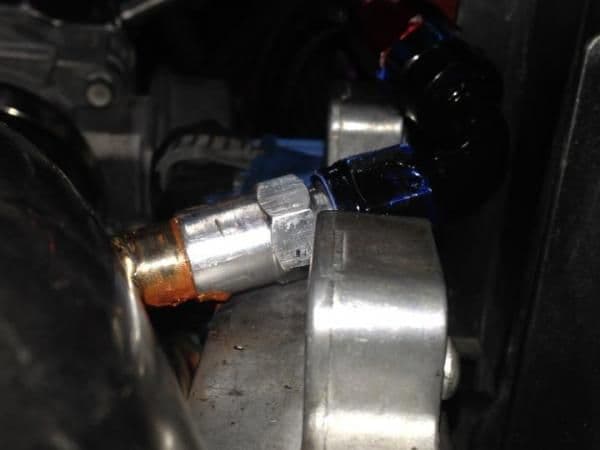
I smeared copper high temp RTV on the PCV nipple, heated the Powell AN adapter to about 350F with a heatgun, then "pressed it on" using an Irwin quick clamp.
In anticipation of the ZZP PCV nipple clearence concern i measured the distance to the PCM and did whatever i could to minimize the projection of the AN adapter from the intake tube. I ended up cutting a portion off using a tubing cutter. I have a Swagelok tubing cutter, worked like a dream.

I also modified the supplied hose by shortening it by 3.5" and changing the end fitting from a 45* to a 90*. John if you have a black 90 laying around ill take it off your hands!!!
side note: i tried rattle canning the blue/red Holley clown fitting and the wrench took off most of the Krylon

onto the final portion of the install...... the dipstick tube for the seperator oil return.
This was the biggest hurdle. remember i mentioned the whole "didnt remove the blower or alt thing" ya sooo... it would have been easier if i did, however those that run the TVS know the dipstick clearence sucks. John sent me a modified diptick to rotate the dipstick to infront of the IM. this is great! I had to make some serious modifications to the tube however.
John sent me a couple dipsticks, which helped to mockup what i did. I ended up bending some serious offsets to the tube in order to get the desired end result. this desired position plus the AC line interference was a hassle. I bent about a 5* offset 2" from the lower dipstick oring base. then bent a 10* offset toward the driver side, then a 20* offset to put the top of the tub directly between the TVS and core support.
you may have to molest your tube as needed. i used a winning combination of my Swagelok tubing bender, and my knee to achieve this.


modified Powell dipstick bracket. i used 2 cresent wrenches to bend a offset in the bracket to match with the dipstick tube. I also slotted my tube bracket to allow for more adjustability and ease of lining up the bracket bolt. further more i dremeled off the lower tab of the dipstick tube, this helped in maneuvering the tube into place. i installed and tweaked the tube about 15 times until i liked the placement and mounting of it.
next route the oil drain line and checkvalve to the dipstick. Care should be taken to avoid the belt and pullies.
due to my small TVS pulley i ended up with a 1/2" nominal clearence from the belt. I secured the line to a wire loom using a ziptie to avoid future contact.
thats it.
let me know if you have any questions or photo requests. Again thanks to John and Gloria at Powell Race Parts for the engineering and customer support. Shameless plug for our local crew, DFWGMElite.com!

Last edited by JapEatr; 10-27-2013 at 02:48 AM.


 10-27-2013, 09:45 PM
#8

I am in awe that you installed that dipstick with the blower in place; the cobalt has less space than a redline lol.
i will send you a black 90 and then it will be good! awesome job noted the 3.5 inches less for the return, i assume the other lengths were okay and good for you using the adel clamps etc. nice. in for the power results with the new fuel system next.
i will send you a black 90 and then it will be good! awesome job noted the 3.5 inches less for the return, i assume the other lengths were okay and good for you using the adel clamps etc. nice. in for the power results with the new fuel system next.
10-27-2013, 09:51 PM
#9
Yes had some clamps left over from another project. If you have another dipstick bracket ill take that as well. Im gonna do a better job on the offset of the bracket
It varies depending on which intake folks run as well.
I am in awe that you installed that dipstick with the blower in place; the cobalt has less space than a redline lol.
i will send you a black 90 and then it will be good! awesome job noted the 3.5 inches less for the return, i assume the other lengths were okay and good for you using the adel clamps etc. nice. in for the power results with the new fuel system next.
i will send you a black 90 and then it will be good! awesome job noted the 3.5 inches less for the return, i assume the other lengths were okay and good for you using the adel clamps etc. nice. in for the power results with the new fuel system next.
Last edited by JapEatr; 10-27-2013 at 09:51 PM. Reason: Automerged Doublepost
10-29-2013, 05:27 PM
#11
appreciate all the PMs i have been sent on this. to answer a few.
I may weld an AN fitting onto the intake piping and ditch the adapter. it depends if i pull the intake pipe off to weld a nitrous bung as well.
the hose to the intake could be shortened further but will wait until i do the above before cutting further. JP mentioned sending a black fitting so i may hold off until i source fittings to weld in place
i havent cleaned the TB yet but will do a before and after a few thous mile comparison for those that asked.
yes it is worth the coin.
i do believe you get what you pay for. i ran a home depot catch can for years and it just wasnt cutting it. at the horsepower i am aiming for i need all the PCV i can get
 11-02-2013, 06:42 PM
#15
some good reading on the importance of a well designed PCV. this problem has plagued Saab owners for years and GM still has yet to solve fully.
Angry Kitchen Appliances: Information about crankcase ventilation in B205 and B235
hat tip, John Powell
Angry Kitchen Appliances: Information about crankcase ventilation in B205 and B235
hat tip, John Powell
 11-06-2013, 12:05 PM
#20

soo let me get this straight.
air/oil comes out of the cover, goes into the seperator by the headlight. then the fresh air line runs under the fuel rail cover to the intake, and whatever oil was seperated goes back into a spot by the dipstick?
air/oil comes out of the cover, goes into the seperator by the headlight. then the fresh air line runs under the fuel rail cover to the intake, and whatever oil was seperated goes back into a spot by the dipstick?
