Interior: How to change cluster, HVAC control, window and door lock to LED
 02-25-2010, 05:36 PM
#1
Senior Member
Thread Starter
iTrader: (5)

Join Date: 09-15-09
Location: Rochester, NY
Posts: 753
Likes: 0
Received 0 Likes
on
0 Posts
How to change cluster, HVAC control, window and door lock to LED
In this write up you will learn how to switch various interior pieces to LED's. For these projects all you need is basic tools to dissasemble car. A good soldering iron, fine solder( I use .032"), 12 volt leds ( 9 for IP cluster, 4 for HVAC control, 4 for coupe driver switches or 6 for sedan, and 2 for passenger switches, and one for each rear for sedan.). You will also need time and some decent soldering skills.
I will use a HVAC control head for the how-to on a 2009 but should apply the same to all years.
first step is to remove the HVAC control head
Preliminary Procedure
�Remove the instrument panel trim plate -- right side. Refer to Instrument Panel Trim Panel Replacement - Right Side .
�Remove the instrument panel trim panel -- center. Refer to Instrument Panel Center Trim Plate Replacement .
Instrument Panel Trim Plate Assembly
Procedures
�Pull out on the trim panel in order to release the retaining fasteners.
�Disconnect the electrical connectors.
�Remove the HVAC control module assembly screws.
�Remove the HVAC control module assembly.
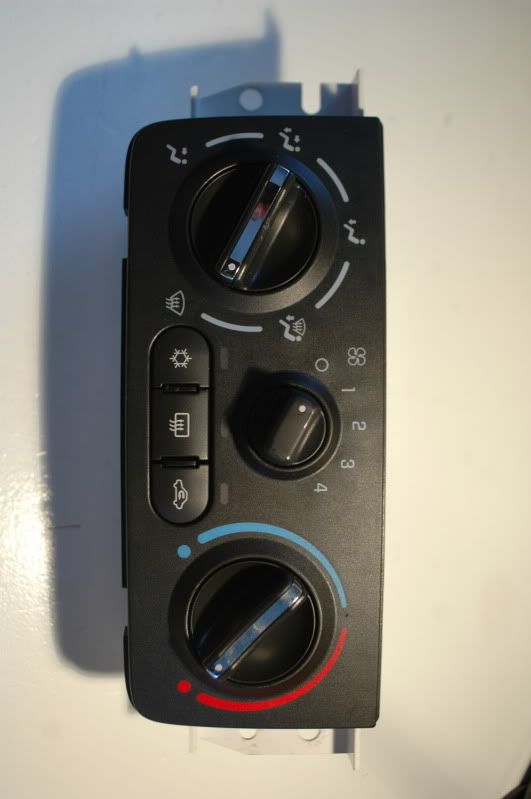
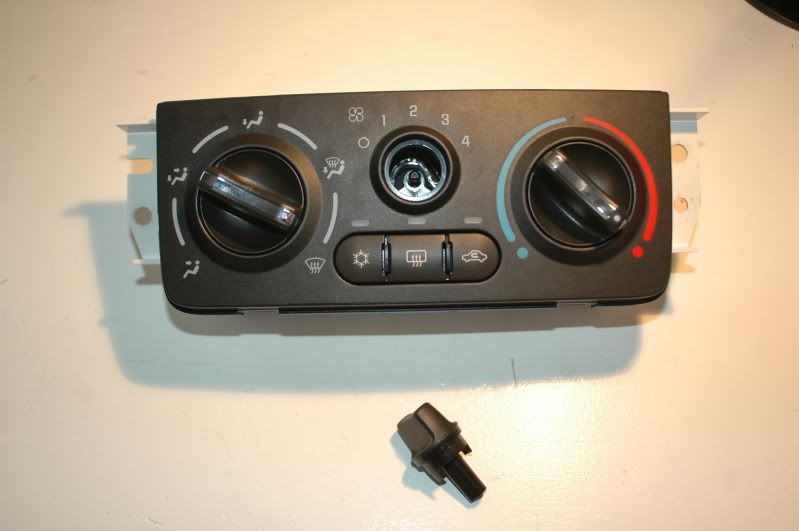
With that removed you'll want to pull the blower speed knob off. With that off take a small flat bladed screw driver and pry and the four clips carefully. The temp and mode knobs are attached to the faceplate of the the module and do not need to be seperatly removed.
1.
2.
3.
4.

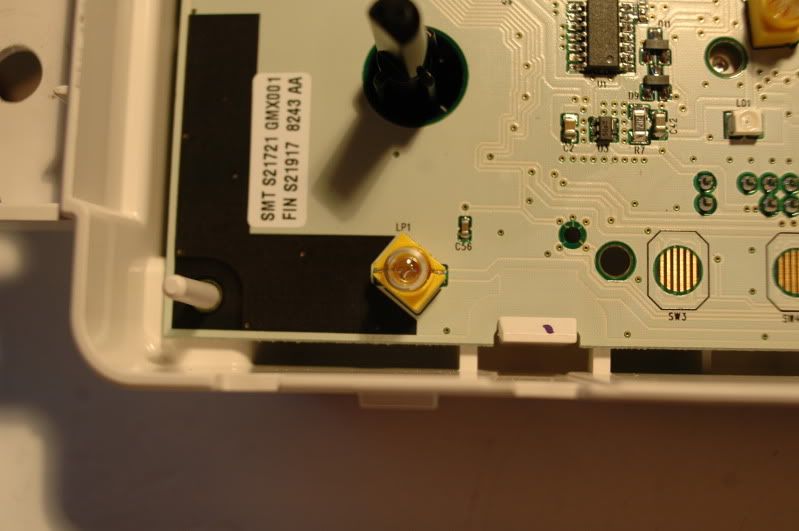
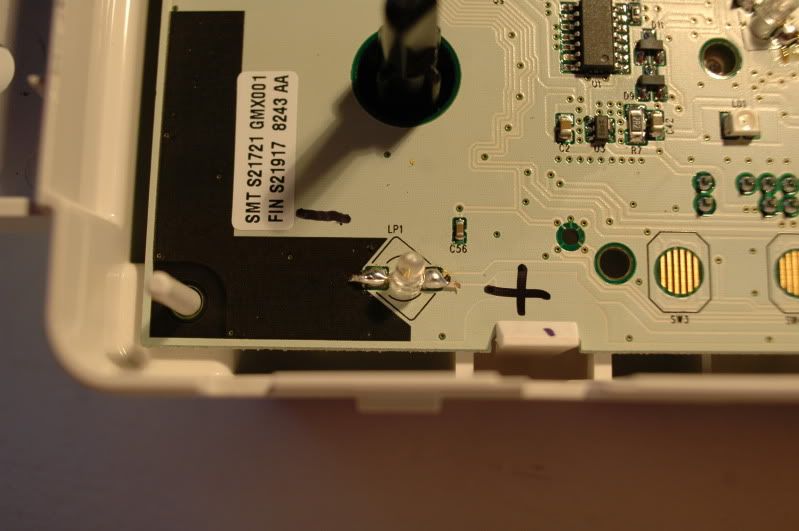
Now thats it apart you can use my pictures for reference, it may be alot easier. I have pictured the unit powered on with factory bulbs in place. I also went through and marked the boards positve and negative sides which is very important because LED's are Diodes and only work one way.
5.

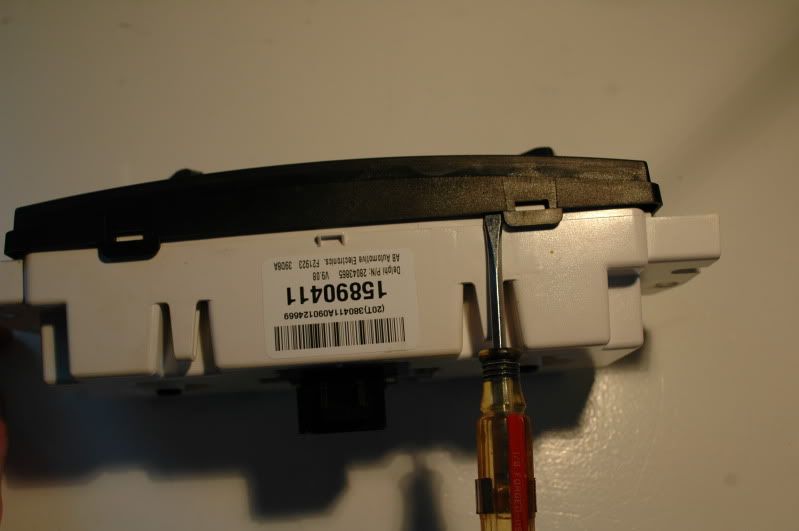
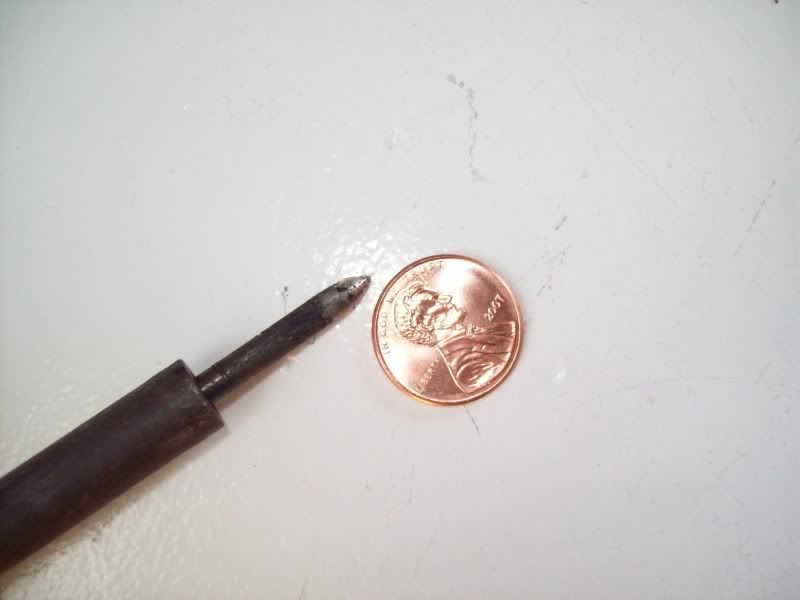
You will want a pretty fine point on a soldering iron for these tasks now. You'll want to take the iron and either a small screwdriver, knife, pair of plies or what ever you want to pull/ pry the old light off carefully while appling heat to the solder. Now, all the parts in all the various interior pieces are surface mount which means they are all soldered on the side of the board that the component mounts.
6.
With all the bulbs removed take your 12 volt LED's and configure the legs to come in contact with the solder pads. Note to find an leds positve and negative look here http://www.instructables.com/id/LED_Polarity_Tester/ .
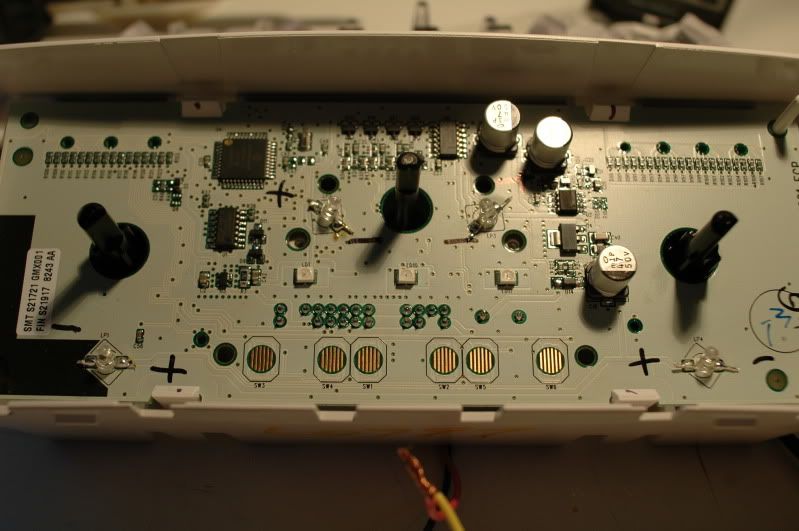
With all the LEDs soldered in you should come up with this
7.
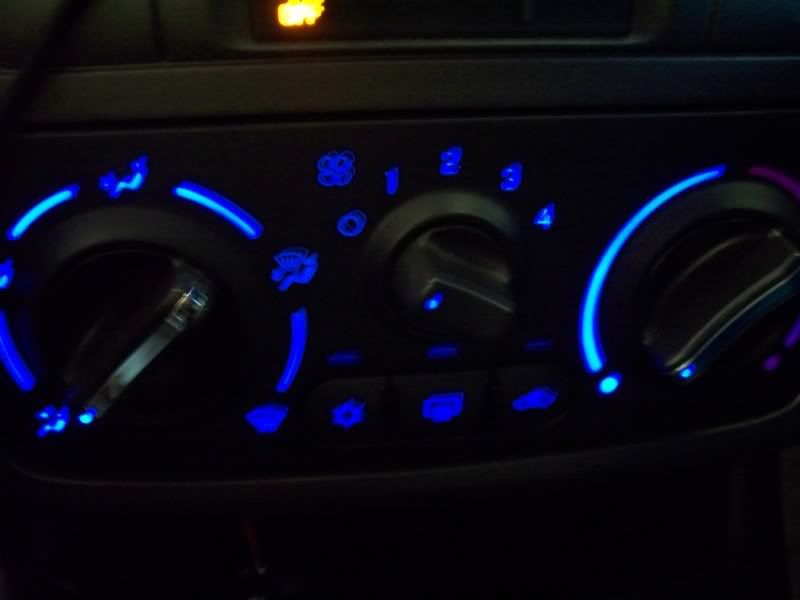
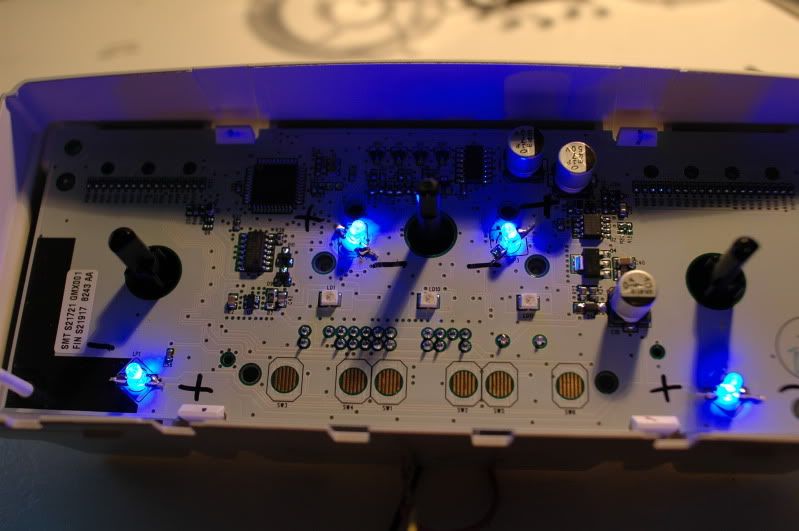
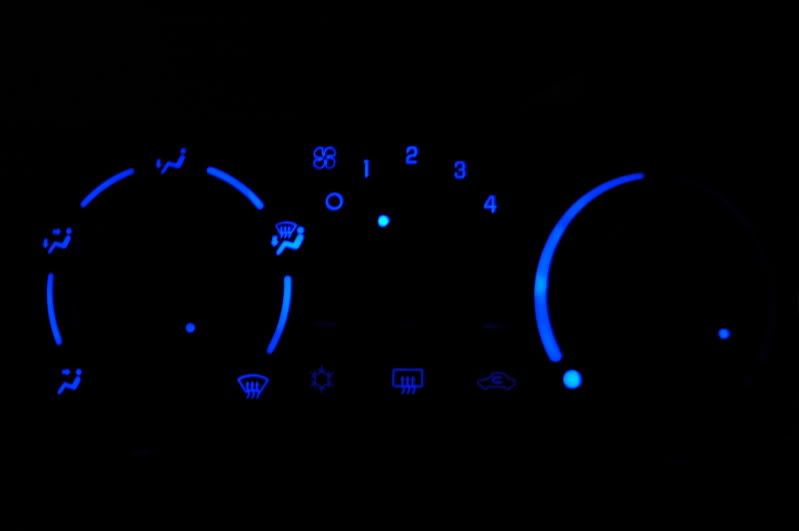
Now you can reverse all the steps off dissasembly and end up with this. note the red heat portion will not be as bright with blue leds but you can still see it just the picture did not come out well.
8.
Reinstall in vehicle by reversing all previous steps. Now this write up applies to the IP cluster, HVAC control, Window switches, and lock switches. You just have to adjust accordingly to which project you are on.
DISCLAIMER: I am not responsible for any damages made to your vehilce im am only doing this for a guide on how to accomplish what I have done.
I will use a HVAC control head for the how-to on a 2009 but should apply the same to all years.
first step is to remove the HVAC control head
Preliminary Procedure
�Remove the instrument panel trim plate -- right side. Refer to Instrument Panel Trim Panel Replacement - Right Side .
�Remove the instrument panel trim panel -- center. Refer to Instrument Panel Center Trim Plate Replacement .
Instrument Panel Trim Plate Assembly
Procedures
�Pull out on the trim panel in order to release the retaining fasteners.
�Disconnect the electrical connectors.
�Remove the HVAC control module assembly screws.
�Remove the HVAC control module assembly.
With that removed you'll want to pull the blower speed knob off. With that off take a small flat bladed screw driver and pry and the four clips carefully. The temp and mode knobs are attached to the faceplate of the the module and do not need to be seperatly removed.
1.
2.
3.
4.
Now thats it apart you can use my pictures for reference, it may be alot easier. I have pictured the unit powered on with factory bulbs in place. I also went through and marked the boards positve and negative sides which is very important because LED's are Diodes and only work one way.
5.
You will want a pretty fine point on a soldering iron for these tasks now. You'll want to take the iron and either a small screwdriver, knife, pair of plies or what ever you want to pull/ pry the old light off carefully while appling heat to the solder. Now, all the parts in all the various interior pieces are surface mount which means they are all soldered on the side of the board that the component mounts.
6.
With all the bulbs removed take your 12 volt LED's and configure the legs to come in contact with the solder pads. Note to find an leds positve and negative look here http://www.instructables.com/id/LED_Polarity_Tester/ .
With all the LEDs soldered in you should come up with this
7.
Now you can reverse all the steps off dissasembly and end up with this. note the red heat portion will not be as bright with blue leds but you can still see it just the picture did not come out well.
8.
Reinstall in vehicle by reversing all previous steps. Now this write up applies to the IP cluster, HVAC control, Window switches, and lock switches. You just have to adjust accordingly to which project you are on.
DISCLAIMER: I am not responsible for any damages made to your vehilce im am only doing this for a guide on how to accomplish what I have done.
Last edited by REIGN SS; 08-23-2010 at 11:00 AM.


 03-03-2010, 12:18 PM
#6
Senior Member
iTrader: (10)

Join Date: 02-22-10
Location: Midland,TX
Posts: 1,735
Likes: 0
Received 0 Likes
on
0 Posts
there is an easier way just paint the existing bulbs with stain glass paint form wall mart,cheap and easy just like led but half the work. BUT GOOD HOW TO ILL GIVE YOU THAT(:
03-05-2010, 09:21 AM
#9
Senior Member
Thread Starter
iTrader: (5)
Join Date: 09-15-09
Location: Rochester, NY
Posts: 753
Likes: 0
Received 0 Likes
on
0 Posts
I bought the LEDS from led-switch.com but he also has his products on ebay he does appear to have red 12 volt leds aswell.
for all of my projects i used a weller 25 watt iron
for all of my projects i used a weller 25 watt iron
03-05-2010, 10:44 AM
#11
Senior Member
Thread Starter
iTrader: (5)
Join Date: 09-15-09
Location: Rochester, NY
Posts: 753
Likes: 0
Received 0 Likes
on
0 Posts
Im more than happy to help any one out just PM with specific questions ill post them on this thred if i feel it will be a FAQ. Im more than will to also do the swap for people .
pricing would be my price with parts plus exact return shipping.
cluster...............55
hvac..................25
door switches.....25
steering wheel....15 for one side 25 for both
full swap............115
pricing would be my price with parts plus exact return shipping.
cluster...............55
hvac..................25
door switches.....25
steering wheel....15 for one side 25 for both
full swap............115
03-05-2010, 07:34 PM
#14
Senior Member
Thread Starter
iTrader: (5)
Join Date: 09-15-09
Location: Rochester, NY
Posts: 753
Likes: 0
Received 0 Likes
on
0 Posts
not a stupis question, but yes they need resistors but if you buy leds that are built for 12 volt power you will not need them. most leds will require 3.5-5 volts depending on color, size, and manufacture.

 03-21-2010, 01:25 AM
#19
http://cgi.ebay.com/5-mm-12-Volt-Red...item2c53a8521c
thats what id need right
also can you take a pic further back
i see the ac is blue since u did blue but what is the heat color? is that blue or red?
thats what id need right
also can you take a pic further back
i see the ac is blue since u did blue but what is the heat color? is that blue or red?
03-21-2010, 11:52 AM
#20
Senior Member
Thread Starter
iTrader: (5)
Join Date: 09-15-09
Location: Rochester, NY
Posts: 753
Likes: 0
Received 0 Likes
on
0 Posts
^^ those are the correct lights and the heat turned purple it can be seen in the thread i made in the appearance section run a quick search there.