Official Retrofit Thread
 02-12-2012, 10:52 PM
#326
I would recommend the Mini H1s over the Mini D2s because the Mini's have a much better output
It's the projector shroud with a halo behind it. Very simple work that you could easily do yourself with just a simple drill bit and some aluminum foil tape. All you would need to do is get 2 E46 extended shrouds, and find a drill bit that fits in the hole without making it any bigger, then just drill out each hole. Then just line up the halo behind it and tape it into place. Takes some time but comes out very nice.
It's the projector shroud with a halo behind it. Very simple work that you could easily do yourself with just a simple drill bit and some aluminum foil tape. All you would need to do is get 2 E46 extended shrouds, and find a drill bit that fits in the hole without making it any bigger, then just drill out each hole. Then just line up the halo behind it and tape it into place. Takes some time but comes out very nice.
 02-12-2012, 11:04 PM
#327
New Member

Join Date: 06-29-11
Location: Unionville, MI
Posts: 181
Likes: 0
Received 0 Likes
on
0 Posts


if i ordered could i get you to to the retro mod like this, including ur special bowtie on the turn sig reflector, **** is sexy, i can get at you with a paypal for it or however it could work out, love ur work
02-12-2012, 11:07 PM
#328
New Member
Join Date: 06-29-11
Location: Unionville, MI
Posts: 181
Likes: 0
Received 0 Likes
on
0 Posts
I would recommend the Mini H1s over the Mini D2s because the Mini's have a much better output
It's the projector shroud with a halo behind it. Very simple work that you could easily do yourself with just a simple drill bit and some aluminum foil tape. All you would need to do is get 2 E46 extended shrouds, and find a drill bit that fits in the hole without making it any bigger, then just drill out each hole. Then just line up the halo behind it and tape it into place. Takes some time but comes out very nice.
It's the projector shroud with a halo behind it. Very simple work that you could easily do yourself with just a simple drill bit and some aluminum foil tape. All you would need to do is get 2 E46 extended shrouds, and find a drill bit that fits in the hole without making it any bigger, then just drill out each hole. Then just line up the halo behind it and tape it into place. Takes some time but comes out very nice.
02-12-2012, 11:14 PM
#329
is this how the e46 extended shroud is, or did u mod to fit halo behind it, love the led look of the shroud either way bro, props
if i ordered could i get you to to the retro mod like this, including ur special bowtie on the turn sig reflector, **** is sexy, i can get at you with a paypal for it or however it could work out, love ur work
if i ordered could i get you to to the retro mod like this, including ur special bowtie on the turn sig reflector, **** is sexy, i can get at you with a paypal for it or however it could work out, love ur work
http://retro-solutions.net/product-i...es-pid550.html, in 100 mm size
This is what the shroud normally looks like
 02-12-2012, 11:30 PM
#330
New Member
Join Date: 06-29-11
Location: Unionville, MI
Posts: 181
Likes: 0
Received 0 Likes
on
0 Posts
if you can do the rest of the retro you can easily do this halo mod. All the holes are already there you just gotta drill out the back, and there's plenty of room behind there to mount the halo. Mine was held in place with some aluminum foil tape which I got from Home Depot. I covered the back of the halo in order to block out any light from the back. These are the halos I used
CCFL angel eyes - Retro-Solutions Store, in 100 mm size
This is what the shroud normally looks like
CCFL angel eyes - Retro-Solutions Store, in 100 mm size
This is what the shroud normally looks like
02-13-2012, 06:57 AM
#333
i was sayin have you do the whole retro kit, ive never done one and dont feel like snapping my unit lenses...unless there is a real good how to for me to check out then i may give it a shot, and any pics of common problems, like were u drilled to stop fogging and such
02-14-2012, 09:03 PM
#335
Junior Member
iTrader: (1)

Join Date: 07-30-10
Location: NE OH
Posts: 462
Likes: 0
Received 0 Likes
on
0 Posts
Here is my problem. I am trying to hook up my brights from my min h1's and I do not know where this part hooks in 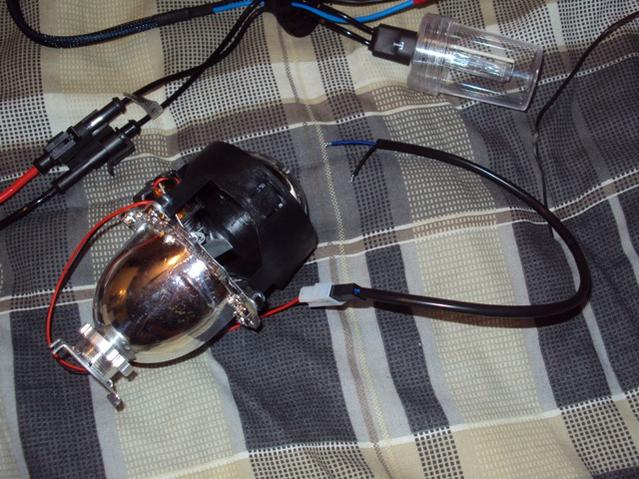
Do you see the wire coming from the projector? Where does it go? Do I splice it in?
Thanks guys!
Tom
Do you see the wire coming from the projector? Where does it go? Do I splice it in?
Thanks guys!
Tom
02-14-2012, 09:15 PM
#339
Ive done 3 mini retros, and painted about 8 sets of lights black, and ALWAYS reheated the back of the lights and then just pressed them back together with my hands with gloves on. The factory sealant is the strongest and sets in SECONDS!
I did one retro and spent about 2 hrs removing all the factory stuff then rtv'd them and they would not stay together, i bear hugged them for 30 minutes, nearly had a heart attack, then c clamped them and they both leaked. Ive never had a leak since keeping the factory silicone/glue.
02-14-2012, 09:20 PM
#341
Senior Member
iTrader: (1)

Join Date: 03-09-09
Location: Winnipeg
Posts: 2,263
Likes: 0
Received 0 Likes
on
0 Posts
Somewhere, someone started an awful rumor. That is, that you need to scrape out the factory sealant and use RTV..... NO NO NO!
Ive done 3 mini retros, and painted about 8 sets of lights black, and ALWAYS reheated the back of the lights and then just pressed them back together with my hands with gloves on. The factory sealant is the strongest and sets in SECONDS!
I did one retro and spent about 2 hrs removing all the factory stuff then rtv'd them and they would not stay together, i bear hugged them for 30 minutes, nearly had a heart attack, then c clamped them and they both leaked. Ive never had a leak since keeping the factory silicone/glue.
02-14-2012, 09:21 PM
#343
Junior Member
iTrader: (1)
Join Date: 07-30-10
Location: NE OH
Posts: 462
Likes: 0
Received 0 Likes
on
0 Posts
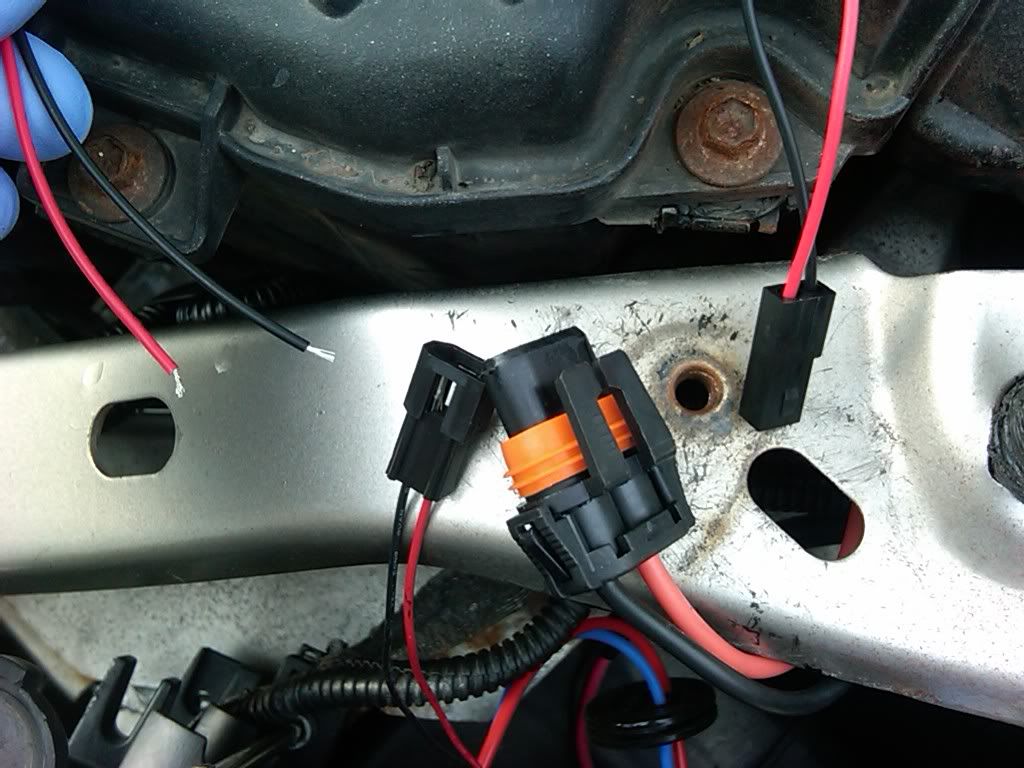
I know you said it plugs into the harness but where? You must not get that I do not understand what part of the harness. Lol I have hooked up my retros and they work but I did not know if I had to plug it in somewhere or splice it in. Where do I plug it in. Sorry but am really confused on this. Anyone have a picture of this part that would be greatly appreciated. Again I am a noob at this stuff sorry for the confusion.
 02-14-2012, 09:52 PM
#346
I know you said it plugs into the harness but where? You must not get that I do not understand what part of the harness. Lol I have hooked up my retros and they work but I did not know if I had to plug it in somewhere or splice it in. Where do I plug it in. Sorry but am really confused on this. Anyone have a picture of this part that would be greatly appreciated. Again I am a noob at this stuff sorry for the confusion.
02-14-2012, 09:59 PM
#347
Junior Member
iTrader: (1)
Join Date: 07-30-10
Location: NE OH
Posts: 462
Likes: 0
Received 0 Likes
on
0 Posts
Listen I guess this is where maybe you are a pro and I am not and have explained myself as a noob comes in! Don't be a dick! I was asking for a picture if anyone had one but I guess not so I will go and try and plug it into everything in my harness. All we want is stuff to work and work well. I was looking for a visual and with your customer service manual it does not show where anything hooks up. I guess it may be a great idea to have a picture and written explanation on how to install so a ******* like myself won't get confused and bother you. With all of the lights that you make it is a wonder that this does not exist. Anyone else have a good picture? I guess this is the easy part that I am missing somehow lol. Thanks guys even you mkulrey.
 02-14-2012, 10:06 PM
#349
Junior Member
iTrader: (1)
Join Date: 07-30-10
Location: NE OH
Posts: 462
Likes: 0
Received 0 Likes
on
0 Posts
Nice thanks and my rant is done! Lol man I get grouchy with no sleep and being hungry ( sorry new baby in the house) I am a little grouchy. Thanks Tommy now I know at least what to look for. Thanks mkulrey for the info as well and everyone else.
02-16-2012, 08:23 AM
#350
Junior Member

Join Date: 05-16-07
Location: Blandon, PA
Posts: 440
Likes: 0
Received 0 Likes
on
0 Posts
Somewhere, someone started an awful rumor. That is, that you need to scrape out the factory sealant and use RTV..... NO NO NO!
Ive done 3 mini retros, and painted about 8 sets of lights black, and ALWAYS reheated the back of the lights and then just pressed them back together with my hands with gloves on. The factory sealant is the strongest and sets in SECONDS!
I did one retro and spent about 2 hrs removing all the factory stuff then rtv'd them and they would not stay together, i bear hugged them for 30 minutes, nearly had a heart attack, then c clamped them and they both leaked. Ive never had a leak since keeping the factory silicone/glue.
Ive done 3 mini retros, and painted about 8 sets of lights black, and ALWAYS reheated the back of the lights and then just pressed them back together with my hands with gloves on. The factory sealant is the strongest and sets in SECONDS!
I did one retro and spent about 2 hrs removing all the factory stuff then rtv'd them and they would not stay together, i bear hugged them for 30 minutes, nearly had a heart attack, then c clamped them and they both leaked. Ive never had a leak since keeping the factory silicone/glue.