Appearance: LED Side Marker Lights
 09-05-2015, 05:47 PM
#1

LED Side Marker Lights
YOU'LL NEED:
1: Your side marker lights
2: Two (2) third brake light from a 2006-2012 Chevy Impala. The 2000-2005 will NOT work. They are twice as long and you can't trim them. You can use whatever LED board you want, however. Just stick with one that's under 5.5" long and 1" wide, and stick with 4-5 LEDs total.
3: Tin Snips to trim LED board.
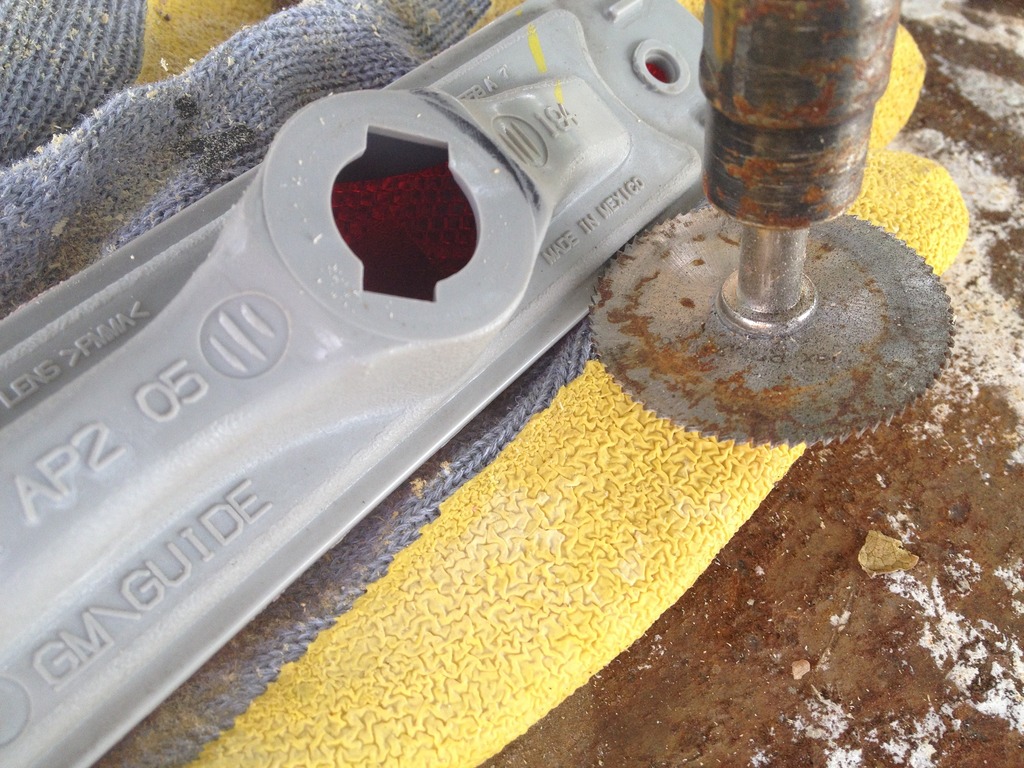
4: A cutoff tool to cut open your side markers
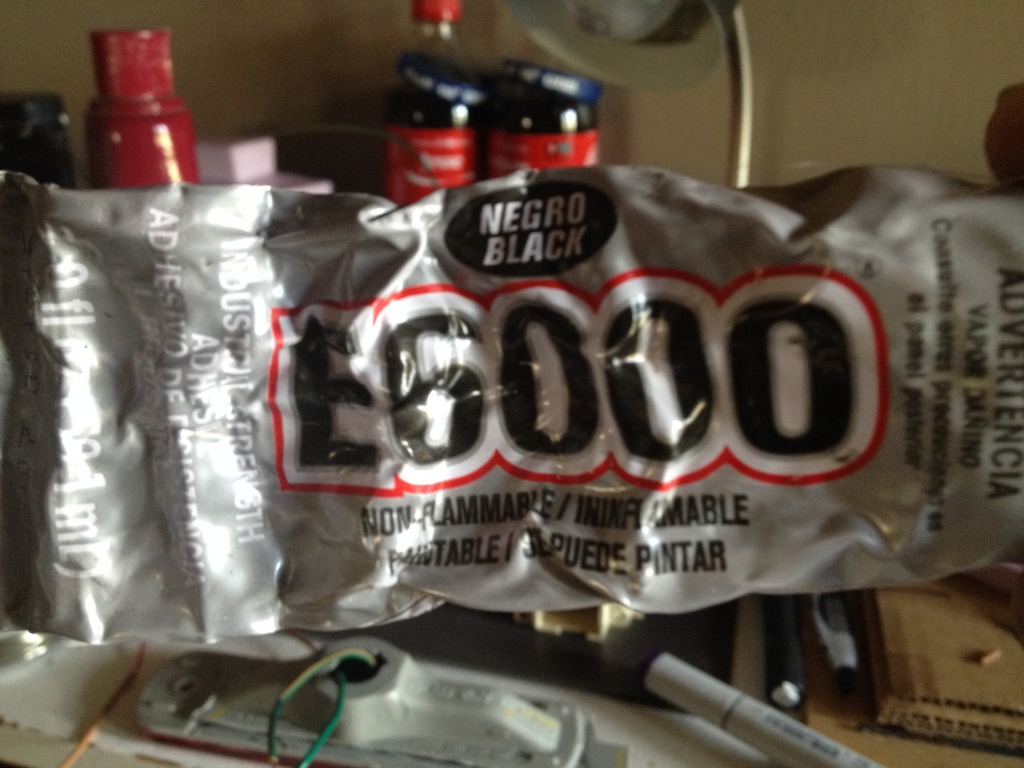
5: E-6000 glue(Found at Hobby Lobby). I use black. This ****'s PERMANENT.
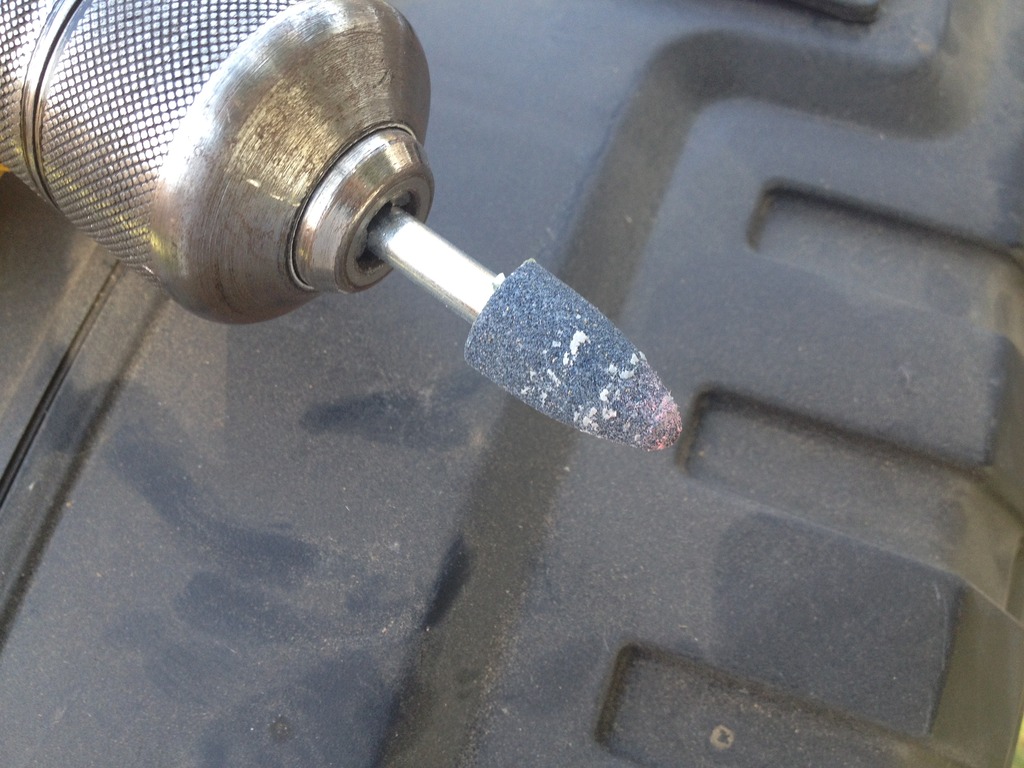
6: A grinding stone for a drill/dremel with a somewhat round tip.
7: Plastidip.
THE PROCESS:
This isn't difficult. You just have to be careful. Give yourself time! The E-6000 needs at least a couple hours to dry and you'll be doing it twice, so if you budget 6-8 hours You'll be good to go.
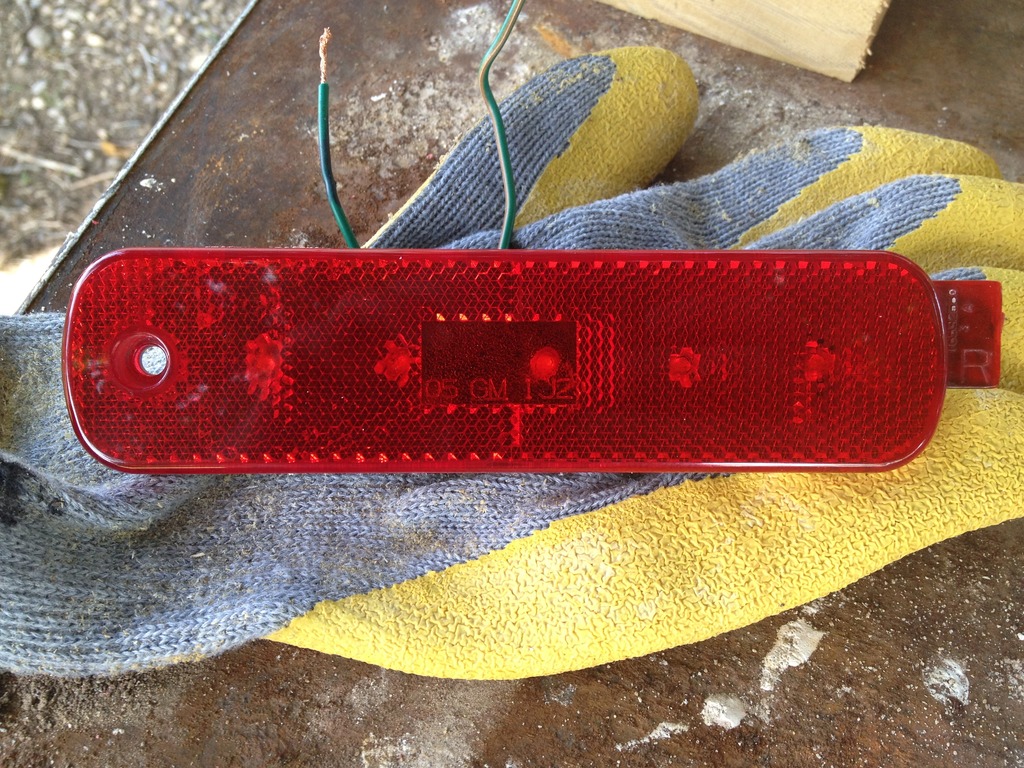
STEP 1: Remove your side markers. It's literally just one phillips screw and it pops out. Twist the light socket and it should pop right out of the housing also.
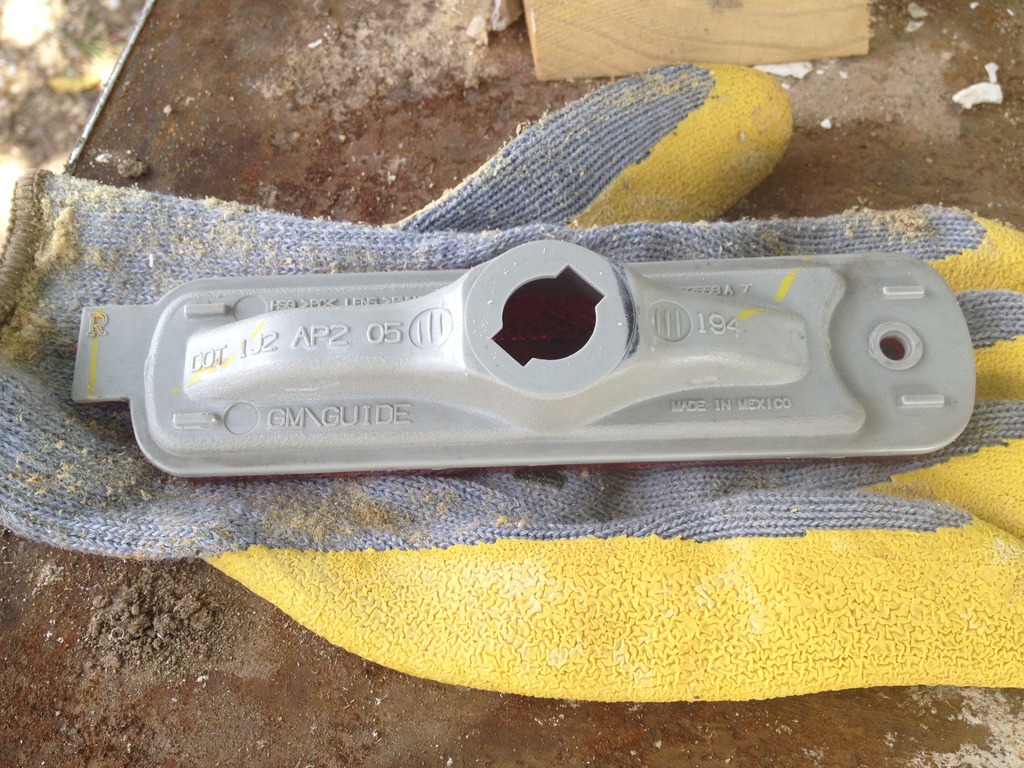
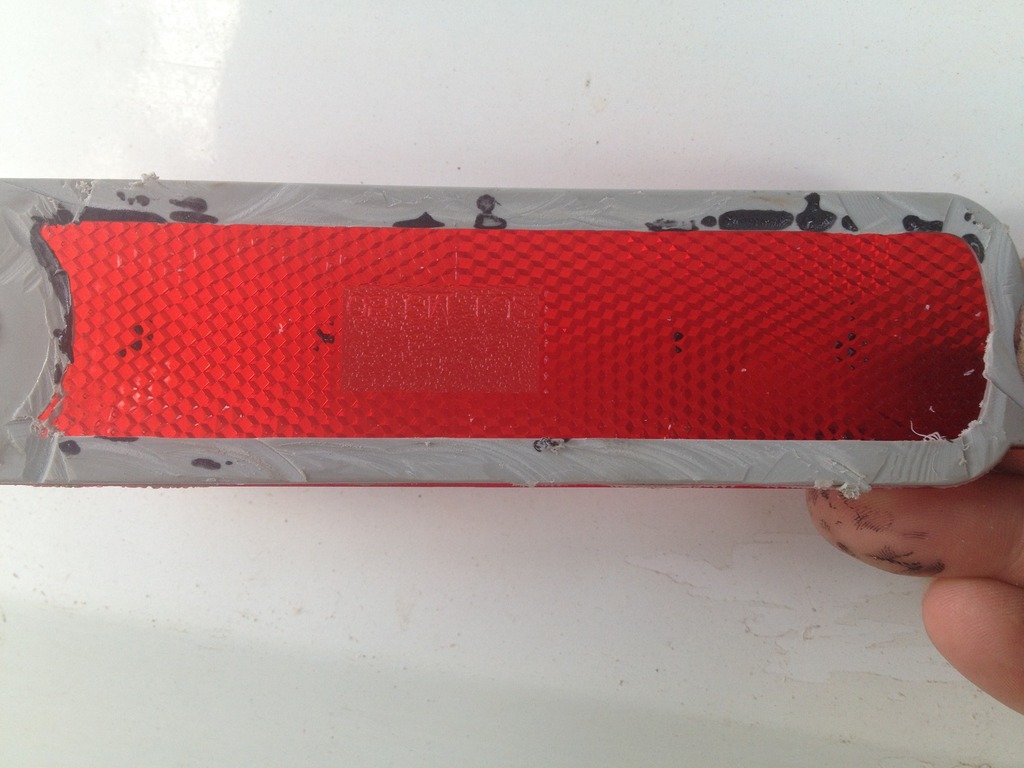
STEP 2: Cut open your side marker. Don't be a pansy. I've found that cutting it horizontally this way makes it way easier later. So cut it horizontally.
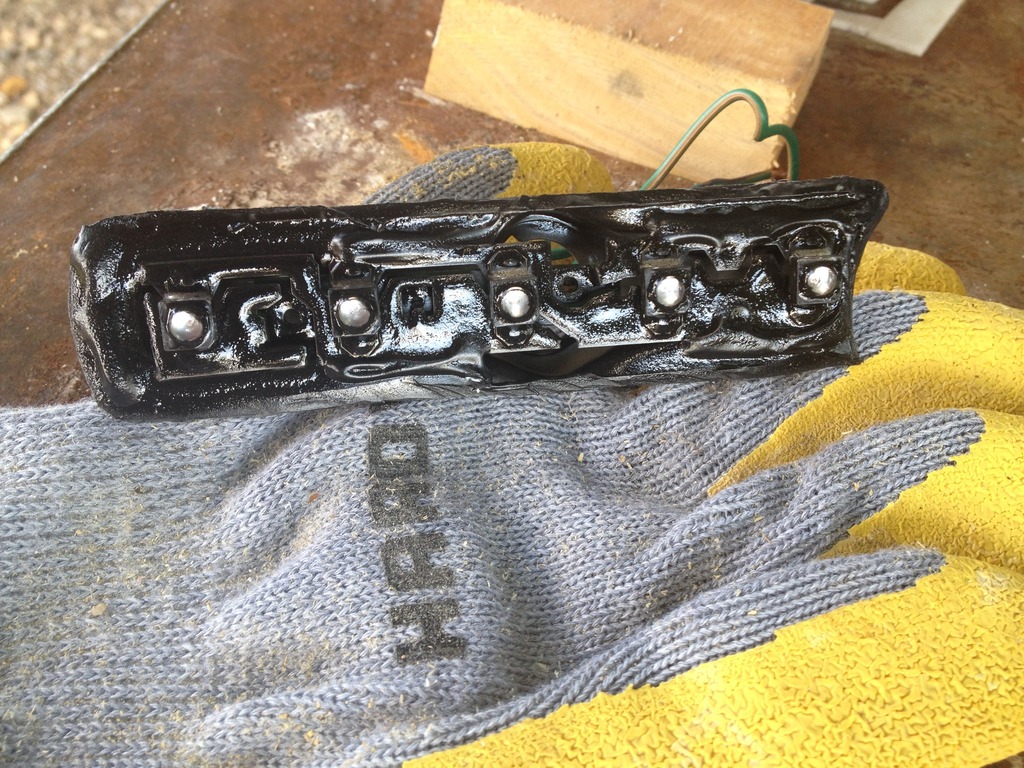
STEP 3: No picture here, but you need to cut one of the LEDs off your Impala board because it is too long otherwise. Since it is a simple metal sheet, you won't disrupt anything by cutting one off. I cut the one off which was farthest away from the prongs on the back so the prongs/pigtail could be more centered in the stock housing.
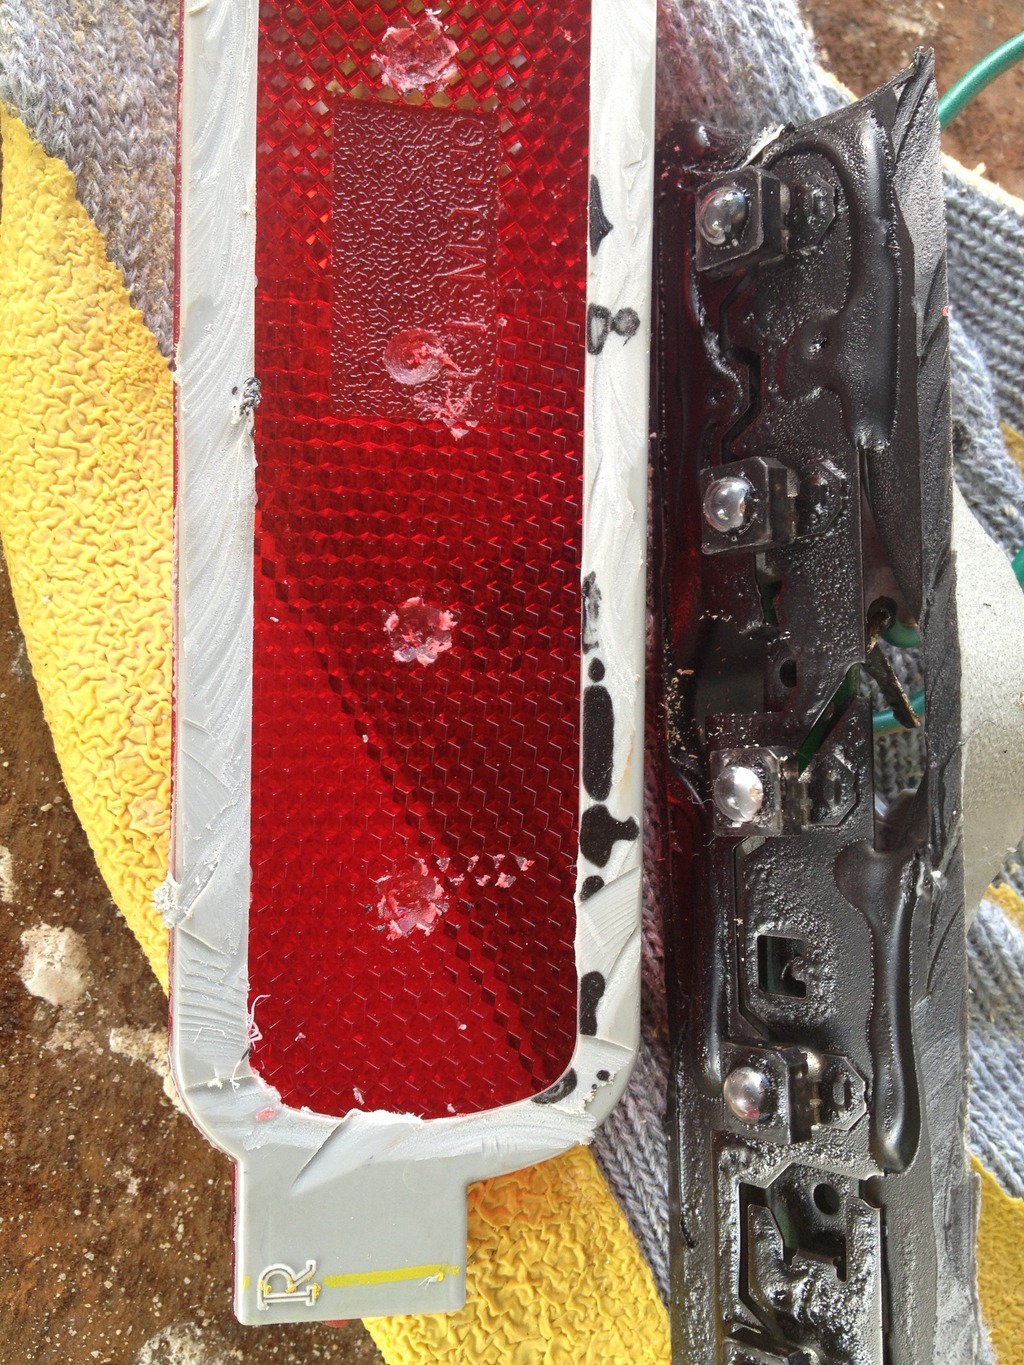
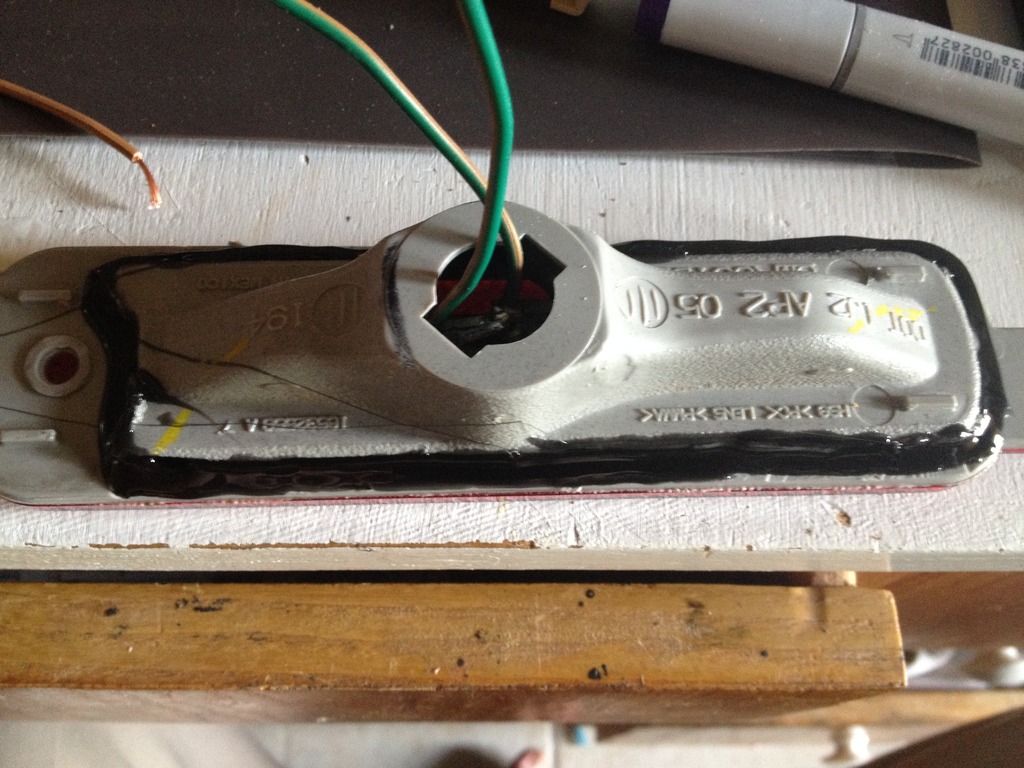
STEP 4: I'm assuming you saved the pigtail from your Impala brake light right? If not, you can solder wires to the prongs on the LED board. That's what I had to do with this one. The prongs are marker + and -, so make sure you know which is which. SO! Stick the wires through the light socket and glue the LED board down. If you're using E-6000 like I told you, this thing is NOT moving. Don't F*** this up. Get it on straight now or you're stuck with it crooked for eternity. The LED board should sit perfectly flush on the housing. See?

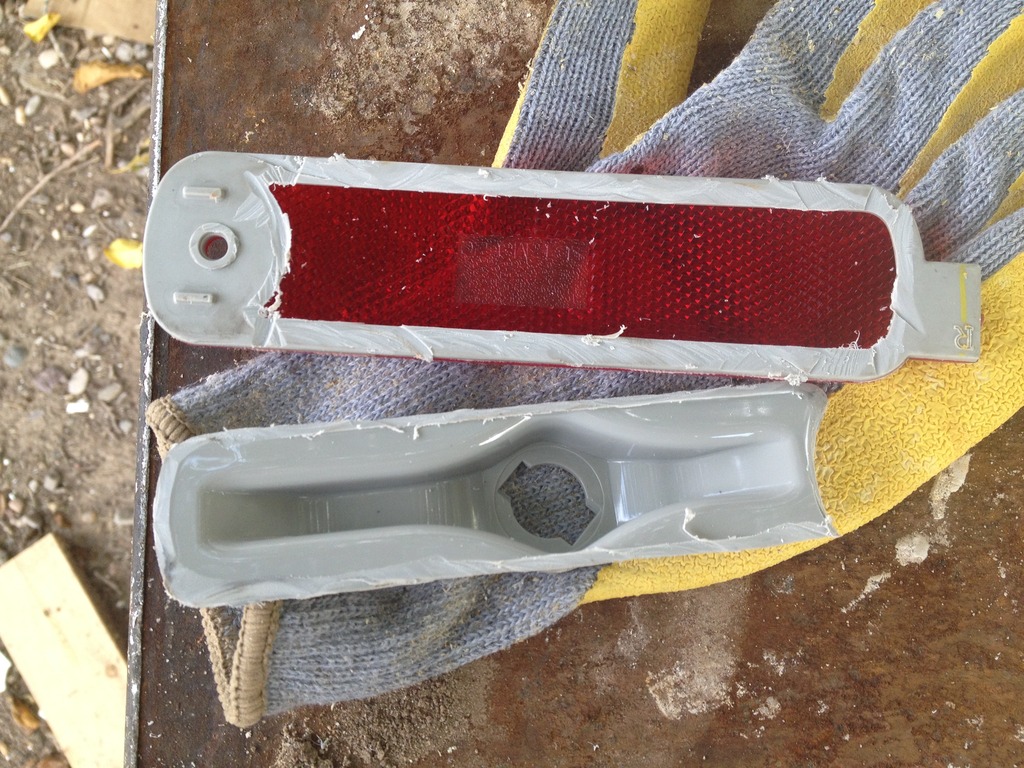
STEP 5: Now you need to make indentations in the lens. THIS STEP IS REQUIRED. YOU CANNOT SKIP IT. The factory lens is purposely built to fill the entire housing with the light from a single bulb by reflecting every which way. If you put the LED board in without making distinct indents for light to collect in, it will look terrible because you won't be able to make out each individual LED, except for the center one. That looks retarded.
To mark the spots I needed to grind, I sprayed a HEAVY coat of Plastidip on my completed LED housing/board. While the paint was still wet, I pushed the marker light assembly back together. The face of the LEDs touched the lens just enough to leave a small mark where I would then need to grind. Then later I could peel away the Plastidip from the LEDs.
I kind of screwed up the far left indentation because I was impatient. Lesson learned. Take it slow.
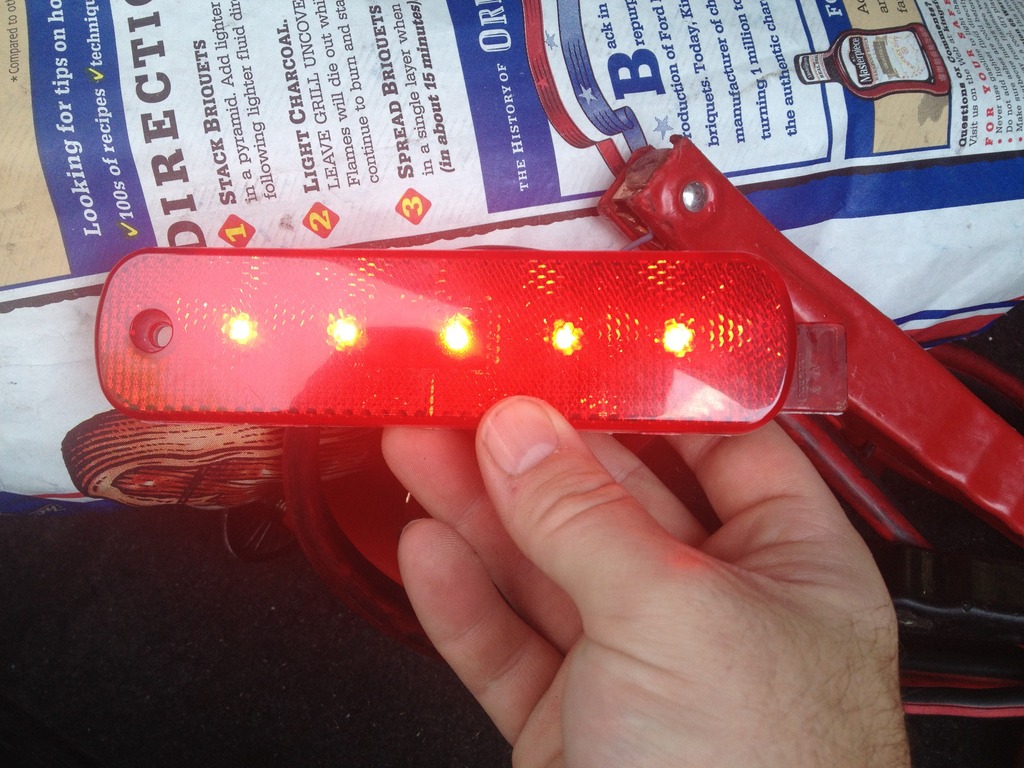
STEP 6: Test fit everything to make sure it looks right. Once you are done, now you can glue the light assembly back together. Once again, E-6000 IS F****** PERMANENT. GET IT RIGHT THE FIRST TIME.
FINAL STEP: All that's left now is to wire it to your car. You can either buy those adapter that convert 2 wires into a standard 194bulb plug, or hard wire them to the car. I hard wired them because I don't want to wait for plug adapters to come in.
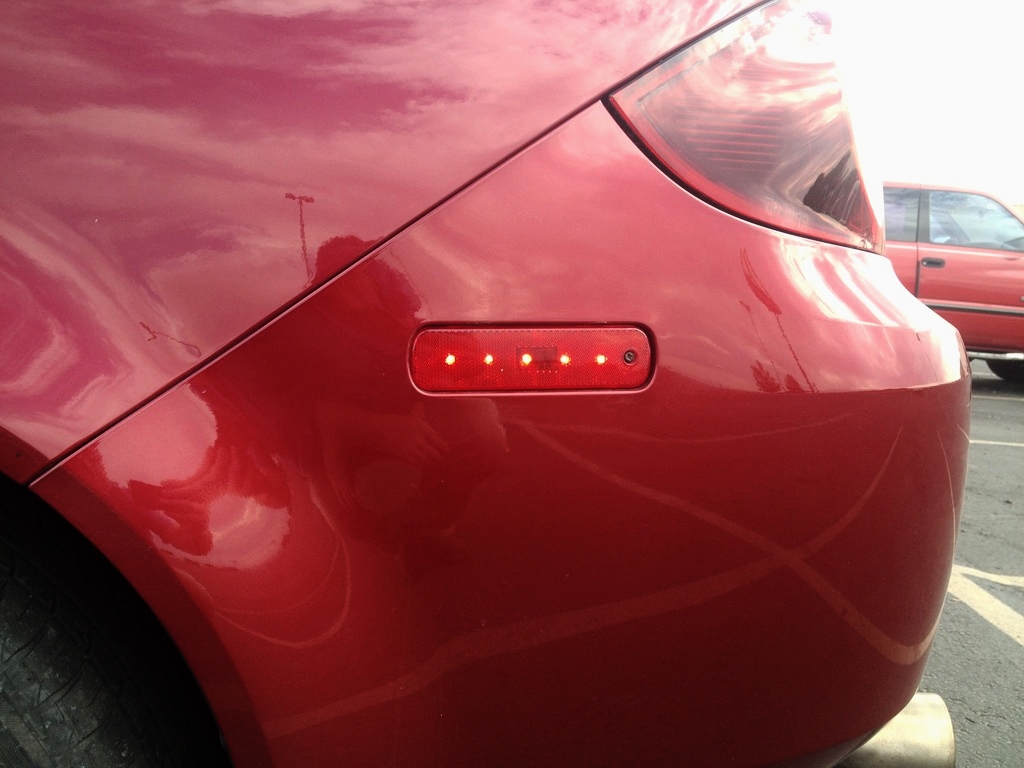
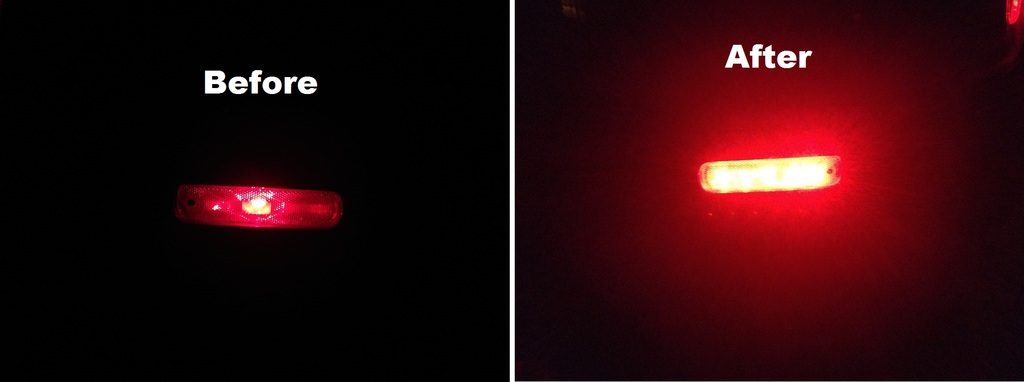
See how pathetic the stock marker looks compared to the LED one?
1: Your side marker lights
2: Two (2) third brake light from a 2006-2012 Chevy Impala. The 2000-2005 will NOT work. They are twice as long and you can't trim them. You can use whatever LED board you want, however. Just stick with one that's under 5.5" long and 1" wide, and stick with 4-5 LEDs total.
3: Tin Snips to trim LED board.
4: A cutoff tool to cut open your side markers
5: E-6000 glue(Found at Hobby Lobby). I use black. This ****'s PERMANENT.
6: A grinding stone for a drill/dremel with a somewhat round tip.
7: Plastidip.
THE PROCESS:
This isn't difficult. You just have to be careful. Give yourself time! The E-6000 needs at least a couple hours to dry and you'll be doing it twice, so if you budget 6-8 hours You'll be good to go.
STEP 1: Remove your side markers. It's literally just one phillips screw and it pops out. Twist the light socket and it should pop right out of the housing also.

STEP 2: Cut open your side marker. Don't be a pansy. I've found that cutting it horizontally this way makes it way easier later. So cut it horizontally.


STEP 3: No picture here, but you need to cut one of the LEDs off your Impala board because it is too long otherwise. Since it is a simple metal sheet, you won't disrupt anything by cutting one off. I cut the one off which was farthest away from the prongs on the back so the prongs/pigtail could be more centered in the stock housing.
STEP 4: I'm assuming you saved the pigtail from your Impala brake light right? If not, you can solder wires to the prongs on the LED board. That's what I had to do with this one. The prongs are marker + and -, so make sure you know which is which. SO! Stick the wires through the light socket and glue the LED board down. If you're using E-6000 like I told you, this thing is NOT moving. Don't F*** this up. Get it on straight now or you're stuck with it crooked for eternity. The LED board should sit perfectly flush on the housing. See?


STEP 5: Now you need to make indentations in the lens. THIS STEP IS REQUIRED. YOU CANNOT SKIP IT. The factory lens is purposely built to fill the entire housing with the light from a single bulb by reflecting every which way. If you put the LED board in without making distinct indents for light to collect in, it will look terrible because you won't be able to make out each individual LED, except for the center one. That looks retarded.
To mark the spots I needed to grind, I sprayed a HEAVY coat of Plastidip on my completed LED housing/board. While the paint was still wet, I pushed the marker light assembly back together. The face of the LEDs touched the lens just enough to leave a small mark where I would then need to grind. Then later I could peel away the Plastidip from the LEDs.


I kind of screwed up the far left indentation because I was impatient. Lesson learned. Take it slow.

STEP 6: Test fit everything to make sure it looks right. Once you are done, now you can glue the light assembly back together. Once again, E-6000 IS F****** PERMANENT. GET IT RIGHT THE FIRST TIME.

FINAL STEP: All that's left now is to wire it to your car. You can either buy those adapter that convert 2 wires into a standard 194bulb plug, or hard wire them to the car. I hard wired them because I don't want to wait for plug adapters to come in.


See how pathetic the stock marker looks compared to the LED one?

 09-05-2015, 11:23 PM
#2
Junior Member

LED Side Marker Lights
At first I was thinking. Ok he threw in some 194 leds from super brite or something. Was not expecting this at all but we'll done sir. Solid write up but I'll stick to those 194 leds unless I find another set to mess with.
 Moderator
 09-06-2015, 02:08 PM
#5
Senior Member
iTrader: (2)

Join Date: 08-18-09
Location: Calgary
Posts: 786
Likes: 0
Received 0 Likes
on
0 Posts
Cool idea. Nice to see something new.
Haven't looked at my side markers in forever but would you be able to heat them up to separate the assembly? Much like you do with headlights?
Haven't looked at my side markers in forever but would you be able to heat them up to separate the assembly? Much like you do with headlights?
09-06-2015, 10:30 PM
#7

Great result!
If Jesse doesn't plan on making these for other people, I don't mind resurrecting this again.
Reason I dropped it was that used side markers are impossible to find online. Those Impala 3rd brake lights he used are even harder to find.
I'd look at a different LED solution but with the same look. If anyone is interested let me know. Bear in mind I may rely on you to get me the side markers. I'm not the guy going to all the u-pull yards lol
09-06-2015, 10:48 PM
#8
Great result!
If Jesse doesn't plan on making these for other people, I don't mind resurrecting this again.
Reason I dropped it was that used side markers are impossible to find online. Those Impala 3rd brake lights he used are even harder to find.
I'd look at a different LED solution but with the same look. If anyone is interested let me know. Bear in mind I may rely on you to get me the side markers. I'm not the guy going to all the u-pull yards lol
If Jesse doesn't plan on making these for other people, I don't mind resurrecting this again.
Reason I dropped it was that used side markers are impossible to find online. Those Impala 3rd brake lights he used are even harder to find.
I'd look at a different LED solution but with the same look. If anyone is interested let me know. Bear in mind I may rely on you to get me the side markers. I'm not the guy going to all the u-pull yards lol
09-06-2015, 11:33 PM
#10
Sweet. You still meeting with EmporerJJ? Let me know if they have any cobalts there! I'm down to build a spare set or two. Colodude still feel free to make them. I'm sure your quality would be hard to beat and you could do all kinds of cool ****.
 and they where 5 bucks each
