Other/Misc: Brake Master Cylinder Replace
 06-05-2016, 02:29 AM
#1
Member
Thread Starter

Brake Master Cylinder Replace
This is a guide on how to replace your brake master cylinder on a Supercharged Cobalt SS, and may work for the Turbo model as well, I am not sure.
Tools needed: 13mm wrench, 3/8 or 1/4" ratchet, 1/2" socket, 7mm socket, 10mm socket, some extensions, swivel, and a little patience.
Step 1: Unhook the positive terminal on the battery and remove the fuse box out of the way to give yourself some room to work. There is a write up on how to remove the fuse box on this site already. You can find that How to here: https://www.cobaltss.net/forums/how-...se-box-290069/
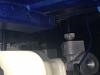
Step 2: Once the fuse box is out of the way, use the 13mm wrench to loosen the brake lines on the master cylinder and remove them from the master cylinder. Below is a picture of the brake lines.
Step 3: Unplug the brake fluid level sensor, its a simple clip located on the side facing you when looking at it from the driver side front of the car.
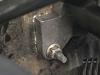
Step 4: Use the ratchet, 1/2" socket, extensions, and swivel to remove the two nuts that are holding the master cylinder to the firewall of the car. Below is a picture of what the 1/2" nuts look like that hold the master cylinder to the firewall of the car.
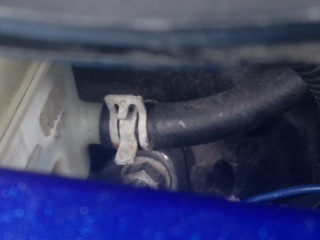
Step 5: Once removed use some pliers and remove the hose clamp on the hose on the master cylinder (this is when the brake fluid will really start to come out so what I did was held the master cylinder on its side since it was already removed from the firewall and removed this hose which resulted in a very minimal spillage). Below is a picture of the hose that connects to the master cylinder.

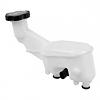
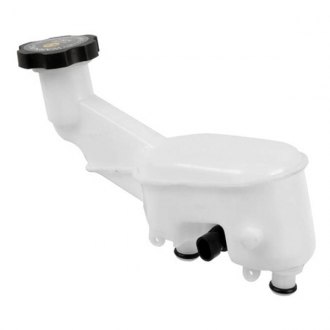
Step 6: Use a punch or screwdriver or something and knock the pins holding the reservoir on the old master cylinder out. Once these pins are out, you may have to use a small screwdriver and pry up on the front and back parts of the reservoir that go inside the master cylinder to get it to release. Install this reservoir on your new master cylinder (most, if not all new master cylinders will include new pins and o rings for the front and back part of the reservoir that go inside master cylinder (it will make sense to you once you see it). Below you can see the two O-Rings on the bottom of the master cylinder as well as the holes that the small pins go through that hold the reservoir on the master cylinder.
Step 7: Bench bleeding the new master cylinder is recommend, but not necessary if you simply just don't want to?
Step 8: Install new master cylinder onto studs on firewall of car but do not put the nuts back on yet. This is when you want to re install your brake lines so you can get them lined up with the master cylinder.
Step 9: Once the brake lines are reinstalled onto the new master cylinder then you can install the nuts to secure the new master cylinder. Once you have the master cylinder secured now you can plug the hose you took off that had the hose clamp and then plug the brake fluid level sensor back up lastly so it wasn't in your way while you were reinstalling the master cylinder nuts and reinstalling the clamped hose.
Step 10: Reassemble the fuse box and things that you removed to give yourself some room.
Step 11: Make sure the brake master cylinder has the appropriate amount of fluid in it, and then proceed to bleed the brake system. The correct bleeding order for our cars is: RR, LF, LR, RF. This can be done easily and sufficiently with one person with the use of a Motive Power Bleeder, or if you have someone helping you then you can do it without the use of a Motive Power Bleeder as well. Here is a link to the Motive Power Bleeder if you wish to purchase one:
Step 12: Check for any leaks, reinstall positive terminal on battery, give your car a bath, give yourself a bath, and give me a thanks!
Tools needed: 13mm wrench, 3/8 or 1/4" ratchet, 1/2" socket, 7mm socket, 10mm socket, some extensions, swivel, and a little patience.
Step 1: Unhook the positive terminal on the battery and remove the fuse box out of the way to give yourself some room to work. There is a write up on how to remove the fuse box on this site already. You can find that How to here: https://www.cobaltss.net/forums/how-...se-box-290069/
Step 2: Once the fuse box is out of the way, use the 13mm wrench to loosen the brake lines on the master cylinder and remove them from the master cylinder. Below is a picture of the brake lines.

Step 3: Unplug the brake fluid level sensor, its a simple clip located on the side facing you when looking at it from the driver side front of the car.
Step 4: Use the ratchet, 1/2" socket, extensions, and swivel to remove the two nuts that are holding the master cylinder to the firewall of the car. Below is a picture of what the 1/2" nuts look like that hold the master cylinder to the firewall of the car.

Step 5: Once removed use some pliers and remove the hose clamp on the hose on the master cylinder (this is when the brake fluid will really start to come out so what I did was held the master cylinder on its side since it was already removed from the firewall and removed this hose which resulted in a very minimal spillage). Below is a picture of the hose that connects to the master cylinder.
Step 6: Use a punch or screwdriver or something and knock the pins holding the reservoir on the old master cylinder out. Once these pins are out, you may have to use a small screwdriver and pry up on the front and back parts of the reservoir that go inside the master cylinder to get it to release. Install this reservoir on your new master cylinder (most, if not all new master cylinders will include new pins and o rings for the front and back part of the reservoir that go inside master cylinder (it will make sense to you once you see it). Below you can see the two O-Rings on the bottom of the master cylinder as well as the holes that the small pins go through that hold the reservoir on the master cylinder.
Step 7: Bench bleeding the new master cylinder is recommend, but not necessary if you simply just don't want to?
Step 8: Install new master cylinder onto studs on firewall of car but do not put the nuts back on yet. This is when you want to re install your brake lines so you can get them lined up with the master cylinder.
Step 9: Once the brake lines are reinstalled onto the new master cylinder then you can install the nuts to secure the new master cylinder. Once you have the master cylinder secured now you can plug the hose you took off that had the hose clamp and then plug the brake fluid level sensor back up lastly so it wasn't in your way while you were reinstalling the master cylinder nuts and reinstalling the clamped hose.
Step 10: Reassemble the fuse box and things that you removed to give yourself some room.
Step 11: Make sure the brake master cylinder has the appropriate amount of fluid in it, and then proceed to bleed the brake system. The correct bleeding order for our cars is: RR, LF, LR, RF. This can be done easily and sufficiently with one person with the use of a Motive Power Bleeder, or if you have someone helping you then you can do it without the use of a Motive Power Bleeder as well. Here is a link to the Motive Power Bleeder if you wish to purchase one:
Step 12: Check for any leaks, reinstall positive terminal on battery, give your car a bath, give yourself a bath, and give me a thanks!
Last edited by GreenStang; 06-06-2016 at 03:24 PM.

The following users liked this post:
taytoe (06-06-2016)

The following users liked this post:
Staged07SS (06-06-2016)

Thread
Thread Starter
Forum
Replies
Last Post
2.0 LSJ Engine: How To: Replace LSJ Clutch Master Cylinder
EXsoccer1921
How to Guide
12
04-07-2018 01:19 PM
L7D4N
General Cobalt
2
08-30-2013 04:47 AM