All Engines: HOW TO FIX: P0010-P0015, P0100-P0104 CEL FIXES T/C light, hard shifts problem
 11-01-2012, 06:17 PM
#1

This is my first how-to guide, and I feel like I'm writing a driving statute, FML... Anyway, text will come first, and the guide will follow.
If there are typos etc, please PM me, so I can target and edit them. Also, before you get too deep into this How-To:
Here are some links to other threads on CobaltSS.net where this problems is addressed:
Traction Control - Cobalt SS Network
Camshaft position sensor - Cobalt SS Network
Traction control light on (rough shifting) - Cobalt SS Network
If I accidentally placed a double anywhere please let me know, and I will remove one.
1. Please ensure that you are pulling one or more of the check engine codes below before you use this guide to work on your car
2. Please ensure that your INT CAS, EXH CAS, and MAF are correctly plugged in when you pull the code(s)
3. It has come to my attention that this guide only applies to engines with Variable Valve Timing (VVT).
<[|]><[|]><[|]><[|]><[|]><[|]><[|]><[|]><[|]><[|]><[|]><[|]><[|]><[|]><[|]><[|]><[|]><[|]><[|]><[|]><[|]><[|]><[|]><[|]><[|]><[|]><[|]><[|]><[|]><[|]><[|]><[|]><[|]>
Key:
CEL = Refers to the illumination of the 'Check Engine Light'
T/C Light = Refers to the 'Traction Control Off' Light illuminated on the Dash
INT/EXH CAS = Intake/Exhaust Camshaft Actuator Solenoid
MAF = Mass Air Flow Sensor
NTB = An un-named shop I took my car to that rips people off.
Note: The INT/EXH CAS and MAF are actual parts on the car
<[|]><[|]><[|]><[|]><[|]><[|]><[|]><[|]><[|]><[|]><[|]><[|]><[|]><[|]><[|]><[|]><[|]><[|]><[|]><[|]><[|]><[|]><[|]><[|]><[|]><[|]><[|]><[|]><[|]><[|]><[|]><[|]><[|]>
I want to create and post a How-To guide for cobalt owners with the common 'T/C Light staying on & Hard Shifts' Problem, found by using an OBD-II scanner to diagnose a Check Engine Light caused by one or more of the following:
The P0010 - P0015 Group: (P0010, P0011, P0012, P0013, P0014, P0015) Pertaining to a faulty INT CAS and/or EXH CAS
P0010 "A" Camshaft Position Actuator Circuit (Bank 1)
P0011 "A" Camshaft Position - Timing Over-Advanced or System Performance (Bank 1)
P0012 "A" Camshaft Position - Timing Over-Retarded (Bank 1)
P0013 "B" Camshaft Position - Actuator Circuit (Bank 1)
P0014 "B" Camshaft Position - Timing Over-Advanced or System Performance (Bank 1)
P0015 "B" Camshaft Position -Timing Over-Retarded (Bank 1)
(I'm wondering if in the group P0010 - P0012, "A" denotes a problem with the INT CAS, and in the group P0013 - P0015, "B" denotes a problem with the EXH CAS)
and/or
The P0100 - P0104 Group: (P0100, P0101, P0102, P0103, P0104)
-P0100 Mass or Volume Air Flow Circuit Malfunction
-P0101 Mass or Volume Air Flow Circuit Range/Performance Problem
-P0102 Mass or Volume Air Flow Circuit Low Input
-P0103 Mass or Volume Air Flow Circuit High Input
-P0104 Mass or Volume Air Flow Circuit Intermittent
<[|]><[|]><[|]><[|]><[|]><[|]><[|]><[|]><[|]><[|]><[|]><[|]><[|]><[|]><[|]><[|]><[|]><[|]><[|]><[|]><[|]><[|]><[|]><[|]><[|]><[|]><[|]><[|]><[|]><[|]><[|]><[|]><[|]>
Now before I go too much further, I want to note that out of all of the listed codes, I have only pulled the P0014 and the P0104 codes. To be on the safe side, I replaced my INT CAS and EXH CAS, and MAF, which will all be covered in the How-To Guide, as well as applicable costs, compared to taking it to a shop. When my CEL and T/C Light first came on and it began to shift hard I first pulled my CEL codes, and got P0014 and P0104. I took it to NTB to get a quote, and see if they would tell me something I didn't know. They wrote up an $800+ quote for some ridiculously over priced "Labor" and "Inspection" fees, none of which would've ended up being the problem. If you're covered under warranty, I recommend bringing your car to the dealer.
<[|]><[|]><[|]><[|]><[|]><[|]><[|]><[|]><[|]><[|]><[|]><[|]><[|]><[|]><[|]><[|]><[|]><[|]><[|]><[|]><[|]><[|]><[|]><[|]><[|]><[|]><[|]><[|]><[|]><[|]><[|]><[|]><[|]>
Here are links and part numbers for: INT CAS, EXH CAS, and MAF from a few different sources, so save you research time. Note: The links below may open a new window to either GM Parts Direct, or eBay. If any of these links are broken/break, please PM me and I will update/fix them as needed. If you buy new parts, I HIGHLY recommend buying AC-Delco whenever possible.
GM Parts Direct: ( GM Parts | GM Accessories | GM Parts House Store )
> INT CAS (GM Part Number: 12646783): I was unable to find the INT CAS on GM Parts Direct.
> EXH CAS (GM Part Number: 12646784): I was unable to find the EXH CAS on GM Parts Direct.
> MAF (GM Part Number: 15865791): 2006 Chevrolet Parts - GM Parts | GM Accessories | GM Parts House Store (~$70 NEW)
eBay: ( Car Truck Parts | eBay )
[CAS General Search Link (To look currently): http://goo.gl/PDMJp]
> INT CAS (GM Part Number: 12646783): Cobalt Malibu G5 G6 2 2 2 4 Intake Camshaft Position Actuator Solenoid 12646783 | eBay (~$40 NEW) *
> EXH CAS (GM Part Number: 12646784): Cobalt Malibu G5 G6 2 2 2 4 Exhaust Camshaft Position Actuator Solenoid 12646784 | eBay (~$40 NEW) *
> MAF General Search Link (GM Part Number: 15865791): cobalt mass airflow sensor | eBay *
*: I have used these links to purchase my parts, and vouch for the sellers of my CAS's as 5-Start sellers by eBay's standards.
<[|]><[|]><[|]><[|]><[|]><[|]><[|]><[|]><[|]><[|]><[|]><[|]><[|]><[|]><[|]><[|]><[|]><[|]><[|]><[|]><[|]><[|]><[|]><[|]><[|]><[|]><[|]><[|]><[|]><[|]><[|]><[|]><[|]>
DISCLAIMER:
I AM NOT RESPONSIBLE FOR ANY DAMAGE TO YOUR CAR DUE TO (BUT NOT LIMITED TO) ONE OR MORE OF THE FOLLOWING:
[1.] I'm simply posting a Do It Yourself (DIY) Guide based on experience of one or more the issues listed in this guide.
[2.] I am not the one actually physically working on your car.
[3.] I am not licensed by General Motors, Chevy, or any other repair shop/company/corporation/any other applicable body to perform work on any vehicle
[4.] I am not licensed by General Motors, Chevy, or any other repair shop/company/corporation/any other applicable body to write repair guides/manuals/any other applicable documents or references for such.
I�d like to note that all of the pictures in this guide are mine, with the exceptions being the engine bay, and the check engine light icon. My engine bay doesn�t look like the one with painted plastic (lol). I used it because it still had the plastic on, and I didn�t want to confuse anyone by skipping the removal of the covers. Also, I�d like to apologize for having so many pictures; They�re for anyone that isn�t 110% oriented with the locations. Again, I apologize for the 'extensiveness' if it takes a long time to load. I threw this together in 6 hours.
Here is a link to the complete album (Pictures not in order) on Photobucket:
Pictures by mcfung2674 - Photobucket
<[|]><[|]><[|]><[|]><[|]><[|]><[|]><[|]><[|]><[|]><[|]><[|]><[|]><[|]><[|]><[|]><[|]><[|]><[|]><[|]><[|]><[|]><[|]><[|]><[|]><[|]><[|]><[|]><[|]><[|]><[|]><[|]><[|]>
[Cover Page]
How-To: Replace the Intake and Exhaust Camshaft Actuator Solenoids and Mass Airflow Sensor in any Chevrolet Cobalt (2005-2010: 2.0, 2.2, or 2.4)
Check Engine Light Code Groups Covered:P0010-P0015 & P0100-P0104
Tools Needed:
> Ratchet
> 8mm Socket
> 6� Extender
> Phillips Screwdriver
This Guide is a How-To for: Replacing the Intake and Exhaust Camshaft Actuator Solenoids and Mass Airflow Sensor in any Chevrolet Cobalt.
Years: 2005-2010
Engines: 2.0L Supercharged LSJ, 2.0L Turbocharged LNF, 2.2L Naturally-Aspirated L61, 2.4L Naturally Aspirated LE5.
Check Engine Light Code Groups Covered: P0010-P0015 & P0100-P0104
<[|]><[|]><[|]><[|]><[|]><[|]><[|]><[|]><[|]><[|]><[|]><[|]><[|]><[|]><[|]><[|]><[|]><[|]><[|]><[|]><[|]><[|]><[|]><[|]><[|]><[|]><[|]><[|]><[|]><[|]><[|]><[|]><[|]>
[Page 1]
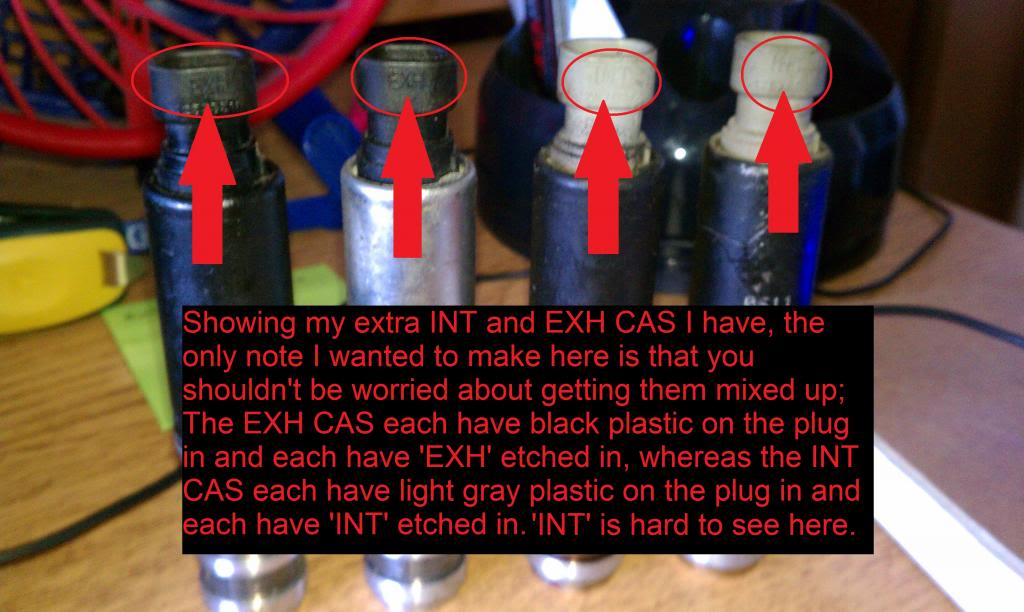
Showing 2 of my INT CAS's and 2 of my EXH CAS's. If you replace both the INT and EXH, you only need one of each.
<[|]><[|]><[|]><[|]><[|]><[|]><[|]><[|]><[|]><[|]><[|]><[|]><[|]><[|]><[|]><[|]><[|]><[|]><[|]><[|]><[|]><[|]><[|]><[|]><[|]><[|]><[|]><[|]><[|]><[|]><[|]><[|]><[|]>
[Page 2]
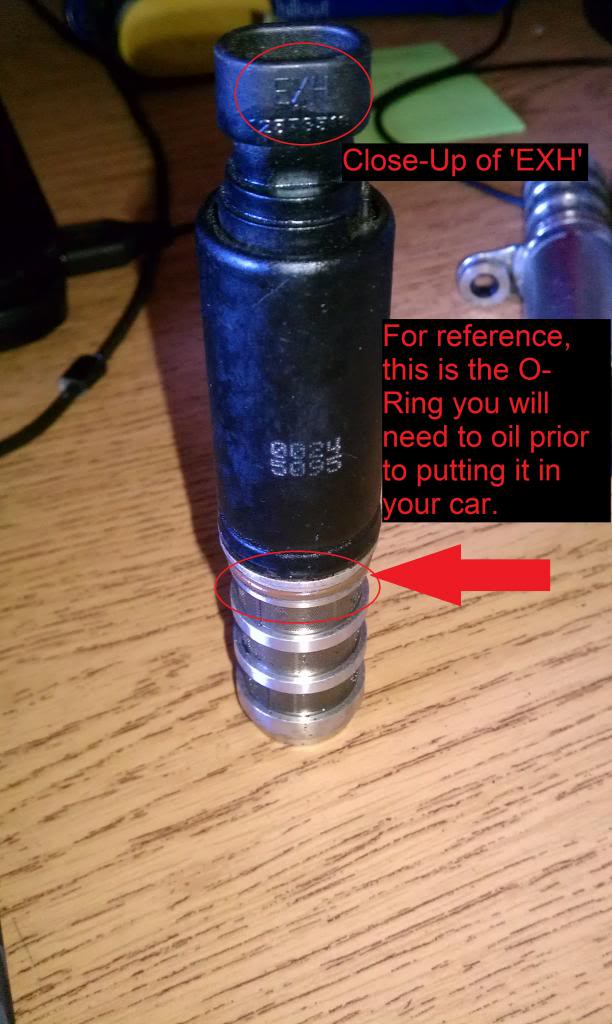
Close-Up of an EXH CAS, showing the 'EXH' Label, and the O-Ring for later reference.
<[|]><[|]><[|]><[|]><[|]><[|]><[|]><[|]><[|]><[|]><[|]><[|]><[|]><[|]><[|]><[|]><[|]><[|]><[|]><[|]><[|]><[|]><[|]><[|]><[|]><[|]><[|]><[|]><[|]><[|]><[|]><[|]><[|]>
[Page 3]
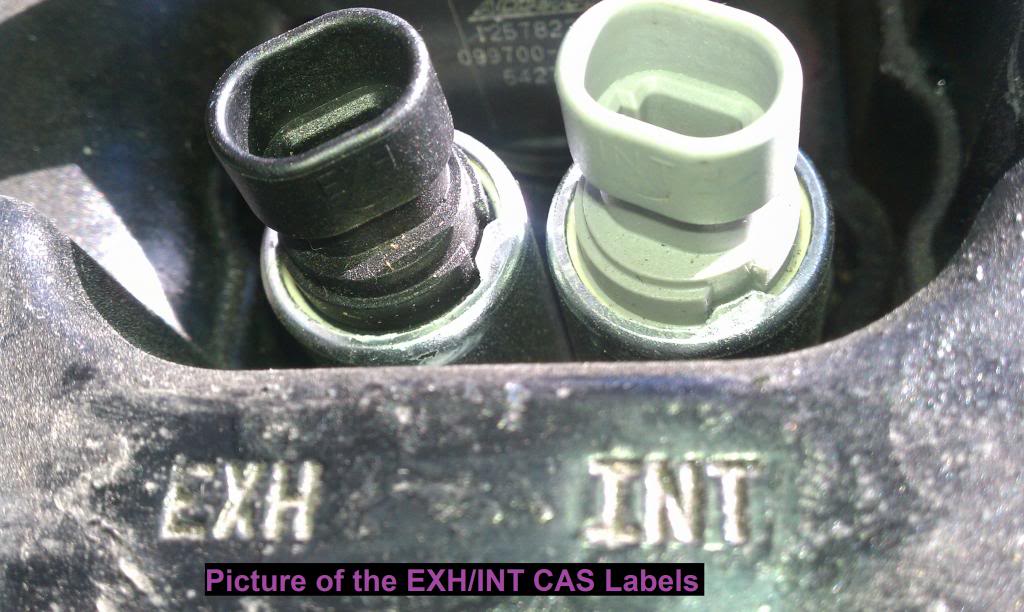
Close-up of both CAS's installed in my engine, showing the clear 'EXH' and 'INT' label (For reference).
<[|]><[|]><[|]><[|]><[|]><[|]><[|]><[|]><[|]><[|]><[|]><[|]><[|]><[|]><[|]><[|]><[|]><[|]><[|]><[|]><[|]><[|]><[|]><[|]><[|]><[|]><[|]><[|]><[|]><[|]><[|]><[|]><[|]>
[Page 4]
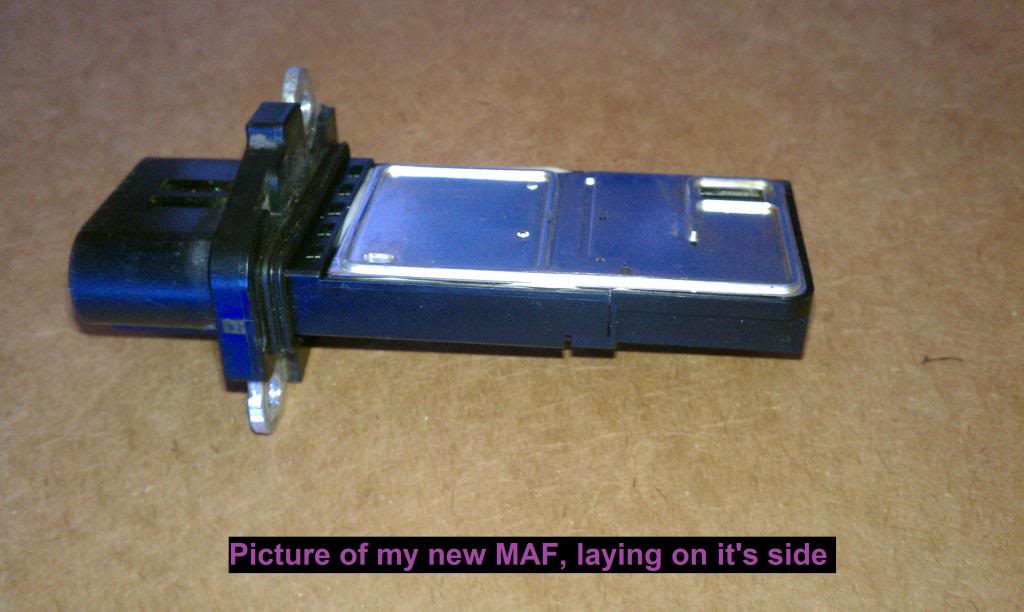
A picture of my New MAF sensor
<[|]><[|]><[|]><[|]><[|]><[|]><[|]><[|]><[|]><[|]><[|]><[|]><[|]><[|]><[|]><[|]><[|]><[|]><[|]><[|]><[|]><[|]><[|]><[|]><[|]><[|]><[|]><[|]><[|]><[|]><[|]><[|]><[|]>
[Page 5]
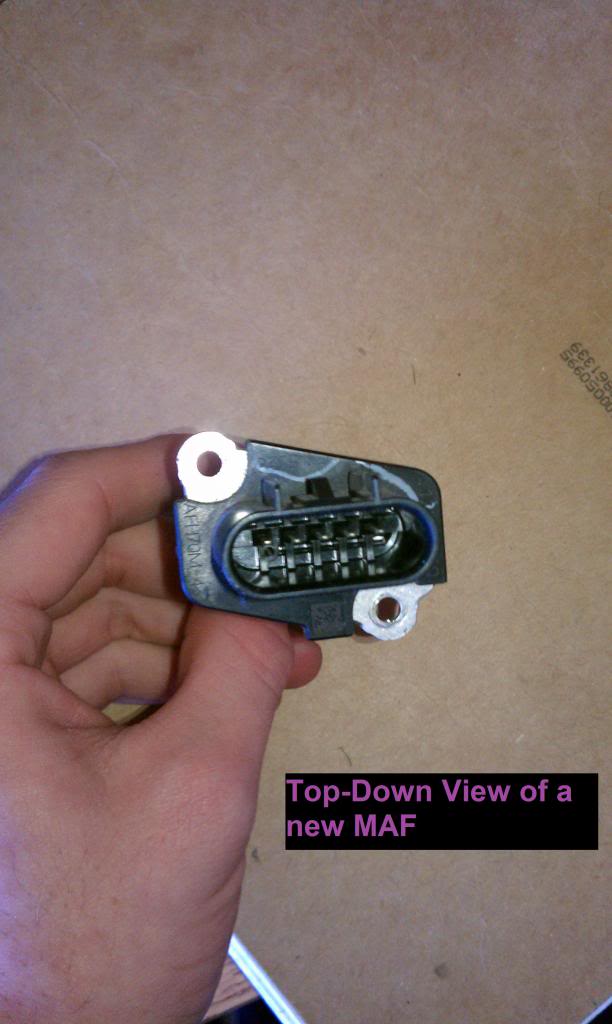
Another Picture of my New MAF sensor
<[|]><[|]><[|]><[|]><[|]><[|]><[|]><[|]><[|]><[|]><[|]><[|]><[|]><[|]><[|]><[|]><[|]><[|]><[|]><[|]><[|]><[|]><[|]><[|]><[|]><[|]><[|]><[|]><[|]><[|]><[|]><[|]><[|]>
[Page 6]
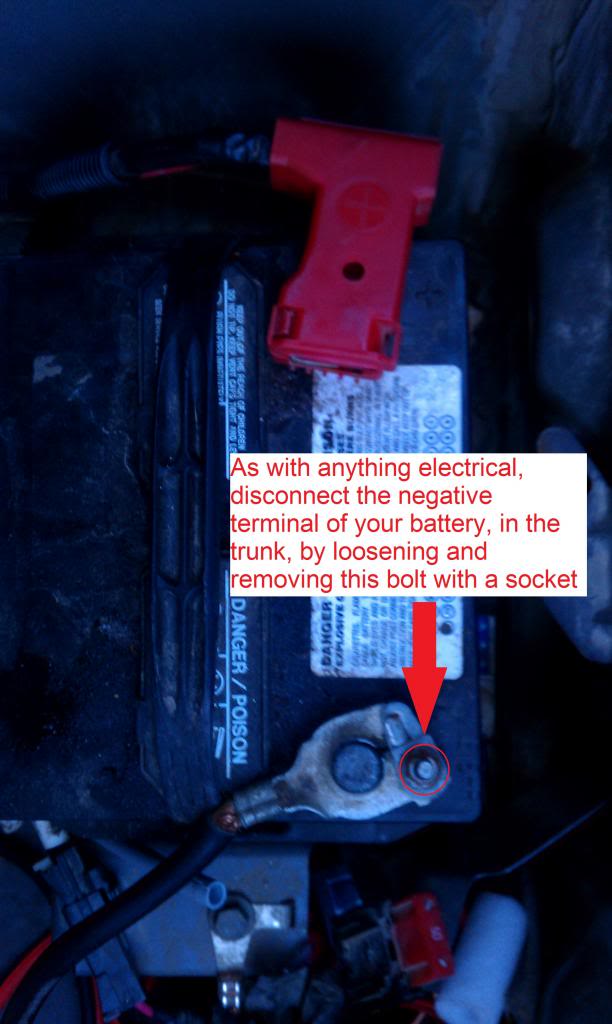
Step 1: Disconnect the battery
<[|]><[|]><[|]><[|]><[|]><[|]><[|]><[|]><[|]><[|]><[|]><[|]><[|]><[|]><[|]><[|]><[|]><[|]><[|]><[|]><[|]><[|]><[|]><[|]><[|]><[|]><[|]><[|]><[|]><[|]><[|]><[|]><[|]>
[Page 7]
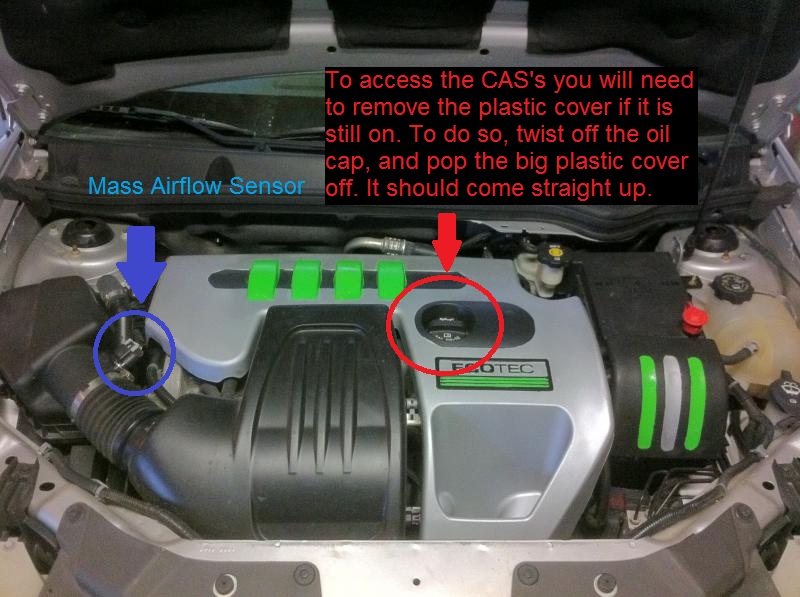
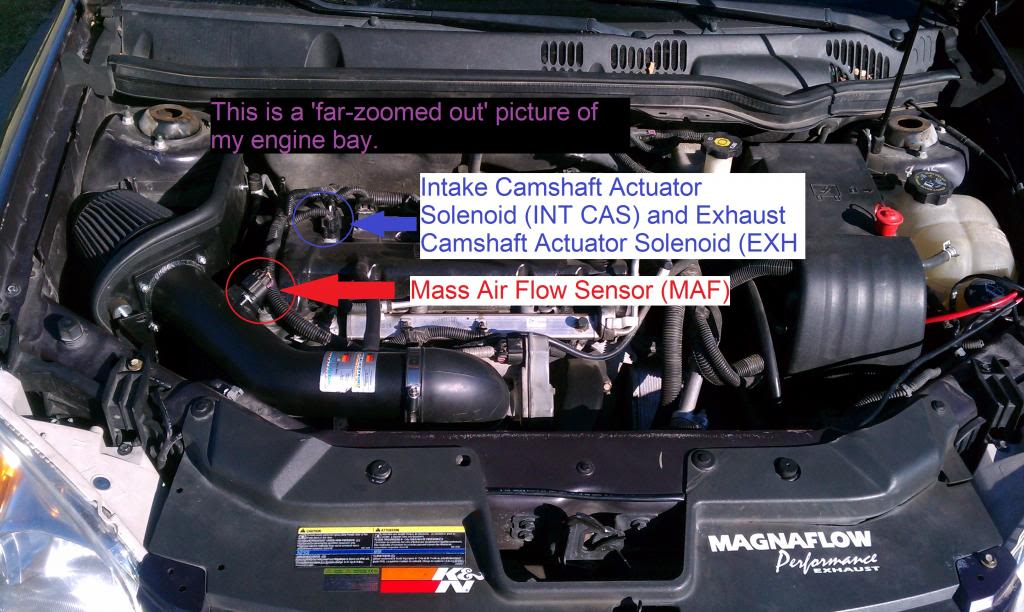
Step 2:Locate the INT CAS, EXH CAS, and MAF under the hood
***Note: This engine bay picture is not mine, I got it off Google because my plastic covers are already removed.
<[|]><[|]><[|]><[|]><[|]><[|]><[|]><[|]><[|]><[|]><[|]><[|]><[|]><[|]><[|]><[|]><[|]><[|]><[|]><[|]><[|]><[|]><[|]><[|]><[|]><[|]><[|]><[|]><[|]><[|]><[|]><[|]><[|]>
[Page 8]
Step 2: (Continued)
<[|]><[|]><[|]><[|]><[|]><[|]><[|]><[|]><[|]><[|]><[|]><[|]><[|]><[|]><[|]><[|]><[|]><[|]><[|]><[|]><[|]><[|]><[|]><[|]><[|]><[|]><[|]><[|]><[|]><[|]><[|]><[|]><[|]>
[Page 9]
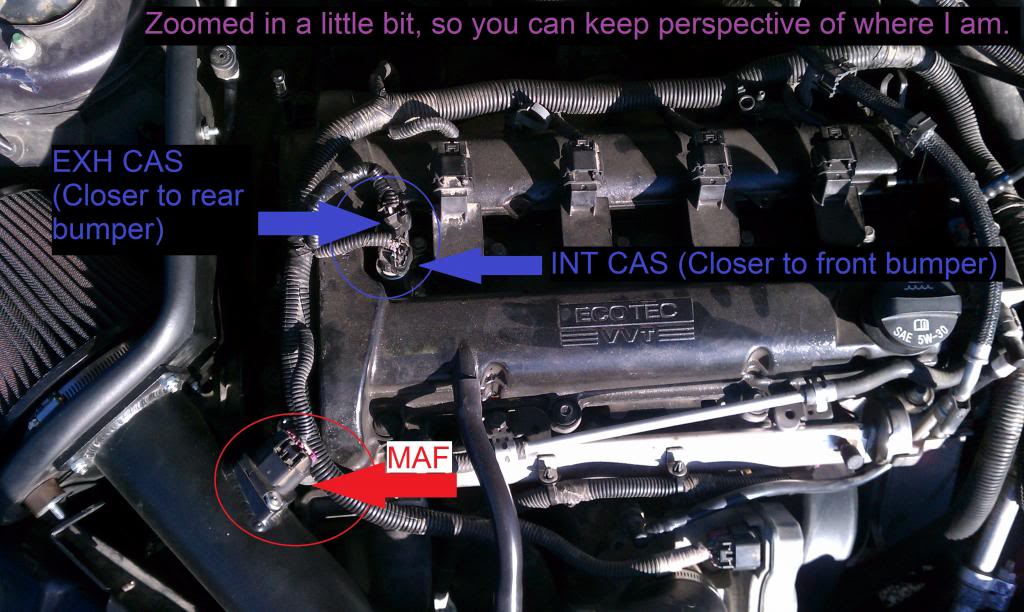
Step 2: (Continued)
<[|]><[|]><[|]><[|]><[|]><[|]><[|]><[|]><[|]><[|]><[|]><[|]><[|]><[|]><[|]><[|]><[|]><[|]><[|]><[|]><[|]><[|]><[|]><[|]><[|]><[|]><[|]><[|]><[|]><[|]><[|]><[|]><[|]>
[Page 10]
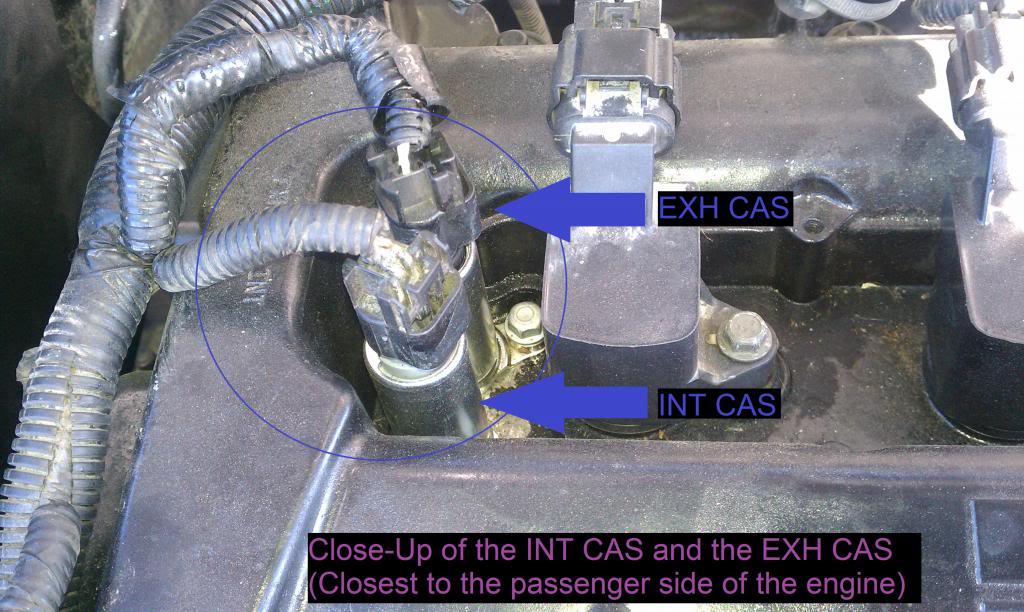
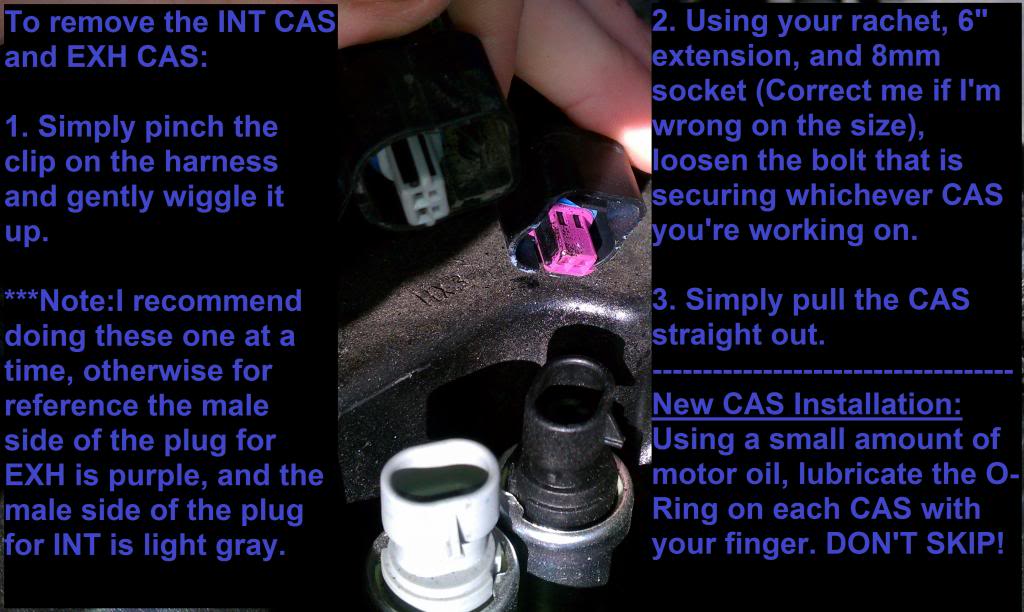
Step 3: Locate the INT CAS and EXH CAS
<[|]><[|]><[|]><[|]><[|]><[|]><[|]><[|]><[|]><[|]><[|]><[|]><[|]><[|]><[|]><[|]><[|]><[|]><[|]><[|]><[|]><[|]><[|]><[|]><[|]><[|]><[|]><[|]><[|]><[|]><[|]><[|]><[|]>
[Page 11]
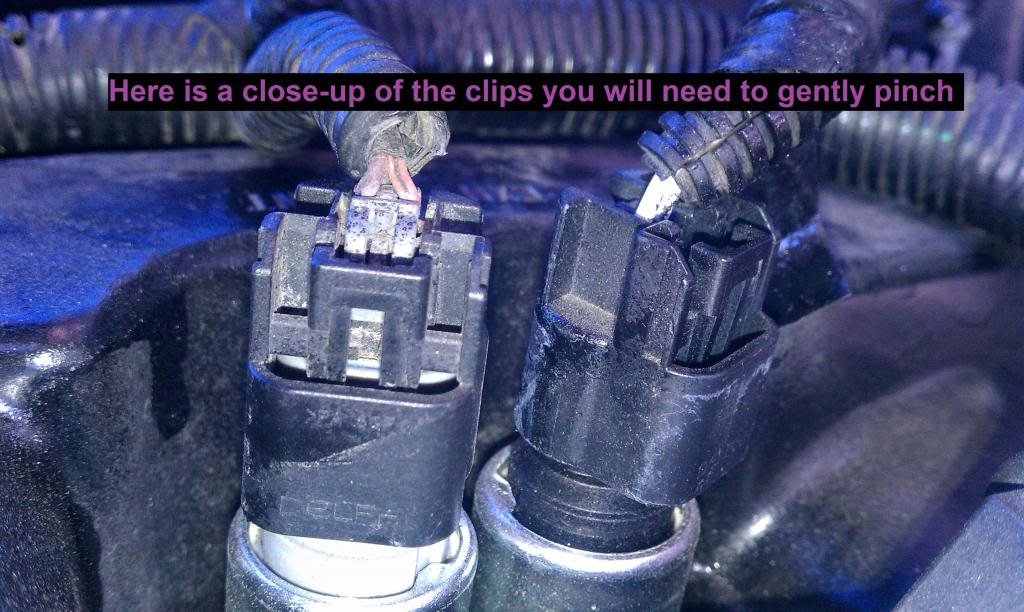
This is a close up picture of the clips on the wiring harness of each CAS.
|| For reference in Step 4: (Old/Faulty) CAS Removal ||

This is a close up picture of the bolts that secure each CAS. There is 1 bolt per CAS.
|| For reference in Step 4: (Old/Faulty) CAS Removal ||
<[|]><[|]><[|]><[|]><[|]><[|]><[|]><[|]><[|]><[|]><[|]><[|]><[|]><[|]><[|]><[|]><[|]><[|]><[|]><[|]><[|]><[|]><[|]><[|]><[|]><[|]><[|]><[|]><[|]><[|]><[|]><[|]><[|]>
[Page 12]
Step 4: (Old/Faulty) CAS Removal
<[|]><[|]><[|]><[|]><[|]><[|]><[|]><[|]><[|]><[|]><[|]><[|]><[|]><[|]><[|]><[|]><[|]><[|]><[|]><[|]><[|]><[|]><[|]><[|]><[|]><[|]><[|]><[|]><[|]><[|]><[|]><[|]><[|]>
DO NOT SKIP THIS, BEFORE Step 5:
When you are ready to drop in your new INT/EXH CAS in to the hole, you need to make sure they are facing the same direction they came from (Use References Above). In Addition, with your new INT/EXH CAS, you need to lubricate the O-Ring on each before they go into the car! All it will take is a small drop of motor oil SAE 5W30 on your finger, then lightly spread it around the O-Ring of each CAS you are putting in your car.
<[|]><[|]><[|]><[|]><[|]><[|]><[|]><[|]><[|]><[|]><[|]><[|]><[|]><[|]><[|]><[|]><[|]><[|]><[|]><[|]><[|]><[|]><[|]><[|]><[|]><[|]><[|]><[|]><[|]><[|]><[|]><[|]><[|]>
[Page 13]
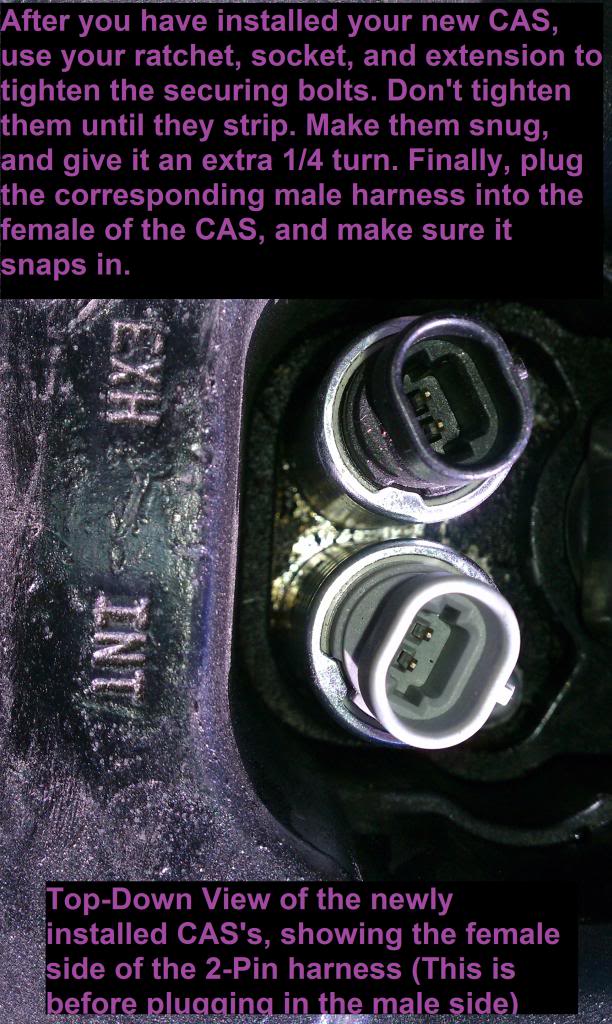
Step 5: (New) CAS Installation
[+] This concludes the CAS portion of this guide. [+]
<[|]><[|]><[|]><[|]><[|]><[|]><[|]><[|]><[|]><[|]><[|]><[|]><[|]><[|]><[|]><[|]><[|]><[|]><[|]><[|]><[|]><[|]><[|]><[|]><[|]><[|]><[|]><[|]><[|]><[|]><[|]><[|]><[|]>
[Page 14]
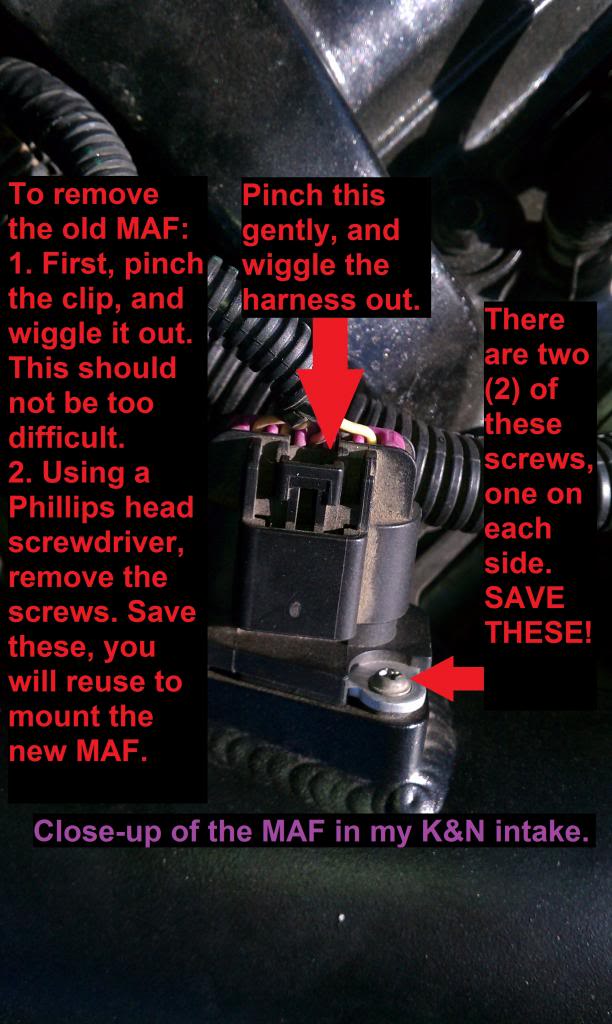
Step 6: (Old) MAF Replacement
<[|]><[|]><[|]><[|]><[|]><[|]><[|]><[|]><[|]><[|]><[|]><[|]><[|]><[|]><[|]><[|]><[|]><[|]><[|]><[|]><[|]><[|]><[|]><[|]><[|]><[|]><[|]><[|]><[|]><[|]><[|]><[|]><[|]>
[Page 15]
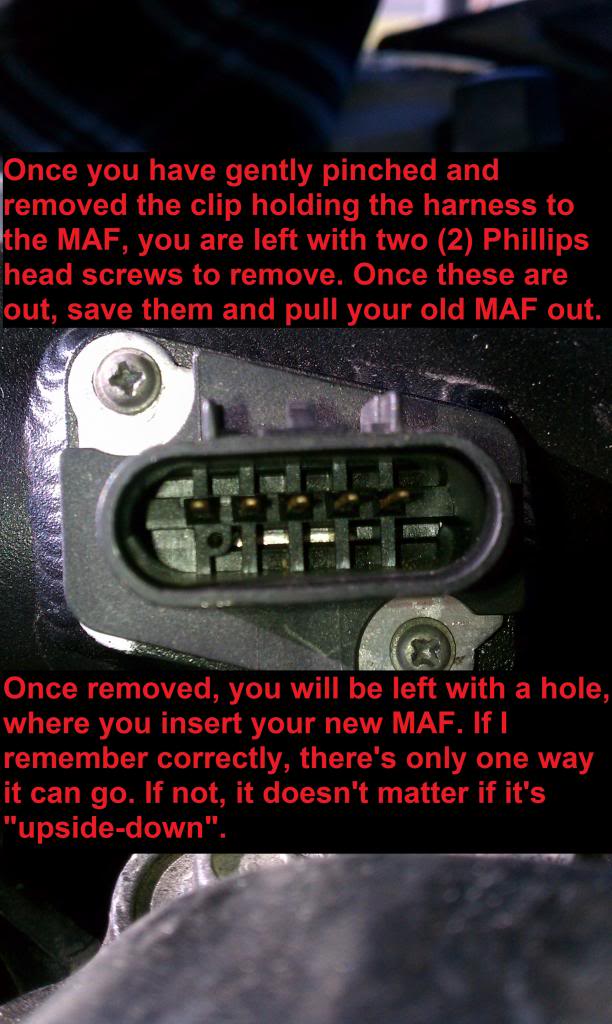
Step 6: (Old) MAF Replacement
To install your (New) MAF, simply insert it where you removed the old one from, and tighten the screws that you saved pretty tight. Ensure there is no leak when you start your car.
To diagnose a leak, you may hear a high-pitched whistling noise when you press the accelerator. The bigger the leak, the louder it will be.
<[|]><[|]><[|]><[|]><[|]><[|]><[|]><[|]><[|]><[|]><[|]><[|]><[|]><[|]><[|]><[|]><[|]><[|]><[|]><[|]><[|]><[|]><[|]><[|]><[|]><[|]><[|]><[|]><[|]><[|]><[|]><[|]><[|]>
[Page 16]
Now for the fun part...
If you take/took your car to a shop to get a quote for repairs which you end up doing yourself, you feel amazing when you do everything at a fraction of the cost.
---
9 months ago, on February 2nd, 2012 (02/02/2012), I took my car to NTB, (a shop with a name that won't be mentioned), because I used an OBD-II reader from O'Reilley Auto Parts to run my codes, and pulled P0014 and P0104.
In addition, My T/C light was on, and my car (With it's automatic transmission) began shifting so hard, that it worried me. I told them my 3 problems, and asked if I could get a quote for the repairs.
The employee (Who was a manager) pulled out a big binder that said something to the effect of 'OBD-II Code Definitions", asked for my Year/Make/Model, and wrote the codes and their definitions down on a notepad.
He then returned to his computer, and printed off a quote for me. I've taken 2 pictures of the quote he gave me that day. As soon as I looked at it I laughed in his face, did a 180 turn, and drove home, laughing hysterically the entire way. On this day I made a 'life decision' to avoid shops like the plague.
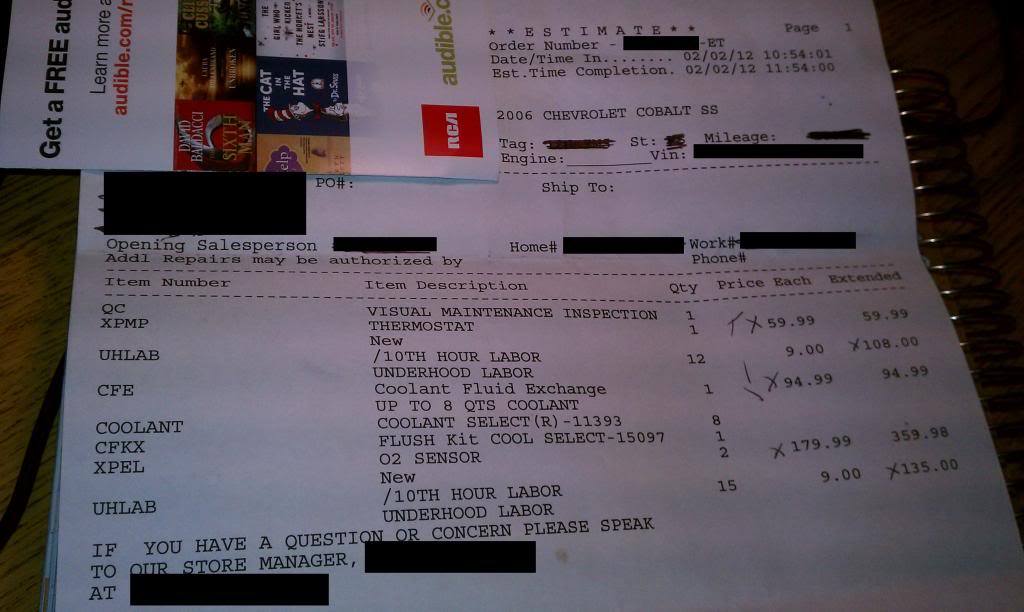
Note the quantities of things too.
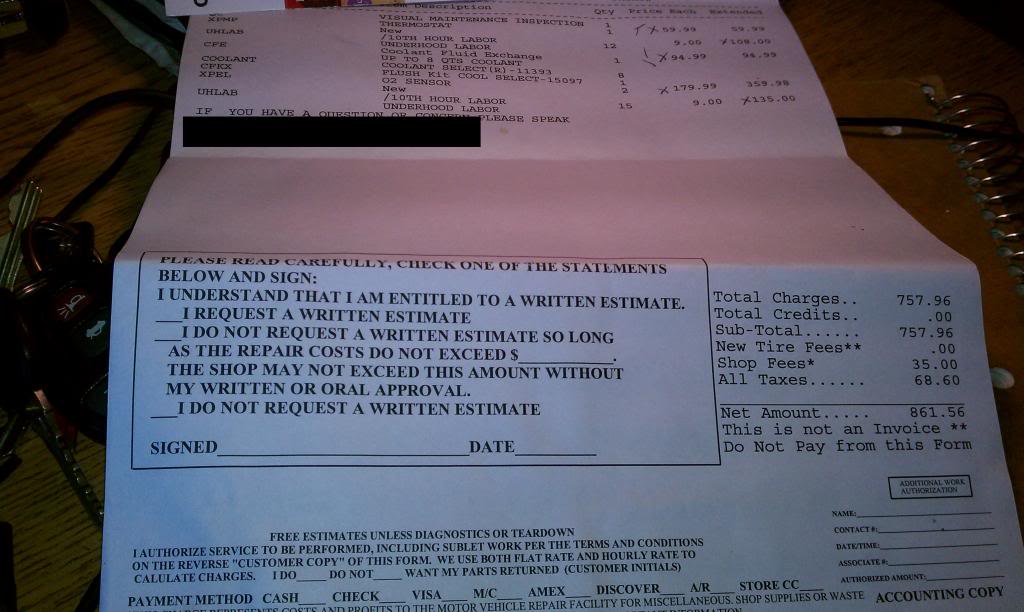
Total Projected Cost: $861.56
Total Actual Cost: $120 with brand NEW Parts
*NEW* INT CAS: $42
*NEW* EXH CAS: $42
*NEW* MAF: $35
Crack money has to come from somewhere I guess..
<[|]><[|]><[|]><[|]><[|]><[|]><[|]><[|]><[|]><[|]><[|]><[|]><[|]><[|]><[|]><[|]><[|]><[|]><[|]><[|]><[|]><[|]><[|]><[|]><[|]><[|]><[|]><[|]><[|]><[|]><[|]><[|]><[|]>
[Page 17]
End Notes:
> Don�t forget to reconnect the negative terminal of your battery.
> By disconnecting the battery (in addition to preventing damage to the vehicle�s electrical system), it should reset the ECM, including any Check Engine Codes.
> If your Check Engine Code(s) persist, use an OBD-II reader to clear your codes. If they persist after that, give it a few days and clear them again.
If you have any questions/comments or notice any typos etc. please pm me, or email: Michael.Fung1993@Yahoo.com
Due to the fact that I worked on this for nearly 10 hours straight from start to finish, I didn't get a chance to read it over in detail. Thanks for Reading. Feedback is appreciated! PLEASE GRAMMAR **** ME
If there are typos etc, please PM me, so I can target and edit them. Also, before you get too deep into this How-To:
Here are some links to other threads on CobaltSS.net where this problems is addressed:
Traction Control - Cobalt SS Network
Camshaft position sensor - Cobalt SS Network
Traction control light on (rough shifting) - Cobalt SS Network
If I accidentally placed a double anywhere please let me know, and I will remove one.
1. Please ensure that you are pulling one or more of the check engine codes below before you use this guide to work on your car
2. Please ensure that your INT CAS, EXH CAS, and MAF are correctly plugged in when you pull the code(s)
3. It has come to my attention that this guide only applies to engines with Variable Valve Timing (VVT).
<[|]><[|]><[|]><[|]><[|]><[|]><[|]><[|]><[|]><[|]><[|]><[|]><[|]><[|]><[|]><[|]><[|]><[|]><[|]><[|]><[|]><[|]><[|]><[|]><[|]><[|]><[|]><[|]><[|]><[|]><[|]><[|]><[|]>
Key:
CEL = Refers to the illumination of the 'Check Engine Light'
T/C Light = Refers to the 'Traction Control Off' Light illuminated on the Dash
INT/EXH CAS = Intake/Exhaust Camshaft Actuator Solenoid
MAF = Mass Air Flow Sensor
NTB = An un-named shop I took my car to that rips people off.
Note: The INT/EXH CAS and MAF are actual parts on the car
<[|]><[|]><[|]><[|]><[|]><[|]><[|]><[|]><[|]><[|]><[|]><[|]><[|]><[|]><[|]><[|]><[|]><[|]><[|]><[|]><[|]><[|]><[|]><[|]><[|]><[|]><[|]><[|]><[|]><[|]><[|]><[|]><[|]>
I want to create and post a How-To guide for cobalt owners with the common 'T/C Light staying on & Hard Shifts' Problem, found by using an OBD-II scanner to diagnose a Check Engine Light caused by one or more of the following:
The P0010 - P0015 Group: (P0010, P0011, P0012, P0013, P0014, P0015) Pertaining to a faulty INT CAS and/or EXH CAS
P0010 "A" Camshaft Position Actuator Circuit (Bank 1)
P0011 "A" Camshaft Position - Timing Over-Advanced or System Performance (Bank 1)
P0012 "A" Camshaft Position - Timing Over-Retarded (Bank 1)
P0013 "B" Camshaft Position - Actuator Circuit (Bank 1)
P0014 "B" Camshaft Position - Timing Over-Advanced or System Performance (Bank 1)
P0015 "B" Camshaft Position -Timing Over-Retarded (Bank 1)
(I'm wondering if in the group P0010 - P0012, "A" denotes a problem with the INT CAS, and in the group P0013 - P0015, "B" denotes a problem with the EXH CAS)
and/or
The P0100 - P0104 Group: (P0100, P0101, P0102, P0103, P0104)
-P0100 Mass or Volume Air Flow Circuit Malfunction
-P0101 Mass or Volume Air Flow Circuit Range/Performance Problem
-P0102 Mass or Volume Air Flow Circuit Low Input
-P0103 Mass or Volume Air Flow Circuit High Input
-P0104 Mass or Volume Air Flow Circuit Intermittent
<[|]><[|]><[|]><[|]><[|]><[|]><[|]><[|]><[|]><[|]><[|]><[|]><[|]><[|]><[|]><[|]><[|]><[|]><[|]><[|]><[|]><[|]><[|]><[|]><[|]><[|]><[|]><[|]><[|]><[|]><[|]><[|]><[|]>
Now before I go too much further, I want to note that out of all of the listed codes, I have only pulled the P0014 and the P0104 codes. To be on the safe side, I replaced my INT CAS and EXH CAS, and MAF, which will all be covered in the How-To Guide, as well as applicable costs, compared to taking it to a shop. When my CEL and T/C Light first came on and it began to shift hard I first pulled my CEL codes, and got P0014 and P0104. I took it to NTB to get a quote, and see if they would tell me something I didn't know. They wrote up an $800+ quote for some ridiculously over priced "Labor" and "Inspection" fees, none of which would've ended up being the problem. If you're covered under warranty, I recommend bringing your car to the dealer.
<[|]><[|]><[|]><[|]><[|]><[|]><[|]><[|]><[|]><[|]><[|]><[|]><[|]><[|]><[|]><[|]><[|]><[|]><[|]><[|]><[|]><[|]><[|]><[|]><[|]><[|]><[|]><[|]><[|]><[|]><[|]><[|]><[|]>
Here are links and part numbers for: INT CAS, EXH CAS, and MAF from a few different sources, so save you research time. Note: The links below may open a new window to either GM Parts Direct, or eBay. If any of these links are broken/break, please PM me and I will update/fix them as needed. If you buy new parts, I HIGHLY recommend buying AC-Delco whenever possible.
GM Parts Direct: ( GM Parts | GM Accessories | GM Parts House Store )
> INT CAS (GM Part Number: 12646783): I was unable to find the INT CAS on GM Parts Direct.
> EXH CAS (GM Part Number: 12646784): I was unable to find the EXH CAS on GM Parts Direct.
> MAF (GM Part Number: 15865791): 2006 Chevrolet Parts - GM Parts | GM Accessories | GM Parts House Store (~$70 NEW)
eBay: ( Car Truck Parts | eBay )
[CAS General Search Link (To look currently): http://goo.gl/PDMJp]
> INT CAS (GM Part Number: 12646783): Cobalt Malibu G5 G6 2 2 2 4 Intake Camshaft Position Actuator Solenoid 12646783 | eBay (~$40 NEW) *
> EXH CAS (GM Part Number: 12646784): Cobalt Malibu G5 G6 2 2 2 4 Exhaust Camshaft Position Actuator Solenoid 12646784 | eBay (~$40 NEW) *
> MAF General Search Link (GM Part Number: 15865791): cobalt mass airflow sensor | eBay *
*: I have used these links to purchase my parts, and vouch for the sellers of my CAS's as 5-Start sellers by eBay's standards.
<[|]><[|]><[|]><[|]><[|]><[|]><[|]><[|]><[|]><[|]><[|]><[|]><[|]><[|]><[|]><[|]><[|]><[|]><[|]><[|]><[|]><[|]><[|]><[|]><[|]><[|]><[|]><[|]><[|]><[|]><[|]><[|]><[|]>
DISCLAIMER:
I AM NOT RESPONSIBLE FOR ANY DAMAGE TO YOUR CAR DUE TO (BUT NOT LIMITED TO) ONE OR MORE OF THE FOLLOWING:
[1.] I'm simply posting a Do It Yourself (DIY) Guide based on experience of one or more the issues listed in this guide.
[2.] I am not the one actually physically working on your car.
[3.] I am not licensed by General Motors, Chevy, or any other repair shop/company/corporation/any other applicable body to perform work on any vehicle
[4.] I am not licensed by General Motors, Chevy, or any other repair shop/company/corporation/any other applicable body to write repair guides/manuals/any other applicable documents or references for such.
I�d like to note that all of the pictures in this guide are mine, with the exceptions being the engine bay, and the check engine light icon. My engine bay doesn�t look like the one with painted plastic (lol). I used it because it still had the plastic on, and I didn�t want to confuse anyone by skipping the removal of the covers. Also, I�d like to apologize for having so many pictures; They�re for anyone that isn�t 110% oriented with the locations. Again, I apologize for the 'extensiveness' if it takes a long time to load. I threw this together in 6 hours.
Here is a link to the complete album (Pictures not in order) on Photobucket:
Pictures by mcfung2674 - Photobucket
<[|]><[|]><[|]><[|]><[|]><[|]><[|]><[|]><[|]><[|]><[|]><[|]><[|]><[|]><[|]><[|]><[|]><[|]><[|]><[|]><[|]><[|]><[|]><[|]><[|]><[|]><[|]><[|]><[|]><[|]><[|]><[|]><[|]>
[Cover Page]
How-To: Replace the Intake and Exhaust Camshaft Actuator Solenoids and Mass Airflow Sensor in any Chevrolet Cobalt (2005-2010: 2.0, 2.2, or 2.4)
Check Engine Light Code Groups Covered:P0010-P0015 & P0100-P0104
Tools Needed:
> Ratchet
> 8mm Socket
> 6� Extender
> Phillips Screwdriver
This Guide is a How-To for: Replacing the Intake and Exhaust Camshaft Actuator Solenoids and Mass Airflow Sensor in any Chevrolet Cobalt.
Years: 2005-2010
Engines: 2.0L Supercharged LSJ, 2.0L Turbocharged LNF, 2.2L Naturally-Aspirated L61, 2.4L Naturally Aspirated LE5.
Check Engine Light Code Groups Covered: P0010-P0015 & P0100-P0104
<[|]><[|]><[|]><[|]><[|]><[|]><[|]><[|]><[|]><[|]><[|]><[|]><[|]><[|]><[|]><[|]><[|]><[|]><[|]><[|]><[|]><[|]><[|]><[|]><[|]><[|]><[|]><[|]><[|]><[|]><[|]><[|]><[|]>
[Page 1]
Showing 2 of my INT CAS's and 2 of my EXH CAS's. If you replace both the INT and EXH, you only need one of each.
<[|]><[|]><[|]><[|]><[|]><[|]><[|]><[|]><[|]><[|]><[|]><[|]><[|]><[|]><[|]><[|]><[|]><[|]><[|]><[|]><[|]><[|]><[|]><[|]><[|]><[|]><[|]><[|]><[|]><[|]><[|]><[|]><[|]>
[Page 2]
Close-Up of an EXH CAS, showing the 'EXH' Label, and the O-Ring for later reference.
<[|]><[|]><[|]><[|]><[|]><[|]><[|]><[|]><[|]><[|]><[|]><[|]><[|]><[|]><[|]><[|]><[|]><[|]><[|]><[|]><[|]><[|]><[|]><[|]><[|]><[|]><[|]><[|]><[|]><[|]><[|]><[|]><[|]>
[Page 3]
Close-up of both CAS's installed in my engine, showing the clear 'EXH' and 'INT' label (For reference).
<[|]><[|]><[|]><[|]><[|]><[|]><[|]><[|]><[|]><[|]><[|]><[|]><[|]><[|]><[|]><[|]><[|]><[|]><[|]><[|]><[|]><[|]><[|]><[|]><[|]><[|]><[|]><[|]><[|]><[|]><[|]><[|]><[|]>
[Page 4]
A picture of my New MAF sensor
<[|]><[|]><[|]><[|]><[|]><[|]><[|]><[|]><[|]><[|]><[|]><[|]><[|]><[|]><[|]><[|]><[|]><[|]><[|]><[|]><[|]><[|]><[|]><[|]><[|]><[|]><[|]><[|]><[|]><[|]><[|]><[|]><[|]>
[Page 5]
Another Picture of my New MAF sensor
<[|]><[|]><[|]><[|]><[|]><[|]><[|]><[|]><[|]><[|]><[|]><[|]><[|]><[|]><[|]><[|]><[|]><[|]><[|]><[|]><[|]><[|]><[|]><[|]><[|]><[|]><[|]><[|]><[|]><[|]><[|]><[|]><[|]>
[Page 6]
Step 1: Disconnect the battery
<[|]><[|]><[|]><[|]><[|]><[|]><[|]><[|]><[|]><[|]><[|]><[|]><[|]><[|]><[|]><[|]><[|]><[|]><[|]><[|]><[|]><[|]><[|]><[|]><[|]><[|]><[|]><[|]><[|]><[|]><[|]><[|]><[|]>
[Page 7]
Step 2:Locate the INT CAS, EXH CAS, and MAF under the hood
***Note: This engine bay picture is not mine, I got it off Google because my plastic covers are already removed.
<[|]><[|]><[|]><[|]><[|]><[|]><[|]><[|]><[|]><[|]><[|]><[|]><[|]><[|]><[|]><[|]><[|]><[|]><[|]><[|]><[|]><[|]><[|]><[|]><[|]><[|]><[|]><[|]><[|]><[|]><[|]><[|]><[|]>
[Page 8]
Step 2: (Continued)
<[|]><[|]><[|]><[|]><[|]><[|]><[|]><[|]><[|]><[|]><[|]><[|]><[|]><[|]><[|]><[|]><[|]><[|]><[|]><[|]><[|]><[|]><[|]><[|]><[|]><[|]><[|]><[|]><[|]><[|]><[|]><[|]><[|]>
[Page 9]
Step 2: (Continued)
<[|]><[|]><[|]><[|]><[|]><[|]><[|]><[|]><[|]><[|]><[|]><[|]><[|]><[|]><[|]><[|]><[|]><[|]><[|]><[|]><[|]><[|]><[|]><[|]><[|]><[|]><[|]><[|]><[|]><[|]><[|]><[|]><[|]>
[Page 10]
Step 3: Locate the INT CAS and EXH CAS
<[|]><[|]><[|]><[|]><[|]><[|]><[|]><[|]><[|]><[|]><[|]><[|]><[|]><[|]><[|]><[|]><[|]><[|]><[|]><[|]><[|]><[|]><[|]><[|]><[|]><[|]><[|]><[|]><[|]><[|]><[|]><[|]><[|]>
[Page 11]
This is a close up picture of the clips on the wiring harness of each CAS.
|| For reference in Step 4: (Old/Faulty) CAS Removal ||
This is a close up picture of the bolts that secure each CAS. There is 1 bolt per CAS.
|| For reference in Step 4: (Old/Faulty) CAS Removal ||
<[|]><[|]><[|]><[|]><[|]><[|]><[|]><[|]><[|]><[|]><[|]><[|]><[|]><[|]><[|]><[|]><[|]><[|]><[|]><[|]><[|]><[|]><[|]><[|]><[|]><[|]><[|]><[|]><[|]><[|]><[|]><[|]><[|]>
[Page 12]
Step 4: (Old/Faulty) CAS Removal
<[|]><[|]><[|]><[|]><[|]><[|]><[|]><[|]><[|]><[|]><[|]><[|]><[|]><[|]><[|]><[|]><[|]><[|]><[|]><[|]><[|]><[|]><[|]><[|]><[|]><[|]><[|]><[|]><[|]><[|]><[|]><[|]><[|]>
DO NOT SKIP THIS, BEFORE Step 5:
When you are ready to drop in your new INT/EXH CAS in to the hole, you need to make sure they are facing the same direction they came from (Use References Above). In Addition, with your new INT/EXH CAS, you need to lubricate the O-Ring on each before they go into the car! All it will take is a small drop of motor oil SAE 5W30 on your finger, then lightly spread it around the O-Ring of each CAS you are putting in your car.
<[|]><[|]><[|]><[|]><[|]><[|]><[|]><[|]><[|]><[|]><[|]><[|]><[|]><[|]><[|]><[|]><[|]><[|]><[|]><[|]><[|]><[|]><[|]><[|]><[|]><[|]><[|]><[|]><[|]><[|]><[|]><[|]><[|]>
[Page 13]
Step 5: (New) CAS Installation
[+] This concludes the CAS portion of this guide. [+]
<[|]><[|]><[|]><[|]><[|]><[|]><[|]><[|]><[|]><[|]><[|]><[|]><[|]><[|]><[|]><[|]><[|]><[|]><[|]><[|]><[|]><[|]><[|]><[|]><[|]><[|]><[|]><[|]><[|]><[|]><[|]><[|]><[|]>
[Page 14]
Step 6: (Old) MAF Replacement
<[|]><[|]><[|]><[|]><[|]><[|]><[|]><[|]><[|]><[|]><[|]><[|]><[|]><[|]><[|]><[|]><[|]><[|]><[|]><[|]><[|]><[|]><[|]><[|]><[|]><[|]><[|]><[|]><[|]><[|]><[|]><[|]><[|]>
[Page 15]
Step 6: (Old) MAF Replacement
To install your (New) MAF, simply insert it where you removed the old one from, and tighten the screws that you saved pretty tight. Ensure there is no leak when you start your car.
To diagnose a leak, you may hear a high-pitched whistling noise when you press the accelerator. The bigger the leak, the louder it will be.
<[|]><[|]><[|]><[|]><[|]><[|]><[|]><[|]><[|]><[|]><[|]><[|]><[|]><[|]><[|]><[|]><[|]><[|]><[|]><[|]><[|]><[|]><[|]><[|]><[|]><[|]><[|]><[|]><[|]><[|]><[|]><[|]><[|]>
[Page 16]
Now for the fun part...
If you take/took your car to a shop to get a quote for repairs which you end up doing yourself, you feel amazing when you do everything at a fraction of the cost.
---
9 months ago, on February 2nd, 2012 (02/02/2012), I took my car to NTB,
(a shop with a name that won't be mentioned), because I used an OBD-II reader from O'Reilley Auto Parts to run my codes, and pulled P0014 and P0104.In addition, My T/C light was on, and my car (With it's automatic transmission) began shifting so hard, that it worried me. I told them my 3 problems, and asked if I could get a quote for the repairs.
The employee (Who was a manager) pulled out a big binder that said something to the effect of 'OBD-II Code Definitions", asked for my Year/Make/Model, and wrote the codes and their definitions down on a notepad.
He then returned to his computer, and printed off a quote for me. I've taken 2 pictures of the quote he gave me that day. As soon as I looked at it I laughed in his face, did a 180 turn, and drove home, laughing hysterically the entire way. On this day I made a 'life decision' to avoid shops like the plague.
Note the quantities of things too.
Total Projected Cost: $861.56
Total Actual Cost: $120 with brand NEW Parts
*NEW* INT CAS: $42
*NEW* EXH CAS: $42
*NEW* MAF: $35
Crack money has to come from somewhere I guess..
<[|]><[|]><[|]><[|]><[|]><[|]><[|]><[|]><[|]><[|]><[|]><[|]><[|]><[|]><[|]><[|]><[|]><[|]><[|]><[|]><[|]><[|]><[|]><[|]><[|]><[|]><[|]><[|]><[|]><[|]><[|]><[|]><[|]>
[Page 17]
End Notes:
> Don�t forget to reconnect the negative terminal of your battery.
> By disconnecting the battery (in addition to preventing damage to the vehicle�s electrical system), it should reset the ECM, including any Check Engine Codes.
> If your Check Engine Code(s) persist, use an OBD-II reader to clear your codes. If they persist after that, give it a few days and clear them again.
If you have any questions/comments or notice any typos etc. please pm me, or email: Michael.Fung1993@Yahoo.com
Due to the fact that I worked on this for nearly 10 hours straight from start to finish, I didn't get a chance to read it over in detail. Thanks for Reading. Feedback is appreciated! PLEASE GRAMMAR **** ME
Last edited by 06Cobalt2.4; 11-01-2012 at 09:15 PM. Reason: Posting Links to threads addressing the problems and editing format.

The following users liked this post:
aterminatorz (02-17-2017)
11-10-2012, 02:24 PM
#2
Senior Member
Cool to have all those pics.
I did this repair on my car back in Spring 2012; I'd searched and searched here on the forum and saw nothing helpful; most threads that had anything to do with the subject eventually got bogged down quibbling whether or not it pertains to the SC Cobalts (it does not).
I bought the two solenoids online for about $40 each but I replaced one at a time (I thought it would be more interesting to see which one solved the problem, and no, I didn't scan for codes since my scanner doesn't work on these cars). Intake first. That didn't solve the problem so I replaced the Exhaust side also. Problem solved!
By the way, its a 10mm socket needed to get the solenoid bolt out, not an 8. And be sure to use something like compressed air to blow away all the dust, dead bugs or other debris that's down there in the little well where the solenoids attach. Don't need that stuff falling into the engine.
Last edited by css9450; 11-10-2012 at 02:33 PM.
The following users liked this post:
Redhwan noaman (10-14-2022)
03-13-2013, 10:12 PM
#3
Senior Member
Join Date: 03-30-06
Location: Chandler, AZ
Posts: 5,491
Likes: 0
Received 0 Likes
on
0 Posts
Just to confirm, the part numbers are the same across all Cobalt VVT engines? I see OP has a 2.4, but I have a 2.0 that is throwing the same codes for the intake side.
03-27-2013, 04:36 PM
#5
Senior Member
Join Date: 03-30-06
Location: Chandler, AZ
Posts: 5,491
Likes: 0
Received 0 Likes
on
0 Posts
 03-27-2013, 09:42 PM
#6
Senior Member
Coincidently, I was looking at a Chevy Trailblazer forum. Evidently they have the same issue with the cam actuator solenoids - except they only have one of them! And its mounted sideways on the side of the cylinder head. Sometimes they leak internally and oil seeps out and can be seen in the wiring harness connector! Lovely...
03-29-2013, 02:13 PM
#8
Senior Member
Here's the thread I was thinking of:
How to: Camshaft Position Actuator Solenoid Cleaning - Chevy TrailBlazer, TrailBlazer SS and GMC Envoy Forum
I'd never heard them described as VVT either, so it makes me wonder if they have something like a special timing at idle, or something like that, for emissions. Anyway, the interesting pictures are on Page 2. Check out the damage to the screens! And the debris trapped on them. I wonder if that's a severely neglected engine or what.


 09-08-2013, 09:15 PM
#14
Senior Member
 09-08-2013, 10:37 PM
#19
Senior Member
 08-02-2014, 10:30 PM
#22
New Member

Join Date: 08-02-14
Location: California
Posts: 1
Likes: 0
Received 0 Likes
on
0 Posts
Thank you so much for this site and this post! My car has off and on thrown these codes for some time now. A local shop suggested the problem was due to sludgy oil even though I have religiously changed the oil at 5000 miles since buying the car new. Mechanic suggested pulling the valve cover to check how bad the oil is and then doing an engine flush to remove sludge from CAS. After reading this post, I purchased the EXH CAS and ordered the INT, EXH is all local store had in stock. Changed the EXH and no more annoying "check engine light"! Going to replace the INT just for GP. I was not at all looking forward to the labor bill much less other potential problems removing the valve cover would no doubt produce. Even worse would be going to the dealer! I tried that and they charged me over $300 to change the thermostat and guess what, that didn't fix the problem! Thanks again for the detailed information including pictures. Has got to be the easiest job I've ever done! I was really worried it was going to cost me an arm and a leg! BTW - I purchased aftermarket units and they work fine.
Last edited by twoduct; 08-02-2014 at 10:31 PM. Reason: Add last line
02-17-2017, 08:37 PM
#23

Great work 06Cobalt2.4!
I have an 08 Cobalt SS/TC with 93k miles and have had a check engine light off/on (mostly on) for a while now. Also the TC light will come on in the first few minutes of driving but then always turns off a few minutes later.
I took my car to an auto parts store and they used their scan tool for free.
Error Codes Read
P0014 Exhaust Camshaft Position (CMP) Actuator Solenoid Control Circuit (Bank 1)
P0013 Exhaust Camshaft Position (CMP) Actuator Solenoid Control Circuit
Today I cleaned the area around the two CAS, although a lot of dirt remained, it's a really tight spot. I used compressed air to blow away the loose stuff and a wet rag to wipe it down. I was worried about spraying any solvents there because of the plastic and wires.
Anyone know if it's possible to get this area clean?
I decided to take the CAS out and check their condition before ordering the parts.
Took me a little while to figure out how to remove the plastic clips and sore fingers. If there is an easy trick to doing this let me know.
I used a 6" extension, css9450 is correct about the 10mm socket being needed to remove the bolts.
I got the INT CAS out with some difficulty, really hard to get a grip on the small plastic and the tab is sharp. Oil came pouring out of the CAS for a second, I was not expecting that. The screens looked good and I didn't see anything wrong. I could not get the EXH CAS out, if felt like pliers would have broken the plastic, so that wasn't an option for me.
I'll have to order the parts and do it for real next time and let everyone know how it goes.
03-10-2017, 06:42 PM
#24
I replaced both the INT and EXH solenoids, CEL went away and has stayed away, fuel economy increased slightly and runs great! A few tips:
1. before you pull the solenoid out all they way, let the oil drip out, you won't be able to see it, but it will help, for added cleanliness, put a shop towel next to the solenoid so when you pull it out you can contain it.
2. have a long flat-head screwdriver to put under the lip of the solenoid to have leverage to pop it straight up.

Thread
Thread Starter
Forum
Replies
Last Post