Interior: How To Install An Auto Dim Rear–view Mirror
 02-16-2011, 11:45 PM
#1
Member
Thread Starter

Join Date: 06-16-05
Location: Newfoundland
Posts: 318
Likes: 0
Received 0 Likes
on
0 Posts
Huge thank–you to Tom from www.CrateEngineDepot.com for his help in making this work for our vehicles and his help with making this “How To”.
I’m sure many of us have been driving at night when someone pulls up behind and blinds you with their headlights. Then you either have to look directly at the mirror (and get blinded even more) or fumble around until you find that little knob on the bottom of the mirror and twist it. By the time you’ve flipped that knob, you are left with bright spots in your vision. How nice would it be for our mirrors to automatically adjust to changing light conditions like they do in so many other GM vehicles? In this “How To”, we will show you how to install an Auto Dim Rear–view Mirror and have it look like it was always there, while at the same time, retaining your Map Lights, your OnStar, and adding the extra convenience of an integrated compass in the mirror!
Difficulty: Easy – Medium
What You Will Need:
1) Auto Dim Rear–view Mirror with OnStar, Map Lights, & Compass:
– GM Part # 25812209
– You can get this part for an awesome price from www.CrateEngineDepot.com (Click on the name or part number above for a direct link to the item)
2) Rear–view Mirror Wire With Terminal:
– GM Part # 13575548
– You can get this part for an awesome price from www.CrateEngineDepot.com (Click on the name or part number above for a direct link to the item)
– You will need a minimum of 1 of these. However, if you want to do a complete install you will need a minimum of 2 of these. See the note between Step 10 and Step 11 for more information on the complete install.
3) 3M Scotchlok (or some other quick wire taps & butt connectors)
– You will need a minimum of 1 wire tap. However, if you want to do a complete install you will need a minimum of 2 wire taps and 1 butt connector. See the note between Step 10 and Step 11 for more information on the complete install.
4) T20 Torx Wrench/Screw Driver
5) T15 Torx Wrench/Screw Driver
– This is only required if you want to do a complete install. See the note between Step 10 and Step 11 for more information on the complete install.
6) Pliers/Wire Crimpers (used to pinch 3M Scotchlok/quick wire taps)
7) Electrical Tape
8) 18–22 Gauge Wire (approximately 9–10 feet), light green if possible
– This is only required if you want to do a complete install. See the note between Step 10 and Step 11 for more information on the complete install.
9) 15mm Socket
– This is only required if you want to do a complete install. See the note between Step 10 and Step 11 for more information on the complete install.
10) Anything else you think you may need to complete this project.
Step 1:
Since you are dealing with something electrical, it is probably wise to disconnect the battery. No huge risk here, but you never know.
Step 2:
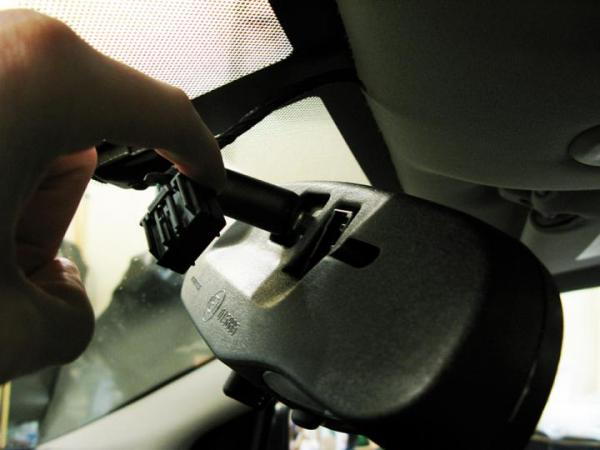
Remove/unplug the connector from the back of the rear–view mirror.
Step 3:
Loosen the Torx screw on the base of the mirror that is connected to the windshield. There is no need to remove this screw, just loosen it by one rotation. You will know when it is loose enough.

Step 4:
Once the screw is loose, simply slide the base of the mirror up towards the headliner and off of the window mount. Leave window mount (the piece which is stuck onto the window) as this will be reused to mount the new mirror.

Note: Step 5 – Step 10 are used to add the extra connection which will bring 12V on ignition to the mirror for the auto–dim and compass functions to operate. These steps use the 12V going to the sunroof button. If you are installing this on a car without a sunroof, you will need to find another 12V ignition source (meaning something which receives 12V when the ignition is in the “On” position only, and receives 0V when the ignition is in the “Off” position). This most likely would involve running another wire to the roof.
Step 5:
Next, remove the bezel/trim around the sunroof switch. To do this, sit in the driver seat and, using your right hand, apply some upwards pressure on the driver side of the trim with your thumb. While applying the upward pressure with your thumb, use your fingers to push the passenger side of the trim towards the driver side and, at the same time, pull down.

The passenger side of the trim will start to come down like this:
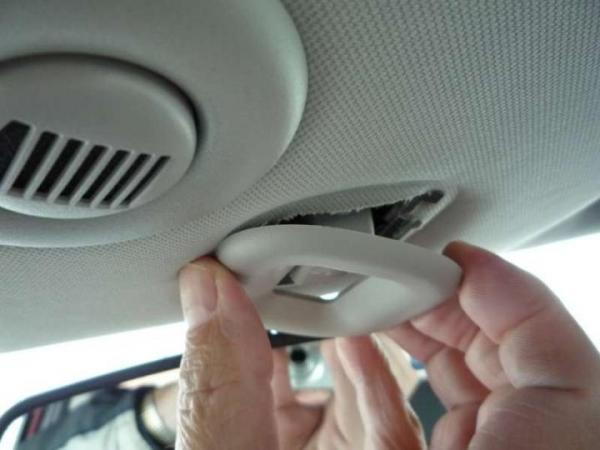
Finally, pull the driver side of the trim down. Here is a picture of the tabs on the trim to give you a better idea of what is keeping it in place:

Step 6:
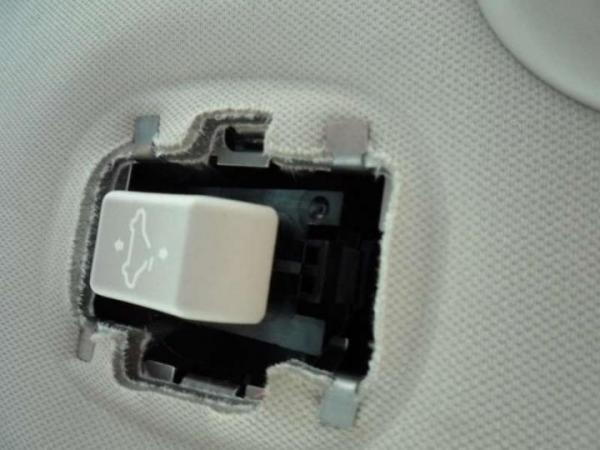
Remove the sunroof button. It is held in place by a squeeze tab on the rear side of the button; the arrow on the top of the pictures of the car is sort of pointing to where the tab is:

To remove the button, use your thumb/finger to press the release tab while pulling the rear side of the button down. This is what it should look like as it is coming out (the rear side of the button is lower than the front side).
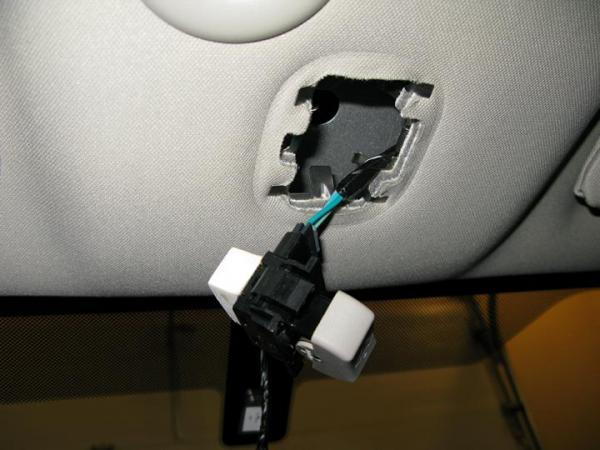
Finally remove the switch by simply pulling it the rest of the way out. There will be a wiring harness snapped into the passenger side of the button and it may be taped to the headliner. This may make it slightly difficult to pull down enough wire to work with.
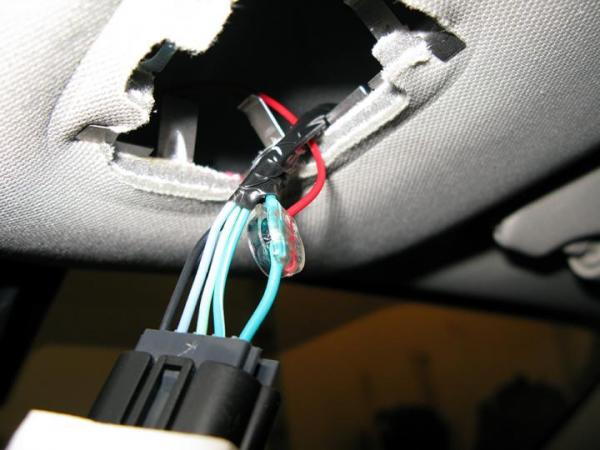
Step 7:
Now take your Rear–view Mirror Wire With Terminal (GM Part # 13575548 which you picked up from www.CrateEngineDepot.com) and thread it up into the headliner. Try to follow the path that the existing rear–view mirror wiring harness takes.

Step 8:
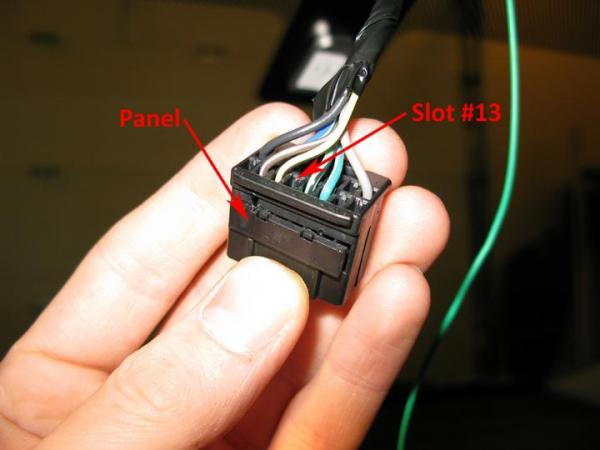
Insert the terminal of the Rear–view Mirror Wire With Terminal into slot #13 on the rear–view mirror connector. To do this, you need to pop out this small panel on the side of the connector. It will only pop out about 1/8 of an inch.
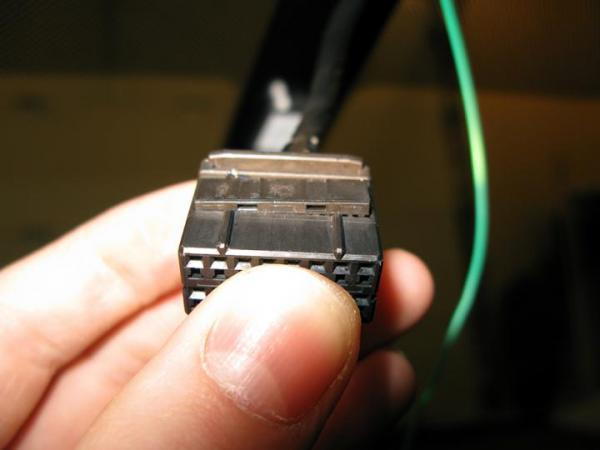
Insert the terminal into slot #13 on the connector. If you are planning to do a complete install, then leave the panel out as you will need to insert another terminal later. If you are not doing a complete install, push this panel back in. It will only close when the terminal has been inserted all the way.
Step 9:
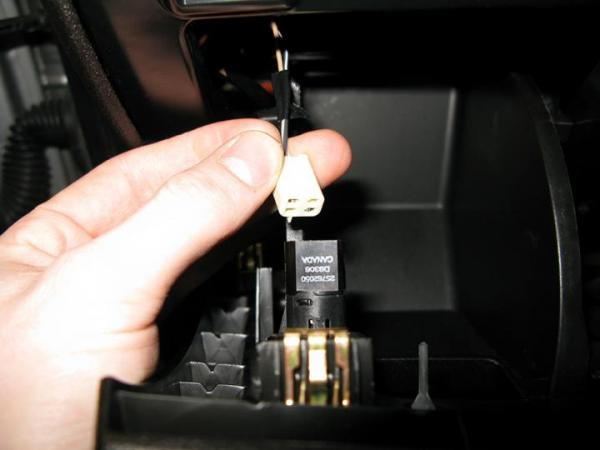
Using 1 of your 3M Scotchlok, connect/tap the other end of your Rear–view Mirror Wire With Terminal into the dark green wire on the wiring harness of the sunroof button.
Step 10:
Use the electrical tape to tape up your wire tap to help protect it. When you finish this you can leave your sunroof button hanging out until Step 25.
Note: Step 11 – Step 23 are optional steps that are only required if you wish to do a complete install. They are used to add the extra connection which will bring the 12V signal from the reverse lights to the mirror. This is used to turn the auto–dim function off when you shift your vehicle into reverse. You can choose to skip these steps and not have this feature and the mirror will still function properly. I am not sure how useful this feature will actually be, but it is how it is installed on vehicles which come with this type of mirror, so for completeness I have included the steps to do this.
Step 11:
Remove the driver seat from the vehicle. To do this, use a 15mm socket to remove the two bolts which are located where the rear seat passenger’s feet would go.
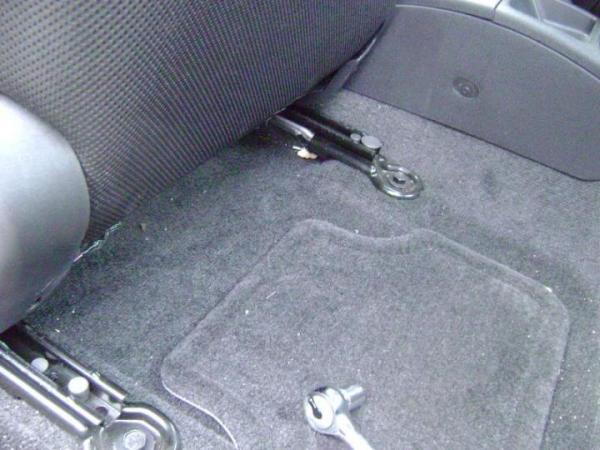
With the bolts removed, pivot the driver seat forward and disconnect the plug on the bottom of the seat cushion.

Finally, lift and remove the seat from the vehicle.
Step 12:
Remove the trim which separates the door sill and the carpet. To do this, you must start at the rear and work forwards, pushing the bottom edge of the trim directly upwards to pop the clips out.

This picture shows the location of the clips to help you with the removal:

Step 13:
Remove the trim underneath the steering wheel. This will give you better access for running your wire to the roof. To remove this panel, start on the bottom right corner (closest to the radio/heating controls) and pull out. When you remove the left side of this trim (closest to the driver door), be careful not to pull too hard and damage your trunk release button. You will have to disconnect this button to fully remove the panel. Here is a picture showing the location of the clips to help with the removal:
And to disconnect the trunk release button:
Step 14:
Remove the A–pillar. To do this, pop the “Airbag” tab out and remove the T15 Torx screw from behind it.

Then, start from the top and work down towards the dash, pulling the A–pillar piece up, and out at the same time. Again there will be a bunch of clips which will have to pop out and can be difficult. When you get the piece removed, disconnected your boost gauge/RPD and set it aside.

Step 15:
Remove the driver side sun–visor. To do this, remove the three (3) T20 Torx screws from the left of the visor, and the single T20 Torx screw from the right clip.

Step 16:
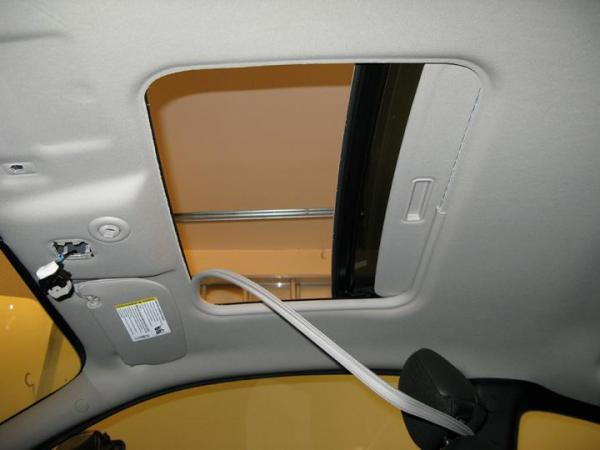
Remove the trim around the driver side of your sunroof. To do this, simply pull it off.
Step 17:
Lift up the carpet and locate your wiring harness. You need to locate a light green wire, which is the reverse lights wire. This is it here:

**IMPORTANT**: I suggest you check to be 100% sure that you have the correct wire before you tap into it. You can check by inserting a needle through the insulation and into the wire. Then put your car into reverse and measure the voltage between the needle and a ground point. This will help to prevent taping into the wrong wire and causing problems.
I’m sure many of us have been driving at night when someone pulls up behind and blinds you with their headlights. Then you either have to look directly at the mirror (and get blinded even more) or fumble around until you find that little knob on the bottom of the mirror and twist it. By the time you’ve flipped that knob, you are left with bright spots in your vision. How nice would it be for our mirrors to automatically adjust to changing light conditions like they do in so many other GM vehicles? In this “How To”, we will show you how to install an Auto Dim Rear–view Mirror and have it look like it was always there, while at the same time, retaining your Map Lights, your OnStar, and adding the extra convenience of an integrated compass in the mirror!
Difficulty: Easy – Medium
What You Will Need:
1) Auto Dim Rear–view Mirror with OnStar, Map Lights, & Compass:
– GM Part # 25812209
– You can get this part for an awesome price from www.CrateEngineDepot.com (Click on the name or part number above for a direct link to the item)
2) Rear–view Mirror Wire With Terminal:
– GM Part # 13575548
– You can get this part for an awesome price from www.CrateEngineDepot.com (Click on the name or part number above for a direct link to the item)
– You will need a minimum of 1 of these. However, if you want to do a complete install you will need a minimum of 2 of these. See the note between Step 10 and Step 11 for more information on the complete install.
3) 3M Scotchlok (or some other quick wire taps & butt connectors)
– You will need a minimum of 1 wire tap. However, if you want to do a complete install you will need a minimum of 2 wire taps and 1 butt connector. See the note between Step 10 and Step 11 for more information on the complete install.
4) T20 Torx Wrench/Screw Driver
5) T15 Torx Wrench/Screw Driver
– This is only required if you want to do a complete install. See the note between Step 10 and Step 11 for more information on the complete install.
6) Pliers/Wire Crimpers (used to pinch 3M Scotchlok/quick wire taps)
7) Electrical Tape
8) 18–22 Gauge Wire (approximately 9–10 feet), light green if possible
– This is only required if you want to do a complete install. See the note between Step 10 and Step 11 for more information on the complete install.
9) 15mm Socket
– This is only required if you want to do a complete install. See the note between Step 10 and Step 11 for more information on the complete install.
10) Anything else you think you may need to complete this project.
Step 1:
Since you are dealing with something electrical, it is probably wise to disconnect the battery. No huge risk here, but you never know.
Step 2:
Remove/unplug the connector from the back of the rear–view mirror.
Step 3:
Loosen the Torx screw on the base of the mirror that is connected to the windshield. There is no need to remove this screw, just loosen it by one rotation. You will know when it is loose enough.
Step 4:
Once the screw is loose, simply slide the base of the mirror up towards the headliner and off of the window mount. Leave window mount (the piece which is stuck onto the window) as this will be reused to mount the new mirror.
Note: Step 5 – Step 10 are used to add the extra connection which will bring 12V on ignition to the mirror for the auto–dim and compass functions to operate. These steps use the 12V going to the sunroof button. If you are installing this on a car without a sunroof, you will need to find another 12V ignition source (meaning something which receives 12V when the ignition is in the “On” position only, and receives 0V when the ignition is in the “Off” position). This most likely would involve running another wire to the roof.
Step 5:
Next, remove the bezel/trim around the sunroof switch. To do this, sit in the driver seat and, using your right hand, apply some upwards pressure on the driver side of the trim with your thumb. While applying the upward pressure with your thumb, use your fingers to push the passenger side of the trim towards the driver side and, at the same time, pull down.
The passenger side of the trim will start to come down like this:
Finally, pull the driver side of the trim down. Here is a picture of the tabs on the trim to give you a better idea of what is keeping it in place:
Step 6:
Remove the sunroof button. It is held in place by a squeeze tab on the rear side of the button; the arrow on the top of the pictures of the car is sort of pointing to where the tab is:
To remove the button, use your thumb/finger to press the release tab while pulling the rear side of the button down. This is what it should look like as it is coming out (the rear side of the button is lower than the front side).
Finally remove the switch by simply pulling it the rest of the way out. There will be a wiring harness snapped into the passenger side of the button and it may be taped to the headliner. This may make it slightly difficult to pull down enough wire to work with.
Step 7:
Now take your Rear–view Mirror Wire With Terminal (GM Part # 13575548 which you picked up from www.CrateEngineDepot.com) and thread it up into the headliner. Try to follow the path that the existing rear–view mirror wiring harness takes.
Step 8:
Insert the terminal of the Rear–view Mirror Wire With Terminal into slot #13 on the rear–view mirror connector. To do this, you need to pop out this small panel on the side of the connector. It will only pop out about 1/8 of an inch.
Insert the terminal into slot #13 on the connector. If you are planning to do a complete install, then leave the panel out as you will need to insert another terminal later. If you are not doing a complete install, push this panel back in. It will only close when the terminal has been inserted all the way.
Step 9:
Using 1 of your 3M Scotchlok, connect/tap the other end of your Rear–view Mirror Wire With Terminal into the dark green wire on the wiring harness of the sunroof button.
Step 10:
Use the electrical tape to tape up your wire tap to help protect it. When you finish this you can leave your sunroof button hanging out until Step 25.
Note: Step 11 – Step 23 are optional steps that are only required if you wish to do a complete install. They are used to add the extra connection which will bring the 12V signal from the reverse lights to the mirror. This is used to turn the auto–dim function off when you shift your vehicle into reverse. You can choose to skip these steps and not have this feature and the mirror will still function properly. I am not sure how useful this feature will actually be, but it is how it is installed on vehicles which come with this type of mirror, so for completeness I have included the steps to do this.
Step 11:
Remove the driver seat from the vehicle. To do this, use a 15mm socket to remove the two bolts which are located where the rear seat passenger’s feet would go.
With the bolts removed, pivot the driver seat forward and disconnect the plug on the bottom of the seat cushion.
Finally, lift and remove the seat from the vehicle.
Step 12:
Remove the trim which separates the door sill and the carpet. To do this, you must start at the rear and work forwards, pushing the bottom edge of the trim directly upwards to pop the clips out.
This picture shows the location of the clips to help you with the removal:
Step 13:
Remove the trim underneath the steering wheel. This will give you better access for running your wire to the roof. To remove this panel, start on the bottom right corner (closest to the radio/heating controls) and pull out. When you remove the left side of this trim (closest to the driver door), be careful not to pull too hard and damage your trunk release button. You will have to disconnect this button to fully remove the panel. Here is a picture showing the location of the clips to help with the removal:
And to disconnect the trunk release button:
Step 14:
Remove the A–pillar. To do this, pop the “Airbag” tab out and remove the T15 Torx screw from behind it.
Then, start from the top and work down towards the dash, pulling the A–pillar piece up, and out at the same time. Again there will be a bunch of clips which will have to pop out and can be difficult. When you get the piece removed, disconnected your boost gauge/RPD and set it aside.
Step 15:
Remove the driver side sun–visor. To do this, remove the three (3) T20 Torx screws from the left of the visor, and the single T20 Torx screw from the right clip.
Step 16:
Remove the trim around the driver side of your sunroof. To do this, simply pull it off.
Step 17:
Lift up the carpet and locate your wiring harness. You need to locate a light green wire, which is the reverse lights wire. This is it here:
**IMPORTANT**: I suggest you check to be 100% sure that you have the correct wire before you tap into it. You can check by inserting a needle through the insulation and into the wire. Then put your car into reverse and measure the voltage between the needle and a ground point. This will help to prevent taping into the wrong wire and causing problems.
Last edited by snoftall; 02-17-2011 at 12:16 PM.
 02-17-2011, 12:15 PM
#2
Member
Thread Starter
Join Date: 06-16-05
Location: Newfoundland
Posts: 318
Likes: 0
Received 0 Likes
on
0 Posts
Step 18:
Run your 9–10 feet of 18–22 gauge wire from your sunroof button in the headliner, down the A–pillar, and under the carpet. Once you get to the carpet, you can use your electrical tape to tape your new wire onto the existing wiring harness. This will keep it a clean and tidy job and help keep the wire from moving around.


Step 19:
Using 1 of your 3M Scotchlok, connect/tap into the light green wire on the wiring harness.
Step 20:
Use the electrical tape to tape up your wire tap to help protect it.
Step 21:
Put your carpet back as it was and reinstall your A–pillar, the sun–visor, the trim around the sunroof, the door sill trim, the trim panel under the steering wheel, and your seat by doing the reverse of how your removed them. Don’t forget to reconnect your boost gauge/RPD, the button for the trunk release, and your plug under the seat.
Step 22:
Now take the second of your Rear–view Mirror Wire With Terminal (GM Part # 13575548 which you picked up from www.CrateEngineDepot.com) and thread it up into the headliner the same as you did earlier. Again, try to follow the path that the existing rear–view mirror wiring harness takes. You will need to connect the two ends of the wires together now (the end of the wire you just ran from the reverse lights to the end of the Rear–view Mirror Wire With Terminal).
Step 23:
Insert the terminal of the Rear–view Mirror Wire With Terminal into slot #9 on the rear–view mirror connector. Hopefully you left that panel on the side of the connector out after Step 8. If you did not, then you will need to pop it out again. It will only pop out about 1/8 of an inch. Once it is popped out, insert the terminal into the connector.

Push the panel back in. It will only close when the terminal has been inserted all the way.
Step 24:
Now go back to the connector which plugs into the mirror. Run your new wire(s) alongside the existing wires and use your electrical tape to tape them all together to clean it up and make it look better.

Step 25:
Reinstall the sunroof button. Work the wires back up inside the headliner, making sure they do not get pinched by anything. Then push the front edge of the sunroof button up and in first, followed by the rear edge (again, the reverse of how you removed it). The rear edge will lock it back into place. Also reinstall the sunroof bezel/trim by simply snapping this piece back in place.
Step 26:
Take your new Auto Dim Rear–view Mirror with OnStar, Map Lights, & Compass (GM Part # 25812209 which you picked up from www.CrateEngineDepot.com) make sure the tip of the Torx screw is flush with its hole.

Slide the base of the mirror down onto the mounting hardware which was left on the windshield.

Tighten the Torx screw to secure the mirror to the windshield.
Step 27:
Plug the connector into the back of the mirror.
Step 28:
Reconnect your battery.
Step 29:
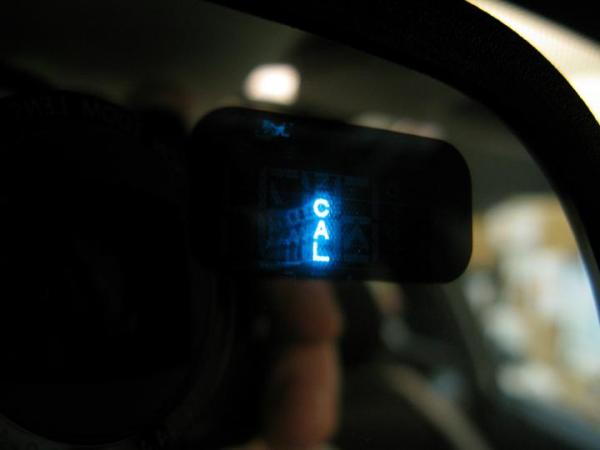
Now the compass needs to be calibrated. When you turn the mirror on for the first time, it will go into a calibration mode and display “CAL” in the window. To complete this step and calibrate the compass, simply drive in a circle 2 – 3 times. This allows the mirror to learn the North, East, South, & West directions and will then automatically start working. You should only have to do this calibration process once (i.e., you should not have to calibrate the mirror every time you start your vehicle!)
Step 30:
Enjoy your new mirror!!

Run your 9–10 feet of 18–22 gauge wire from your sunroof button in the headliner, down the A–pillar, and under the carpet. Once you get to the carpet, you can use your electrical tape to tape your new wire onto the existing wiring harness. This will keep it a clean and tidy job and help keep the wire from moving around.
Step 19:
Using 1 of your 3M Scotchlok, connect/tap into the light green wire on the wiring harness.
Step 20:
Use the electrical tape to tape up your wire tap to help protect it.
Step 21:
Put your carpet back as it was and reinstall your A–pillar, the sun–visor, the trim around the sunroof, the door sill trim, the trim panel under the steering wheel, and your seat by doing the reverse of how your removed them. Don’t forget to reconnect your boost gauge/RPD, the button for the trunk release, and your plug under the seat.
Step 22:
Now take the second of your Rear–view Mirror Wire With Terminal (GM Part # 13575548 which you picked up from www.CrateEngineDepot.com) and thread it up into the headliner the same as you did earlier. Again, try to follow the path that the existing rear–view mirror wiring harness takes. You will need to connect the two ends of the wires together now (the end of the wire you just ran from the reverse lights to the end of the Rear–view Mirror Wire With Terminal).
Step 23:
Insert the terminal of the Rear–view Mirror Wire With Terminal into slot #9 on the rear–view mirror connector. Hopefully you left that panel on the side of the connector out after Step 8. If you did not, then you will need to pop it out again. It will only pop out about 1/8 of an inch. Once it is popped out, insert the terminal into the connector.
Push the panel back in. It will only close when the terminal has been inserted all the way.
Step 24:
Now go back to the connector which plugs into the mirror. Run your new wire(s) alongside the existing wires and use your electrical tape to tape them all together to clean it up and make it look better.
Step 25:
Reinstall the sunroof button. Work the wires back up inside the headliner, making sure they do not get pinched by anything. Then push the front edge of the sunroof button up and in first, followed by the rear edge (again, the reverse of how you removed it). The rear edge will lock it back into place. Also reinstall the sunroof bezel/trim by simply snapping this piece back in place.
Step 26:
Take your new Auto Dim Rear–view Mirror with OnStar, Map Lights, & Compass (GM Part # 25812209 which you picked up from www.CrateEngineDepot.com) make sure the tip of the Torx screw is flush with its hole.
Slide the base of the mirror down onto the mounting hardware which was left on the windshield.
Tighten the Torx screw to secure the mirror to the windshield.
Step 27:
Plug the connector into the back of the mirror.
Step 28:
Reconnect your battery.
Step 29:
Now the compass needs to be calibrated. When you turn the mirror on for the first time, it will go into a calibration mode and display “CAL” in the window. To complete this step and calibrate the compass, simply drive in a circle 2 – 3 times. This allows the mirror to learn the North, East, South, & West directions and will then automatically start working. You should only have to do this calibration process once (i.e., you should not have to calibrate the mirror every time you start your vehicle!)
Step 30:
Enjoy your new mirror!!
 02-18-2011, 10:59 AM
#5
Member
Thread Starter
Join Date: 06-16-05
Location: Newfoundland
Posts: 318
Likes: 0
Received 0 Likes
on
0 Posts
However, you can still use this mirror. The OnStar buttons do not have to be functional. One thing you may want to check first is to make sure you have a 16-pin connector which plugs into the rear of the mirror. If you only have an 8-pin connector, this may not work for you.
*EDIT*
Did a quick search around and couldn't come up with anything. However, that doesn't mean there are none out there. I'm sure if you took the time to look back into some of the older GM vehicles (maybe 2000 - 2005 ish? or before OnStar came standard in the higher-end models) you will probably find one.
Last edited by snoftall; 02-18-2011 at 11:41 AM.
02-18-2011, 11:07 AM
#6
Member
Thread Starter
Join Date: 06-16-05
Location: Newfoundland
Posts: 318
Likes: 0
Received 0 Likes
on
0 Posts
This mirror is out of a 2008 HHR. There are a few different types of mirros which were used in the HHR. Some don't include the Auto-Dim feature, some don't inlcude the map lights on the bottom of the mirror, and some don't inlcude the compass. So make sure to double check that the mirror you pick up includes everyone you want! I also think this mirror may have been used in the Cadillac CTS, although I am not sure what year. Don't quote me on that one though.
02-27-2011, 08:06 PM
#8
Senior Member
iTrader: (4)

Join Date: 01-31-10
Location: Middletown,PA
Posts: 1,167
Likes: 0
Received 0 Likes
on
0 Posts
Another option is to do like i did if you don't need the lights or Onstar. I bought a $70 Auto dimming mirror from Amazon.com.
It's just a Auto dim. No compass or lights.
For power since I don't have a sunroof. I used a fuse tap on the sunroof fuse in the fusebox.
The factory plug from my On Star mirror i just stuffed up in the headliner.
It's just a Auto dim. No compass or lights.
For power since I don't have a sunroof. I used a fuse tap on the sunroof fuse in the fusebox.
The factory plug from my On Star mirror i just stuffed up in the headliner.
 02-28-2011, 07:19 AM
#11
Member
Thread Starter
Join Date: 06-16-05
Location: Newfoundland
Posts: 318
Likes: 0
Received 0 Likes
on
0 Posts
^ This. The hardest part will be to pick the wires apart under the carpet to find the right wire for the reverse lights...and that is only if you wanted to do a complete install...you can install this in probably 30 minutes if you were to just tap into the sunroof power. All you would really need to do then is remove the sunroof trim.
03-12-2011, 01:20 PM
#12
New Member

Join Date: 06-03-09
Location: Morris NJ (Parsippany)
Posts: 30
Likes: 0
Received 0 Likes
on
0 Posts
I am selling a 2006-2009 HHR Rear view mirror on ebay that i got from a local junk yard by me for over $90.00 and im selling it for way under that.. If anyone is interested in it please check it out here is the link. 2006-2008 HHR Rear View Mirror w/ Onstar, Auto Dim, Map - eBay (item 140522676042 end time Mar-19-11 00:02:40 PDT)
03-12-2011, 01:32 PM
#13
fack i wanted to do this a long time ago! sweet not for the auto dim, just for the compass...stupid gm thought the balt wasnt good enough for a compass unlink all their other cars i guess haha
and i dont wanna take away business from ced but that mirror is cheaper here http://www.gmpartsdirect.com
and i dont wanna take away business from ced but that mirror is cheaper here http://www.gmpartsdirect.com
GM PART # 25812209
CATEGORY: All
PACK QTY: 1
CORE CHARGE: $0.00
List Price: $273.36
Price: $164.59
You Save: $108.77 (40%)
DESCRIPTION: MIRROR
CATEGORY: All
PACK QTY: 1
CORE CHARGE: $0.00
List Price: $273.36
Price: $164.59
You Save: $108.77 (40%)
DESCRIPTION: MIRROR
Last edited by RooTBeeR; 03-12-2011 at 01:54 PM.
 03-15-2011, 08:04 PM
#15

The mirror from select Envoys, Trailblazers, Torrents, and Equinoxes (not new style) have auto-dim and no onstar.
Click me. You can see it has what appears to be the same type of connector on the back as the non-onstar Cobalt mirrors too, so it should work. But, does anyone know which pin spot you would have to use on that harness?
Edit: has no map lights...****
I would really like to do this, given all the people that think their HIDs in stock headlights are cool...
Nice write-up though!!!!!
Edit again: Found this. Might work. Hard to find them without the onstar buttons and with the map lights...
Last edited by 2.2balt; 03-15-2011 at 08:30 PM.
03-16-2011, 07:59 AM
#16
Member
Thread Starter
Join Date: 06-16-05
Location: Newfoundland
Posts: 318
Likes: 0
Received 0 Likes
on
0 Posts
From what I learned when I was researching this, the mirrors without OnStar on the Cobalts have an 8-pin connector. So if you were to add this mirror you would need to make sure you get the 16-pin connector with it and changed it over.
The first link 2.2balt posted looks like it has the 16-pin connector included with it.
The last link 2.2balt posted says it has a "7-pin connector", so this one might work. It doesn't actually show a good picture of the back of the mirror to see the connector though, so it is hard to tell. Also, I'm not sure if the base of this mirror will connect to our windshield mount because it looks to be a different shape.
Also, I don't know the pin-outs for the mirror without OnStar or the other mirrors posted. Sorry.
03-22-2011, 07:09 AM
#18
Member
Thread Starter
Join Date: 06-16-05
Location: Newfoundland
Posts: 318
Likes: 0
Received 0 Likes
on
0 Posts
However, you may be able to find the 16-pin connector at a salvage/junk yard and use that. Lot's of GM vehicles use this connector so it should be readily available. Then, you could run your own wires to the mirror from another power source (possibly from under the carpet) in the same way I show running the wire from the reverse lights (Step 11 – Step 23).
03-22-2011, 08:29 AM
#19
New Member

Join Date: 04-07-07
Location: IL
Posts: 108
Likes: 0
Received 0 Likes
on
0 Posts
I'm going to say it's slim to none. I was hoping my SS/TC was going to have the heated seat connectors sitting under the seat and behind the dash for a simple plug and play deal, but they were no where to be found.
However, you may be able to find the 16-pin connector at a salvage/junk yard and use that. Lot's of GM vehicles use this connector so it should be readily available. Then, you could run your own wires to the mirror from another power source (possibly from under the carpet) in the same way I show running the wire from the reverse lights (Step 11 – Step 23).
However, you may be able to find the 16-pin connector at a salvage/junk yard and use that. Lot's of GM vehicles use this connector so it should be readily available. Then, you could run your own wires to the mirror from another power source (possibly from under the carpet) in the same way I show running the wire from the reverse lights (Step 11 – Step 23).
 05-13-2011, 02:29 PM
#21
New Member
iTrader: (3)

Join Date: 05-06-11
Location: .
Posts: 84
Likes: 0
Received 0 Likes
on
0 Posts
Nice write up !!!
Worked out great, but I have on question.
Is the green light on the right side of the mirror for the ON Star? Mine is not on, it wasn't on before the install either, I was just wondering if this was an indicator that the ON Star is active or not?
Thanks
Scott
Worked out great, but I have on question.
Is the green light on the right side of the mirror for the ON Star? Mine is not on, it wasn't on before the install either, I was just wondering if this was an indicator that the ON Star is active or not?
Thanks
Scott
05-13-2011, 02:46 PM
#22
Senior Member
iTrader: (2)

Join Date: 06-23-09
Location: Chesterfield Missouri
Posts: 3,820
Likes: 0
Received 0 Likes
on
0 Posts
Ive always wanted one of these. Not sure if Im ready to drop 200+ on it right now. But nicely done. Didnt realize it would require removing that much stuff just to do that mirror though 
But looks great and great writeup!
But looks great and great writeup!
05-13-2011, 06:51 PM
#23
Member
Thread Starter
Join Date: 06-16-05
Location: Newfoundland
Posts: 318
Likes: 0
Received 0 Likes
on
0 Posts
Nice write up !!!
Worked out great, but I have on question.
Is the green light on the right side of the mirror for the ON Star? Mine is not on, it wasn't on before the install either, I was just wondering if this was an indicator that the ON Star is active or not?
Thanks
Scott
Worked out great, but I have on question.
Is the green light on the right side of the mirror for the ON Star? Mine is not on, it wasn't on before the install either, I was just wondering if this was an indicator that the ON Star is active or not?
Thanks
Scott
05-13-2011, 07:22 PM
#25

guys...
07-08 Chevrolet HHR Rear View Mirror OEM LKQ | eBay
25$
im gonna search and see if i can fin one with the same connector as ours, that would be nice, and i dont have OnStar as well.
07-08 Chevrolet HHR Rear View Mirror OEM LKQ | eBay
25$
im gonna search and see if i can fin one with the same connector as ours, that would be nice, and i dont have OnStar as well.

