2.0 LSJ Engine: "How to" Install Dual Pass Endplate w/o Removing Your Alternator
 03-20-2012, 12:29 PM
#1
"How to" Install Dual Pass Endplate w/o Removing Your Alternator
This is the "How To Guide" to end all "How to's" for installing any version of the dual pass endplate (GMR, ZZP, OTTP, Homemade, etc.) on the 05'-07' Chevrolet Cobalt SS Supercharged & 04'-07' Saturn Ion Redline. I myself chose the GMR endplate, because I'm going for a build that consists of mainly GMR & GMPP parts. I acquired my GMR endplate through ZZP for practically nothing when they were purchasing PCM's for in-store credit. Since I run the GMR Stage 3 PCM, I had my stock PCM laying around collecting dust. When I saw the offer for $200 in-store credit for my PCM, I jumped on the opportunity, and picked up the missing link to my GMR Stage 3 setup. Ok, enough of my rambling, and on to the install process....
Every thread, post, & comment I've seen dealing with the install of a dual pass endplate mentions removing the alternator to get to the "elusive" 8th bolt. Well, me being me, wanted to find an easy way to avoid that. I hate removing more parts than I have to during an install of any kind (see my thread: https://www.cobaltss.net/forums/how-...bumper-221176/). It just leads to more chances of something else going wrong. I also hate dealing with the serpentine belt setup on our cars, and finding a way to avoid messing with the belt was my objective. Well folks, I completed that objective, and want to provide you with the step by step procedure I performed to install my dual pass endplate w/o removing the alternator.
Tools you will need:
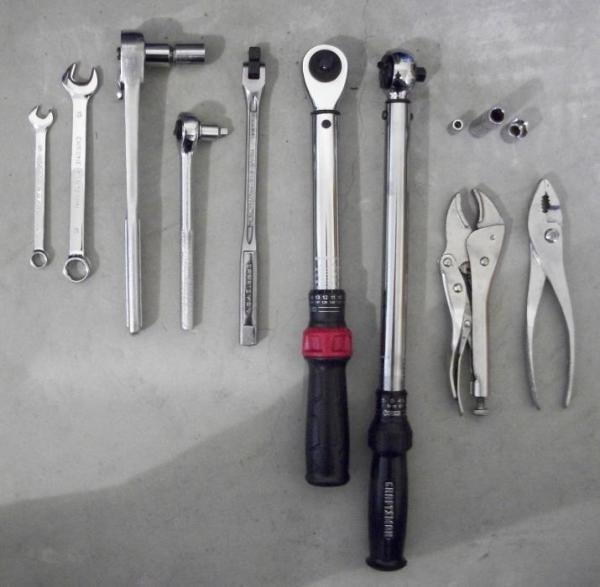
From left to right:
- 10mm open end wrench
- 15mm open end wrench
- 1/2" drive socket wrench w/ 15mm socket
- 3/8" drive short socket wrench
- 3/8" drive flex t-handle
- inch-lb torque wrench
- ft-lb torque wrench
- vice grips
- pliers
- 5.5mm socket (intake manifold studs)
- 10mm deep wall socket
- 13mm short wall socket (I.C. Pump Bracket Bolts)
Tools not shown in photo:
- Flat head screw driver
- 6mm hex bolt socket (supercharger hold down bolts)
- Extension
NOTE: I highly recommend placing all nuts/bolts in labled bags to keep track of everything. This will make re-installation much easier. (see photo below)

Step 1: Removing the Supercharger
- Disconnect your battery (use a 10mm socket & extension).
- Remove the vacuum lines, the supercharger inlet pressure sensor connection, & the throttle position sensor connection (found on throttle body).
- Ease tension to remove serpentine belt from the supercharger pulley.
- Tie belt up with "zip tie" in order to prevent it from falling off the A/C compressor pulley.
- Remove the four (4) 6mm supercharger hold down hex bolts.
- Carefully remove supercharger & supercharger to intake manifold gasket from intake manifold.
For additional information on removing/installing the supercharger (including detailed photos) see Chapter 4 of the LSJ Build Book found at the link below:
GMTunerSource.com - LSJ Build Book - LSJ Build Book
NOTE: Tape off your intake manifold to help prevent anything from falling in. (see photo below)
Step 2: Draining the coolant from the Heat Exchanger/Intake Manifold
- Jack car up (or use a lift), and make sure it is properly supported (E-brake, Block behind tire, Jack Stands, etc.). I used the good ol' floor jack method in my home garage.
- Place a medium sized tub/container under the car (directly below the I.C. Pump) to capture the coolant during the draining process. This can be messy!!
- Remove the cap from your intercooler fill neck, or Opt. B tank (if you have one). This helps the coolant drain quicker.
- Remove coolant line from I.C. Pump, and let her drain.
- Once completely drained, carefully remove tub/container (now filled with coolant) out from under the car, clean up any spills, and proceed back to the engine compartment.
Step 3: Removing the Intake Manifold w/o removing your Alternator
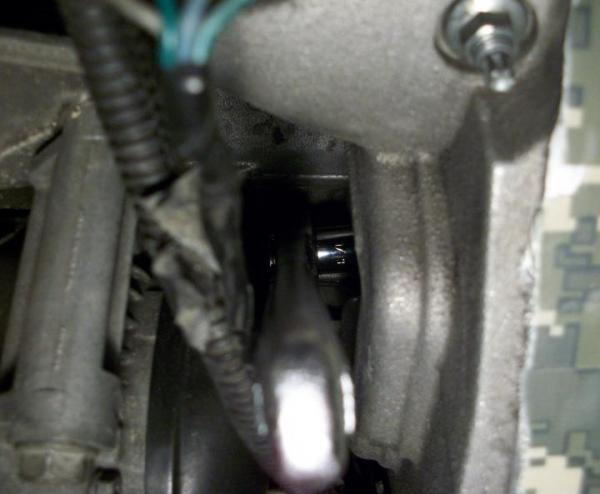
- Take a 1/2" drive or 3/8" drive socket wrench w/ 15mm socket, and place on the "elusive" 8th bolt as show in the above photo.
- Loosen the bolt until the ratchet action of the socket wrench wont pull the bolt out futher.
- Now take a 15mm open end wrench, and work the bolt out turn by turn. (Yes, this may seem like a pain, but like I said, I rather do this than remove more parts than I have to).
- Move up to the top of the intake manifold, disconnect the map sensor, and remove the remaining seven (7) 10mm bolts.
- The intake manifold & intake manifold gasket can now be removed.
Step 4: Removing & swaping the Laminova Cores
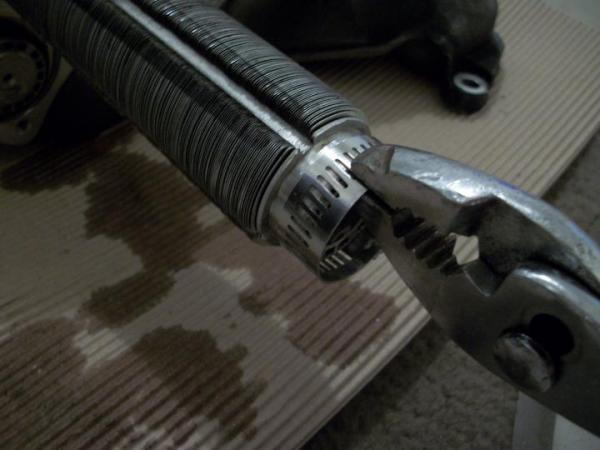
- Remove stock endplate from intake manifold by removing the seven (7) 10mm bolts.
- Place a worm gear clamp on the end of the two (2) bottom laminova cores, and remove with pliers as shown in the photo above.
NOTE: Never grip the end of the laminova core with a hard faced tool. This can cause permanent damage to the tube, and may lead to replacement.

- Place some fresh oil on the rubber o-ring washers before placing/rearranging the laminova cores back in the intake manifold. (as shown in the photo above)
NOTE: Take care not to damage/loose any of the rubber o-ring washers!!
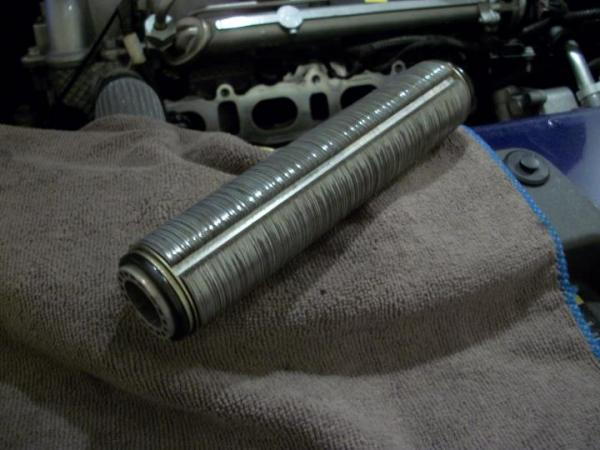
- Photo of a fully assembled laminova core above. (HANDLE WITH CARE)

- Swap the two (2) lower laminova cores so they look like the photo above.
NOTE: Make sure to lock the cores into place. To do so, gently (but firmly) press them down.
Step 5: Installing the Dual Pass Endplate
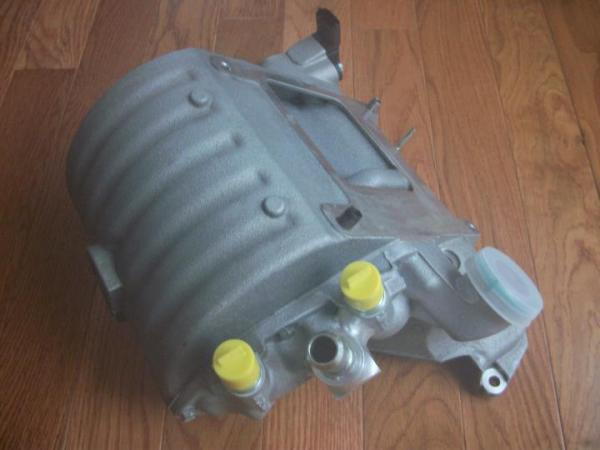
- Install new endplate gasket. (Make sure it is properly placed within the channel)
- Carefully place your dual pass endplate onto the intake manifold.
- Take the seven (7) 10mm bolts (hand start them), and torque them to 89 in-lbs.
- Your intake manifold should now look like the photo above.
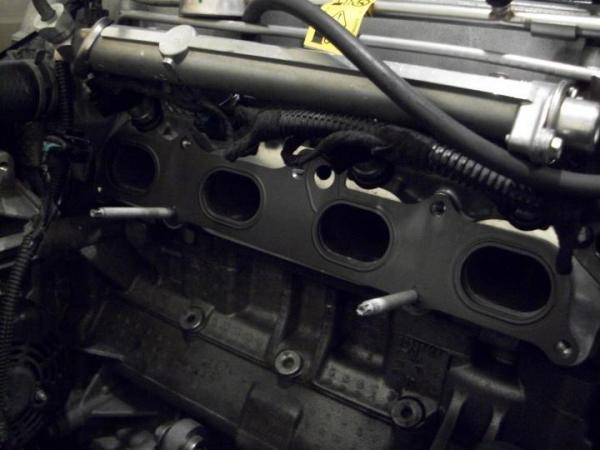
Step 6: Reinstalling the intake manifold
- Place a light dab of red loctite onto the threaded end of the two (2) intake manifold studs.
- Install the two (2) intake manifold studs (start by hand).
- Carefully torque the two (2) intake manifold studs to 44 in-lbs.
- Install intake manifold gasket.
NOTE: You can re-use your original intake manifold gasket if it looks to be in good shape/not damaged. I personally chose to purchase a new one, because I'm ****, and like to use brand new gaskets.
- Take the intake manifold, and carefully slide it onto the two (2) intake manifold studs.
- Hand start two (2) 10mm intake manifold bolts to hold the manifold in place.
- Start the "elusive" 8th bolt, but do not tighten.
- Hand start the remaining five (5) 10mm intake manifold bolts.
- Torque the seven (7) 10mm intake manifold bolts to 16 ft-lbs. (See the link below for the proper torque sequence)
- Tighten the "elusive" 8th bolt. (Tighten it the same way you took it off.... Start with the 15mm open end wrench, followed by the 15mm socket wrench to finish it off)
- Reconnect the map sensor.
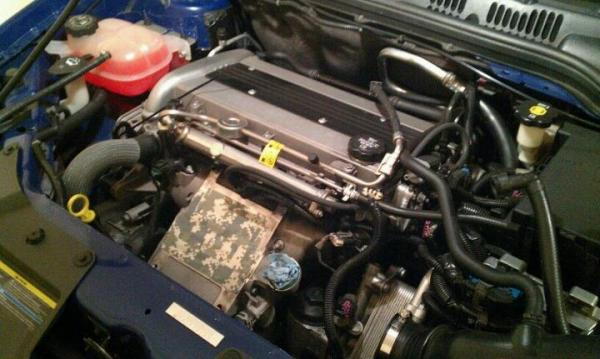
- Your intake manifold/engine bay should now look like the photo below.

For additional information on removing/installing the intake manifold see the link below:
http://www.crateenginedepot.com/pdfs/sidekit.pdf
Step 7: Running the coolant lines
I'm not going to get into great detail about this, because there is info on this all over the site. I will provide some photos of what I did, along with the link to the coolant line diagram I used.
Photos of my coolant line plumbing (see below):

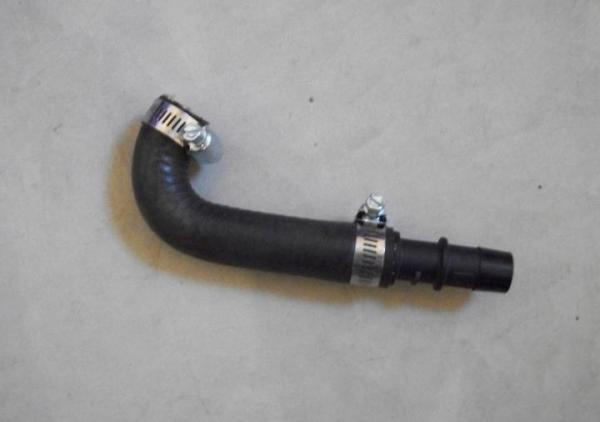

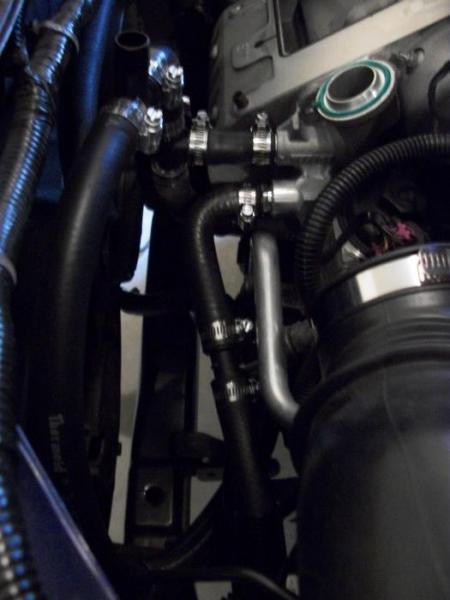
Purchase around 10ft of 3/4" heater hose if you plan on running Option B with your Dual Pass Endplate.
Link to the diagram I used to run my lines (see below):
http://www.zzperformance.com/miscftp/HE%20routing2.jpg
Step 8: Reinstall the supercharger
- See the link in "Step 1" for reinstallation of the supercharger.
Step 9: Fill with 50/50 Dexcool mix
- You can purchase pre-diluted 50/50 Dexcool mixtures at any Advance Auto or Auto Zone.
Step 10: Start Up / Test Drive
- Your engine bay should now look similar to the photos below.


- Inspect all coolant lines for leaks.
- Make sure coolant is bled properly (very easy if you have Option B).
- Go for a test drive & log your IAT2's.
- Enjoy!!
Review
All in all, this is a great modification, and I'm very happy with the results. IAT2's hover around 15*F (+/-) above IAT1 while cruising, the temps don't rise as fast, and they drop almost immediately after a pull. The immediate recovery of IAT2 is the biggest benefit of the dual pass endplate, and I highly recommend this modification to anyone. It really works!!
Install Issues
Issue #1:
After finishing the install, I started the car up, and had wild idle issues. The revs were pinned around 1500-2000rpm, and would randomly drop and almost stall. This told me I had a vac leak somewhere. After further inspection, I found some of the tape I used for covering the intake manifold sticking out between the bottom of the blower and manifold. I couldn't believe I allowed that to happen considering I took my time installing everything. It must have got stuck to the bottom of the blower when I set it down before installing it to the intake manifold. Anyways, I loosend the supercharger hold down bolts, and was able to get the tape out w/o entirely removing the blower. After I torque the blower bolts back to spec, I started the car back up, and everything was working great!
Issue #2:
A day after I got the car running, I noticed a small puddle of coolant on the garage floor. My stomach sank.... I've heard horror stories of the o-rings on the laminova cores leaking after installing dual pass endplates. I checked my exhaust to see if I cold see or smell coolant, but everything seemed fine. This led me to believe the cores werent leaking (thankfully). So, I jacked the car up, and started inspecting the issue further. I noticed a small trickle of coolant running down the edge of the endplate. My stomach sank even further now!! I figured this confirmed the endplate was leaking, and I would be removing everything all over again. I dreaded the thought, and decided to inspect a little bit more. Finally, I found where the coolant was actually leaking from!! It was leaking from the top nipple on the dual pass endplate. I had the hose clamp positioned too far towards the end, and this allowed the hose to seep coolant. After positioning the clamp back from the edge of the heater hose, my leak stop completely. I was so relieved, and everything has been great since!!
Recommendations
I highly recommend taking your time on this install. I performed the install over the course of 3 weeks while my car was parked for the winter. I could have done this in one day, but had much better results doing a little bit each day (when I had time). I didn't get pissed off as much, and things went much smoother. One of the most tedious tasks was running the coolant lines. I wanted my coolant lines to look like the ones found in the GMR Dual Pass Endplate instructions. I used some of the orginal heater hose used for the intercooling system when I needed to make sharp bends, because most of the stock heater hose is preformed. Take extra time here, and make sure you have no kinks or sharp bends. You want the coolant to flow as smooth as possible.
Every thread, post, & comment I've seen dealing with the install of a dual pass endplate mentions removing the alternator to get to the "elusive" 8th bolt. Well, me being me, wanted to find an easy way to avoid that. I hate removing more parts than I have to during an install of any kind (see my thread: https://www.cobaltss.net/forums/how-...bumper-221176/). It just leads to more chances of something else going wrong. I also hate dealing with the serpentine belt setup on our cars, and finding a way to avoid messing with the belt was my objective. Well folks, I completed that objective, and want to provide you with the step by step procedure I performed to install my dual pass endplate w/o removing the alternator.
Tools you will need:
From left to right:
- 10mm open end wrench
- 15mm open end wrench
- 1/2" drive socket wrench w/ 15mm socket
- 3/8" drive short socket wrench
- 3/8" drive flex t-handle
- inch-lb torque wrench
- ft-lb torque wrench
- vice grips
- pliers
- 5.5mm socket (intake manifold studs)
- 10mm deep wall socket
- 13mm short wall socket (I.C. Pump Bracket Bolts)
Tools not shown in photo:
- Flat head screw driver
- 6mm hex bolt socket (supercharger hold down bolts)
- Extension
NOTE: I highly recommend placing all nuts/bolts in labled bags to keep track of everything. This will make re-installation much easier. (see photo below)
Step 1: Removing the Supercharger
- Disconnect your battery (use a 10mm socket & extension).
- Remove the vacuum lines, the supercharger inlet pressure sensor connection, & the throttle position sensor connection (found on throttle body).
- Ease tension to remove serpentine belt from the supercharger pulley.
- Tie belt up with "zip tie" in order to prevent it from falling off the A/C compressor pulley.
- Remove the four (4) 6mm supercharger hold down hex bolts.
- Carefully remove supercharger & supercharger to intake manifold gasket from intake manifold.
For additional information on removing/installing the supercharger (including detailed photos) see Chapter 4 of the LSJ Build Book found at the link below:
GMTunerSource.com - LSJ Build Book - LSJ Build Book
NOTE: Tape off your intake manifold to help prevent anything from falling in. (see photo below)
Step 2: Draining the coolant from the Heat Exchanger/Intake Manifold
- Jack car up (or use a lift), and make sure it is properly supported (E-brake, Block behind tire, Jack Stands, etc.). I used the good ol' floor jack method in my home garage.
- Place a medium sized tub/container under the car (directly below the I.C. Pump) to capture the coolant during the draining process. This can be messy!!
- Remove the cap from your intercooler fill neck, or Opt. B tank (if you have one). This helps the coolant drain quicker.
- Remove coolant line from I.C. Pump, and let her drain.
- Once completely drained, carefully remove tub/container (now filled with coolant) out from under the car, clean up any spills, and proceed back to the engine compartment.
Step 3: Removing the Intake Manifold w/o removing your Alternator
- Take a 1/2" drive or 3/8" drive socket wrench w/ 15mm socket, and place on the "elusive" 8th bolt as show in the above photo.
- Loosen the bolt until the ratchet action of the socket wrench wont pull the bolt out futher.
- Now take a 15mm open end wrench, and work the bolt out turn by turn. (Yes, this may seem like a pain, but like I said, I rather do this than remove more parts than I have to).
- Move up to the top of the intake manifold, disconnect the map sensor, and remove the remaining seven (7) 10mm bolts.
- The intake manifold & intake manifold gasket can now be removed.
Step 4: Removing & swaping the Laminova Cores
- Remove stock endplate from intake manifold by removing the seven (7) 10mm bolts.
- Place a worm gear clamp on the end of the two (2) bottom laminova cores, and remove with pliers as shown in the photo above.
NOTE: Never grip the end of the laminova core with a hard faced tool. This can cause permanent damage to the tube, and may lead to replacement.
- Place some fresh oil on the rubber o-ring washers before placing/rearranging the laminova cores back in the intake manifold. (as shown in the photo above)
NOTE: Take care not to damage/loose any of the rubber o-ring washers!!
- Photo of a fully assembled laminova core above. (HANDLE WITH CARE)
- Swap the two (2) lower laminova cores so they look like the photo above.
NOTE: Make sure to lock the cores into place. To do so, gently (but firmly) press them down.
Step 5: Installing the Dual Pass Endplate
- Install new endplate gasket. (Make sure it is properly placed within the channel)
- Carefully place your dual pass endplate onto the intake manifold.
- Take the seven (7) 10mm bolts (hand start them), and torque them to 89 in-lbs.
- Your intake manifold should now look like the photo above.
Step 6: Reinstalling the intake manifold
- Place a light dab of red loctite onto the threaded end of the two (2) intake manifold studs.
- Install the two (2) intake manifold studs (start by hand).
- Carefully torque the two (2) intake manifold studs to 44 in-lbs.
- Install intake manifold gasket.
NOTE: You can re-use your original intake manifold gasket if it looks to be in good shape/not damaged. I personally chose to purchase a new one, because I'm ****, and like to use brand new gaskets.
- Take the intake manifold, and carefully slide it onto the two (2) intake manifold studs.
- Hand start two (2) 10mm intake manifold bolts to hold the manifold in place.
- Start the "elusive" 8th bolt, but do not tighten.
- Hand start the remaining five (5) 10mm intake manifold bolts.
- Torque the seven (7) 10mm intake manifold bolts to 16 ft-lbs. (See the link below for the proper torque sequence)
- Tighten the "elusive" 8th bolt. (Tighten it the same way you took it off.... Start with the 15mm open end wrench, followed by the 15mm socket wrench to finish it off)
- Reconnect the map sensor.
- Your intake manifold/engine bay should now look like the photo below.
For additional information on removing/installing the intake manifold see the link below:
http://www.crateenginedepot.com/pdfs/sidekit.pdf
Step 7: Running the coolant lines
I'm not going to get into great detail about this, because there is info on this all over the site. I will provide some photos of what I did, along with the link to the coolant line diagram I used.
Photos of my coolant line plumbing (see below):
Purchase around 10ft of 3/4" heater hose if you plan on running Option B with your Dual Pass Endplate.
Link to the diagram I used to run my lines (see below):
http://www.zzperformance.com/miscftp/HE%20routing2.jpg
Step 8: Reinstall the supercharger
- See the link in "Step 1" for reinstallation of the supercharger.
Step 9: Fill with 50/50 Dexcool mix
- You can purchase pre-diluted 50/50 Dexcool mixtures at any Advance Auto or Auto Zone.
Step 10: Start Up / Test Drive
- Your engine bay should now look similar to the photos below.
- Inspect all coolant lines for leaks.
- Make sure coolant is bled properly (very easy if you have Option B).
- Go for a test drive & log your IAT2's.
- Enjoy!!
Review
All in all, this is a great modification, and I'm very happy with the results. IAT2's hover around 15*F (+/-) above IAT1 while cruising, the temps don't rise as fast, and they drop almost immediately after a pull. The immediate recovery of IAT2 is the biggest benefit of the dual pass endplate, and I highly recommend this modification to anyone. It really works!!
Install Issues
Issue #1:
After finishing the install, I started the car up, and had wild idle issues. The revs were pinned around 1500-2000rpm, and would randomly drop and almost stall. This told me I had a vac leak somewhere. After further inspection, I found some of the tape I used for covering the intake manifold sticking out between the bottom of the blower and manifold. I couldn't believe I allowed that to happen considering I took my time installing everything. It must have got stuck to the bottom of the blower when I set it down before installing it to the intake manifold. Anyways, I loosend the supercharger hold down bolts, and was able to get the tape out w/o entirely removing the blower. After I torque the blower bolts back to spec, I started the car back up, and everything was working great!
Issue #2:
A day after I got the car running, I noticed a small puddle of coolant on the garage floor. My stomach sank.... I've heard horror stories of the o-rings on the laminova cores leaking after installing dual pass endplates. I checked my exhaust to see if I cold see or smell coolant, but everything seemed fine. This led me to believe the cores werent leaking (thankfully). So, I jacked the car up, and started inspecting the issue further. I noticed a small trickle of coolant running down the edge of the endplate. My stomach sank even further now!! I figured this confirmed the endplate was leaking, and I would be removing everything all over again. I dreaded the thought, and decided to inspect a little bit more. Finally, I found where the coolant was actually leaking from!! It was leaking from the top nipple on the dual pass endplate. I had the hose clamp positioned too far towards the end, and this allowed the hose to seep coolant. After positioning the clamp back from the edge of the heater hose, my leak stop completely. I was so relieved, and everything has been great since!!
Recommendations
I highly recommend taking your time on this install. I performed the install over the course of 3 weeks while my car was parked for the winter. I could have done this in one day, but had much better results doing a little bit each day (when I had time). I didn't get pissed off as much, and things went much smoother. One of the most tedious tasks was running the coolant lines. I wanted my coolant lines to look like the ones found in the GMR Dual Pass Endplate instructions. I used some of the orginal heater hose used for the intercooling system when I needed to make sharp bends, because most of the stock heater hose is preformed. Take extra time here, and make sure you have no kinks or sharp bends. You want the coolant to flow as smooth as possible.
Last edited by Staged07SS; 06-08-2012 at 10:44 AM.
 03-28-2012, 09:31 AM
#3

I will be using this.
I have had my dual pass sitting out for over a year, heat exchanger is mounted, no hoses ran..
I have the hoses, just been lazy, waiting for my new ic pump to get here and I'll do it all in one sitting.. I just don't like putting the tvs back on. LOL
I have had my dual pass sitting out for over a year, heat exchanger is mounted, no hoses ran..
I have the hoses, just been lazy, waiting for my new ic pump to get here and I'll do it all in one sitting.. I just don't like putting the tvs back on. LOL
 03-28-2012, 09:35 AM
#5
I figured I would add my install issues to the thread to keep people aware of things that "can" happen during the install, and how to pin point the problem.
Thanks


 03-28-2012, 09:50 AM
#11
Yeah, I was putting this install off for years, because I didn't want to get into a big job. When you take your time, and go through all the steps you will find it's really not that hard. I recommend really looking over all the links I provided, and then using my how to as a guide to help you along.
 03-28-2012, 10:41 AM
#17
I've been keeping up with the cleaning of my engine bay since I purchased her brand new in 07'. I obviously don't have a flashy engine bay, but I like to keep it looking neat & clean
Last edited by Staged07SS; 03-28-2012 at 11:47 AM.
04-10-2012, 10:29 AM
#18
Senior Member


great write up, while everything is apart, you might aswell add the zzp phenolic spacer, it worx well and complements the rest of the cooling mods when done proper like this job.
good work as always mang.
good work as always mang.
04-10-2012, 09:00 PM
#20
Platinum Member
iTrader: (2)

Join Date: 07-01-09
Location: Ontario, Canada
Posts: 229
Likes: 0
Received 0 Likes
on
0 Posts
Ok.. I'm curious.. How much time do you figured you saved by not removing the alternator??
I had the charger off on Good Friday.. but after taking about 10-15 minutes just to find that stupid "elusive 8th bolt", I wasn't about get too involved... lol..
I know.. sounds like I made it half way and turned around, but it was a holiday and the beer was calling... loudly.. lol
I'm goin to a bud's shop with proper tools and having at it next week to install the Phenolic Spacer.. Just wondering what kind of time saved we're talkin here??
 04-11-2012, 07:10 AM
#22
Ok.. I'm curious.. How much time do you figured you saved by not removing the alternator??
I had the charger off on Good Friday.. but after taking about 10-15 minutes just to find that stupid "elusive 8th bolt", I wasn't about get too involved... lol..
I know.. sounds like I made it half way and turned around, but it was a holiday and the beer was calling... loudly.. lol
I'm goin to a bud's shop with proper tools and having at it next week to install the Phenolic Spacer.. Just wondering what kind of time saved we're talkin here??
I had the charger off on Good Friday.. but after taking about 10-15 minutes just to find that stupid "elusive 8th bolt", I wasn't about get too involved... lol..
I know.. sounds like I made it half way and turned around, but it was a holiday and the beer was calling... loudly.. lol
I'm goin to a bud's shop with proper tools and having at it next week to install the Phenolic Spacer.. Just wondering what kind of time saved we're talkin here??
I like to make things look neat & clean.
I'll let you in on a little secret, use some of the stock 3/4" hose. The pre-bent hose works wonders for tight turns, and avoiding pinches.
Last edited by Staged07SS; 04-11-2012 at 09:51 AM.
