Exhaust: HOW TO INSTALL header and down pipe TO A COBALT
 01-20-2008, 03:09 PM
#1
New Member
Thread Starter

Join Date: 07-13-06
Location: lala land
Posts: 45
Likes: 0
Received 0 Likes
on
0 Posts
HOW TO INSTALL header and down pipe TO A COBALT
i take no resposiblity for damages or you being not responsible.
TOOLS NEEDED:
13MM DEEP SOCKET
15MM DEEP SOCKET
13MM RACHET OPEN BOX ENDWRENCH
15MM RACHET OPEN BOX END WRENCH
LIQUID WRENCH
PROPANE TORCH (IF NECCESSARY)
BREAKER BAR
JACK AND STANDS ( BE VERY CAREFUL WHILE JACKING)
EXTENDER AND RACHET
LIGHTS
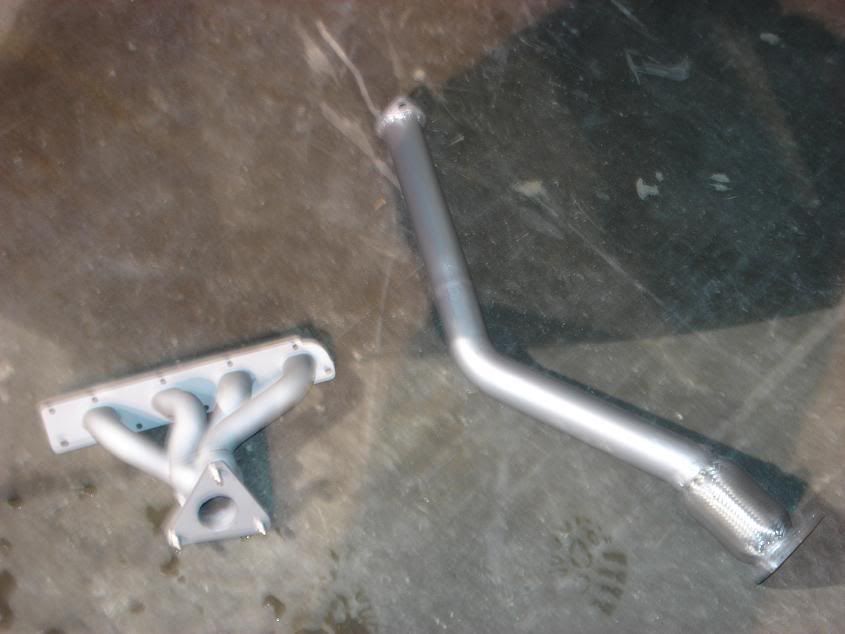
HERE IS WHAT WE ARE INSTALLING:
STEP 1:
GET YOUR STUFF READY AND JACK THE CAR FROM THE FRONT END AND PLACE YOUR JACK STANDS ON THE APPROPRIATE PLACES. I THINK THERE IS A HOW TO JACK HERE SOMEWHERE. SORRY NO PICS ON JACKING
STEP2
remove stuff out of your way and do whatever helps you to remember where it goes. i removed my hoses on top and my strutbar (not shown) and the heat sheild.
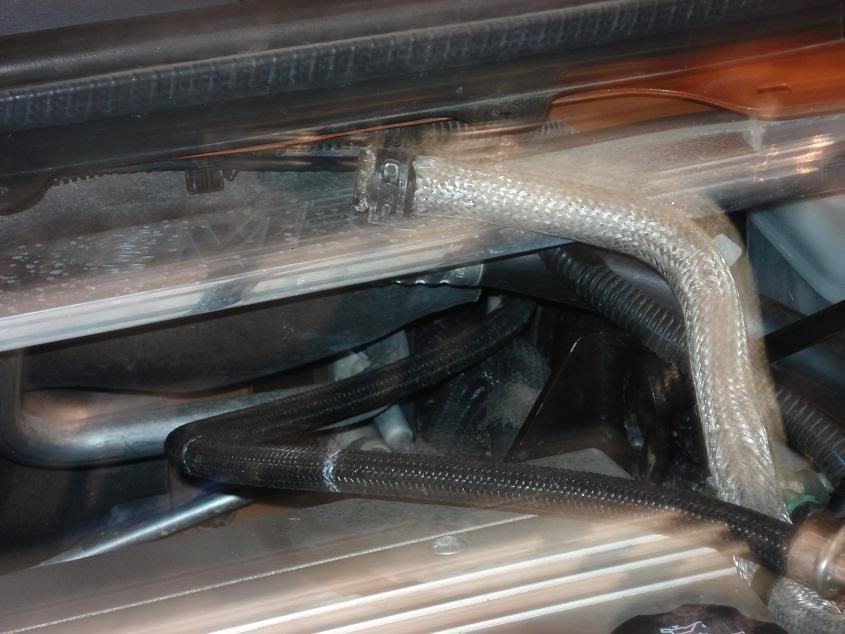
above hose for pvc right side.
pushed the left side to the left. note there are 2 bolts to remove to do this, just look at your car to see.

here is the heat sheild 3bolts 13mm and one is on stock manifold and 2 on block. NOTE: WHEN YOU PUT THIS BACK ON THE BOLT ON THE MANIFOLD NO LONGER IS NEEDED FOR THE HEADERS.
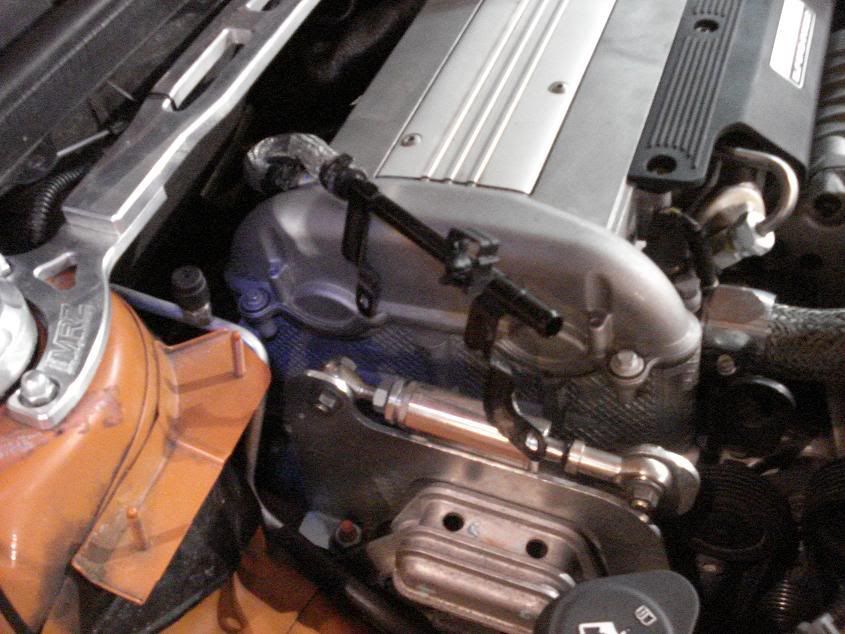
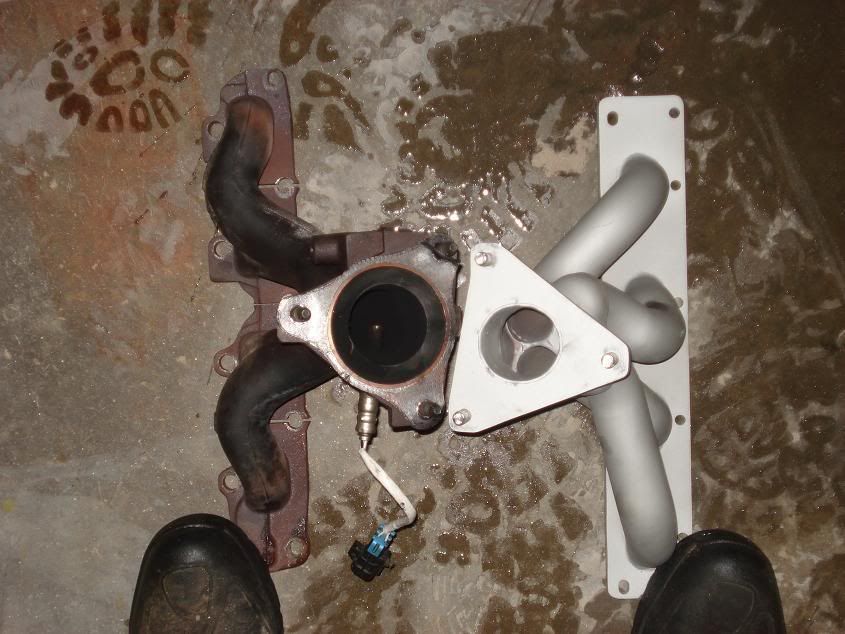
HERE IS A ABOVE IMAGE OF THE MANIFOLD WITH THE HEAT SHEILD REMOVED
STEP 3
BEFORE YOU UNBOLT LOOK FOR YOUR OXYGEN SENSORS AND THE PRE MANIFOLD SENSOR DISCONTECT AND REMOVE AFTER YOU TAKE OUT THE MANIFOLD AND DOWN PIPE.
STEP 4
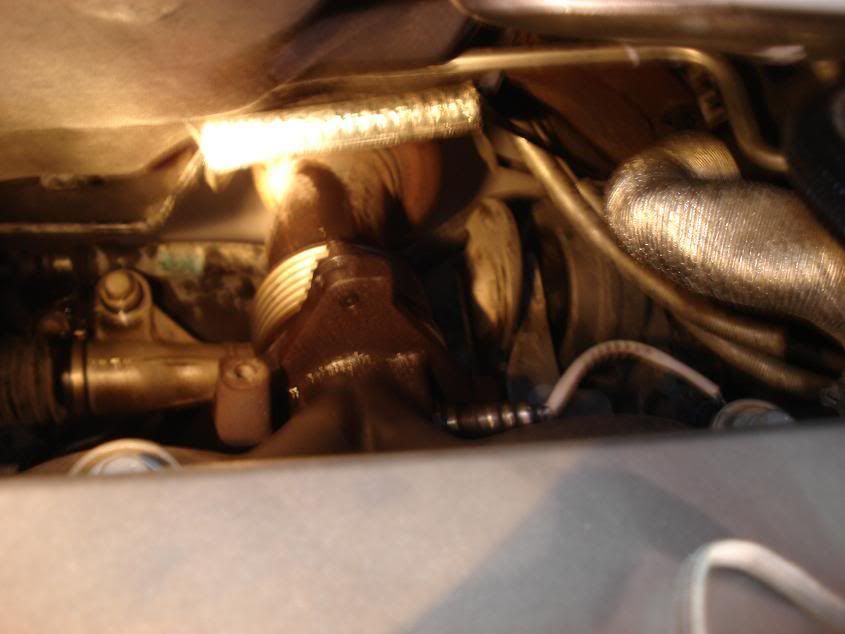
NOW THAT IS DONE CRAWL UNDER OR SLIDE AND START REMOVING THE 10, 13MM BOLTS THAT HOLD YOUR MANIFOLD TO THE BLOCK AND THE 3, 15MM BOLTS THAT HOLD YOUR DOWN PIPE TO THE MANIFOLD

MANIFOLD I USED THE DEEP SOCKETS AND EXTENDER(WHEN NEEDED)
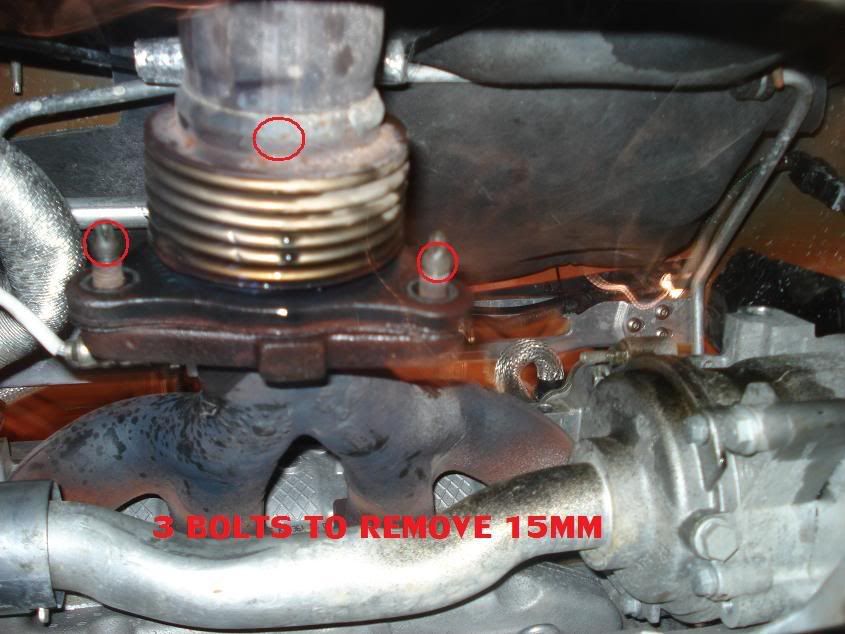
HERE I USED THE 15MM DEEP SOCKET ON THE THREE BOLTS.
STEP 5
THIS I HAVE NO PICTURES OF. REMOVE THE 2 BOLTS NEAR THE REAR OF THE STOCK DOWN PIPE. THESE BOLTS WHERE THE ONLY ONES ON MY CAR THAT GAVE ME TROUBLE. I USED LIQUID WRENCH LET IT SOAK AND TRIIED, DIDN'T WORK. SO I THAN TRIED MY LITTLE TORCH TO HEAT THEM UP AND THAT WORKED WITH A LITTLE MUSCEL AND ELBOW GREASE. BE VERY CAREFUL WHEN YOU USE A TORCH AND WHEN NEEDING TO BUST A COUPLE OF NUTS WITH MUSCEL BECAUSE JACK STANDS COULD FALL AND YOU GET HURT AND WITH THE TORCH USE LOWEST SETTING AND TRY NOT TO BURN THINGS.
STEP 6
TAKE A BREAK AND REMOVE ALL THE STOCK CRAP. REPAIR YOUR BUSTED KNUCKLES.
STEP 7
INSTALL NEW STUFF IN REVERSE.
SIDE NOTES:
OKAY I RAN INTO TROUBLE TRING TO INSTALL HEADERS BOLTS WHERE A ASS HAIR APART SO WOULDN'T MOUNT TO ENGINE BLOCK. SOLUTION WAS MAKE HEADER HOLES AN ASS HAIR WIDER TO SLIDE ON EASY TO THE BLOCK.
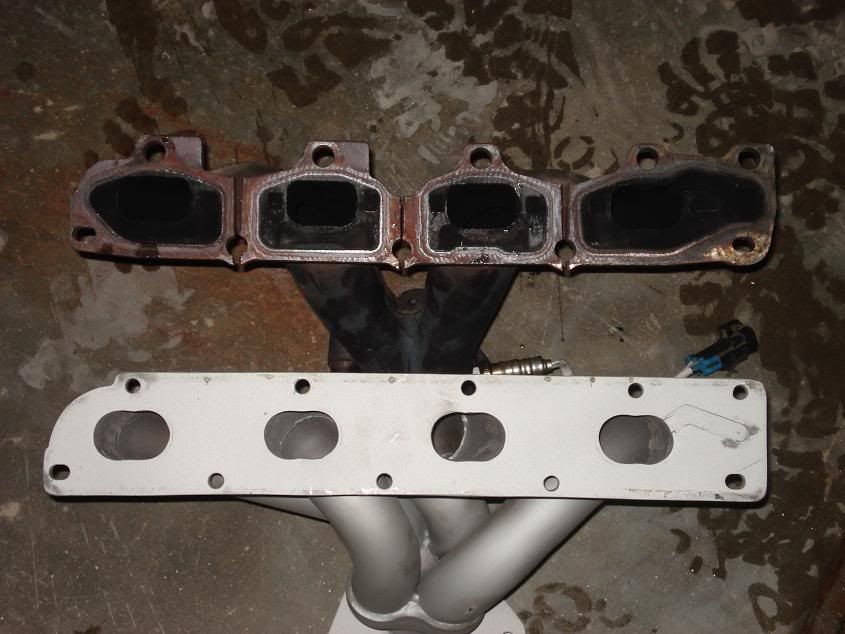
ALSO LOOK AT THE DIFFERENCE.
WHEN I REMOVED OXYGEN SENSORS THEY DIDN'T CLIP OFF THE BODY TO WELL SO I SNIPPED THEM OFF AND REATTACHED THEM WITH ZIP TIES.
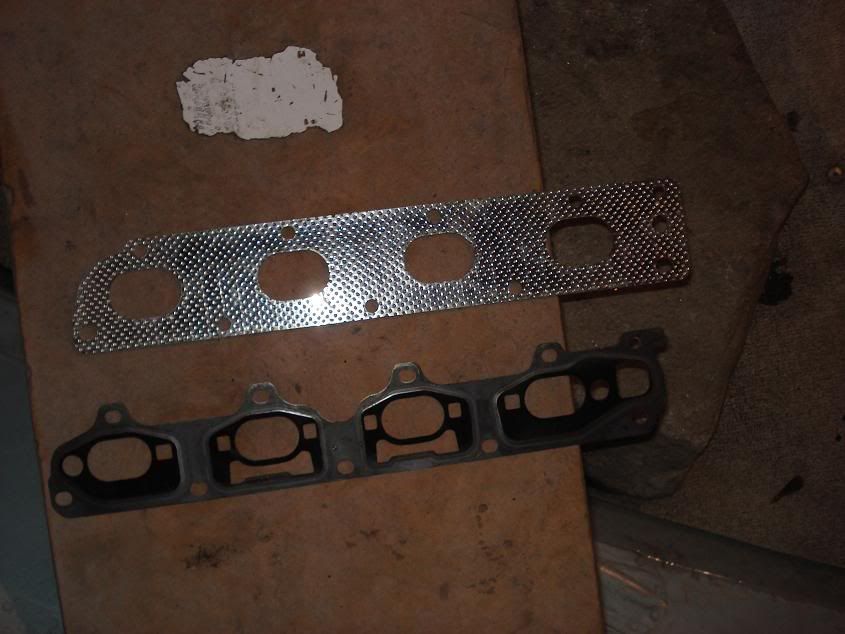
MY HEADERS NEEDED NO NEW BOLTS AND NUTS USED FACTORY ONES, HOW EVER THE BOLTS AND NUTS FOR THE DOWNPIPE TO ATTACH TO THE HEADERS WERE. GASKETS WHERE ALL REPLACED WITH NEW ONES SUPPLIED.
I FOUND IT EASY TO INSTALL HEADERS WITH THOSE OPEN END RACHET WRENCHS SENSE THOSE NUTS ARE A LITTLE HARD TO GET AT. IN SOME PLACES.
DON'T USE ANY GASKET MAKER MAY CAUSE LEAKS.
AFTER YOU'RE SATISFIED WITH YOUR HEADERS AND MOUNTED CHECK FOR LEAKS AND LET COOL DOWN. ALSO RECHECK BOLTS AFTER COOL DOWN AND TIGHTEN IF NEEDED.
TAKE YOUR TIME IF YOU'RE CRAWLING AROUND IT TAKES TIME AND SOME TIMES A LITTLE THOUGHT TO GET YOU OUT OF JAMS AND PROBLEMS. REMEMBER THIS IS FUN
HERE ARE SOME PICTURES TO SHOW YOU WHAT THE STOCK TO THE NEW LOOK LIKE
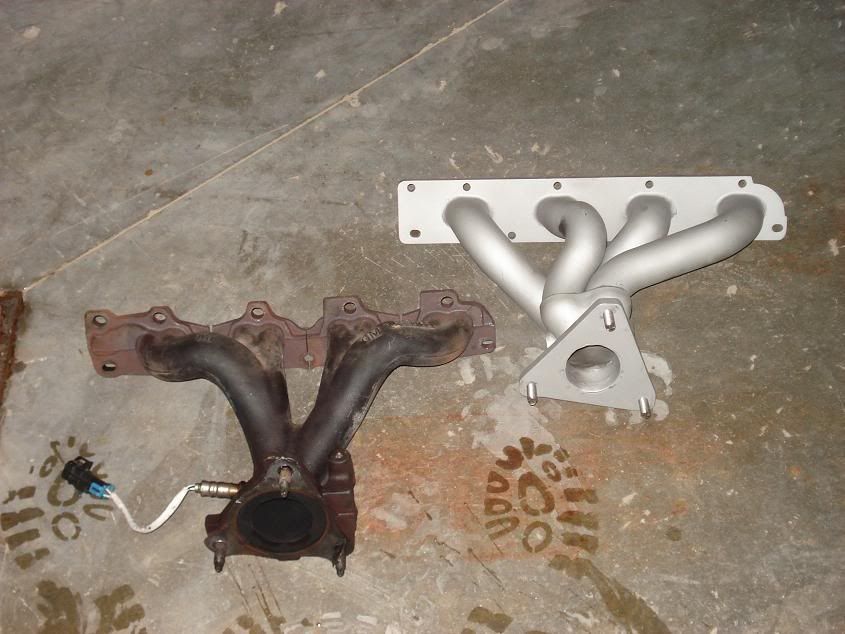
DIDN'T GO WITH FLASH JUST PAINTED STAINLESS STEEL STILL LOOKS BETTER
TOOLS NEEDED:
13MM DEEP SOCKET
15MM DEEP SOCKET
13MM RACHET OPEN BOX ENDWRENCH
15MM RACHET OPEN BOX END WRENCH
LIQUID WRENCH
PROPANE TORCH (IF NECCESSARY)
BREAKER BAR
JACK AND STANDS ( BE VERY CAREFUL WHILE JACKING)
EXTENDER AND RACHET
LIGHTS
HERE IS WHAT WE ARE INSTALLING:
STEP 1:
GET YOUR STUFF READY AND JACK THE CAR FROM THE FRONT END AND PLACE YOUR JACK STANDS ON THE APPROPRIATE PLACES. I THINK THERE IS A HOW TO JACK HERE SOMEWHERE. SORRY NO PICS ON JACKING
STEP2
remove stuff out of your way and do whatever helps you to remember where it goes. i removed my hoses on top and my strutbar (not shown) and the heat sheild.
above hose for pvc right side.
pushed the left side to the left. note there are 2 bolts to remove to do this, just look at your car to see.
here is the heat sheild 3bolts 13mm and one is on stock manifold and 2 on block. NOTE: WHEN YOU PUT THIS BACK ON THE BOLT ON THE MANIFOLD NO LONGER IS NEEDED FOR THE HEADERS.
HERE IS A ABOVE IMAGE OF THE MANIFOLD WITH THE HEAT SHEILD REMOVED
STEP 3
BEFORE YOU UNBOLT LOOK FOR YOUR OXYGEN SENSORS AND THE PRE MANIFOLD SENSOR DISCONTECT AND REMOVE AFTER YOU TAKE OUT THE MANIFOLD AND DOWN PIPE.
STEP 4
NOW THAT IS DONE CRAWL UNDER OR SLIDE AND START REMOVING THE 10, 13MM BOLTS THAT HOLD YOUR MANIFOLD TO THE BLOCK AND THE 3, 15MM BOLTS THAT HOLD YOUR DOWN PIPE TO THE MANIFOLD
MANIFOLD I USED THE DEEP SOCKETS AND EXTENDER(WHEN NEEDED)
HERE I USED THE 15MM DEEP SOCKET ON THE THREE BOLTS.
STEP 5
THIS I HAVE NO PICTURES OF. REMOVE THE 2 BOLTS NEAR THE REAR OF THE STOCK DOWN PIPE. THESE BOLTS WHERE THE ONLY ONES ON MY CAR THAT GAVE ME TROUBLE. I USED LIQUID WRENCH LET IT SOAK AND TRIIED, DIDN'T WORK. SO I THAN TRIED MY LITTLE TORCH TO HEAT THEM UP AND THAT WORKED WITH A LITTLE MUSCEL AND ELBOW GREASE. BE VERY CAREFUL WHEN YOU USE A TORCH AND WHEN NEEDING TO BUST A COUPLE OF NUTS WITH MUSCEL BECAUSE JACK STANDS COULD FALL AND YOU GET HURT AND WITH THE TORCH USE LOWEST SETTING AND TRY NOT TO BURN THINGS.
STEP 6
TAKE A BREAK AND REMOVE ALL THE STOCK CRAP. REPAIR YOUR BUSTED KNUCKLES.
STEP 7
INSTALL NEW STUFF IN REVERSE.
SIDE NOTES:
OKAY I RAN INTO TROUBLE TRING TO INSTALL HEADERS BOLTS WHERE A ASS HAIR APART SO WOULDN'T MOUNT TO ENGINE BLOCK. SOLUTION WAS MAKE HEADER HOLES AN ASS HAIR WIDER TO SLIDE ON EASY TO THE BLOCK.
ALSO LOOK AT THE DIFFERENCE.
WHEN I REMOVED OXYGEN SENSORS THEY DIDN'T CLIP OFF THE BODY TO WELL SO I SNIPPED THEM OFF AND REATTACHED THEM WITH ZIP TIES.
MY HEADERS NEEDED NO NEW BOLTS AND NUTS USED FACTORY ONES, HOW EVER THE BOLTS AND NUTS FOR THE DOWNPIPE TO ATTACH TO THE HEADERS WERE. GASKETS WHERE ALL REPLACED WITH NEW ONES SUPPLIED.
I FOUND IT EASY TO INSTALL HEADERS WITH THOSE OPEN END RACHET WRENCHS SENSE THOSE NUTS ARE A LITTLE HARD TO GET AT. IN SOME PLACES.
DON'T USE ANY GASKET MAKER MAY CAUSE LEAKS.
AFTER YOU'RE SATISFIED WITH YOUR HEADERS AND MOUNTED CHECK FOR LEAKS AND LET COOL DOWN. ALSO RECHECK BOLTS AFTER COOL DOWN AND TIGHTEN IF NEEDED.
TAKE YOUR TIME IF YOU'RE CRAWLING AROUND IT TAKES TIME AND SOME TIMES A LITTLE THOUGHT TO GET YOU OUT OF JAMS AND PROBLEMS. REMEMBER THIS IS FUN
HERE ARE SOME PICTURES TO SHOW YOU WHAT THE STOCK TO THE NEW LOOK LIKE
DIDN'T GO WITH FLASH JUST PAINTED STAINLESS STEEL STILL LOOKS BETTER
Last edited by TommyP; 10-03-2012 at 12:53 PM.


 03-02-2008, 11:21 AM
#5
New Member

Join Date: 02-05-08
Location: PA
Posts: 98
Likes: 0
Received 0 Likes
on
0 Posts
Hey man, what make is the new headers you put on. I ordered some GMPP headers and I"m wondering if I"ll have the same problem with the "OKAY I RAN INTO TROUBLE TRING TO INSTALL HEADERS BOLTS WHERE A ASS HAIR APART SO WOULDN'T MOUNT TO ENGINE BLOCK. SOLUTION WAS MAKE HEADER HOLES AN ASS HAIR WIDER TO SLIDE ON EASY TO THE BLOCK." My guess is since i'm sticking with GM, then I should't have too much problem installing them.

 03-05-2008, 06:42 AM
#8
New Member
Thread Starter
Join Date: 07-13-06
Location: lala land
Posts: 45
Likes: 0
Received 0 Likes
on
0 Posts
there was a differece because stock there is no even flow and the weight you take off and it sounds cool. umm xtc headers. not sure if gm headers have the same problem. i would have bitched but i'm a little far away to send back so fixed myself.
03-10-2008, 02:53 PM
#9
New Member
Join Date: 02-05-08
Location: PA
Posts: 98
Likes: 0
Received 0 Likes
on
0 Posts
Just got done installing my GMPP headers. Direct fit, the only problem is that on the 2.0 I assume has an O2 sensor on the manifold, well my 2.2 didn't so I had to plug the hole with a plug and some J.B weld. Other then that, it was a perfect fit. Nice write up on the installation. It helped a lot.


 05-09-2008, 12:08 PM
#14
Senior Member

Join Date: 10-08-06
Location: Scottsdale, AZ
Posts: 3,043
Likes: 0
Received 0 Likes
on
0 Posts
hey i have a 2.4 i and was installing the CA header and the header wouldnt clear the coolant bypass pipe everytime i tighten the bolts i would leak coolant.
 05-09-2008, 01:20 PM
#16
Senior Member

Join Date: 11-20-06
Location: Charleston, SC
Posts: 537
Likes: 0
Received 0 Likes
on
0 Posts
Alright REZ, I'm counting on you to post up a good quality, badass video of idle, cruising and under load conditions for this setup. Don't let me down. Please  .
.
.
05-09-2008, 07:45 PM
#17
Senior Member
iTrader: (1)

Join Date: 02-08-08
Location: Fayetteville/Linden, NC/Myrtle Beach, SC
Posts: 3,728
Likes: 0
Received 0 Likes
on
0 Posts
Two things, why did you go under when removing the header? When I did mine I just came down from the top and also dont forget the o2 sensor socket. I was mostly at this angle right here: 


 05-17-2008, 09:38 PM
#25
Member

Join Date: 03-04-08
Location: West Des Moines, Iowa
Posts: 308
Likes: 0
Received 0 Likes
on
0 Posts
yes you can use just an open end wrench on the o2 but alot of the time the o2 sensor is siezed in the bung so you may end up stripping it which is why its much easier to spend the 10 bucks on a o2 socket and do it correctly, a lil word of advise put some anti-sieze on the o2 when reinstalling it helps out for future removal.

