All Engines: How-to Install header and downpipe
 07-03-2016, 05:45 AM
#176

TOOLS NEEDED
10MM RATCHET WRENCH
13MM DEEP SOCKET
14MM DEEP SOCKET & BOX END WRENCH
15MM DEEP SOCKET
13MM SOCKET & OPEN BOX END WRENCH
15MM SOCKET & OPEN BOX END WRENCH
JACK AND STANDS, OR RAMPS (or a car lift if your lucky)
RATCHET AND 6" & 3" EXTENSION
FLASHLIGHT
PENETRATING FLUID
O2 SENSOR SOCKET, OR 7/8 BOX END WRENCH
(Step 1)
Jack up the car and put on jack stands and make sure care is secure. Let the car cool down. (If you have a strut bar, this is a good time to remove it. Makes install much easier)
(Step 2)
Remove top and bottom heat shields. (Top = 3 13MM bolts) (Bottom = 1 15MM bolt & 10MM bolt) Remove the 10mm bolt from the top.
(Step 3)
Spray down all 10 bolts on the manifold, the 3 bolts on the manifold/downpipe and the 2 bolts on the downpipe/catback with penetrating fluid. (This will make this whole process much easier!)
(Step 4)
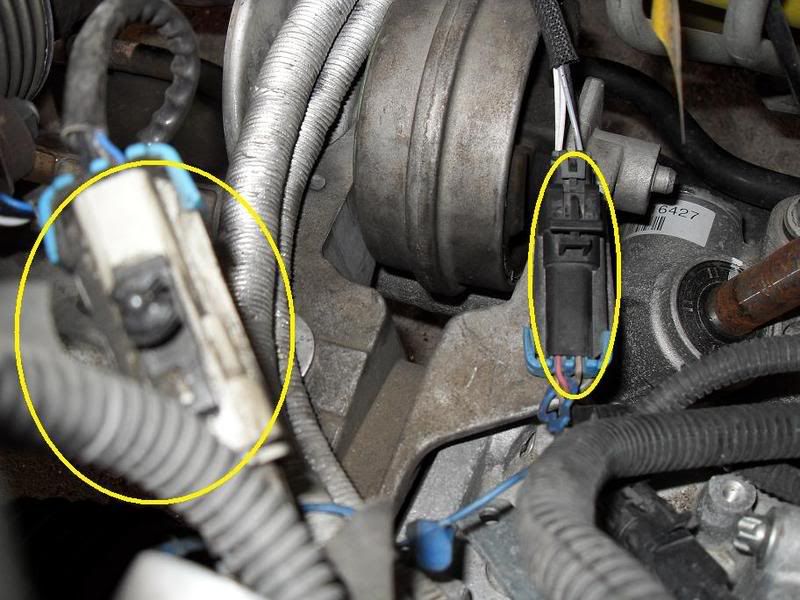
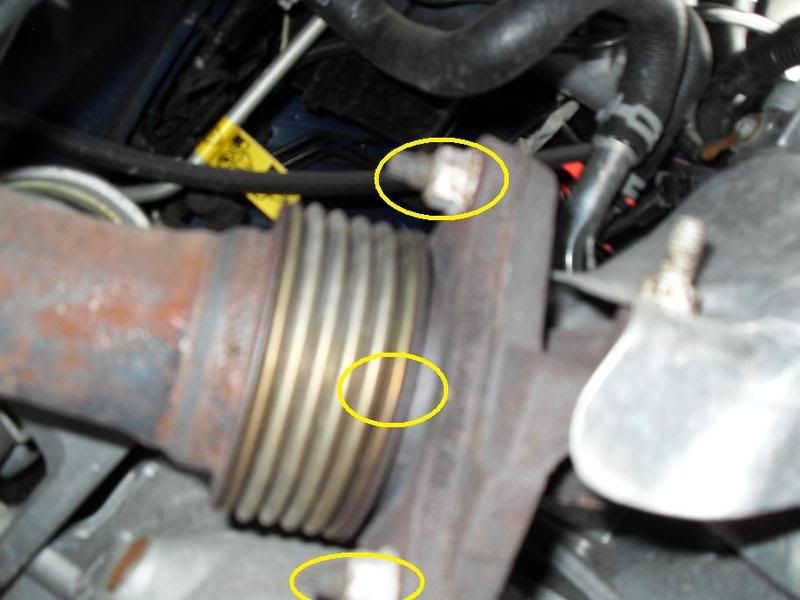
Unclip the oxygen sensors, There is a little blue tab that has to be pushed out which acts like a lock holding the 2 snaps together. The lower clip is to the downpipe sensor. The upper one is to the one on the manifold. (removing the downpipe makes this much easier, even if your just installing the header) Do not remove the sensor from the manifold yet. This will be done after the manifold is out.
(Step 5)
Remove the downpipe, Starting with the 2 rear 14MM bolts. You will need a wrench for the nut and the socket for the bolt.
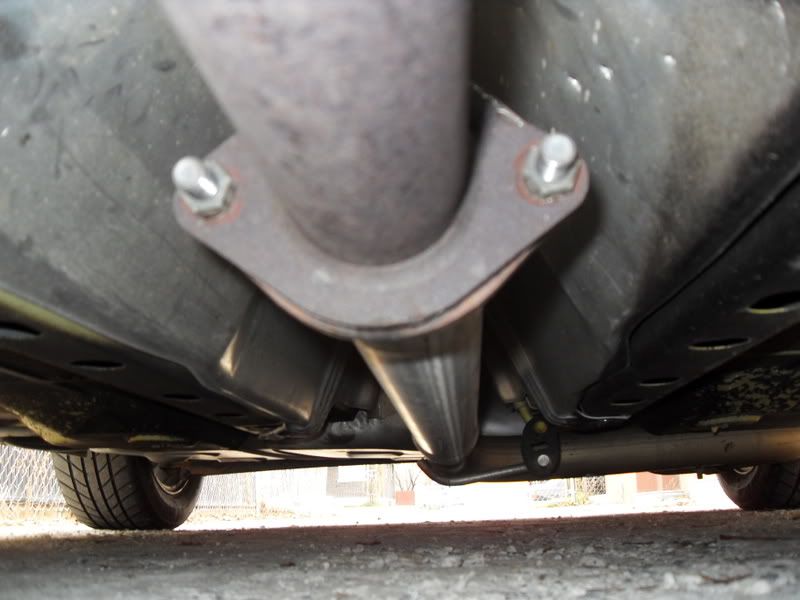
Then use your 15 MM deep socket to remove the front 3 15MM nuts from the manifold/downpipe
Once you have the downpipe off the car, place it aside.
(Step 6)
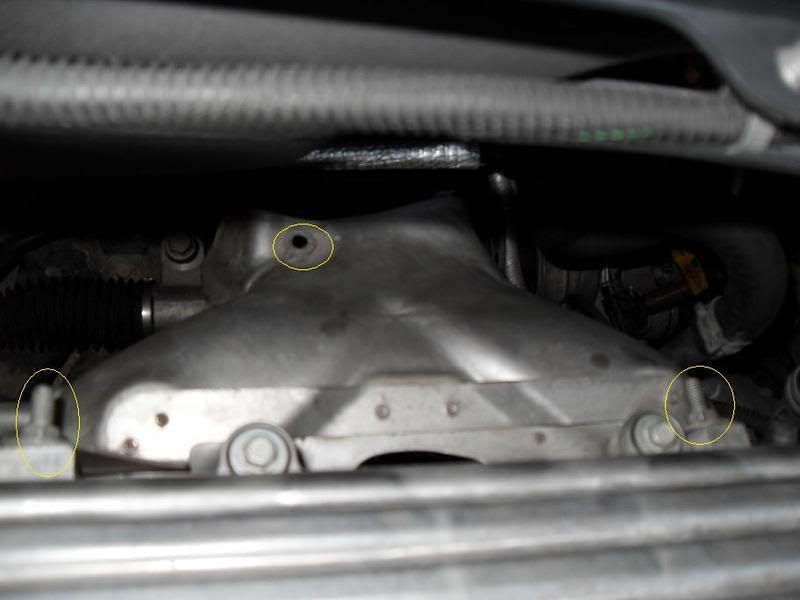
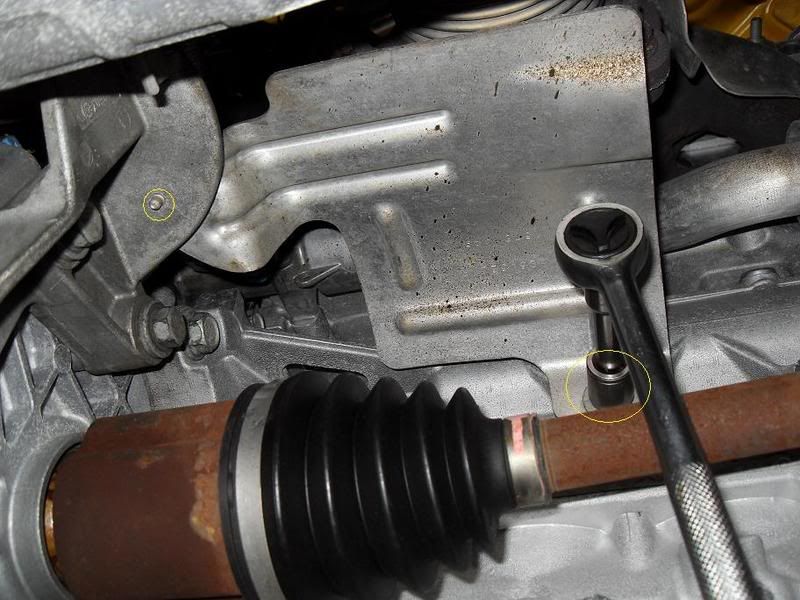
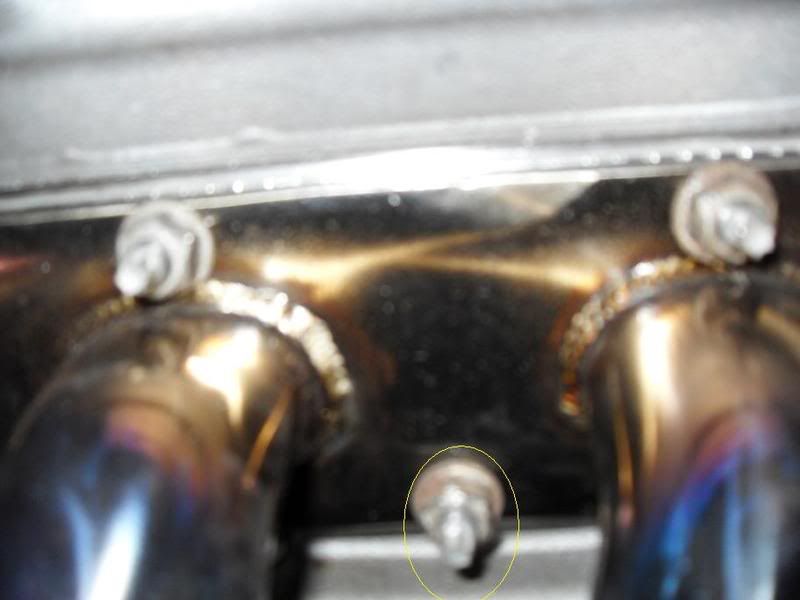
Removing the manifold, There are 10, 13MM nuts holding on the manifold that need to be removed. All but the 3 middle bottom nuts can be removed from the top. The others are easier to remove from the bottom. (ON AUTO's MOST OF THE WORK CAN BE DONE FROM THE TOP) The very middle bottom nut is a PITA! You will need a long extension and go at it above the manifold but still from under the car.
(Here is a pic that gives you an idea of the nuts to be removed. Sorry I do not have any pics with the stock manifold on)

The nut circled is the PITA one
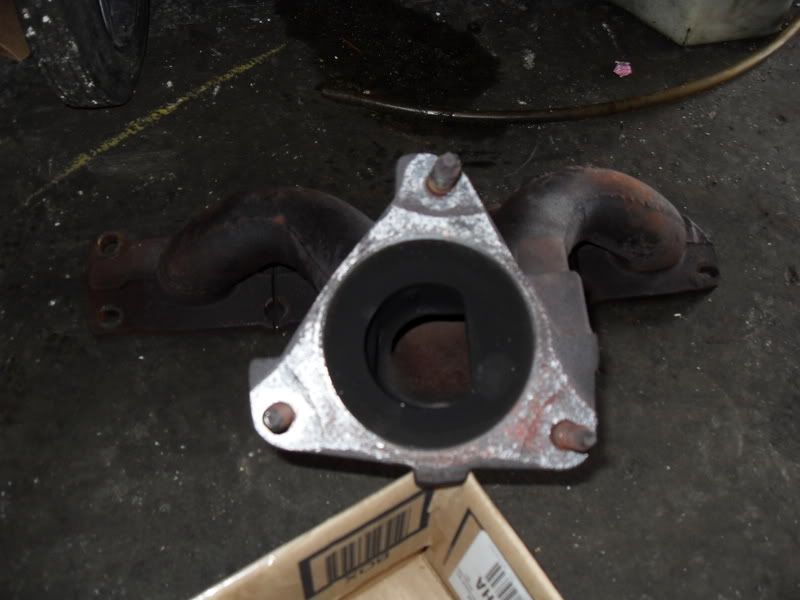
Once all nuts are removed, remove stock manifold and gasket. Inspect the head to be sure the area is clean and there are no obstructions that could cause leaks. Here is a pic of the manifold removed. (Very restrictive)
(Step 7)
Installing the header, Place the new gasket and the header on the head bolts and finger tighten down all 10, of the 13MM nuts so the header sits in place like so.. (DO NOT USE ANY KIND OF GASKET SEALER!)
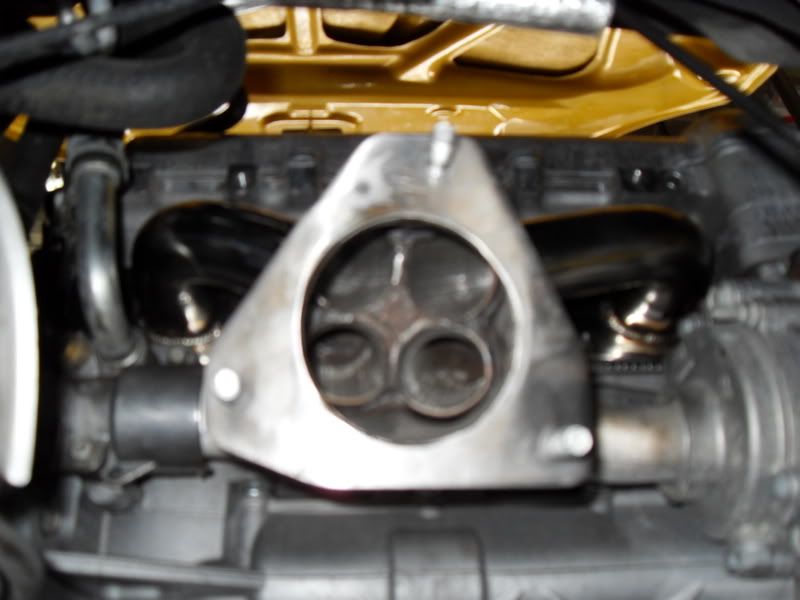
Go in order of the diagram below, torquing all 10 nuts down to 106in/lbs, followed by a 2nd pass, again in order, and make sure they're all at 106in/lbs the 89in/lbs is for the exhaust shield studs.

(Step 8 )
Remove oxygen sensor from the stock manifold, Using either an O2 sensor socket (A 7/8 deep socket with a slit down the side for the wires) or simply a 7/8 box end wrench. Next, take the sensor and screw it into the bung on the header. And give it just a little "snug" with the 7/8 wrench.
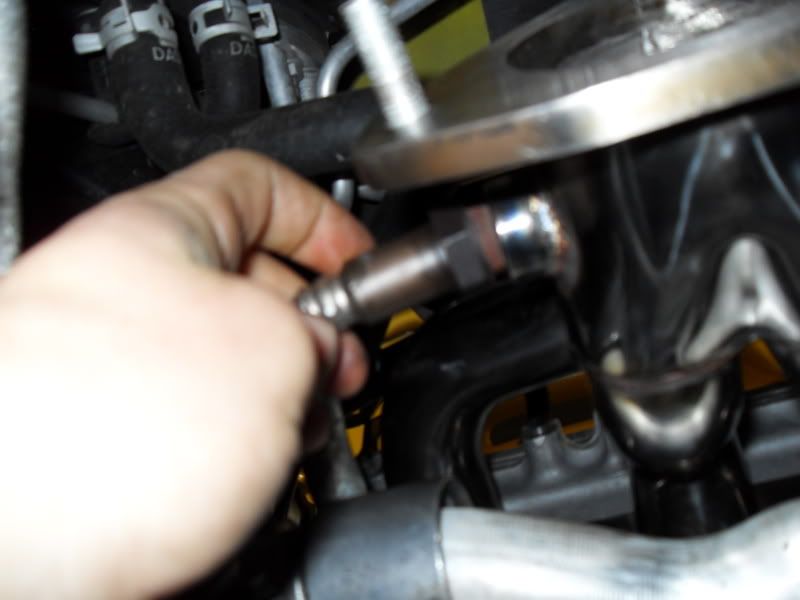
(If installing a new downpipe, Repeat this step for the O2 sensor on the downpipe.)
(STEP 9)
Installing the downpipe, This particular header came with 3 double threaded bolts and 3 nuts like so..
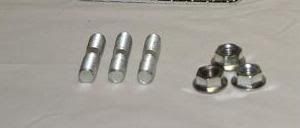
You will want to screw these bolts into the bottom flange of the header so there is only about 1/8 inch of threads before the middle non threaded part of the bolt.
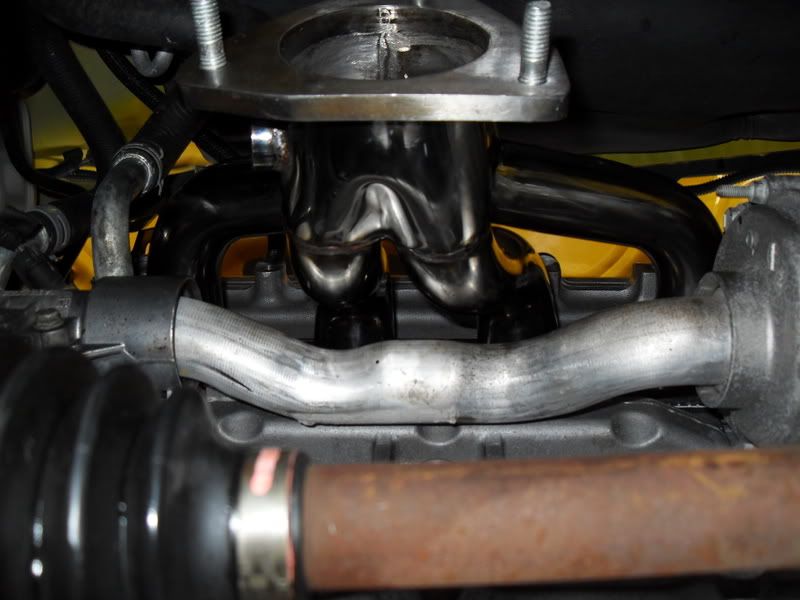
Next, pair the downpipe and header flanges together along with the new gasket. Finger tighten on all 3 of the 15MM nuts onto the bolts, and then tighten them with a ratchet. (Do not over tighten!) Be sure there are threads exposed on both sides, the header and beyond the nuts like this.
Once those bolts are tightened on, the rear downpipe flange should be pretty much mated up with the flange for the rest of the exhaust. Reinstall the 2, 14MM bolts.
(Step 10) Reclip both sensors, and reinstall the bottom heat shield. The top heat shield will take a little hand bending and manipulating but it can be reinstalled also, with the exception of one bolt.
Now start the car and check for leaks. If there are none, Go rip down the street and enjoy your new header!
10MM RATCHET WRENCH
13MM DEEP SOCKET
14MM DEEP SOCKET & BOX END WRENCH
15MM DEEP SOCKET
13MM SOCKET & OPEN BOX END WRENCH
15MM SOCKET & OPEN BOX END WRENCH
JACK AND STANDS, OR RAMPS (or a car lift if your lucky)
RATCHET AND 6" & 3" EXTENSION
FLASHLIGHT
PENETRATING FLUID
O2 SENSOR SOCKET, OR 7/8 BOX END WRENCH
(Step 1)
Jack up the car and put on jack stands and make sure care is secure. Let the car cool down. (If you have a strut bar, this is a good time to remove it. Makes install much easier)
(Step 2)
Remove top and bottom heat shields. (Top = 3 13MM bolts) (Bottom = 1 15MM bolt & 10MM bolt) Remove the 10mm bolt from the top.
(Step 3)
Spray down all 10 bolts on the manifold, the 3 bolts on the manifold/downpipe and the 2 bolts on the downpipe/catback with penetrating fluid. (This will make this whole process much easier!)
(Step 4)
Unclip the oxygen sensors, There is a little blue tab that has to be pushed out which acts like a lock holding the 2 snaps together. The lower clip is to the downpipe sensor. The upper one is to the one on the manifold. (removing the downpipe makes this much easier, even if your just installing the header) Do not remove the sensor from the manifold yet. This will be done after the manifold is out.
(Step 5)
Remove the downpipe, Starting with the 2 rear 14MM bolts. You will need a wrench for the nut and the socket for the bolt.
Then use your 15 MM deep socket to remove the front 3 15MM nuts from the manifold/downpipe
Once you have the downpipe off the car, place it aside.
(Step 6)
Removing the manifold, There are 10, 13MM nuts holding on the manifold that need to be removed. All but the 3 middle bottom nuts can be removed from the top. The others are easier to remove from the bottom. (ON AUTO's MOST OF THE WORK CAN BE DONE FROM THE TOP) The very middle bottom nut is a PITA! You will need a long extension and go at it above the manifold but still from under the car.
(Here is a pic that gives you an idea of the nuts to be removed. Sorry I do not have any pics with the stock manifold on)
The nut circled is the PITA one
Once all nuts are removed, remove stock manifold and gasket. Inspect the head to be sure the area is clean and there are no obstructions that could cause leaks. Here is a pic of the manifold removed. (Very restrictive)
(Step 7)
Installing the header, Place the new gasket and the header on the head bolts and finger tighten down all 10, of the 13MM nuts so the header sits in place like so.. (DO NOT USE ANY KIND OF GASKET SEALER!)
Go in order of the diagram below, torquing all 10 nuts down to 106in/lbs, followed by a 2nd pass, again in order, and make sure they're all at 106in/lbs
the 89in/lbs is for the exhaust shield studs.(Step 8 )
Remove oxygen sensor from the stock manifold, Using either an O2 sensor socket (A 7/8 deep socket with a slit down the side for the wires) or simply a 7/8 box end wrench. Next, take the sensor and screw it into the bung on the header. And give it just a little "snug" with the 7/8 wrench.
(If installing a new downpipe, Repeat this step for the O2 sensor on the downpipe.)
(STEP 9)
Installing the downpipe, This particular header came with 3 double threaded bolts and 3 nuts like so..
You will want to screw these bolts into the bottom flange of the header so there is only about 1/8 inch of threads before the middle non threaded part of the bolt.
Next, pair the downpipe and header flanges together along with the new gasket. Finger tighten on all 3 of the 15MM nuts onto the bolts, and then tighten them with a ratchet. (Do not over tighten!) Be sure there are threads exposed on both sides, the header and beyond the nuts like this.
Once those bolts are tightened on, the rear downpipe flange should be pretty much mated up with the flange for the rest of the exhaust. Reinstall the 2, 14MM bolts.
(Step 10) Reclip both sensors, and reinstall the bottom heat shield. The top heat shield will take a little hand bending and manipulating but it can be reinstalled also, with the exception of one bolt.
Now start the car and check for leaks. If there are none, Go rip down the street and enjoy your new header!
(06 Cobalt ls 2.2)
 07-30-2016, 12:16 AM
#177

Started work on this today, did not finish today... It was pretty rough for me to get all the bolts out, but I have some tips, I also have some questions I'd really appreciate some advice on.
First tips I found:
1. If the bolt don't move, even after spraying them, nothing works like holding the wrench head on the bolt and smacking the wrench handle with a hammer (sometimes up to 10 times, but hey, it does the trick). I did that to free up the 3rd bolt at the top of where the header meets the downpipe, you may want to try the same. Be reasonable about your hits, you don't want to smack it at full power here, but give it a good whap.
2. Electric impact wrench works like a charm on most bolts, but make sure you work your way in reverse from the exhaust connection back to the header, seems obvious, but I forgot this and had to re-torque down my damn header (just 2 of the 10 bolts luckily).
3. The bolt shown as the hardest one, the one at the bottom middle of the header, is actually easier to get out from above than below. I couldn't find any configurations from below that worked as well as my options from above.
Questions (Please help me!)
1. The tutorial states to undo the oxygen sensor from the clip in the engine bay, but it doesn't mention about pulling the cable down and out with the downpipe. I assume though that you have to pull all the cable out with the downpipe as you don't want to take the sensor out until the downpipe is out?
2. I'd like to use Copper RTV on all connections instead of gaskets, how precise do I have to be when I place the parts? After all I'm doing this myself and I'll have to hold the header up with one hand and bolt with the other. Is that feasible?
3. Any other tips for someone who just got it taken apart, and is bolting it back up in the morning with RTV? Also oxygen sensor advice is appreciated, never dealt with these things before, I just learned twisting the cables is bad?
Thanks again!
07-30-2016, 03:06 AM
#178
I just did this last week
Started work on this today, did not finish today... It was pretty rough for me to get all the bolts out, but I have some tips, I also have some questions I'd really appreciate some advice on.
First tips I found:
1. If the bolt don't move, even after spraying them, nothing works like holding the wrench head on the bolt and smacking the wrench handle with a hammer (sometimes up to 10 times, but hey, it does the trick). I did that to free up the 3rd bolt at the top of where the header meets the downpipe, you may want to try the same. Be reasonable about your hits, you don't want to smack it at full power here, but give it a good whap.
2. Electric impact wrench works like a charm on most bolts, but make sure you work your way in reverse from the exhaust connection back to the header, seems obvious, but I forgot this and had to re-torque down my damn header (just 2 of the 10 bolts luckily).
3. The bolt shown as the hardest one, the one at the bottom middle of the header, is actually easier to get out from above than below. I couldn't find any configurations from below that worked as well as my options from above.
Questions (Please help me!)
1. The tutorial states to undo the oxygen sensor from the clip in the engine bay, but it doesn't mention about pulling the cable down and out with the downpipe. I assume though that you have to pull all the cable out with the downpipe as you don't want to take the sensor out until the downpipe is out?
2. I'd like to use Copper RTV on all connections instead of gaskets, how precise do I have to be when I place the parts? After all I'm doing this myself and I'll have to hold the header up with one hand and bolt with the other. Is that feasible?
3. Any other tips for someone who just got it taken apart, and is bolting it back up in the morning with RTV? Also oxygen sensor advice is appreciated, never dealt with these things before, I just learned twisting the cables is bad?
Thanks again!
First tips I found:
1. If the bolt don't move, even after spraying them, nothing works like holding the wrench head on the bolt and smacking the wrench handle with a hammer (sometimes up to 10 times, but hey, it does the trick). I did that to free up the 3rd bolt at the top of where the header meets the downpipe, you may want to try the same. Be reasonable about your hits, you don't want to smack it at full power here, but give it a good whap.
2. Electric impact wrench works like a charm on most bolts, but make sure you work your way in reverse from the exhaust connection back to the header, seems obvious, but I forgot this and had to re-torque down my damn header (just 2 of the 10 bolts luckily).
3. The bolt shown as the hardest one, the one at the bottom middle of the header, is actually easier to get out from above than below. I couldn't find any configurations from below that worked as well as my options from above.
Questions (Please help me!)
1. The tutorial states to undo the oxygen sensor from the clip in the engine bay, but it doesn't mention about pulling the cable down and out with the downpipe. I assume though that you have to pull all the cable out with the downpipe as you don't want to take the sensor out until the downpipe is out?
2. I'd like to use Copper RTV on all connections instead of gaskets, how precise do I have to be when I place the parts? After all I'm doing this myself and I'll have to hold the header up with one hand and bolt with the other. Is that feasible?
3. Any other tips for someone who just got it taken apart, and is bolting it back up in the morning with RTV? Also oxygen sensor advice is appreciated, never dealt with these things before, I just learned twisting the cables is bad?
Thanks again!
The following users liked this post:
boostbalt (07-30-2016)
07-30-2016, 02:01 PM
#179
I just installed this shorty header on my cobalt and it was preaty easy just took a bit longer than i thought (about 3hrs) mainly on the 10 bolts conected to engine. But if your doing just the header you can do it without removing the downpipe/catalytic converter. All you have to do is unclip the o2 sensor for the header then remove the 3 bolts that go to dp/cat and pull it off and you can let it hang there . Than itll take a little bit of wiggling to get the manifold out, once its out than you can take off the o2 sensor and screw it on to the header , than screw the header back on to the engine a little than try and wiggle the dp/cat back on to the header screw it back together, than finish off all the 10 screws to the header and youll be good to go! Just make sure to have good gaskets and put them on right cause my gasket that connects the header to dp/cat blew so now i have an exhaust leak. (It could have been cause i took it for a 30 min drive down the freeway and was really hitting the gas testing out the new headers LOL)
07-30-2016, 02:49 PM
#180
[QUOTE=boostbalt;7616539]Thanks, but I am also doing the downpipe at the same time, so I have to remove that sensor. Also I'm using RTV, not gaskets. But thanks for the info. I put at least 5 hours into this yesterday, hope today goes much better. [/QUOT Scince your doing both header and dp it should be easier to just take them out then remove the o2 sensors once off the car you can put them aside somewhere safe were they wont fall and screw them on to the new exhaust parts once your ready to bolt up the header and dp. As for the RTV iv never heard of, im about to look it up scince i have to get rid of this exhaust leak. Next ill be getting the dp/cat from zzp 😎
[/QUOT Scince your doing both header and dp it should be easier to just take them out then remove the o2 sensors once off the car you can put them aside somewhere safe were they wont fall and screw them on to the new exhaust parts once your ready to bolt up the header and dp. As for the RTV iv never heard of, im about to look it up scince i have to get rid of this exhaust leak. Next ill be getting the dp/cat from zzp 😎
07-30-2016, 04:03 PM
#181
[QUOTE=jg123boss;7616544]
RTV is a very popular new option, if you do your research you'll find RTV is much superior than a gasket for strength and durability, but application is critical as it's essentially a liquid gasket that solidifies on the car (imagine missing or smearing a spot, there would be a hole in the gasket).
I can't re-use the gasket for the old header either, it's ports are slightly smaller than the vibrant header's ports. And I can't get a vibrant header gasket, so RTV it is! If it doesn't work, I will have to get a custom gasket made up for it, I'll probably go with copper which I heard is pretty good.
If you go RTV clean BOTH mating surfaces with BRAKE CLEANER first and let them dry completely. This is like dealing with glues, both surfaces must be clean as possible. The instructions specifically mention to use nothing but brake cleaner, if you use other cleaners it won't work.
I now have all parts off the car, I'm putting the O2 sensors in the new parts now and prepping to put back in the header studs. After getting the studs in, then I can have confidence that once I put the header on the studs it wont be able to move much and thus I'll get good RTV adhesion all around each exhaust port.
As I have a newer stock downpipe, I'm going to utilize the gaskets already at both ends of the downpipe, it seems like a bitch to RTV between the last connection on the downpipe and the exhaust as there's not much play room to mate them up flush.
Thanks, but I am also doing the downpipe at the same time, so I have to remove that sensor. Also I'm using RTV, not gaskets. But thanks for the info. I put at least 5 hours into this yesterday, hope today goes much better. [/QUOT Scince your doing both header and dp it should be easier to just take them out then remove the o2 sensors once off the car you can put them aside somewhere safe were they wont fall and screw them on to the new exhaust parts once your ready to bolt up the header and dp. As for the RTV iv never heard of, im about to look it up scince i have to get rid of this exhaust leak. Next ill be getting the dp/cat from zzp 😎
[/QUOT Scince your doing both header and dp it should be easier to just take them out then remove the o2 sensors once off the car you can put them aside somewhere safe were they wont fall and screw them on to the new exhaust parts once your ready to bolt up the header and dp. As for the RTV iv never heard of, im about to look it up scince i have to get rid of this exhaust leak. Next ill be getting the dp/cat from zzp 😎I can't re-use the gasket for the old header either, it's ports are slightly smaller than the vibrant header's ports. And I can't get a vibrant header gasket, so RTV it is! If it doesn't work, I will have to get a custom gasket made up for it, I'll probably go with copper which I heard is pretty good.
If you go RTV clean BOTH mating surfaces with BRAKE CLEANER first and let them dry completely. This is like dealing with glues, both surfaces must be clean as possible. The instructions specifically mention to use nothing but brake cleaner, if you use other cleaners it won't work.
I now have all parts off the car, I'm putting the O2 sensors in the new parts now and prepping to put back in the header studs. After getting the studs in, then I can have confidence that once I put the header on the studs it wont be able to move much and thus I'll get good RTV adhesion all around each exhaust port.
As I have a newer stock downpipe, I'm going to utilize the gaskets already at both ends of the downpipe, it seems like a bitch to RTV between the last connection on the downpipe and the exhaust as there's not much play room to mate them up flush.

Thread
Thread Starter
Forum
Replies
Last Post