Appearance: How to install RKsport kit
 05-24-2006, 11:19 PM
#1
Senior Member
Thread Starter

Join Date: 09-27-05
Location: Pocono's
Posts: 989
Likes: 0
Received 0 Likes
on
0 Posts
How to install RKsport kit
This is a "How to" install the RkSport's Kit. Once the Item arrives at your house. The first thing you should do is inspect the package, and the contents inside. Once you open the rather large box you should see 5 parts(1 Front Valance, 2 Side Skirts, 1 rear valance, 1 mesh grill for the rear valance with a bag of screws, rivets, adhesion promoter, and instructions).
The first thing you should do is actually take out all the body parts(the lip kit itself) out of the box and lay them out in the sun or warm them up with a blow dyer. The reason for this step is to actually get the urethane back to its original shape. Once the body pieces have returned to its original shape it is now time to test fit and see how they look on the car. Go get a couple friends or family members, because having a couple extra hands for this step will help greatly.
You will see that the kit fits really well. The front valance is a perfect fit, and the side skirts for the coupe and the sedan are the same exact length for anyone that didn't know, but on the sedan will have to be modified just a tad to make them fit nicely without any problems. The rear valance is slight large for the sedan, but will fit perfect for the coupe. At this time once you get to see how the kit itself fits onto your car. After that its time to either prep or take lip kit to a paint shop.
The first part that we installed on my car was the front valance. The front valance will be a perfect fit regardless if you own a sedan or a coupe. First clean the car and make sure its warm at least near 80 degrees(if it's not that warm outside the adhesive will not stick as well, so you may have to use a heat gun or a blow dyer to help the 3M tape stick better to your car), and scrub all areas with degreaser that the front valance will actually stick to. After that I rubbed the entire area with rubbing alcohol, which the front valance would have direct contact to. I then applied the Adhesion promoter which was supplied from RK Sport to those areas you just went over. You will have to let the Adhesion promoter sit for about 5-10 minutes before installing the front valance. Now I was lucky enough to have a couple hands to help me with the next couple steps. You will now line up the front valance to where you want it to sit on your car. Make sure that everything is balanced before removing the 3M tape backing. Once you are sure and happy with the placement you can begin to remove the 3M tape backing slowly. I started from the driver side first and inched my way over to the passenger side( I only pulled the 3M tape backing about 1ft at a time and applied pressure to the areas which the tape was just released).

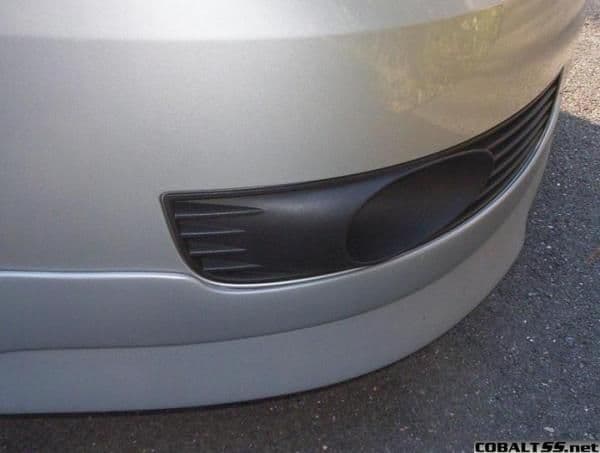
You will notice that the front valance has notches inside the end caps of the lip, those notches will actually end up locking onto the existing bumper so make sure they are tight. The only problem I experienced was that I wanted to rivet and or screw the kit into something sturdy, but I was unable to. There isn't anything extremely close to the end caps for the front valance to actually rivet or screw to the car. So I will actually be fabricating some custom brackets for that area of the car for some piece of mind.

I have to say I have not had one problem with the front valance just relying on just the 3M tape. The fit on the front valance is amazingly tight and perfect. As for the brackets I will do another "how to" with pics once I fabricate the custom brackets for the front valance.
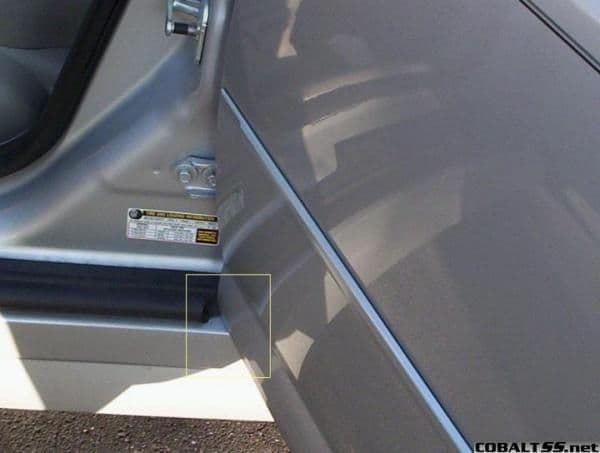
The next step we did was actually installing the two side skirts. If your car is equipped with those factory mud flaps, you will have to cut them off. I used a dremel, and try to cut the mud flaps as closely as you can to the shape of the car. The closer the better. The 3M tape will stick to only two areas of the side skirt, the first area is between the wheel well and the front door and the second area is rear door area(I have a sedan). The first step is again to test fit and see what areas need fixing. I noticed that my doors were sticking in the front and rear. If you ever notice when you open your doors, the door actually drops a slight bit, which in turns actually pinches the side skirt and ends up pushing it away from the car. The problem with this obviously is it will eventually rub the paint off the door and the side skirt away, secondly make an annoying noise whenever you open your doors or whenever you go over bumps and thirdly actually pull the 3M tape off the car and off the side skirt causing dirt to get into the gaps. Once you have figured out the problem areas, its time to fix. My areas of problems were under each door, and the rear area of the skirt. The first thing you need to do when installing the side skirt is to remove the rubber protectors that are placed on the door sills. They are held down with retainer clips. Once removed test fit the side skirt, and mark the problem areas. Again mine were under both doors and the rear. You will need to either cut or grind away the area right under the front door, to avoid the front skirt grabbing or rubbing. The second area, because I have a sedan is the rear door, again you will need to grind away or neatly cut away some of the side skirt to avoid the skirt grabbing or rubbing against the door.

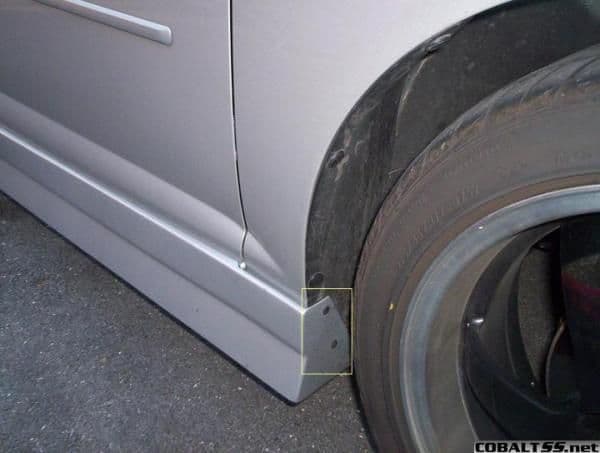
Next step is to make a custom bracket for the rear. The skirt will remain on, even if the skirt does not have a bracket to support it. I have two custom brackets which actually connect to the bottom of the skirt to the bottom of the rocker. It is similar to a "U-shape" I screwed the bracket to the bottom of the rocker and bolted the skirt to the bracket. I will get pics of the bracket once I remove the skirt for repainting. For installing the side skirts you will have to do the same steps that you did for the front valance; Clean, degrease, and apply promoter. Once again having an extra set of hands will help greatly. After the side skirt is tucked under the doors, you will remove the 3M tape backing and then apply pressure to the areas of the freshly released tape.The side skirt has two areas, the front area and the rear area. I started in the front and then progressed to the rear. I then went a step further to actually fill the gap, to prevent water and dirty from damaging the adhesion between the side skirt and the car.

The rear part of the side skirt will have an end cap which you will have to drill a pilot hole into the car's sheet metal. You can obviously screw or rivet this part of the side skirt to the car, and in the case for my car I then screwed and bolted the custom bracket to the rear part of the car and side skirt. Remember the bracket is is inside the side skirt, because the side skirt is hollow.
As for the front of the side skirt you can see again there's nothing extremely sturdy to screw the side skirt to, it will hold well if it is screwed or riveted off the wheel well lining. We actually ended up taking a piece of sheet metal and actually welding it behind the wheel well lining so the side skirt would have a better area for support. If this is done, you will then have to drill a pilot hole and screw and or rivet the end cap of the front of the side skirt to the car.
You will then need to screw or rivet the top lip of the side skirt (the lip that sits under the door) so it doesn't bow out from the car, and again doesn't get pushed away from the car when the door opens. I did it in two spots, towards the front door, and right in front of the rear door.

Open the doors and replace the door sill protectors and tuck the side skirt lip under them. Do the same steps for the opposite side. Your side skirts are now done.


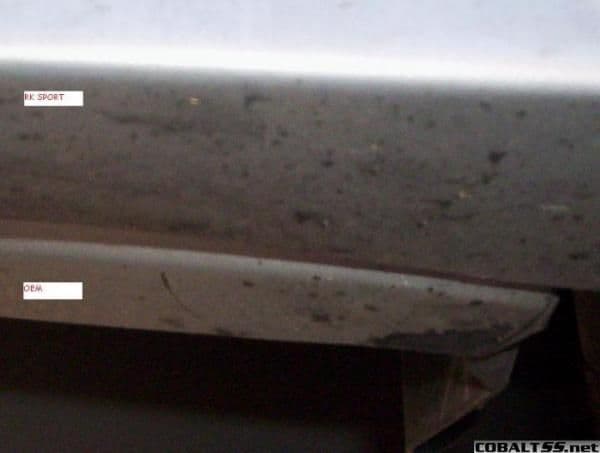
The final step is the rear valance. For the coupe I am sure it will fit very similar to the front valance and well for the sedan it will not. The valance for the rear is slightly larger than the sedan's OEM bumper. Again do the same preparation steps as you did on the previous steps. The problems I experienced was the exhaust and the extra length on the rear valance compared to my rear bumper. You will have to make or buy plastic shims to make it tight fit. The OEM bumper is actually hollow underneath and is actually easy to bolt something to it. Ok, when installing again after all preparations have been completed you will have to line up the rear valance. High enough over the exhaust so it doesn't melt and low enough that it blends with the car's shape.

The perfect spot I found was actually making it even with the license indent on the rear bumper and the ends of the lip even with the existing rear bumper.

You must go with the natural flow of the of the rear valance or the 3M tape or the glue will separate. Unless you end up screwing the rear valance lip down to the OEM bumper. The rear lip will actually flare out a little. Installing the rear valance, I again started on the driver side slowly releasing the 3M backing going about 1ft at a time and then applying pressure until I finished on the passenger side. The next couple steps will require a jack. It will make your life a lot easier if you remove your wheels. For sturdiness I again made pilot holes through the end caps and through my plastic shims into the rear wheel well lining. This time instead of using screws I bolted them in using a nut on the inside of the OEM bumper on the opposite side of the wheel well lining. Again repeat the last couple steps on the other side.

Now I have been thinking of actually making a straight brackets for the end of the rear valance which is even with the OEM bumper, but I am not sure if that would make a difference actually.
I honestly believe even with just the 3M tape the rear valance would stay fine. The final step is to install the rear mesh, and please be careful. It is extremely sharp! It will cut you and scratch all your paint if your not careful. You can can either screw it in (RK sport was nice enough to make tabs for it to be screwed in, but you will need smaller screws than the ones they supplied you with) or you can glue it down.

That's it...the kit has been completely installed and now you can drive around with everyone staring at your car wondering what exactly it is. I hope this "how to" helped all you guys out having problems or the ones that were just nervous about installing the kit yourself.
The first thing you should do is actually take out all the body parts(the lip kit itself) out of the box and lay them out in the sun or warm them up with a blow dyer. The reason for this step is to actually get the urethane back to its original shape. Once the body pieces have returned to its original shape it is now time to test fit and see how they look on the car. Go get a couple friends or family members, because having a couple extra hands for this step will help greatly.
You will see that the kit fits really well. The front valance is a perfect fit, and the side skirts for the coupe and the sedan are the same exact length for anyone that didn't know, but on the sedan will have to be modified just a tad to make them fit nicely without any problems. The rear valance is slight large for the sedan, but will fit perfect for the coupe. At this time once you get to see how the kit itself fits onto your car. After that its time to either prep or take lip kit to a paint shop.
The first part that we installed on my car was the front valance. The front valance will be a perfect fit regardless if you own a sedan or a coupe. First clean the car and make sure its warm at least near 80 degrees(if it's not that warm outside the adhesive will not stick as well, so you may have to use a heat gun or a blow dyer to help the 3M tape stick better to your car), and scrub all areas with degreaser that the front valance will actually stick to. After that I rubbed the entire area with rubbing alcohol, which the front valance would have direct contact to. I then applied the Adhesion promoter which was supplied from RK Sport to those areas you just went over. You will have to let the Adhesion promoter sit for about 5-10 minutes before installing the front valance. Now I was lucky enough to have a couple hands to help me with the next couple steps. You will now line up the front valance to where you want it to sit on your car. Make sure that everything is balanced before removing the 3M tape backing. Once you are sure and happy with the placement you can begin to remove the 3M tape backing slowly. I started from the driver side first and inched my way over to the passenger side( I only pulled the 3M tape backing about 1ft at a time and applied pressure to the areas which the tape was just released).
You will notice that the front valance has notches inside the end caps of the lip, those notches will actually end up locking onto the existing bumper so make sure they are tight. The only problem I experienced was that I wanted to rivet and or screw the kit into something sturdy, but I was unable to. There isn't anything extremely close to the end caps for the front valance to actually rivet or screw to the car. So I will actually be fabricating some custom brackets for that area of the car for some piece of mind.
I have to say I have not had one problem with the front valance just relying on just the 3M tape. The fit on the front valance is amazingly tight and perfect. As for the brackets I will do another "how to" with pics once I fabricate the custom brackets for the front valance.
The next step we did was actually installing the two side skirts. If your car is equipped with those factory mud flaps, you will have to cut them off. I used a dremel, and try to cut the mud flaps as closely as you can to the shape of the car. The closer the better. The 3M tape will stick to only two areas of the side skirt, the first area is between the wheel well and the front door and the second area is rear door area(I have a sedan). The first step is again to test fit and see what areas need fixing. I noticed that my doors were sticking in the front and rear. If you ever notice when you open your doors, the door actually drops a slight bit, which in turns actually pinches the side skirt and ends up pushing it away from the car. The problem with this obviously is it will eventually rub the paint off the door and the side skirt away, secondly make an annoying noise whenever you open your doors or whenever you go over bumps and thirdly actually pull the 3M tape off the car and off the side skirt causing dirt to get into the gaps. Once you have figured out the problem areas, its time to fix. My areas of problems were under each door, and the rear area of the skirt. The first thing you need to do when installing the side skirt is to remove the rubber protectors that are placed on the door sills. They are held down with retainer clips. Once removed test fit the side skirt, and mark the problem areas. Again mine were under both doors and the rear. You will need to either cut or grind away the area right under the front door, to avoid the front skirt grabbing or rubbing. The second area, because I have a sedan is the rear door, again you will need to grind away or neatly cut away some of the side skirt to avoid the skirt grabbing or rubbing against the door.
Next step is to make a custom bracket for the rear. The skirt will remain on, even if the skirt does not have a bracket to support it. I have two custom brackets which actually connect to the bottom of the skirt to the bottom of the rocker. It is similar to a "U-shape" I screwed the bracket to the bottom of the rocker and bolted the skirt to the bracket. I will get pics of the bracket once I remove the skirt for repainting. For installing the side skirts you will have to do the same steps that you did for the front valance; Clean, degrease, and apply promoter. Once again having an extra set of hands will help greatly. After the side skirt is tucked under the doors, you will remove the 3M tape backing and then apply pressure to the areas of the freshly released tape.The side skirt has two areas, the front area and the rear area. I started in the front and then progressed to the rear. I then went a step further to actually fill the gap, to prevent water and dirty from damaging the adhesion between the side skirt and the car.
The rear part of the side skirt will have an end cap which you will have to drill a pilot hole into the car's sheet metal. You can obviously screw or rivet this part of the side skirt to the car, and in the case for my car I then screwed and bolted the custom bracket to the rear part of the car and side skirt. Remember the bracket is is inside the side skirt, because the side skirt is hollow.
As for the front of the side skirt you can see again there's nothing extremely sturdy to screw the side skirt to, it will hold well if it is screwed or riveted off the wheel well lining. We actually ended up taking a piece of sheet metal and actually welding it behind the wheel well lining so the side skirt would have a better area for support. If this is done, you will then have to drill a pilot hole and screw and or rivet the end cap of the front of the side skirt to the car.
You will then need to screw or rivet the top lip of the side skirt (the lip that sits under the door) so it doesn't bow out from the car, and again doesn't get pushed away from the car when the door opens. I did it in two spots, towards the front door, and right in front of the rear door.
Open the doors and replace the door sill protectors and tuck the side skirt lip under them. Do the same steps for the opposite side. Your side skirts are now done.
The final step is the rear valance. For the coupe I am sure it will fit very similar to the front valance and well for the sedan it will not. The valance for the rear is slightly larger than the sedan's OEM bumper. Again do the same preparation steps as you did on the previous steps. The problems I experienced was the exhaust and the extra length on the rear valance compared to my rear bumper. You will have to make or buy plastic shims to make it tight fit. The OEM bumper is actually hollow underneath and is actually easy to bolt something to it. Ok, when installing again after all preparations have been completed you will have to line up the rear valance. High enough over the exhaust so it doesn't melt and low enough that it blends with the car's shape.
The perfect spot I found was actually making it even with the license indent on the rear bumper and the ends of the lip even with the existing rear bumper.
You must go with the natural flow of the of the rear valance or the 3M tape or the glue will separate. Unless you end up screwing the rear valance lip down to the OEM bumper. The rear lip will actually flare out a little. Installing the rear valance, I again started on the driver side slowly releasing the 3M backing going about 1ft at a time and then applying pressure until I finished on the passenger side. The next couple steps will require a jack. It will make your life a lot easier if you remove your wheels. For sturdiness I again made pilot holes through the end caps and through my plastic shims into the rear wheel well lining. This time instead of using screws I bolted them in using a nut on the inside of the OEM bumper on the opposite side of the wheel well lining. Again repeat the last couple steps on the other side.
Now I have been thinking of actually making a straight brackets for the end of the rear valance which is even with the OEM bumper, but I am not sure if that would make a difference actually.
I honestly believe even with just the 3M tape the rear valance would stay fine. The final step is to install the rear mesh, and please be careful. It is extremely sharp! It will cut you and scratch all your paint if your not careful. You can can either screw it in (RK sport was nice enough to make tabs for it to be screwed in, but you will need smaller screws than the ones they supplied you with) or you can glue it down.
That's it...the kit has been completely installed and now you can drive around with everyone staring at your car wondering what exactly it is. I hope this "how to" helped all you guys out having problems or the ones that were just nervous about installing the kit yourself.
Last edited by TommyP; 05-23-2012 at 01:25 PM.


 05-24-2006, 11:27 PM
#3
Banned

Join Date: 06-25-05
Location: Palm Beach
Posts: 1,076
Likes: 0
Received 0 Likes
on
0 Posts
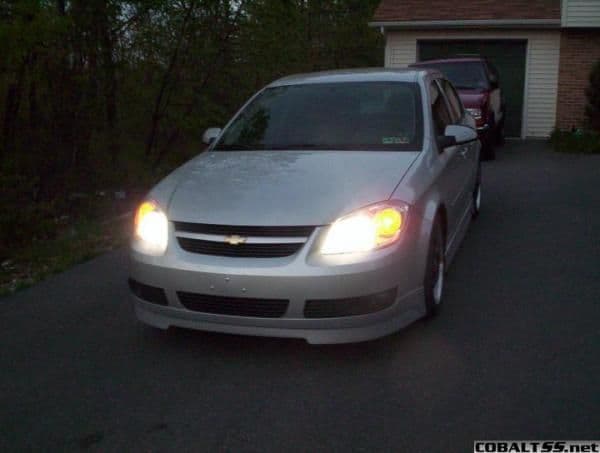
Looks sweet best 4 door cobalt I've seen. Do you have any room to lower it I don't know how far the front valence is from the ground but it looks like you could put on a small drop.
05-24-2006, 11:33 PM
#4
Senior Member
Thread Starter
Join Date: 09-27-05
Location: Pocono's
Posts: 989
Likes: 0
Received 0 Likes
on
0 Posts
Originally Posted by glockglade
Looks sweet best 4 door cobalt I've seen. Do you have any room to lower it I don't know how far the front valence is from the ground but it looks like you could put on a small drop.
its already dropped i got sprint springs on there i cant even get a jack under there its kinda annoying actually lol.
 05-26-2006, 09:18 PM
#6
I'm old school
I've had my kit on for about a year now. I have removed the front since due to poor ground clearance in city driving. I just kept beating the **** out of it. I had the rocker panels (skirts) adhesive fail after about 2 months due to the skirt stretching a bit putting some bow into the piece. I corrected that by shimming out the rear attach point in the wheel well and taking up that stretched slack. Otherwise, I haven't had any problems.
 05-29-2006, 08:49 PM
#10
I'm old school
Originally Posted by biohazard
wheres the cheapest place to get one of these kits? if i could get a prepainted black one thatd b cool
05-29-2006, 10:53 PM
#11
Senior Member
Thread Starter
Join Date: 09-27-05
Location: Pocono's
Posts: 989
Likes: 0
Received 0 Likes
on
0 Posts
Originally Posted by sweettheshocker
I think bigger wheels/smaller tires would change the look considerably... but I can't talk, cause I'm broke
come dude you live where i live and you honestly think you can roll around with comfort with the roads around here with anything less than 40-45 series? unless you like bent rims everyday...but its true the rims look a lil small only because of the style they are, they have a 3 inch lip on the edge of the rims hence giving it an appearance of them being smaller than they really are.
05-29-2006, 10:53 PM
#12
Senior Member
Thread Starter
Join Date: 09-27-05
Location: Pocono's
Posts: 989
Likes: 0
Received 0 Likes
on
0 Posts
Originally Posted by Halfcent
You won't get one pre-painted, I can assure you of that. However, PM Racecrafter right here on this site and he'll give you about 10% off I think. He's the RK Sport rep here at CSS.net.


Thread
Thread Starter
Forum
Replies
Last Post
Jesse
Problems/Service/Maintenance
2
09-28-2015 12:51 PM