2.0 LSJ Engine: (How-to) Port & Polish your Supercharger!


 08-03-2009, 05:47 PM
#27
Senior Member

Join Date: 10-27-08
Location: ohio
Posts: 1,420
Likes: 0
Received 0 Likes
on
0 Posts
anyone live in ohio that wants to do this? lol i dont have the time to take it out and port and polish mine... ile also buy one if anyone wants to trade me ur ported blower for my stock m62(never off a stock pully) +cash
 08-28-2009, 09:49 AM
#29
Senior Member
Thread Starter
11-05-2009, 03:57 AM
#31
Senior Member

Join Date: 06-11-09
Location: Iowa
Posts: 636
Likes: 0
Received 0 Likes
on
0 Posts
nothanks
not trying to be rude i think this is a great write up however id like to see the underside of the supercharger i dont know why you didnt get one thats the most importan also wondering if you did tb as well
11-05-2009, 04:41 PM
#32
Senior Member

Join Date: 07-27-09
Location: Proctorville OH
Posts: 1,868
Likes: 0
Received 0 Likes
on
0 Posts
11-06-2009, 04:17 PM
#33
Senior Member
Thread Starter
I've been running this since I started this thread....No Cells....Faster response....Lower intake temps...A little more power, I see no down side, unless your an idiot & will screw it up... then leave it to the pros!
Yes they are, pic is upside down. I did not plug mine, it isn't worth it to me!
Last edited by BlilBT; 11-06-2009 at 04:18 PM. Reason: Automerged Doublepost

 12-02-2013, 09:13 PM
#37
New Member

Join Date: 02-16-13
Location: belleville, ontario
Posts: 91
Likes: 0
Received 0 Likes
on
0 Posts
When removing the snout, you mention the endplate being attached to the rotors. Do they have to be seperated, and the fan removed from the inlet? i just dont see how the rotors remove from the snout end with there just being the 2 holes for the bearings.
12-02-2013, 09:59 PM
#38
New Member

Join Date: 08-11-13
Location: boaz alabama
Posts: 8
Likes: 0
Received 0 Likes
on
0 Posts
For people questioning this its pretty simple. Its pretty much like how everyone wants an aftermarket air intake or header, the better the flow the more horsepower/torque you will get. With the rough edges taken out and polished the air flows better so your more efficient.
02-26-2014, 09:39 PM
#39
New Member

Join Date: 01-26-14
Location: El paso, Tx
Posts: 59
Likes: 0
Received 0 Likes
on
0 Posts
I have ah question on these, the rotor do they ahve to be really still with out movement or can they have some movement and im talking about to like the side and up and down not like turning
07-28-2016, 04:47 PM
#41
Senior Member
iTrader: (10)

Join Date: 03-29-07
Location: UTAH
Posts: 1,137
Likes: 0
Received 0 Likes
on
0 Posts
I'll try & explian this the best I can, This thread on Polishing will help with tools reguired!Detailing Polishing 101 (How-To) - Cobalt SS Network
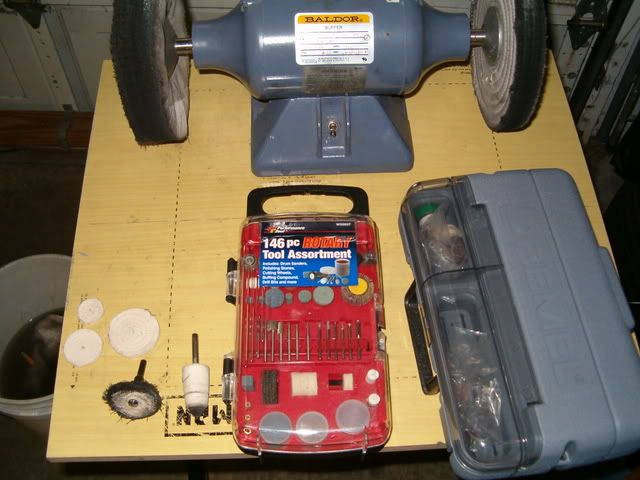
1st some of the tools
1 dremel
1 dremel kit as seen in Pic #1
In Pic #1 you can see a sanding wheel on the right side of kit with a Yellow top, It is 80 grit & That wheel is the 1 I used the most to do this Job! Actually I wore it down to nothing so if you get 1 >> Get 2, I got that kit at Pep boys automotive. There are also grinding stones & bits in that Kit that are useful!
Pic #1
Ok Now that you Know what you need it's time to start taking apart the supercharger!
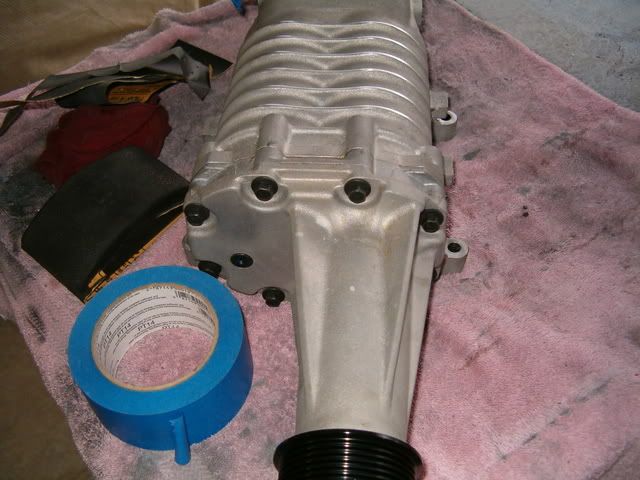
In pic #2 you will see a black drain Plug for the Oil! there is at the most 3 ounces of fluid in the snout you need to drain out that plug & catch in a clean cup or what ever if you plan on reusing it!
Now that the Oil is drained Take out all bolts on the snout, After removing the bolts use a small Flat head screw driver to get the casing to separate as it does some oil may come out so be sure to hold it over a catch pan!
Pic #2
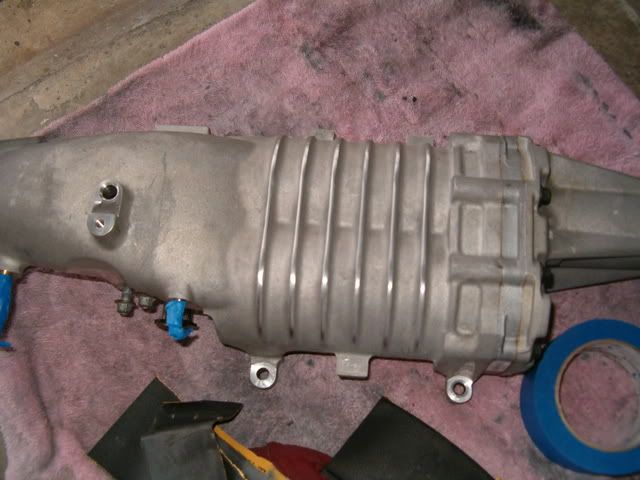
Now that you have all the oil drianed separate the Snout from the rest of the casing by prying it apart just be carefull not to scare up the surface were the 2 meet! With the snout off you will be looking at the drive gears which are mounted to the center plate seen in Pic #3 as the darker gray Plate between the Housing & the Snout! when you pry this plate off the Blades for the supercharger will come with it so be Carefull & slide them straight out!
This step is not that difficult just be easy when separating the the plates!
Pic #3
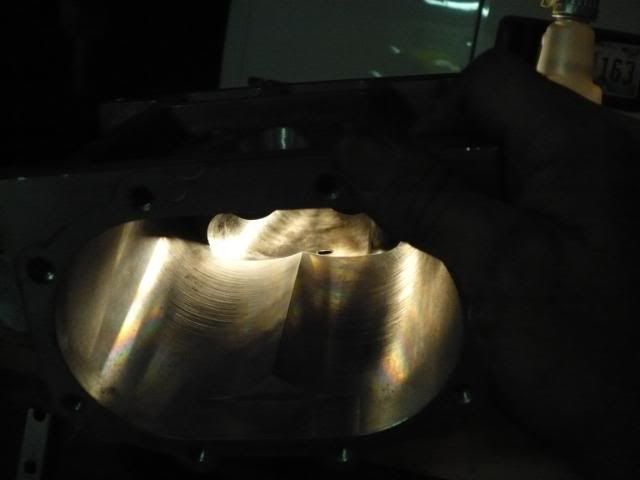
Now you have a supercharger that looks like this from the snout end! In this Picture at the Bottom of the supercharger you can see 2 Holes>> Them are the bearings for the Blades to rest in>> You need to fill them to the top with Paper Towel or Toilet Paper so no Shavings from the sanding gets in them or the bearings will be shot!
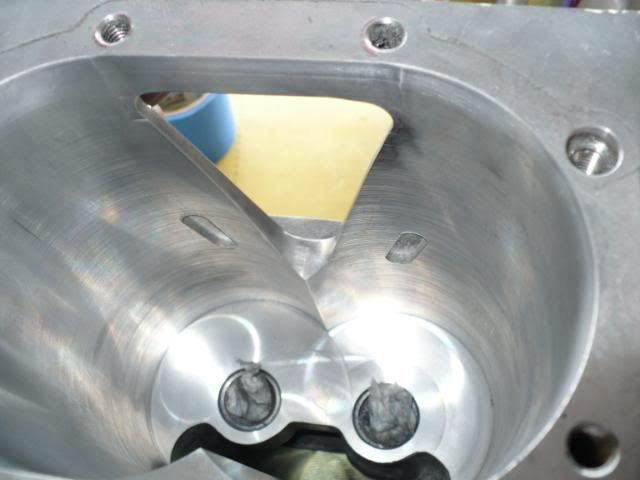
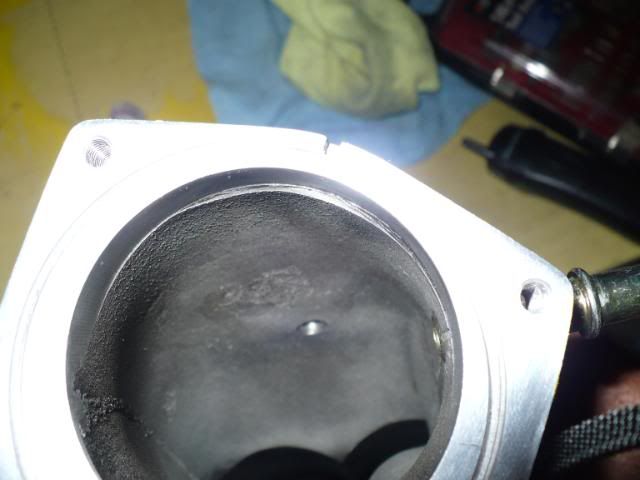
Ok Now it is Time to start Porting & Polishing your Supercharger, looking at it from the neck end you can see all the roughness & Slag inside as seen in Pic #4 & #5
Pic #4
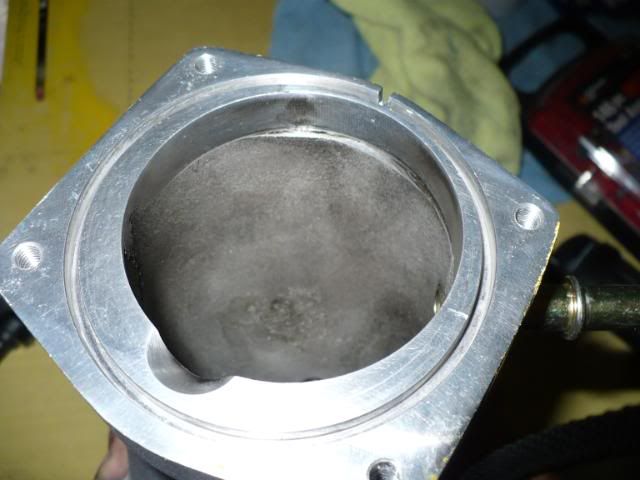
Pic #5
All the rough areas should be sanded down smooth>>> This will reguire you reaching in from both ends the Neck end & the Blade end with your dremel, Just be carefull when reaching in the Blade end not to mess up the machined finish! If you have an extension for you dremel for this step it helps alot when you have big hands!
When sanding inside the Housing you will have to use the different size sanding wheels that come in the dremel Kit! It will be up to you to decide which 1 ones to use where, The 3 I used the Most where the small drum, The large drum & the Yellow paddle wheel as stated above!
Polishing it after sanding follows the guidlines stated in the Polishing link at top of page!
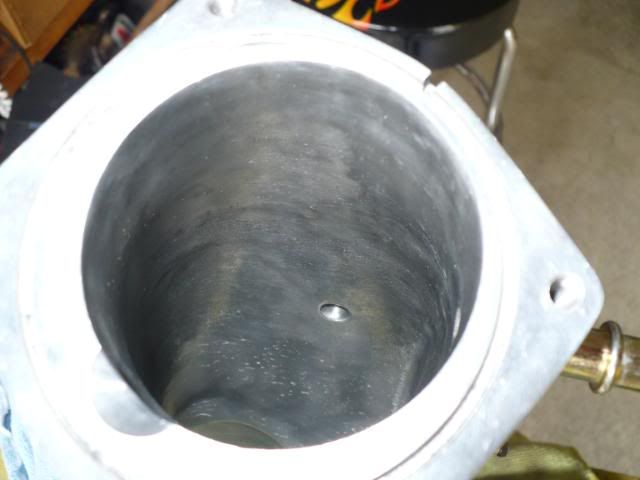
Now you Neck & The inlet Chamber should be Smooth & Looking good as seen in Pics #6 & #7
Pic #6
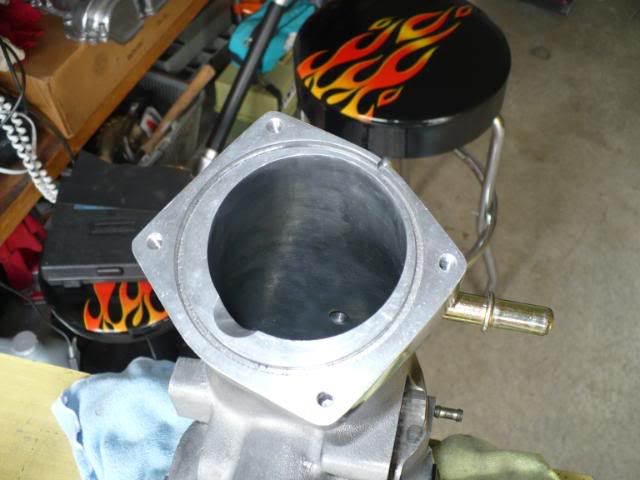
Pic #7
Now it is time for the Outlet port, this is up to you on how Much to remove But removing to much can hurt! I simple took a ruler & mark a Line around the triangle just under 1/8 of a inch all the way around all 3 sides on the bottom side! Now grind the opening to the Lines you put on the Bottom keeping it as straight as possible! when done it will look like pic #8 >> Again be carefull not to hit the machined finish were the Blades go & if you do sand it with some 1000 grit to smooth it back out & dont leave any Metal burrs!
Make sure to Blow out the metal shavings often & to clean it out well before moving to the Polishing! The left over shavings could play hell on your Supercharger if not clean out well!
Now Polish everything with your Polishing wheels & metal Polish to a shine, Then wipe it down with a clean colth & blow out with air! Your supercharger should look like this!
Looking from the Blades back thru the neck!
Looking from the neck end!
just a few more shots!
Now put your supercharger back together the same way you took it apart, remove the tissue from the bearings that you put in Install the Blades! Now line up the up the 2 Dimples on the Snout shaft with the recessed holes on the Main gear drive & slide together>>> then replace your Bolts & refill with Oil.
Your done!
I did this in 1 1/2 days & I would suggest that you practice a little 1st on something to get use to the tools if you are not acustom to sanding with a Dremel!
Happy Modding!
1st some of the tools
1 dremel
1 dremel kit as seen in Pic #1
In Pic #1 you can see a sanding wheel on the right side of kit with a Yellow top, It is 80 grit & That wheel is the 1 I used the most to do this Job! Actually I wore it down to nothing so if you get 1 >> Get 2, I got that kit at Pep boys automotive. There are also grinding stones & bits in that Kit that are useful!
Pic #1
Ok Now that you Know what you need it's time to start taking apart the supercharger!
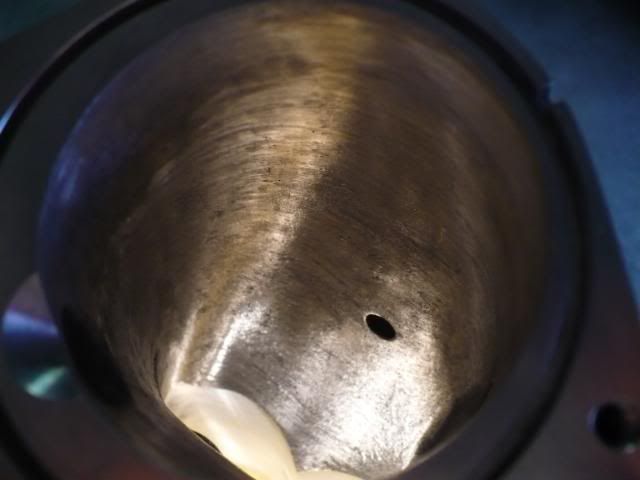
In pic #2 you will see a black drain Plug for the Oil! there is at the most 3 ounces of fluid in the snout you need to drain out that plug & catch in a clean cup or what ever if you plan on reusing it!
Now that the Oil is drained Take out all bolts on the snout, After removing the bolts use a small Flat head screw driver to get the casing to separate as it does some oil may come out so be sure to hold it over a catch pan!
Pic #2
Now that you have all the oil drianed separate the Snout from the rest of the casing by prying it apart just be carefull not to scare up the surface were the 2 meet! With the snout off you will be looking at the drive gears which are mounted to the center plate seen in Pic #3 as the darker gray Plate between the Housing & the Snout! when you pry this plate off the Blades for the supercharger will come with it so be Carefull & slide them straight out!
This step is not that difficult just be easy when separating the the plates!
Pic #3
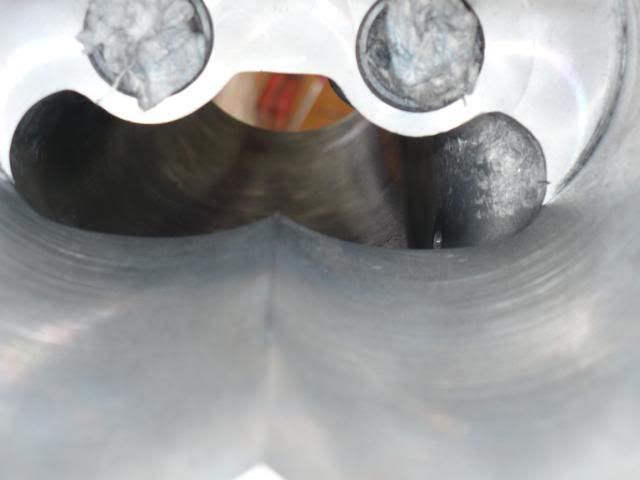
Now you have a supercharger that looks like this from the snout end! In this Picture at the Bottom of the supercharger you can see 2 Holes>> Them are the bearings for the Blades to rest in>> You need to fill them to the top with Paper Towel or Toilet Paper so no Shavings from the sanding gets in them or the bearings will be shot!
Ok Now it is Time to start Porting & Polishing your Supercharger, looking at it from the neck end you can see all the roughness & Slag inside as seen in Pic #4 & #5
Pic #4
Pic #5
All the rough areas should be sanded down smooth>>> This will reguire you reaching in from both ends the Neck end & the Blade end with your dremel, Just be carefull when reaching in the Blade end not to mess up the machined finish! If you have an extension for you dremel for this step it helps alot when you have big hands!
When sanding inside the Housing you will have to use the different size sanding wheels that come in the dremel Kit! It will be up to you to decide which 1 ones to use where, The 3 I used the Most where the small drum, The large drum & the Yellow paddle wheel as stated above!
Polishing it after sanding follows the guidlines stated in the Polishing link at top of page!
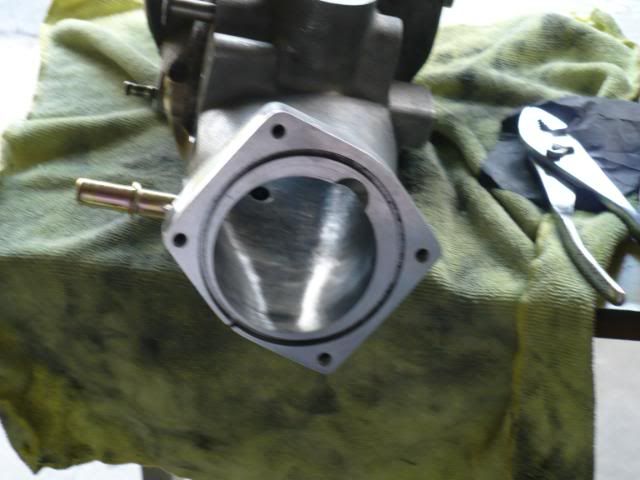
Now you Neck & The inlet Chamber should be Smooth & Looking good as seen in Pics #6 & #7
Pic #6
Pic #7
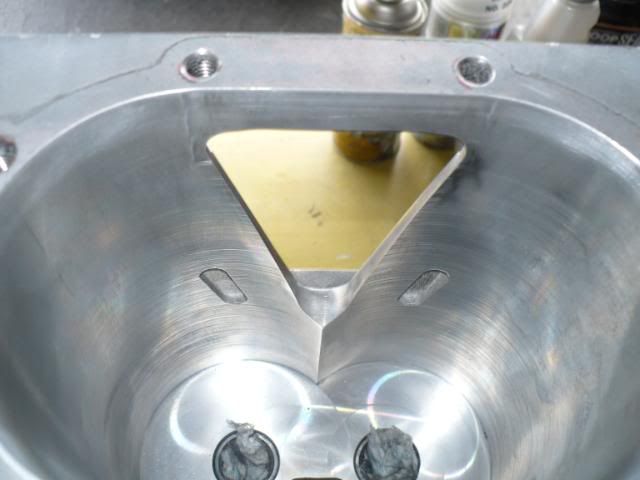
Now it is time for the Outlet port, this is up to you on how Much to remove But removing to much can hurt! I simple took a ruler & mark a Line around the triangle just under 1/8 of a inch all the way around all 3 sides on the bottom side! Now grind the opening to the Lines you put on the Bottom keeping it as straight as possible! when done it will look like pic #8 >> Again be carefull not to hit the machined finish were the Blades go & if you do sand it with some 1000 grit to smooth it back out & dont leave any Metal burrs!
Make sure to Blow out the metal shavings often & to clean it out well before moving to the Polishing! The left over shavings could play hell on your Supercharger if not clean out well!
Now Polish everything with your Polishing wheels & metal Polish to a shine, Then wipe it down with a clean colth & blow out with air! Your supercharger should look like this!
Looking from the Blades back thru the neck!
Looking from the neck end!
just a few more shots!
Now put your supercharger back together the same way you took it apart, remove the tissue from the bearings that you put in Install the Blades! Now line up the up the 2 Dimples on the Snout shaft with the recessed holes on the Main gear drive & slide together>>> then replace your Bolts & refill with Oil.
Your done!
I did this in 1 1/2 days & I would suggest that you practice a little 1st on something to get use to the tools if you are not acustom to sanding with a Dremel!
Happy Modding!

Thread
Thread Starter
Forum
Replies
Last Post

