Wheels/Tires: How to: Painting your stock rims
 05-18-2006, 09:50 AM
#1
Member
Thread Starter

Join Date: 04-20-06
Location: Warren, MI
Posts: 308
Likes: 0
Received 0 Likes
on
0 Posts
How to: Painting your stock rims
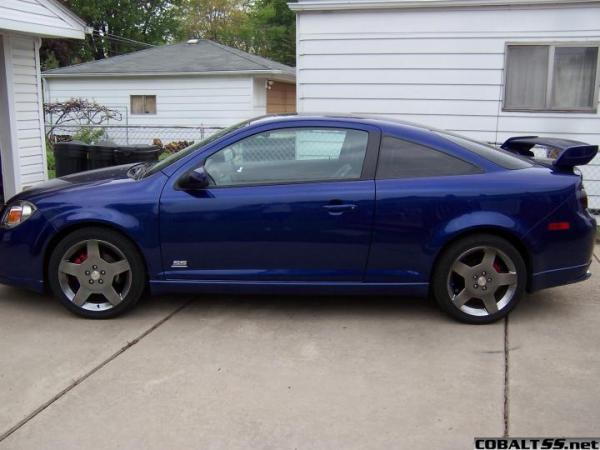
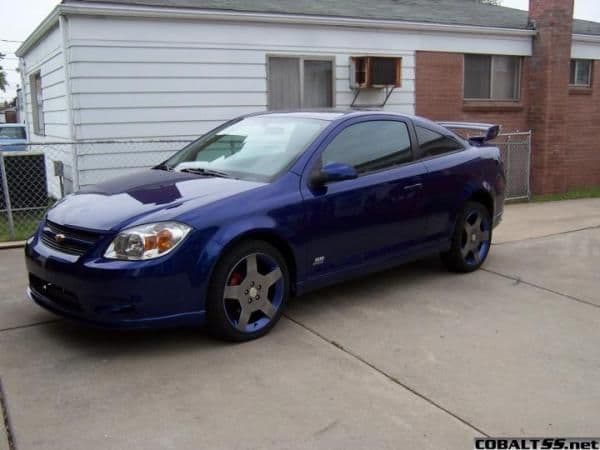
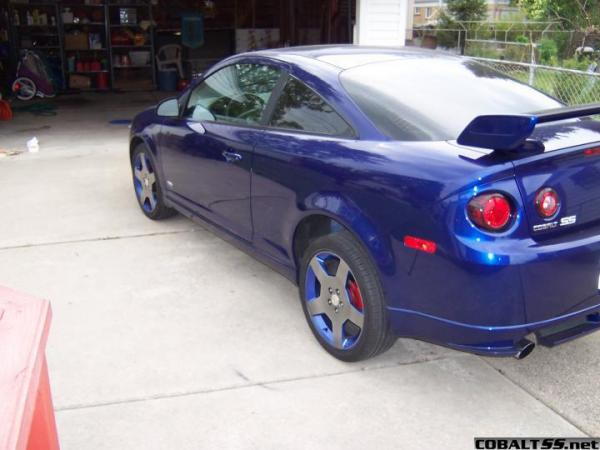
Hey all, just wanted to give you guys a new How-To-Guide on modifying your stock rims. I did this project back in 95 with my Ford Escort, and in 2001 with my F-150. Now I did it again with my 06 Cobalt SS/SC.
For now these are my rims but they will become my winter rims when I get my summer ones
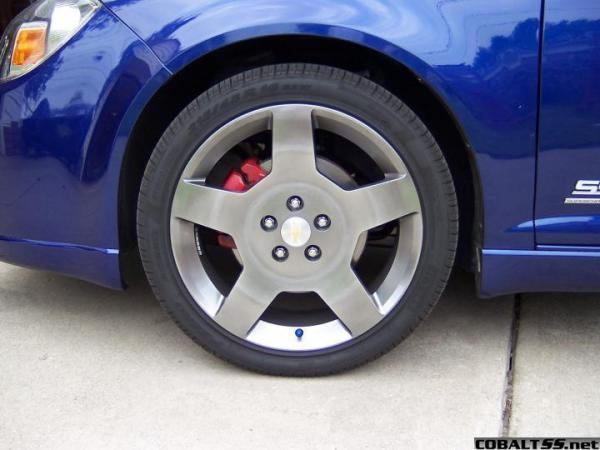
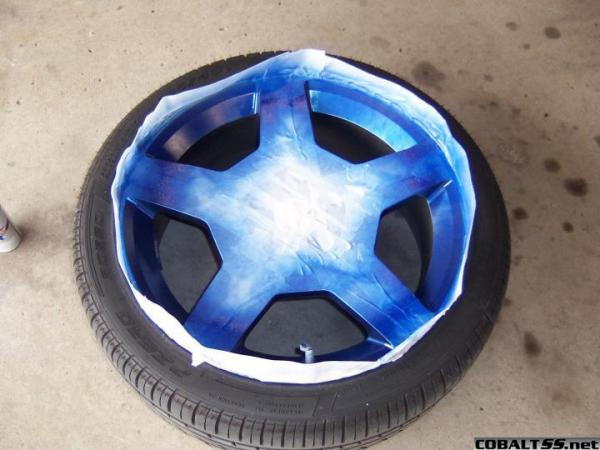
Borring stock rims
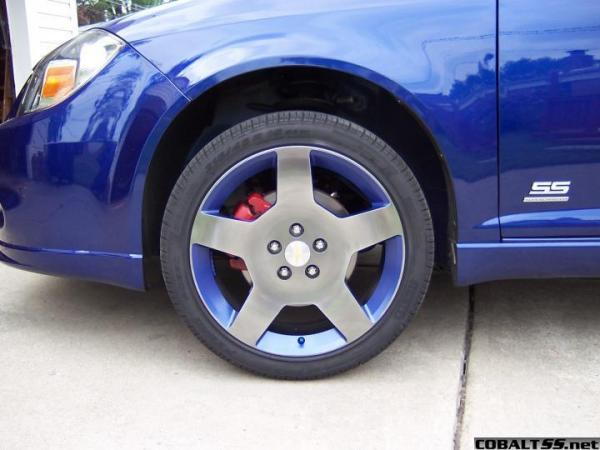
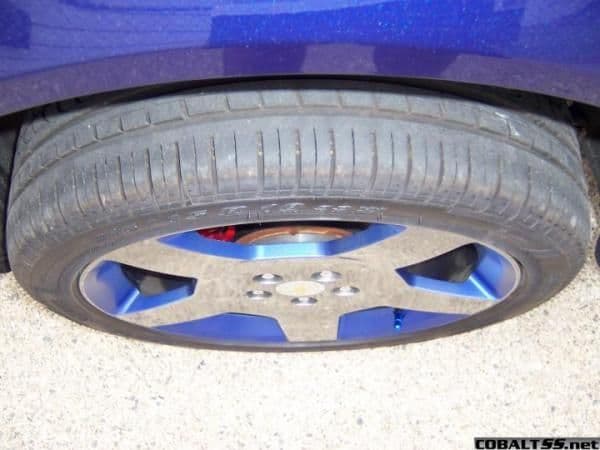
Modified stock rims
This project took me about 4 hours from start to finish. The most time consuming was in the taping of the rims. I'm a real sticker when it comes to perfection so my tape lines are 99.99% flawless.
Materials I used were:
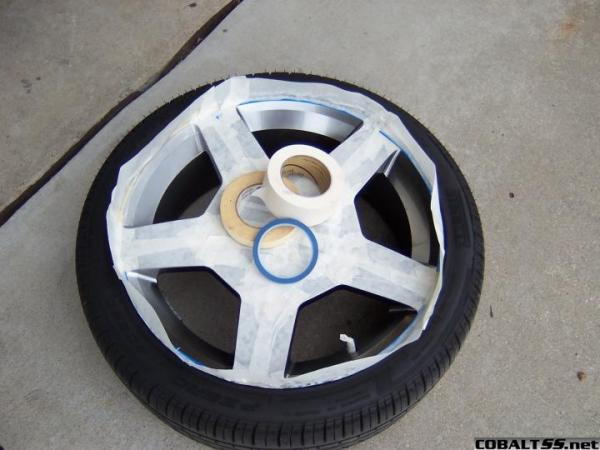
2" Masking Tape
1" Masking tape
1/4" Body shop blue tape (don't know what its called, found it in my tool box from years ago)
200 grit sand paper
2 cans of Electron Blue Pearl Dupli Color 5oz Spray paint.
1 Razor blade
Step 1: Wash your rims very good.
Step 2: Remove a rim from the car (what a suprise). Removing your rims from the car will prevent any overspray from getting onto your car from the spray can that might get picked up in case of a sudden gust of wind while your painting.
Step 3: Start taping off your rims, don't forget to tape off the valve stems too.

Step 4: Sanding. Once your rims are all taped off then use 200 grit sand paper to sand the areas that you want painted.
Step 5: Start painting. Once your rims are taped off. Start applying your paint in VERY LIGTH strokes. Your first coat should not cover the entire surface completely. It will take 2-3 coats before the entire area's are covered in paint. Let each coat dry for 10-15 minutes before you apply your next coat.
Coat 4
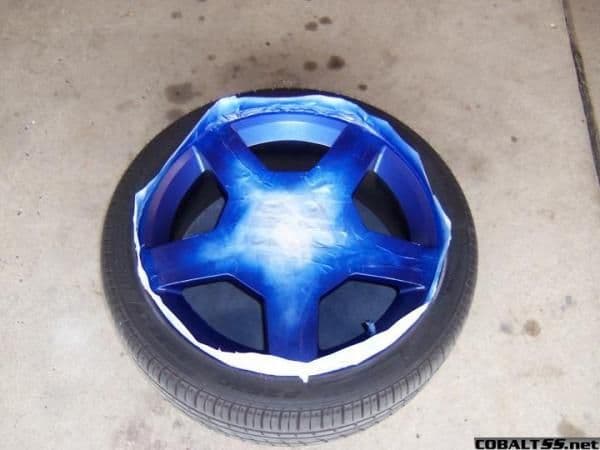
Step 6: Remove your tape. Once you are all done painting, let your 4th coat dry for 20-30 minutes. Then remove the tape.
Step 7: Final touches. Once all the tape is removed, I used a strait edge razor blade on an angle to scrape an outline & clean up the edges.
Step 8: Mount and enjoy

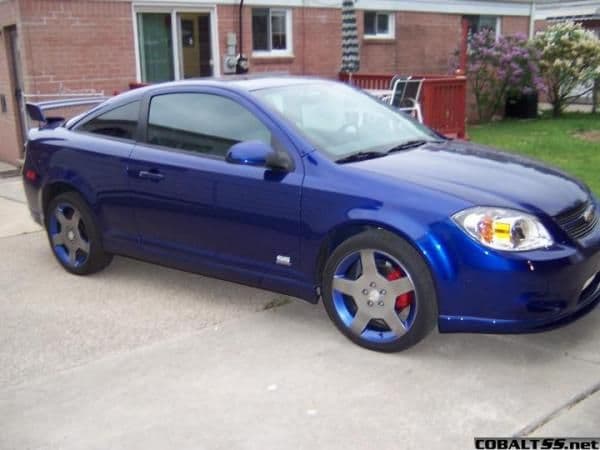
For now these are my rims but they will become my winter rims when I get my summer ones
Borring stock rims
Modified stock rims
This project took me about 4 hours from start to finish. The most time consuming was in the taping of the rims. I'm a real sticker when it comes to perfection so my tape lines are 99.99% flawless.
Materials I used were:
2" Masking Tape
1" Masking tape
1/4" Body shop blue tape (don't know what its called, found it in my tool box from years ago)
200 grit sand paper
2 cans of Electron Blue Pearl Dupli Color 5oz Spray paint.
1 Razor blade
Step 1: Wash your rims very good.
Step 2: Remove a rim from the car (what a suprise). Removing your rims from the car will prevent any overspray from getting onto your car from the spray can that might get picked up in case of a sudden gust of wind while your painting.
Step 3: Start taping off your rims, don't forget to tape off the valve stems too.
Step 4: Sanding. Once your rims are all taped off then use 200 grit sand paper to sand the areas that you want painted.
Step 5: Start painting. Once your rims are taped off. Start applying your paint in VERY LIGTH strokes. Your first coat should not cover the entire surface completely. It will take 2-3 coats before the entire area's are covered in paint. Let each coat dry for 10-15 minutes before you apply your next coat.
Coat 4
Step 6: Remove your tape. Once you are all done painting, let your 4th coat dry for 20-30 minutes. Then remove the tape.
Step 7: Final touches. Once all the tape is removed, I used a strait edge razor blade on an angle to scrape an outline & clean up the edges.
Step 8: Mount and enjoy
Last edited by TommyP; 05-17-2012 at 08:58 PM.


 05-18-2006, 09:54 AM
#3
Member

Join Date: 05-01-05
Location: Arizona City, AZ
Posts: 318
Likes: 0
Received 0 Likes
on
0 Posts
Good workmanship there and also a nice How-To.
But my personal preferance I don't like how the rims look accented to the color of the car. Should have smoked out the factory rims
But my personal preferance I don't like how the rims look accented to the color of the car. Should have smoked out the factory rims
05-18-2006, 11:29 AM
#5
Senior Member

Join Date: 11-15-05
Location: Egg Harbor Township, NJ
Posts: 993
Likes: 0
Received 0 Likes
on
0 Posts
Originally Posted by Gorilla unit 33
What about doing this black on a black balt. think it'll look good?
05-18-2006, 11:34 AM
#6
Senior Member

Join Date: 09-14-05
Location: Phx, AZ
Posts: 6,697
Likes: 0
Received 0 Likes
on
0 Posts
hmm that looks really really good. what do you guys think of maybe blacking the front of the rims then accenting as illustrated with red ... with a redchevy symbol?
05-18-2006, 11:41 AM
#7
Senior Member

Join Date: 04-30-06
Location: Livonia, Michigan
Posts: 520
Likes: 0
Received 0 Likes
on
0 Posts
How well does the paint adhere to the rims? I am wondering because if I did smoke mine out I wouldn't want to have to worry about them chipping off from regular wear and tear.
 05-18-2006, 11:51 AM
#10
Banned

Join Date: 02-01-06
Location: PHILLY BURBS
Posts: 177
Likes: 0
Received 0 Likes
on
0 Posts
Originally Posted by OniMirage
hmm that looks really really good. what do you guys think of maybe blacking the front of the rims then accenting as illustrated with red ... with a redchevy symbol?
hotness. i was thinking blacking the rim with red accent and red calipers. I have black with red inserts
05-18-2006, 11:52 AM
#11
Banned
Join Date: 02-01-06
Location: PHILLY BURBS
Posts: 177
Likes: 0
Received 0 Likes
on
0 Posts
Originally Posted by CobaltBurst
duplicolor was chipping/flaking on someones calipers after a couple thousand miles, it would be a pain to repaint these over and over.... does it last a while?
the guy who had the chipping didn't prep the surface properlly. they should never ship if done correctly. Clean, scuff, wipe, paint
05-18-2006, 11:58 AM
#12
Senior Member
Join Date: 09-14-05
Location: Phx, AZ
Posts: 6,697
Likes: 0
Received 0 Likes
on
0 Posts
Originally Posted by Gorilla unit 33
hotness. i was thinking blacking the rim with red accent and red calipers. I have black with red inserts
05-18-2006, 11:59 AM
#13
Senior Member
Join Date: 09-14-05
Location: Phx, AZ
Posts: 6,697
Likes: 0
Received 0 Likes
on
0 Posts
Originally Posted by Gorilla unit 33
the guy who had the chipping didn't prep the surface properlly. they should never ship if done correctly. Clean, scuff, wipe, paint
05-18-2006, 12:19 PM
#17
Member

Join Date: 09-30-05
Location: Richmond, TX
Posts: 349
Likes: 0
Received 0 Likes
on
0 Posts
i think that looks REALLY good.
i'm not usually a fan of color-matched rims (a few sets looked okay on third-gen Camaros), but those came out looking really clean.
any idea how that particular blue might match up to an Arrival Blue Metallic car?
i'm not usually a fan of color-matched rims (a few sets looked okay on third-gen Camaros), but those came out looking really clean.
any idea how that particular blue might match up to an Arrival Blue Metallic car?
 05-18-2006, 12:41 PM
#20
Member
Thread Starter
Join Date: 04-20-06
Location: Warren, MI
Posts: 308
Likes: 0
Received 0 Likes
on
0 Posts
As far as the durability questions. Like I mentioned in my first post. I did this to my past 2 vehicles and the never peeled, chipped cracked etc. My Escort had 140K miles on it and my F-150 had 130K miles. You MUST sand them and they must be clean so the paint adheres to the rims. Paint in light coats and give the final coat a longer drying time before you take the tape off. I like in Michigan where there's snow on the ground 7-8 months out of th e year. Painted rims like these can handle the harsh weather.
As far as color matching. I just went to Murry's and started spraying to see the blue colors that matched the closest to Laser Blue. I couln't tell you what colors of Dupli Color would match your car's color.
As far as color matching. I just went to Murry's and started spraying to see the blue colors that matched the closest to Laser Blue. I couln't tell you what colors of Dupli Color would match your car's color.


