Interior: How to upgrade the stock Pioneer sub to sound awesome and look stock. (With Pics)
 03-15-2009, 09:34 PM
#1
New Member
Thread Starter

Join Date: 06-21-07
Location: Sioux Falls, South Dakota
Posts: 106
Likes: 0
Received 0 Likes
on
0 Posts
How to upgrade the stock Pioneer sub to sound awesome and look stock. (With Pics)
This is a basic guide to upgrading your stock pioneer sub to something with a lot more thump while still maintaining balanced sound and a stock appearance.
Some things you need.
Screwdriver Set
A ratchet with an extension and 8mm, 10,mm, and 15mm sockets
A wire stripper and crimper
A rotary cutting tool such as a dremel
Caulk to seal the sub
A low profile replacement subwoofer
A 2 channel bridgeable amp
A subwoofer wiring kit and some half inch ring terminals. I used a 680 watt kit from walmart that came with 8 gauge cables and cost less than $30.
The first thing you need to do is remove the stock sub from the car. You need a 10mm deepwell socket and an extension to remove the four bolts that hold the sub in the car. I purchased a salvaged pioneer sub off of ebay for $30 so that I have the option of easily bolting the stock sub back in if I ever sell the car.
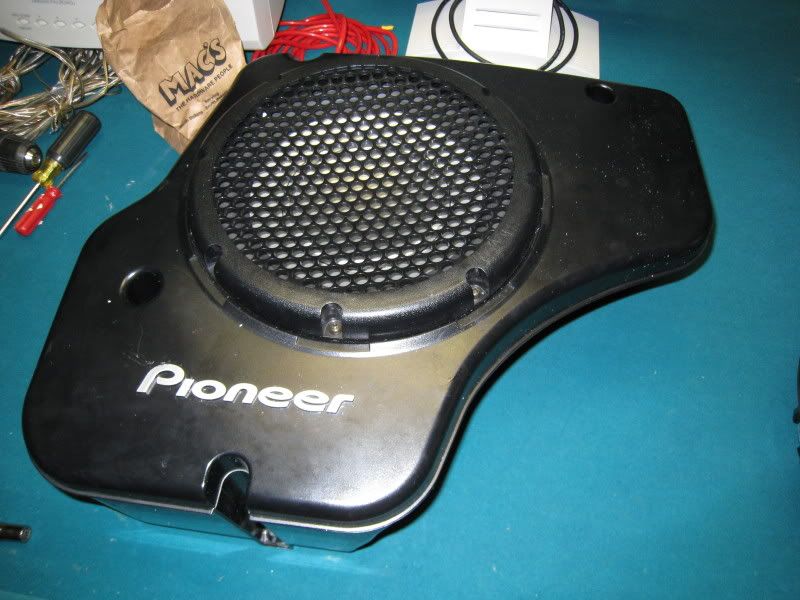
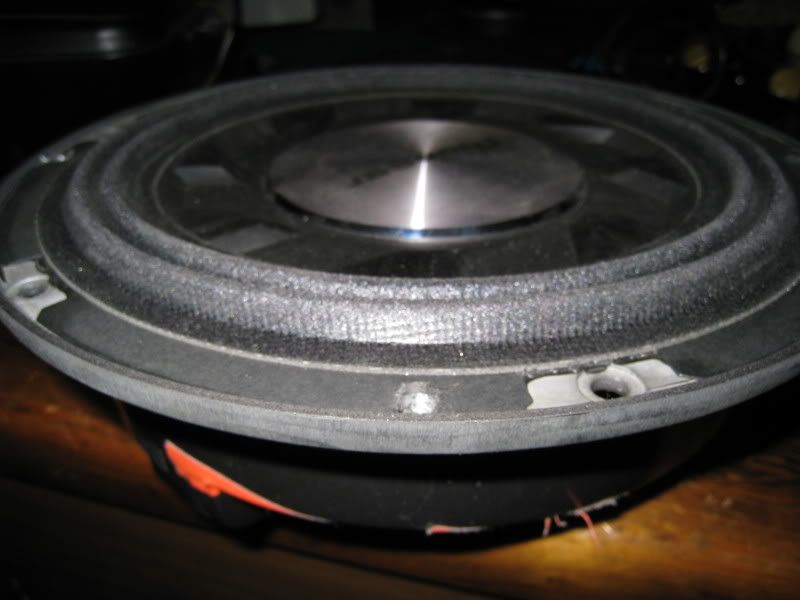
For starters here is the stock sub before modification.
I upgraded my setup with a pioneer TS-SW2541D ($80) and a GM-5300T amp ($110). I chose this setup because the sub fit in the stock enclosure and was perfect for the cubic feet of space it had. The amp is inexpensive and has plenty of power (380 watts RMS) and matches the subwoofers capabilities perfectly.
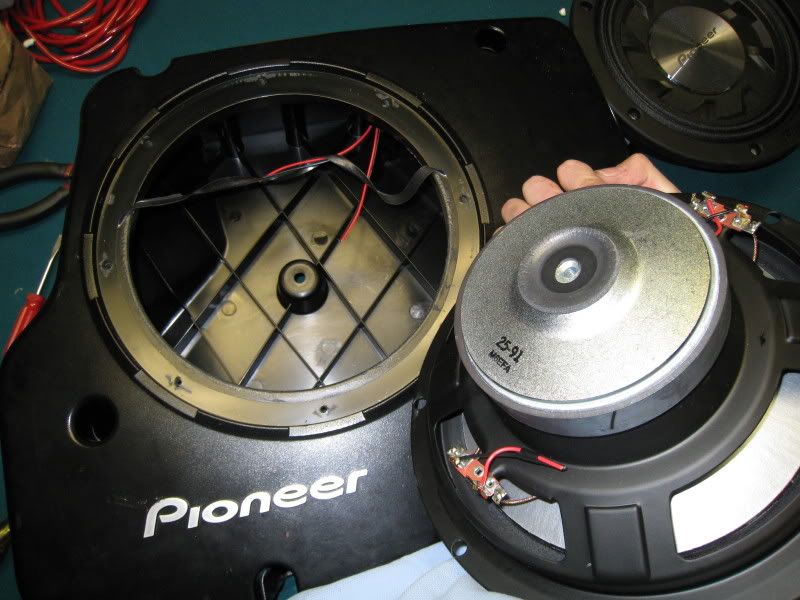
First you need to remove the stock sub from it's enclosure. Take out the bolt on center of the back side first with a 8mm socket and then remove all the screws from the front of the sub. You just need to gently pry along the edges and the sub should pop out of it's enclosure. Clip the wires and set it aside. Remove the stock wiring harness and set it aside also.
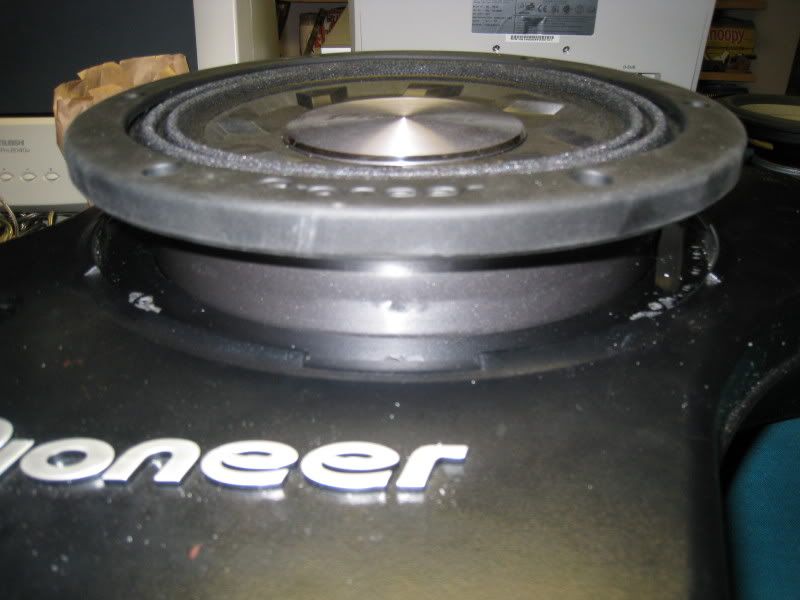
You will notice that the new sub is a little too big to fit in the enclosure. We will need to modify the enclosure and sub a bit to fit it properly.
First you need to break out your dremel and cutoff tool and cut the inner ring out of the sock sub box. What? You don't have a dremel? Well go get one!
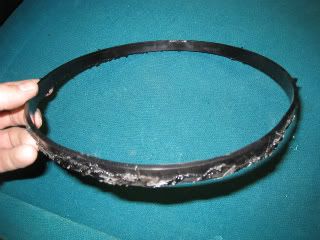
Now on to the subwoofer. Remove the rubber cover from the rim and also flip the sub over and put tape over ALL of the vents and holes. We will be doing some sanding and drilling and we don't want any shavings to get into the speaker and damage it.
First you need to take a sander, preferably a belt sander and sand the outside rim of the new sub until it is small enough to fit into the modified stock enclosure you have. Just keep sanding and test fitting until you are able to get the sub to drop into place. after you have gotten the sub to fit nicely you will notice that there are eight holes on the stock enclosure and only six on the sub. Take the stock grill and use that as a template to drill the extra needed holes. Two of the holes will line up properly already so put two screws through them so that the grill will not shift while drilling the rest. Set the subwoofer somewhere safe where you can drill the holes without damaging anything underneath and carefully drill the remaining six holes.
If you have done this properly you will now be able to line up all your holes in the grill, sub and enclosure.
Once you are satisfied with the fit of the sub then you can pull it back out and set it aside. You can also take the tape off the back once you clean off all the metal shavings.
Feed some speaker into the enclosure and strip the ends of the cable. I used 5 feet of 16 gauge speaker wire which fit tightly through the hole where the stock wiring came out. Find a bolt and a nut and use them to seal the hole in the bottom of the enclosure. I used a half inch thick bolt and a couple washers to ensure it sealed.
Now you need to caulk around the entire mounting area of the enclosure. Lay a nice thick bead right across the holes, hook up the speaker wires, and then gently ease the sub onto the caulk.
Now put the stock grille onto the sub and put the six screws that came with your subwoofer in and use the stock screws for the remaining two. You should use the longer screws that came with the sub as the stock screws are too short to hold well enough on their own. The caulk will come out of the holes and edges a bit and you can wipe this off once the screws are tight. You should also caulk the hole where the speaker wire comes out of the enclosure. This caulk is essential because the sub will leak and sound terrible if you don't seal it properly.
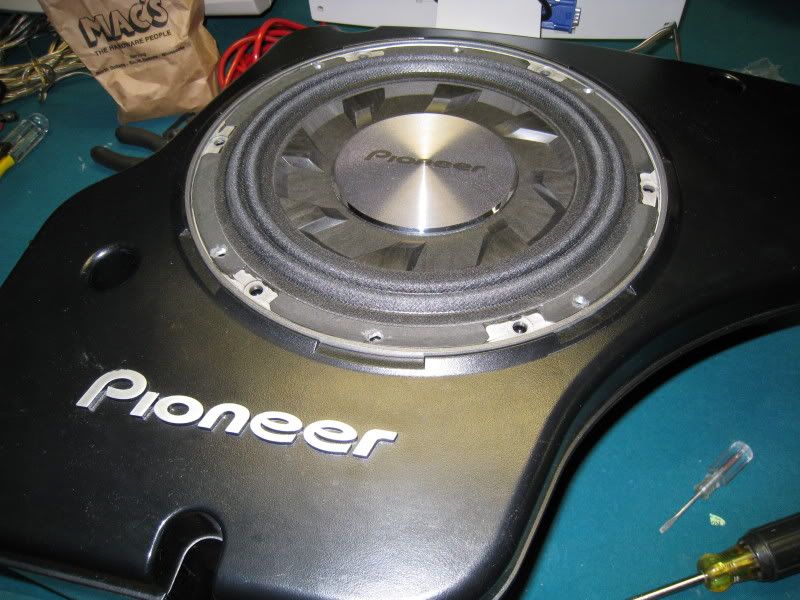
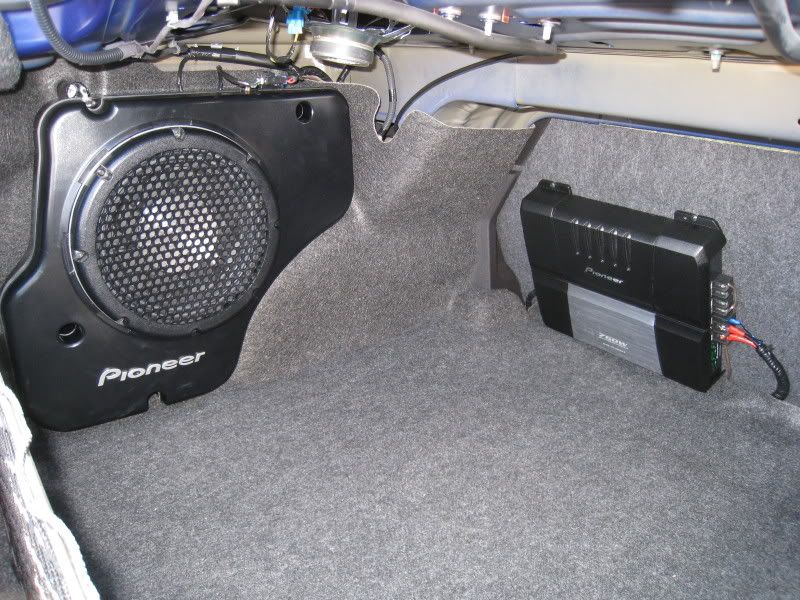
Here is the completed subwoofer.
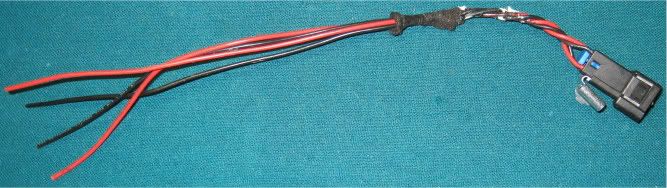
The last thing you need to do is make an adapter cable for hooking your stock sub output to the high level input of the amp. Just follow the wiring diagram for the amp and hook the positive and negative for the left and right up to their counterparts on the stock connector you took out of the box. Don't worry about what is left or right, just make sure positive and negative are correct for each pair. I used 16 gauge speaker wire and end to end crimp connectors to make a five foot cable. I put the wires in a flex tube and taped it's entire length with black electrical tape.


Install Phase
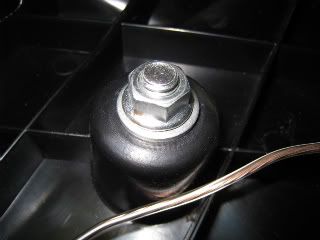
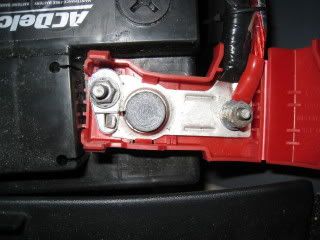
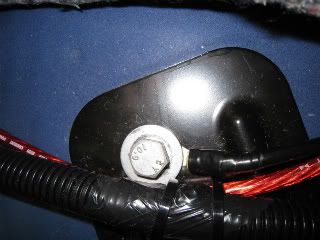
Mount the amplifier to the back of the drivers side rear seat as low as possible to minimize the amount of cable you will see. Take the carpet out of your trunk and run your positive power cable along the main battery cable all the way to where your amp is mounted. I used zip ties to secure the cable. Remove the fuse from the power cable and then hook the cable up to the battery. The positive cable comes with a ring connector so all you need is a nut to go onto the provided stud. For the ground cable I crimped on the half inch ring terminal onto the ground cable and out it under the bolt that is right next to the amp. You need a 15mm socket to remove this bolt. Now just trim the positive and ground cables to the proper length leaving enough slack so that the seat folds down properly and crimp the nice terminal connectors that were provided with your kit onto the cables.
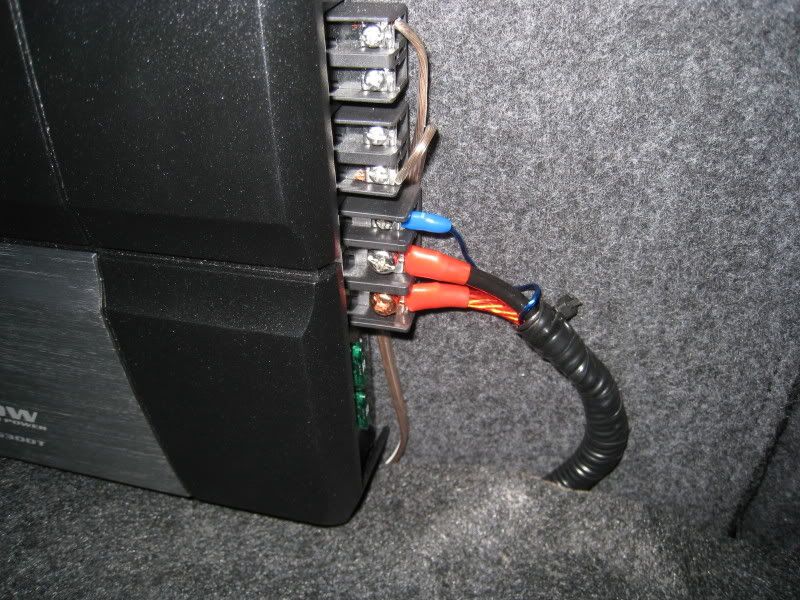
Here is the completed power wiring.
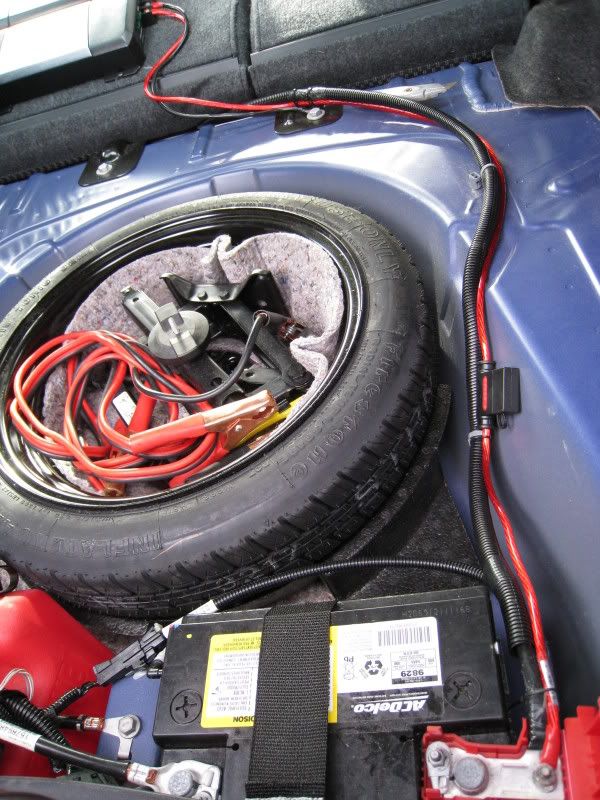
Mount your subwoofer into place and route the speaker wire and high level cable behind the trunk lining to the amplifier and connect them. You want to bridge the amp so hook the speaker wires to the outer connectors on each side.
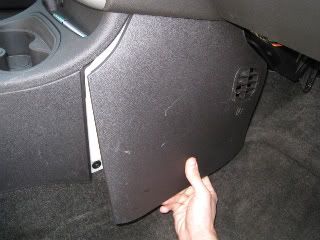
Now you need to run the remote wire up front to the fuse box. I ran it along the drivers side since there were plenty of places to ziptie the wire out of the way under the dashboard. Run the remote wire to the fuse box which is on the passenger side of the center console. To remove the cover simply grab the bottom and tug firmly.
Strip one inch off of the end of the remote cable. Take the fuse for the power windows out and insert it half way into one side of the fuse.
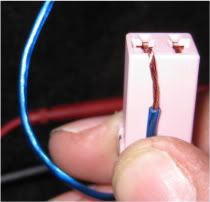
Now carefully put the fuse back in place and it should pull the wire into the socket and make a very secure connection.
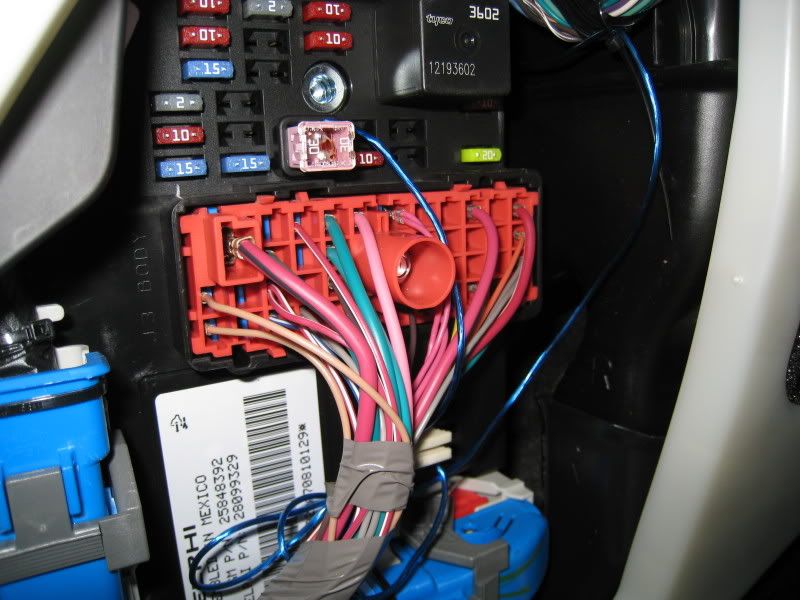
The reason for using the power window fuse is simple. It only turns on when the key is turned on and it will continue to power when you take the key out but don't open the door (which would shut off the stereo and power windows and your amp). It also remains off when you remote start your car so you won't have your amp needlessly running.
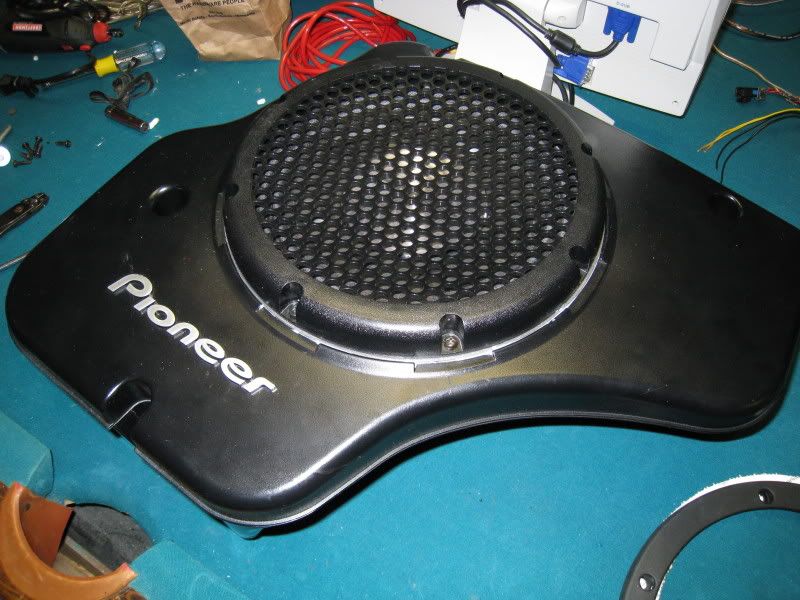
Here is the completed system.
I set the gain on the amp to a little less then half. I run my headunit with the treble and bass maxed and the system sounds fantastic. It can rumble and shake when there is music with lots of bass and it is balanced and not too boomy when it is not supposed to be. The bass scales perfectly with volume. If you setup the system the way I have you can use the head units bass control to vary your bass down for when your passengers don't share the love of bass you do. There shouldn't be any problems with the sub hitting the stock grill unless you are playing techmaster *techno bass cd* at high volume levels. If you want to add that little bit of extra clearance for the woofer then add washers to the screws that hold the grill.
Some things you need.
Screwdriver Set
A ratchet with an extension and 8mm, 10,mm, and 15mm sockets
A wire stripper and crimper
A rotary cutting tool such as a dremel
Caulk to seal the sub
A low profile replacement subwoofer
A 2 channel bridgeable amp
A subwoofer wiring kit and some half inch ring terminals. I used a 680 watt kit from walmart that came with 8 gauge cables and cost less than $30.
The first thing you need to do is remove the stock sub from the car. You need a 10mm deepwell socket and an extension to remove the four bolts that hold the sub in the car. I purchased a salvaged pioneer sub off of ebay for $30 so that I have the option of easily bolting the stock sub back in if I ever sell the car.
For starters here is the stock sub before modification.
I upgraded my setup with a pioneer TS-SW2541D ($80) and a GM-5300T amp ($110). I chose this setup because the sub fit in the stock enclosure and was perfect for the cubic feet of space it had. The amp is inexpensive and has plenty of power (380 watts RMS) and matches the subwoofers capabilities perfectly.
First you need to remove the stock sub from it's enclosure. Take out the bolt on center of the back side first with a 8mm socket and then remove all the screws from the front of the sub. You just need to gently pry along the edges and the sub should pop out of it's enclosure. Clip the wires and set it aside. Remove the stock wiring harness and set it aside also.
You will notice that the new sub is a little too big to fit in the enclosure. We will need to modify the enclosure and sub a bit to fit it properly.
First you need to break out your dremel and cutoff tool and cut the inner ring out of the sock sub box. What? You don't have a dremel? Well go get one!
Now on to the subwoofer. Remove the rubber cover from the rim and also flip the sub over and put tape over ALL of the vents and holes. We will be doing some sanding and drilling and we don't want any shavings to get into the speaker and damage it.
First you need to take a sander, preferably a belt sander and sand the outside rim of the new sub until it is small enough to fit into the modified stock enclosure you have. Just keep sanding and test fitting until you are able to get the sub to drop into place. after you have gotten the sub to fit nicely you will notice that there are eight holes on the stock enclosure and only six on the sub. Take the stock grill and use that as a template to drill the extra needed holes. Two of the holes will line up properly already so put two screws through them so that the grill will not shift while drilling the rest. Set the subwoofer somewhere safe where you can drill the holes without damaging anything underneath and carefully drill the remaining six holes.
If you have done this properly you will now be able to line up all your holes in the grill, sub and enclosure.
Once you are satisfied with the fit of the sub then you can pull it back out and set it aside. You can also take the tape off the back once you clean off all the metal shavings.
Feed some speaker into the enclosure and strip the ends of the cable. I used 5 feet of 16 gauge speaker wire which fit tightly through the hole where the stock wiring came out. Find a bolt and a nut and use them to seal the hole in the bottom of the enclosure. I used a half inch thick bolt and a couple washers to ensure it sealed.
Now you need to caulk around the entire mounting area of the enclosure. Lay a nice thick bead right across the holes, hook up the speaker wires, and then gently ease the sub onto the caulk.
Now put the stock grille onto the sub and put the six screws that came with your subwoofer in and use the stock screws for the remaining two. You should use the longer screws that came with the sub as the stock screws are too short to hold well enough on their own. The caulk will come out of the holes and edges a bit and you can wipe this off once the screws are tight. You should also caulk the hole where the speaker wire comes out of the enclosure. This caulk is essential because the sub will leak and sound terrible if you don't seal it properly.
Here is the completed subwoofer.
The last thing you need to do is make an adapter cable for hooking your stock sub output to the high level input of the amp. Just follow the wiring diagram for the amp and hook the positive and negative for the left and right up to their counterparts on the stock connector you took out of the box. Don't worry about what is left or right, just make sure positive and negative are correct for each pair. I used 16 gauge speaker wire and end to end crimp connectors to make a five foot cable. I put the wires in a flex tube and taped it's entire length with black electrical tape.
Install Phase
Mount the amplifier to the back of the drivers side rear seat as low as possible to minimize the amount of cable you will see. Take the carpet out of your trunk and run your positive power cable along the main battery cable all the way to where your amp is mounted. I used zip ties to secure the cable. Remove the fuse from the power cable and then hook the cable up to the battery. The positive cable comes with a ring connector so all you need is a nut to go onto the provided stud. For the ground cable I crimped on the half inch ring terminal onto the ground cable and out it under the bolt that is right next to the amp. You need a 15mm socket to remove this bolt. Now just trim the positive and ground cables to the proper length leaving enough slack so that the seat folds down properly and crimp the nice terminal connectors that were provided with your kit onto the cables.
Here is the completed power wiring.
Mount your subwoofer into place and route the speaker wire and high level cable behind the trunk lining to the amplifier and connect them. You want to bridge the amp so hook the speaker wires to the outer connectors on each side.
Now you need to run the remote wire up front to the fuse box. I ran it along the drivers side since there were plenty of places to ziptie the wire out of the way under the dashboard. Run the remote wire to the fuse box which is on the passenger side of the center console. To remove the cover simply grab the bottom and tug firmly.
Strip one inch off of the end of the remote cable. Take the fuse for the power windows out and insert it half way into one side of the fuse.
Now carefully put the fuse back in place and it should pull the wire into the socket and make a very secure connection.
The reason for using the power window fuse is simple. It only turns on when the key is turned on and it will continue to power when you take the key out but don't open the door (which would shut off the stereo and power windows and your amp). It also remains off when you remote start your car so you won't have your amp needlessly running.
Here is the completed system.
I set the gain on the amp to a little less then half. I run my headunit with the treble and bass maxed and the system sounds fantastic. It can rumble and shake when there is music with lots of bass and it is balanced and not too boomy when it is not supposed to be. The bass scales perfectly with volume. If you setup the system the way I have you can use the head units bass control to vary your bass down for when your passengers don't share the love of bass you do. There shouldn't be any problems with the sub hitting the stock grill unless you are playing techmaster *techno bass cd* at high volume levels. If you want to add that little bit of extra clearance for the woofer then add washers to the screws that hold the grill.
Last edited by TommyP; 10-06-2012 at 09:22 AM.


 04-29-2009, 06:18 PM
#8
New Member
Thread Starter
Join Date: 06-21-07
Location: Sioux Falls, South Dakota
Posts: 106
Likes: 0
Received 0 Likes
on
0 Posts
Yes you can. I love my stock 6 Disc MP3 changer! It is easy to install and sounds great. The amp I picked has a hi-level input that allows you to hook it directly to the car.
Thanks! I wanted it to look clean as the stock sub already is.
What holes are you talking about by the way? The holes from screwing the amp to the seat? Those can't be seen unless you are looking for them after removing the amp. I wanted this setup to be easily returned to stock and leave no permanent changes. Do it my way and you can return to stock anytime.
Last edited by SWmaster; 04-30-2009 at 10:30 PM.
05-05-2009, 07:53 PM
#10
Senior Member

Wow not joking Ive did the exact same thing last year when I upgraded mine. Same sub, similar method of installing. Couple things I did diff was mounted the amp to the underside of the rear shelf so its outta the way, and use a 300W Pioneer amp instead of the 760W you used, and I put white insulation inside the enclosure to help with the sound quality. Im very happy with it. Good write up
05-08-2009, 01:10 AM
#11
New Member
Thread Starter
Join Date: 06-21-07
Location: Sioux Falls, South Dakota
Posts: 106
Likes: 0
Received 0 Likes
on
0 Posts
Wow not joking Ive did the exact same thing last year when I upgraded mine. Same sub, similar method of installing. Couple things I did diff was mounted the amp to the underside of the rear shelf so its outta the way, and use a 300W Pioneer amp instead of the 760W you used, and I put white insulation inside the enclosure to help with the sound quality. Im very happy with it. Good write up
I thought about mounting the amp under the rear deck but it was just too large to easily mount up there. The back of the seat was super easy and still looks good. The amp choice was for a couple reasons. It was the cheapest amp I could find with a hi level input ($110 at walmart) and the 380 watt RMS matched well with the subs 350 watt nominal power rating while not exceeding the 1000w max. I have found that the enclosure hasn't had any problems thus far and I don't even have any new rattles with the upgraded sub.
I would love to see a pic of your amp for reference for an alternate amp location.
05-08-2009, 04:18 AM
#12
Former Vendor
iTrader: (3)

Join Date: 08-27-06
Location: Dearborn H
Posts: 1,313
Likes: 0
Received 0 Likes
on
0 Posts
this is awesome! i wonder how much of a difference mine would go from my alpine type-s 12" to an alpine type-s 10" in this enclosure with my 300watt rms amp.
05-12-2009, 10:18 PM
#14
New Member
Thread Starter
Join Date: 06-21-07
Location: Sioux Falls, South Dakota
Posts: 106
Likes: 0
Received 0 Likes
on
0 Posts
This setup was plenty loud for me and I cant imagine needing anything more. It sounds really good, not just loud. I would put washers behind the grill if you want maximum excursion without the sub hitting the grill. It is way better than stock.
05-12-2009, 10:26 PM
#15
Senior Member

i have been thinking about this cuz a full system will weigh tooooooo much. nice write up. better then the other one that was posted forever ago on here.
props dude!!!
also, can you possibly add a price list? it would be ver helpfull
props dude!!!
also, can you possibly add a price list? it would be ver helpfull
Last edited by 09turbo; 05-12-2009 at 10:26 PM. Reason: Automerged Doublepost


 06-26-2009, 02:14 AM
#18
New Member
Thread Starter
Join Date: 06-21-07
Location: Sioux Falls, South Dakota
Posts: 106
Likes: 0
Received 0 Likes
on
0 Posts
06-26-2009, 08:37 AM
#19
Senior Member
07-07-2009, 03:15 AM
#21
Senior Member
iTrader: (2)

Join Date: 06-23-09
Location: Chesterfield Missouri
Posts: 3,820
Likes: 0
Received 0 Likes
on
0 Posts
Good write up. Ive considered it but honestly if I cant run off the stock amp then I will end up just running 2 digital designs 8 inch subs at 400w each. Should be sufficient.
Though does anyone know the power level of the stock sub and what ohm it runs at?
Though does anyone know the power level of the stock sub and what ohm it runs at?
07-07-2009, 06:11 PM
#22
Senior Member

Join Date: 11-20-07
Location: Pittsburgh, Pistolvania
Posts: 2,961
Likes: 0
Received 1 Like
on
1 Post
The stock sub is only rated for 100 Watts RMS. Its a DVC sub with two 2 Ohm coils (Can be wired to become either 1 ohm, 2 ohms or 4 ohms depending on how you wire it).
I personally have mine wired in series to make the sub 4 Ohms for my amp since I have it on bridged output.
It's not alot of power out of the stock sub... but its still enough to make my mirror difficult to see out of with certain music ("Put on" being a good example).
I personally have mine wired in series to make the sub 4 Ohms for my amp since I have it on bridged output.
It's not alot of power out of the stock sub... but its still enough to make my mirror difficult to see out of with certain music ("Put on" being a good example).
07-08-2009, 02:18 AM
#23
Senior Member
iTrader: (2)
Join Date: 06-23-09
Location: Chesterfield Missouri
Posts: 3,820
Likes: 0
Received 0 Likes
on
0 Posts
Can the stock amp be wired for a lower ohm level?
And there must be some variances in the systems. I have an 08 sport and my family has an 08 sport. Both optioned identical yet my families cobalt hits noticeably harder.
And there must be some variances in the systems. I have an 08 sport and my family has an 08 sport. Both optioned identical yet my families cobalt hits noticeably harder.
