2.4 LE5 Engine: Installing the GMPP Intake
 09-10-2006, 01:05 AM
#1
Senior Member
Thread Starter
Join Date: 05-17-06
Location: Denver Metro
Posts: 872
Likes: 0
Received 0 Likes
on
0 Posts
Installing the GMPP Intake
First, read the instructions that come with the intake. Unpack all components and check against the list on the instructions. Here are some general comments/observations:
The list of needed tools is correct except for the allen wrench needed. The one listed didn't fit the screws that came with my kit. I'm not sure what size fits - I found a loose allen wrench in my toolbox that fit, but the size wasn't marked. If you have a full set you'll be OK.
Almost every clamp that comes with the kit is a different size. Pay attention to the size clamp that the instructions say to use for each location. The clamp number is stamped on the clamp. When you install a clamp in a given location, pay attention to how it is oriented so you can easily reach it with a screwdriver after installation.
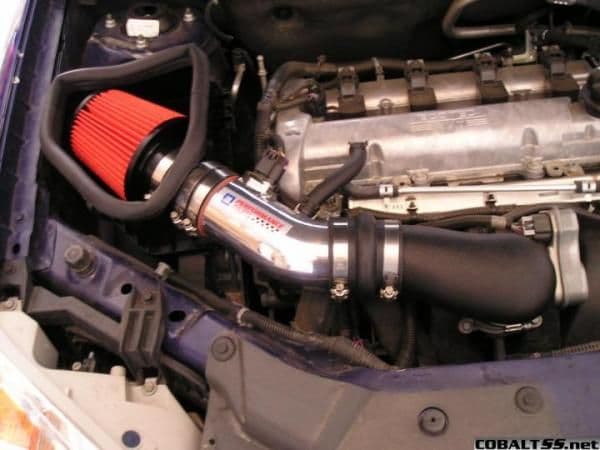
OK, let's get started! First remove the engine cover like it says in the instructions. Take off the oil cap. The cover is held on by 2 grommets on the underside that pop over 2 pins. One is at the back left when you're facing the engine. The other is near the dipstick. Pull the cover off these mounts. Put the oil cap back on.
Remove the stock air box parts per the instructions. The clamp that holds the air tube to the throttle body is tucked underneath and can be seen by looking under the air tube on the right as you face the engine.
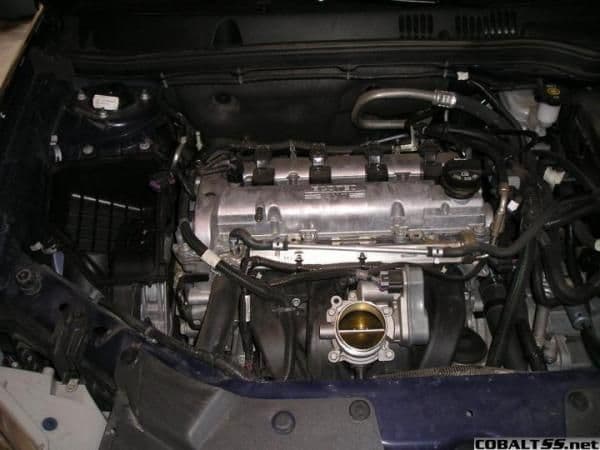
Here's what it looks like after all the stock parts are removed.
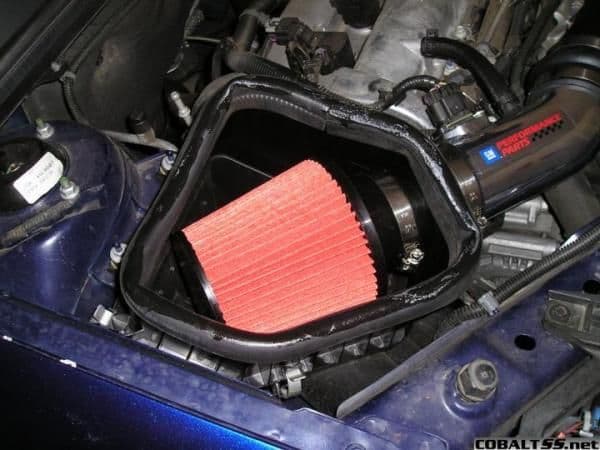
Next it's time to start assembling the new stuff! As per the GM instructions, mount the air cleaner inside the new upper air box. Rotate the filter until it sits evenly in the box. Make sure to use the right clamp! Place the clamp so that you can get to the screw after it's mounted so you can change the filter some day without taking everything apart. Mount the new air box top onto the old air box bottom using the stock clamps.
Press the hood gasket onto the air box top. Make sure it goes down well. You can press fairly hard on the gasket to get it to fit. Work it around the box, pressing it down really good as you go. When you get back to where you start, it's time to cut the gasket to fit. Note that I started the gasket in the middle of the straight part of the air box. If you start it in the middle of a bend, the ends won't fit together as well as on a straight run.
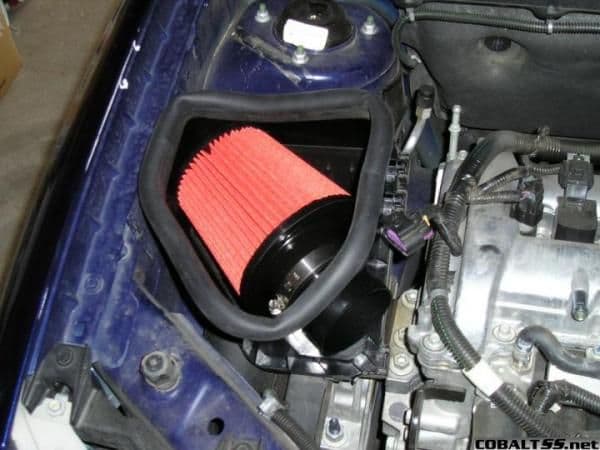
Here's the air box top in place with filter and gasket installed.
When you remove the screws from the stock airbox that holds the MAF, DO NOT re-use the screws. The kit comes with screws that fit the new air tube. Use them!
After following the instructions for installing the MAF in the new tube, the instructions say to loosely fit all the parts together and put the air tube assembly in place. I found this to be tedious, as it is difficult to keep everything in place while you try to fit it together. This runs the risk of not getting the couplers in the right place. Here's a better order to assemble things.
Put the stainless steel air tube in place using the coupler and clamps to the air box as per the instructions. Rotate it so that the PCV tube fits well. Use the clamps that held the old PCV tube to hold the new tube. Cut the new tube to fit. Check the rotational position of the steel air tube again, and clamp it to the air box.
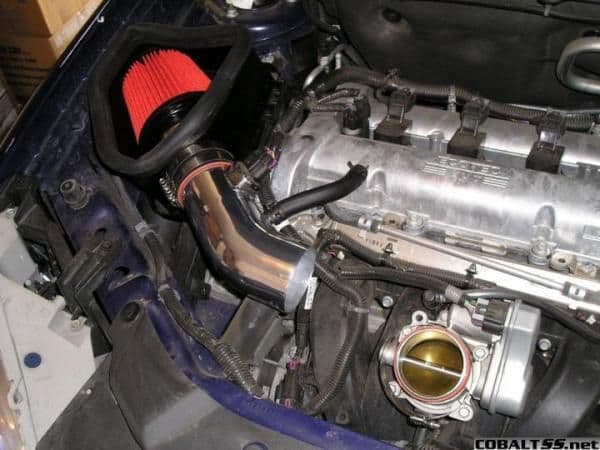
And this is what it looks like. Next, place the flex coupler onto the steel tube and position it per the picture below. This ensures that the steel tube is the right depth into the flex coupler, not too shallow and not too far in. Clamp it in place.
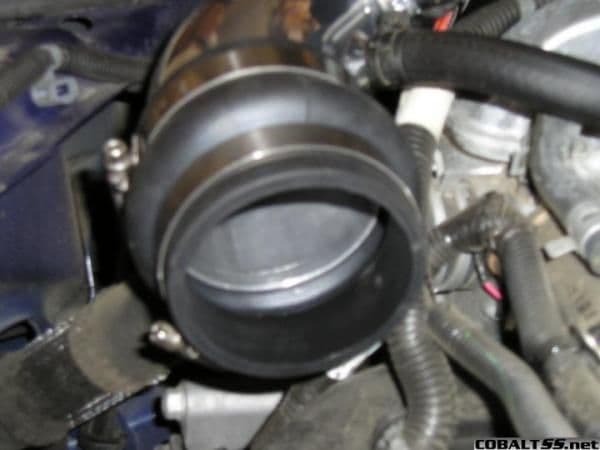
Next, put the throttle body adapter over the throttle body, loosely place the proper clamp onto the bottom of the throttle body adapter, put the right clamp onto the flex coupler, and slip the throttle body adapter into the flex coupler and over the throttle body. Wiggle it around a bit until it seems to be �comfortable� and tighten the clamps.
There are two stickers that can be put on of left off, your choice. I chose to install both. I installed the GM Performance Parts sticker to avoid any hassle with GM dealers over warranty. Since it�s a GM part, there shouldn�t be any issues. I installed the CARB EO number sticker to avoid problems with getting the car through emissions testing. If your state does not have this, it might not matter. By the way, CARB is the California Air Resources Board, and an EO number indicates that the part has been tested in California and passes their emissions requirements. Since California is the most stringent requirements in the country, a CARB EO number is accepted by all other states and the feds.
You can see the GM sticker in the picture above that shows the finished installation. I placed the CARB sticker on the hood next to the existing emissions sticker. Why isn�t it centered? It leaves room for other CARB stickers for other parts that I may install later.
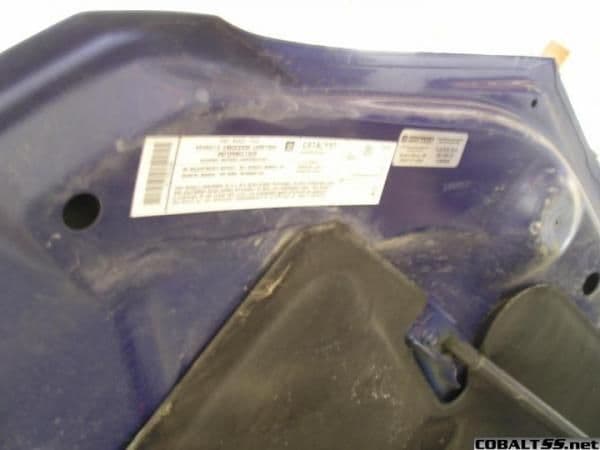
Here�s the CARB sticker in place.
It�s done! Or is it?
Why did GM design the new air box to be open on top, then seal to the hood blanket? What�s the point? Wouldn�t it have made more sense to put a top on the new air box to seal it, if the intent was to get the new filter to breathe through the stock fender inlet in the existing air box bottom? Past GM performance practice, going back to the muscle car days has been to vent outside air through the hood by way of a scoop to the air cleaner. Many GM muscle cars used a gasket very similar to the one on this kit. Therefore, I will seal the new air cleaner to the bottom of the hood, not the hood blanket, cut through the hood above the air box, and place a scoop on the outside to cover the hole.
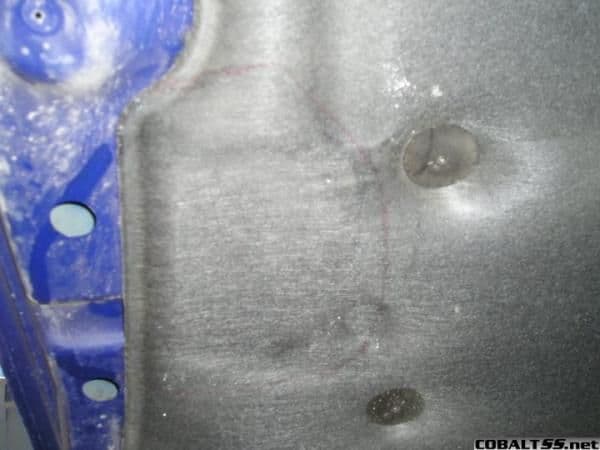
To determine where to cut the hood blanket, I decided to let the gasket mark the blanket to show me. What to use for this marking? I didn�t want to use grease, as it would be difficult to clean up. I used dish washing liquid. It�s thick and somewhat sticky, and can be washed off with water. The worst it will do is clean things. I put dish washing liquid on my finger and generously coated the top of the gasket on the air box.
I then closed the hood and re-opened it. There was a nice soap line where the gasket hit the blanket. I re-marked this line with a marker to see it better.
Using this mark, I cut the hood blanket just outside the mark so the gasket will contact metal instead of blanket. I dressed the cut edge with black duct tape. I�m not satisfied with the look of this and plan to find another hood blanket, make a better cut and dressing the cut better later.
I then re-soaped the gasket and closed the hood. Upon re-opening it, I found that the gasket doesn�t reach the hood under where the blanket was. Therefore, I used 3/4 inch wide, 3/8 inch thick black closed cell foam sticky back weatherstrip from Home Depot to fill in the areas that the gasket won�t reach. Since the gasket fits well on the hood area outside the location of the old blanket, I decided to build up the gasket to that level. I also filled in a dip. Use layers of the gasket to build it up. Stick the first layer to the hood with the adhesive on the gasket. Stick the next layer to the first layer.
I drove the car after I cut the hood blanket and it was definitely louder than stock. However, it had a nice, deep tone which I didn�t expect from other cone filters I�ve installed. This indicated that the filter was breathing air from under the hood. This is not preferable to the stock system. After installing the sticky back closed cell foam weatherstrip, it was definitely quieter. This indicated that it was being forced to breathe through the stock fender intake.
The next step will be to cut the holes in the hood and mount the scoop. I plan to do some striping on the hood at the same time. I will post the next installment when I get all this done. Once the air filter is breathing through the hood, it should move the noise outside somewhat. It will also then be a true cold air system, and will draw more air than the stock system by quite a bit.
I hope this helps other installers!
For part 2, making this functional, see post: 2.4 LE5 Engine Making The GMPP Intake Functional - Cobalt SS Network
The list of needed tools is correct except for the allen wrench needed. The one listed didn't fit the screws that came with my kit. I'm not sure what size fits - I found a loose allen wrench in my toolbox that fit, but the size wasn't marked. If you have a full set you'll be OK.
Almost every clamp that comes with the kit is a different size. Pay attention to the size clamp that the instructions say to use for each location. The clamp number is stamped on the clamp. When you install a clamp in a given location, pay attention to how it is oriented so you can easily reach it with a screwdriver after installation.
OK, let's get started! First remove the engine cover like it says in the instructions. Take off the oil cap. The cover is held on by 2 grommets on the underside that pop over 2 pins. One is at the back left when you're facing the engine. The other is near the dipstick. Pull the cover off these mounts. Put the oil cap back on.
Remove the stock air box parts per the instructions. The clamp that holds the air tube to the throttle body is tucked underneath and can be seen by looking under the air tube on the right as you face the engine.
Here's what it looks like after all the stock parts are removed.
Next it's time to start assembling the new stuff! As per the GM instructions, mount the air cleaner inside the new upper air box. Rotate the filter until it sits evenly in the box. Make sure to use the right clamp! Place the clamp so that you can get to the screw after it's mounted so you can change the filter some day without taking everything apart. Mount the new air box top onto the old air box bottom using the stock clamps.
Press the hood gasket onto the air box top. Make sure it goes down well. You can press fairly hard on the gasket to get it to fit. Work it around the box, pressing it down really good as you go. When you get back to where you start, it's time to cut the gasket to fit. Note that I started the gasket in the middle of the straight part of the air box. If you start it in the middle of a bend, the ends won't fit together as well as on a straight run.
Here's the air box top in place with filter and gasket installed.
When you remove the screws from the stock airbox that holds the MAF, DO NOT re-use the screws. The kit comes with screws that fit the new air tube. Use them!
After following the instructions for installing the MAF in the new tube, the instructions say to loosely fit all the parts together and put the air tube assembly in place. I found this to be tedious, as it is difficult to keep everything in place while you try to fit it together. This runs the risk of not getting the couplers in the right place. Here's a better order to assemble things.
Put the stainless steel air tube in place using the coupler and clamps to the air box as per the instructions. Rotate it so that the PCV tube fits well. Use the clamps that held the old PCV tube to hold the new tube. Cut the new tube to fit. Check the rotational position of the steel air tube again, and clamp it to the air box.
And this is what it looks like. Next, place the flex coupler onto the steel tube and position it per the picture below. This ensures that the steel tube is the right depth into the flex coupler, not too shallow and not too far in. Clamp it in place.
Next, put the throttle body adapter over the throttle body, loosely place the proper clamp onto the bottom of the throttle body adapter, put the right clamp onto the flex coupler, and slip the throttle body adapter into the flex coupler and over the throttle body. Wiggle it around a bit until it seems to be �comfortable� and tighten the clamps.
There are two stickers that can be put on of left off, your choice. I chose to install both. I installed the GM Performance Parts sticker to avoid any hassle with GM dealers over warranty. Since it�s a GM part, there shouldn�t be any issues. I installed the CARB EO number sticker to avoid problems with getting the car through emissions testing. If your state does not have this, it might not matter. By the way, CARB is the California Air Resources Board, and an EO number indicates that the part has been tested in California and passes their emissions requirements. Since California is the most stringent requirements in the country, a CARB EO number is accepted by all other states and the feds.
You can see the GM sticker in the picture above that shows the finished installation. I placed the CARB sticker on the hood next to the existing emissions sticker. Why isn�t it centered? It leaves room for other CARB stickers for other parts that I may install later.
Here�s the CARB sticker in place.
It�s done! Or is it?
Why did GM design the new air box to be open on top, then seal to the hood blanket? What�s the point? Wouldn�t it have made more sense to put a top on the new air box to seal it, if the intent was to get the new filter to breathe through the stock fender inlet in the existing air box bottom? Past GM performance practice, going back to the muscle car days has been to vent outside air through the hood by way of a scoop to the air cleaner. Many GM muscle cars used a gasket very similar to the one on this kit. Therefore, I will seal the new air cleaner to the bottom of the hood, not the hood blanket, cut through the hood above the air box, and place a scoop on the outside to cover the hole.
To determine where to cut the hood blanket, I decided to let the gasket mark the blanket to show me. What to use for this marking? I didn�t want to use grease, as it would be difficult to clean up. I used dish washing liquid. It�s thick and somewhat sticky, and can be washed off with water. The worst it will do is clean things. I put dish washing liquid on my finger and generously coated the top of the gasket on the air box.
I then closed the hood and re-opened it. There was a nice soap line where the gasket hit the blanket. I re-marked this line with a marker to see it better.
Using this mark, I cut the hood blanket just outside the mark so the gasket will contact metal instead of blanket. I dressed the cut edge with black duct tape. I�m not satisfied with the look of this and plan to find another hood blanket, make a better cut and dressing the cut better later.
I then re-soaped the gasket and closed the hood. Upon re-opening it, I found that the gasket doesn�t reach the hood under where the blanket was. Therefore, I used 3/4 inch wide, 3/8 inch thick black closed cell foam sticky back weatherstrip from Home Depot to fill in the areas that the gasket won�t reach. Since the gasket fits well on the hood area outside the location of the old blanket, I decided to build up the gasket to that level. I also filled in a dip. Use layers of the gasket to build it up. Stick the first layer to the hood with the adhesive on the gasket. Stick the next layer to the first layer.
I drove the car after I cut the hood blanket and it was definitely louder than stock. However, it had a nice, deep tone which I didn�t expect from other cone filters I�ve installed. This indicated that the filter was breathing air from under the hood. This is not preferable to the stock system. After installing the sticky back closed cell foam weatherstrip, it was definitely quieter. This indicated that it was being forced to breathe through the stock fender intake.
The next step will be to cut the holes in the hood and mount the scoop. I plan to do some striping on the hood at the same time. I will post the next installment when I get all this done. Once the air filter is breathing through the hood, it should move the noise outside somewhat. It will also then be a true cold air system, and will draw more air than the stock system by quite a bit.
I hope this helps other installers!
For part 2, making this functional, see post: 2.4 LE5 Engine Making The GMPP Intake Functional - Cobalt SS Network
Last edited by TommyP; 10-03-2012 at 10:15 AM.

 09-10-2006, 01:40 AM
#4
Senior Member
Join Date: 12-22-05
Location: newport news.VA
Posts: 2,819
Likes: 0
Received 0 Likes
on
0 Posts
Originally Posted by HackAbuse
I think this intake would make the RK Sport hood functional
09-10-2006, 02:29 AM
#6
Senior Member
Thread Starter
Join Date: 05-17-06
Location: Denver Metro
Posts: 872
Likes: 0
Received 0 Likes
on
0 Posts
Originally Posted by HackAbuse
i think RK sport anticipated this intake when they created the Hood, look at a picture of the underside of the hood
09-10-2006, 08:05 AM
#7
Member

Join Date: 11-10-05
Location: Northern Illinois
Posts: 381
Likes: 0
Received 0 Likes
on
0 Posts
Got to love all them clamp sizes! I had to take mine apart and move two of them because I didn't pay attention to the instructions. The price of being a proffesional I guess.
Looking forward to seeing your scoop install. I thought about putting a scoop on mine, but I can't bring myself to cut a hole in my hood. Pretty sad since I am an autobody repairman that would think nothing of (and have) cutting up someone elses car!
GM has built built aftermarket functional hoods in the past. I installed a Grand Am ram air hood once. It was a very nice hood. I wouldn't hold my breath waiting for a Cobalt hood though.
Good Luck,
Dennis
09-10-2006, 12:05 PM
#8
Senior Member

Join Date: 11-10-05
Location: USA
Posts: 2,477
Likes: 0
Received 0 Likes
on
0 Posts
Thanks for the write up LewiSS and congrats on your new intake. Is there anyway you could get a sound clip?
Also, I have a question. Is it possible to install the piping and filter without attaching the top piece of the airbox that seals to the hood of the car? If so then this intake could function similarly to the Injen in that it could be CAI when the airbox is attached and an under the hood SRI when the box is not attached.
Also, I have a question. Is it possible to install the piping and filter without attaching the top piece of the airbox that seals to the hood of the car? If so then this intake could function similarly to the Injen in that it could be CAI when the airbox is attached and an under the hood SRI when the box is not attached.
09-10-2006, 02:35 PM
#9
Senior Member
Thread Starter
Join Date: 05-17-06
Location: Denver Metro
Posts: 872
Likes: 0
Received 0 Likes
on
0 Posts
Originally Posted by denniss
Got to love all them clamp sizes! I had to take mine apart and move two of them because I didn't pay attention to the instructions. The price of being a proffesional I guess.
Looking forward to seeing your scoop install. I thought about putting a scoop on mine, but I can't bring myself to cut a hole in my hood. Pretty sad since I am an autobody repairman that would think nothing of (and have) cutting up someone elses car!
GM has built built aftermarket functional hoods in the past. I installed a Grand Am ram air hood once. It was a very nice hood. I wouldn't hold my breath waiting for a Cobalt hood though.
Good Luck,
Dennis
Looking forward to seeing your scoop install. I thought about putting a scoop on mine, but I can't bring myself to cut a hole in my hood. Pretty sad since I am an autobody repairman that would think nothing of (and have) cutting up someone elses car!
GM has built built aftermarket functional hoods in the past. I installed a Grand Am ram air hood once. It was a very nice hood. I wouldn't hold my breath waiting for a Cobalt hood though.
Good Luck,
Dennis
I too have reservations about cutting a new stock hood, but I've also done a few of these in the past. I'm being cheap - I don't want to spend a grand on the RK sport hood and having it painted. Plus I'm not fond of the look of it. Had it been the SS stuyle hood scoop I'd probably be going that route. I strongly considered using an SS style scoop in my stock hood and ducting over to the intake, like the RK hood, but decided it was a lot of effort for no gain but style. I think more direct route will work better.
A good compromise is to go ahead and cut the hood blanket and do the weatherstrip thing to better seal the new intake. This quiets it down somewhat and forces it to not draw hot air from under the hood. You can stop at this point and not finish the hood scoop part of the install.
Done well. this shouldn't detract too much from the value. The only part I'm disappointed in is how I trimmed the hood blanket, and I can fix that with a new one and a more careful cut and better trimming. It actually isn't as noticable as the flash pic makes it out to be. The closed cell foam weatherstrip looks a lot like the molded closed cell gaskets GM has used in the past for hood ducting (it, too, looks a lot more professional than the pic makes it look).
More to come, if I don't chicken out!
Jay
Last edited by LewiSS; 09-10-2006 at 02:50 PM.
09-10-2006, 02:38 PM
#10
Senior Member
Thread Starter
Join Date: 05-17-06
Location: Denver Metro
Posts: 872
Likes: 0
Received 0 Likes
on
0 Posts
Originally Posted by tonio5555
Thanks for the write up LewiSS and congrats on your new intake. Is there anyway you could get a sound clip?
Also, I have a question. Is it possible to install the piping and filter without attaching the top piece of the airbox that seals to the hood of the car? If so then this intake could function similarly to the Injen in that it could be CAI when the airbox is attached and an under the hood SRI when the box is not attached.
Also, I have a question. Is it possible to install the piping and filter without attaching the top piece of the airbox that seals to the hood of the car? If so then this intake could function similarly to the Injen in that it could be CAI when the airbox is attached and an under the hood SRI when the box is not attached.
So, the answer is a definite maybe! But I wouldn't buy one counting on that to work.
If you do try this and it works, please post the results!
-J-
 09-12-2006, 01:49 AM
#14
Senior Member
Thread Starter
Join Date: 05-17-06
Location: Denver Metro
Posts: 872
Likes: 0
Received 0 Likes
on
0 Posts
Originally Posted by halfj99
please..somone...where can i buy this?
https://www.cobaltss.net/forums/show...d=1#post488916
DenniSS did the first install of one of these on the board. This thread contains his pics, and the part number and sources if you read through the posts.
Jay L.
09-12-2006, 01:58 AM
#15
Senior Member
Thread Starter
Join Date: 05-17-06
Location: Denver Metro
Posts: 872
Likes: 0
Received 0 Likes
on
0 Posts
Originally Posted by HunterKiller89
great write up...especially since im probably going to get one of these
same with the SS model hood
same with the SS model hood
If the SS hood in carbon fiber had had that ducting, I would have spent crazy money on it and not cut into a perfectly good stock hood
 09-12-2006, 10:16 AM
#16
New Member

Join Date: 08-16-06
Location: Poinciana, FL
Posts: 54
Likes: 0
Received 0 Likes
on
0 Posts
Im too lazy to lok but this is offered for the 2.2 right ?? it better be anywayz
http://www.rksport.com/main/part_det...did=14&catid=4
here is the hood link and we'll be darned if they did not build this for this purpose or themsleves making one either way very functional only worry is rain here in FL but maybe a bypass can be added
http://www.rksport.com/main/part_det...did=14&catid=4
here is the hood link and we'll be darned if they did not build this for this purpose or themsleves making one either way very functional only worry is rain here in FL but maybe a bypass can be added
09-12-2006, 10:30 AM
#17
Senior Member
Thread Starter
Join Date: 05-17-06
Location: Denver Metro
Posts: 872
Likes: 0
Received 0 Likes
on
0 Posts
Originally Posted by b00st3d
Im too lazy to lok but this is offered for the 2.2 right ?? it better be anywayz
http://www.rksport.com/main/part_det...did=14&catid=4
here is the hood link and we'll be darned if they did not build this for this purpose or themsleves making one either way very functional only worry is rain here in FL but maybe a bypass can be added
http://www.rksport.com/main/part_det...did=14&catid=4
here is the hood link and we'll be darned if they did not build this for this purpose or themsleves making one either way very functional only worry is rain here in FL but maybe a bypass can be added
I don't think rain will be as much trouble for a scoop as for the bottom-feeder intakes that can become submerged. The bottom of the stock air box should drain water into the fender intake. You could also design a flap to close if it's a worry. The only way you can hydraulic lock a motor and explode it is if the intake is completely submreged suddenly. I can't imagine rain doing it coming in a scoop - worse case it might mess up the mixture enough that it would stop firing (the engine would quit) but that doesn't cause actual damage.
09-12-2006, 02:42 PM
#19
Senior Member
Thread Starter
Join Date: 05-17-06
Location: Denver Metro
Posts: 872
Likes: 0
Received 0 Likes
on
0 Posts
Originally Posted by HunterKiller89
ive been waiting to hear tat last sentence for a LONG time LewiSS...you're positive it wont cause damage?
But one of the reasons I don't like the bottom-breating cold air intakes is because I have seen cases of hitting a deep puddle that completely submerges the intake and the engine ingests enough water to hydraulic lock and break itself. There's great pics of that on the 2.4 forum right now, and I know a couple of BMW drivers that had to spend a lot of money from the same thing.
What kills the engine isn't the water, but the fact that water, unlike air, will not compress. So when the crank pushes the piston up with the cylinder full of water, since the water won't compress something has to give. I would guess that it would require a volume of water greater than the squish area (the combustion volume with the piston at the top). I don't see how you could get that much water into the intake stream any way other than submerging the intake. The engine would stop running before the volume of water in the air even approached that if you're taking in water through a scoop in the rain. Some water vapor won't hurt, and in fact water injection is used in some turbocharged applications.
I've never seen or heard of hydraulic lock with a through the hood intake, whether it's a scoop or cowl induction. I've driven muscle cars with intakes sealed to the hood scoop in some pretty bad rain and have never seen any effect. GM has sold cars in the '60's that were effectively like the system I'm building. I would imagine that if there were going to be a problem, they wouldn't have sold them.
Check out this link:
http://www.beannies.com/images/Cars/...80%20Motor.JPG
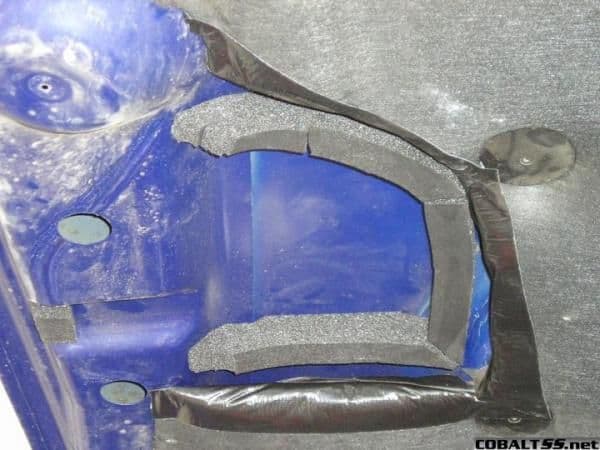
This is a 1970 Buick GS. The foam thingies seal to holes in the bottom of the hood and feed outside air from above the hood to the round air cleaner box where the filter lives. This is functionally identical to what I'm building (in fact, it's one of the inspirations for my design).
As they say, "your mileage may vary" and all that, and I won't be responsible for any engine other than my own.
Anyone else had direct experience with this?
Jay L.
09-13-2006, 01:12 AM
#20
Originally Posted by LewiSS
Don't expect me to pay for a broken engine 
But one of the reasons I don't like the bottom-breating cold air intakes is because I have seen cases of hitting a deep puddle that completely submerges the intake and the engine ingests enough water to hydraulic lock and break itself. There's great pics of that on the 2.4 forum right now, and I know a couple of BMW drivers that had to spend a lot of money from the same thing.
What kills the engine isn't the water, but the fact that water, unlike air, will not compress. So when the crank pushes the piston up with the cylinder full of water, since the water won't compress something has to give. I would guess that it would require a volume of water greater than the squish area (the combustion volume with the piston at the top). I don't see how you could get that much water into the intake stream any way other than submerging the intake. The engine would stop running before the volume of water in the air even approached that if you're taking in water through a scoop in the rain. Some water vapor won't hurt, and in fact water injection is used in some turbocharged applications.
I've never seen or heard of hydraulic lock with a through the hood intake, whether it's a scoop or cowl induction. I've driven muscle cars with intakes sealed to the hood scoop in some pretty bad rain and have never seen any effect. GM has sold cars in the '60's that were effectively like the system I'm building. I would imagine that if there were going to be a problem, they wouldn't have sold them.
Check out this link:
http://www.beannies.com/images/Cars/...80%20Motor.JPG
This is a 1970 Buick GS. The foam thingies seal to holes in the bottom of the hood and feed outside air from above the hood to the round air cleaner box where the filter lives. This is functionally identical to what I'm building (in fact, it's one of the inspirations for my design).
As they say, "your mileage may vary" and all that, and I won't be responsible for any engine other than my own.
Anyone else had direct experience with this?
Jay L.
I've driven muscle cars with intakes sealed to the hood scoop
 09-14-2006, 10:59 AM
#22
Senior Member
Thread Starter
Join Date: 05-17-06
Location: Denver Metro
Posts: 872
Likes: 0
Received 0 Likes
on
0 Posts
Originally Posted by spencer
got pics of the new hood scoop yet?
Jay
09-15-2006, 03:37 PM
#24
New Member

Join Date: 11-16-05
Location: Sunrise, Florida
Posts: 159
Likes: 0
Received 0 Likes
on
0 Posts
Quick update: Gotta call back from RK Sport. They are unsure if their hood matches up to the GMPP intake. However, they said that it was designed to work with a modified stock airbox. If you cut the top off of a stock airbox, it would line up. That leads me to believe that it would work. However, it would only work for the 2.4 SS and the 2.2 base motor cars, since the airbox is on that side of the motor. They said it would be similar to the hood they made for the J-bodies, where all one needed to do was cut the top off of the airbox to get it to fit....
09-15-2006, 05:29 PM
#25
Senior Member
Thread Starter
Join Date: 05-17-06
Location: Denver Metro
Posts: 872
Likes: 0
Received 0 Likes
on
0 Posts
Originally Posted by BlwnGP
Quick update: Gotta call back from RK Sport. They are unsure if their hood matches up to the GMPP intake. However, they said that it was designed to work with a modified stock airbox. If you cut the top off of a stock airbox, it would line up. That leads me to believe that it would work. However, it would only work for the 2.4 SS and the 2.2 base motor cars, since the airbox is on that side of the motor. They said it would be similar to the hood they made for the J-bodies, where all one needed to do was cut the top off of the airbox to get it to fit....
Now that I have a "template" in the form of built-up weatherstripping, I plan to buy a 4 inch thick slab of closed cell foam from a local craft store and carve a one-piece gasket to replace the built-up weatherstripping material and glue it to the bottom of the hood. This would both seal better (no seams) and would also look a lot more stock.
The scoop is now installed so the system is esentially complete. I will clean up the car Saturday or Sunday depending on weather, take some final pics and do another "how to" post.
Jay L.