2.4 LE5 Engine: Making The GMPP Intake Functional
 09-17-2006, 07:47 PM
#1
Senior Member
Thread Starter
Join Date: 05-17-06
Location: Denver Metro
Posts: 872
Likes: 0
Received 0 Likes
on
0 Posts
Making The GMPP Intake Functional
For Part 1, see the following post:
Installing the GMPP Intake - Cobalt SS Network
The long-awaited sequel to “Installing the GMPP intake” can now be told! The following suppliers provided the items indicated:
Summit Racing
Summit Racing
Scoop P/N SUM-471104CF
Jazz It Up
12201 E. Arapahoe Rd
Englewood, CO 80112
Mark Kilmer
Applied all the graphics
Tools Needed:
3/8 drill
2 inch STEEL hole saw for drill
1/8 bit
Pop rivet gun
1/8 x Ľ aluminum pop rivets
Four-in-hand file for wood and plastic
Round bastard file
Touch-up paint
Let’s get started!
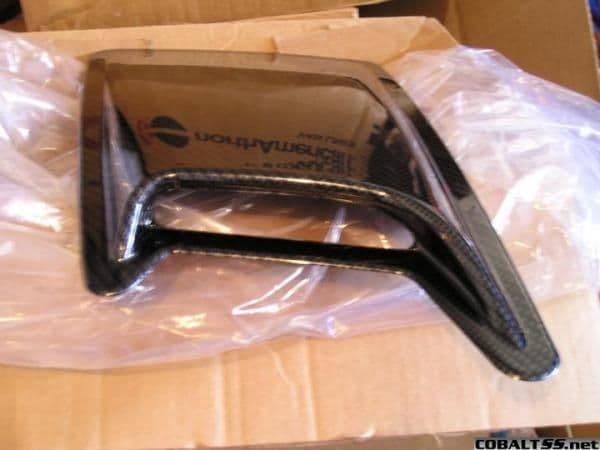
This is the scoop I ordered from Summit. It is one of a mirror-image pair – you have to buy the pair. I picked this scoop because of the shape, and I wanted carbon fiber look. The scoop is non-functional when it comes. I used a dremmel tool with a cutting wheel to cut out the front of the scoop. Cut close, but not exact. Use a four-in-hand file and a round bastard file to carve down and finish off the hole.
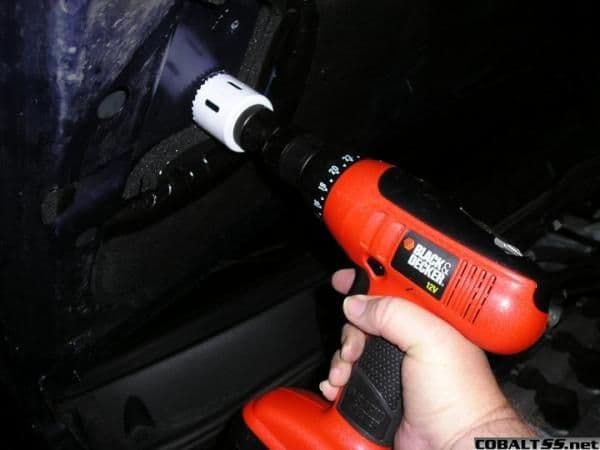
Next it’s time to drill the holes through the hood (can’t put this off any longer!). I placed the scoop on the top and positioned it, and did careful measuring both top and bottom to make sure the holes would be inside the air box and would be inboard enough for the scoop to cover them. After a lot of measuring and marking, I started the hole. Start both holes from the bottom. The hole cutter has a pilot drill bit. Once it goes through the hole cutter drops onto the metal to be cut.
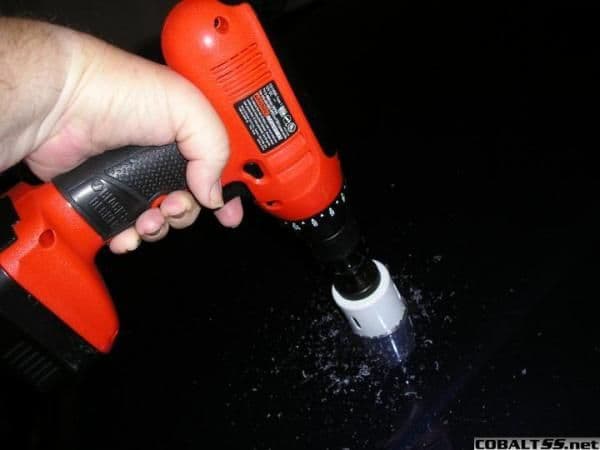
I moved to the top, using the pilot holes already drilled and finished the holes from the top.
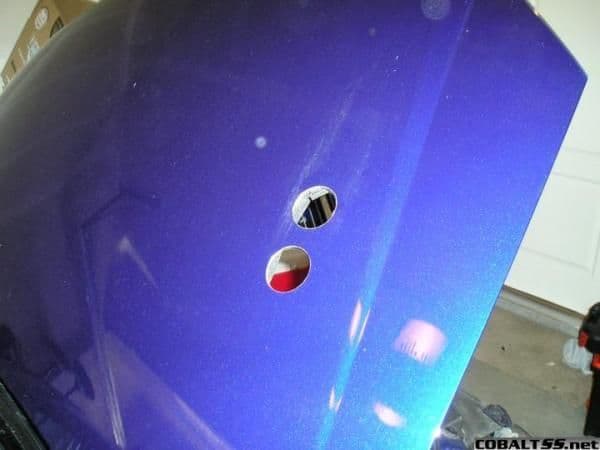
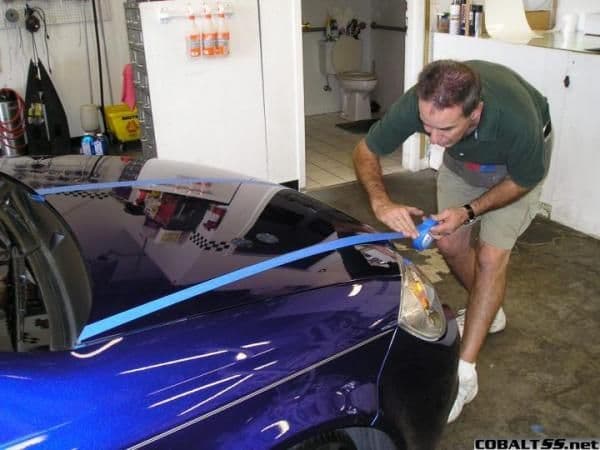
There will be some burring, and it tends to be on the bottom of the cut. Drilling from the top means the burrs will be on the underside of the hood. Once the holes are cut, test fit the scoop to see if they’re in the right place (although if they aren’t, it’s a bit late now!). Use your round bastard file to clean up the holes. I then used touch-up paint to paint the bare metal in the cut to prevent rusting.
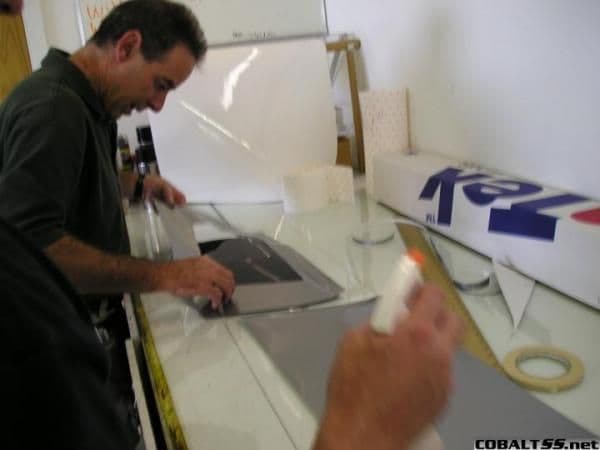
Next the hood graphics must be applied before the scoop is installed. I drove to Jazz It Up, the local experts in window tinting and vinyl graphics where owner Mark Killmer took over to execute my design. We thoroughly discussed what I had in mind. Mark was careful to make sure he understood exactly what I wanted, and made suggestions for improvements/changes based on his years of experience in auto graphics.

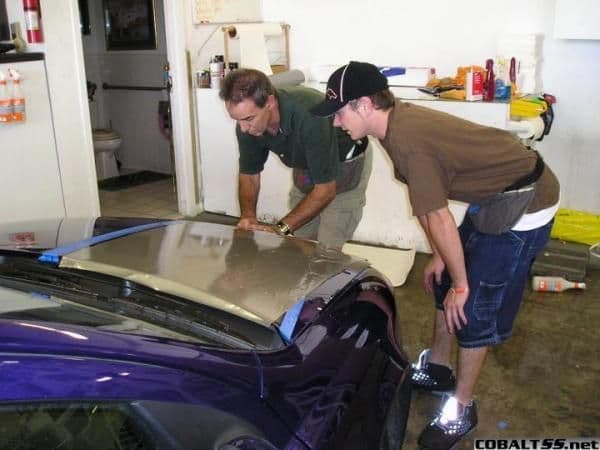
Mark measures everything 2 or 3 times. These measurement marks are used to place the guide tape.
Mark uses painter’s tape and cheap side stripe tape to lay out the design on the hood. This allows the design to be finalized and visually straightened before the vinyl sheet is applied.
The vinyl sheet is applied. First Mark and a helper peel the backing and spray the sticky sheet with application liquid. The hood is also sprayed. The sheet is laid in place, and can be moved around because the liquid keeps it from tacking. I picked pewter metallic. This proves to be a great choice, as the silver goes well with the blue, and it’s a bit darker than straight silver. Plus the metallic pattern is almost exactly the same as that in the Lazer Blue.

The vinyl is moved into place and smoothed out. Note how you can see the ridge of the guide tape under the vinyl. This will be the guide Mark will use to trim the vinyl. T
he metalic in the vinyl comes out in this picture, too.
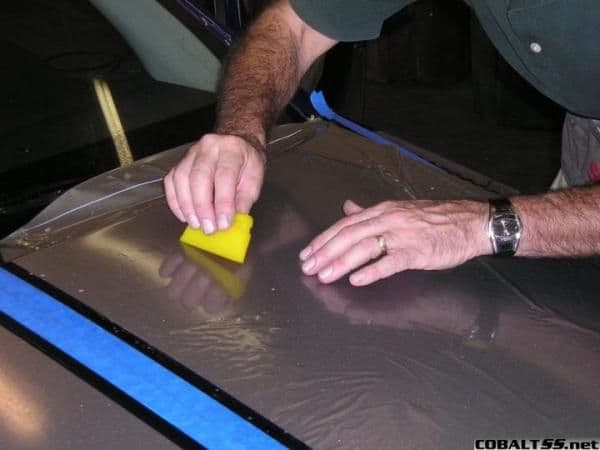
All the liquid is squeegeed out, which bonds the vinyl to the hood.
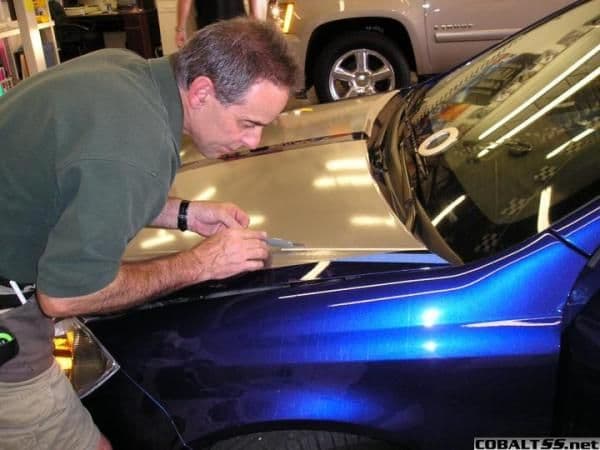
Mark then cuts the vinyl. This is where skill and artistry come in. Mark is as good as any pin-striper I’ve known, but with a knife instead of a brush.

And here are the panels complete, ready for the pin stripe.
Mark cut the vinyl into Ľ inch strips to make the pin stripe, and applies them by hand. Quiet! Master Artist at work!

To match the hood stripe, we applied a pin stripe on the side. This stripe is a wide and a narrow stripe to keep with the panel and pinstripe theme on the hood. This stripe is off-the-shelf, but is a very close match in color.
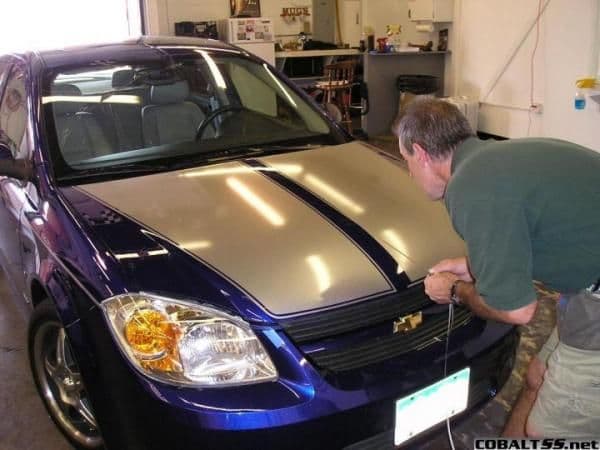
To make the scoop blend into the hood and look a bit less “add-on” I wanted the flange around the bottom of the scoop covered in silver. Here Mark is doing this. To get the edges to roll under and tuck up nicely, they are heated quickly with a heat gun and smoothed over.

This scoop uses 3m tape all the way around the flange. We used the tape, but the sides of the scoop had a bit more arch than the hood. To get the scoop to sit down on the hood, we were afraid the spring in the scoop would pull the vinyl off the hood if we just used the sticky tape. I decided to use 2 pop-rivets on each side (plus we did still use the tape). I measured and pre-drilled the scoop. We then positioned the scoop and marked the position on the hood with tape. Next, the 3M backing on the scoop was pulled, Using the guide tape, we positioned the scoop starting with the back, the lowered it forward onto the hood. Get this right – wherever it hits is where it will be! With my son-in-law pressing the scoop down onto the hood, I match drilled the hood and installed the pop-rivets. I had pre-checked their position to ensure I wasn’t getting into anything on the underside of the hood. Be careful at this point, and don’t let the drill drop free when the bit goes through or you’ll end up with holes in engine parts.

This is the finished product! It came out pretty much like I imagined it when I designed this mod. The color is spectacular in the sun. It almost now looks like a silver car with candy blue over it – that’s how well the metallic in the vinyl matches the paint. Functionally, it moved almost all the noise out of the interior. When you open the right window, you can really hear the intake. With the windows closed, it’s much more subdued. This indicates it’s really drawing air from the scoop. For those of you more interested in noise in the interior than function, feel free to leave the gasketing off, don’t drill the hood and leave the scoop fake. That will give you maximum noise with minimum performance gain!
Next, I plan to cut a 1-piece gasket for the hood and replace the hood blanket with a new one cut a lot more professionally. I have more vinyl on order to do the trunk to match. We’re not sure yet about the roof. More to come!
Jay
Installing the GMPP Intake - Cobalt SS Network
The long-awaited sequel to “Installing the GMPP intake” can now be told! The following suppliers provided the items indicated:
Summit Racing
Summit Racing
Scoop P/N SUM-471104CF
Jazz It Up
12201 E. Arapahoe Rd
Englewood, CO 80112
Mark Kilmer
Applied all the graphics
Tools Needed:
3/8 drill
2 inch STEEL hole saw for drill
1/8 bit
Pop rivet gun
1/8 x Ľ aluminum pop rivets
Four-in-hand file for wood and plastic
Round bastard file
Touch-up paint
Let’s get started!
This is the scoop I ordered from Summit. It is one of a mirror-image pair – you have to buy the pair. I picked this scoop because of the shape, and I wanted carbon fiber look. The scoop is non-functional when it comes. I used a dremmel tool with a cutting wheel to cut out the front of the scoop. Cut close, but not exact. Use a four-in-hand file and a round bastard file to carve down and finish off the hole.
Next it’s time to drill the holes through the hood (can’t put this off any longer!). I placed the scoop on the top and positioned it, and did careful measuring both top and bottom to make sure the holes would be inside the air box and would be inboard enough for the scoop to cover them. After a lot of measuring and marking, I started the hole. Start both holes from the bottom. The hole cutter has a pilot drill bit. Once it goes through the hole cutter drops onto the metal to be cut.
I moved to the top, using the pilot holes already drilled and finished the holes from the top.
There will be some burring, and it tends to be on the bottom of the cut. Drilling from the top means the burrs will be on the underside of the hood. Once the holes are cut, test fit the scoop to see if they’re in the right place (although if they aren’t, it’s a bit late now!). Use your round bastard file to clean up the holes. I then used touch-up paint to paint the bare metal in the cut to prevent rusting.
Next the hood graphics must be applied before the scoop is installed. I drove to Jazz It Up, the local experts in window tinting and vinyl graphics where owner Mark Killmer took over to execute my design. We thoroughly discussed what I had in mind. Mark was careful to make sure he understood exactly what I wanted, and made suggestions for improvements/changes based on his years of experience in auto graphics.
Mark measures everything 2 or 3 times. These measurement marks are used to place the guide tape.
Mark uses painter’s tape and cheap side stripe tape to lay out the design on the hood. This allows the design to be finalized and visually straightened before the vinyl sheet is applied.
The vinyl sheet is applied. First Mark and a helper peel the backing and spray the sticky sheet with application liquid. The hood is also sprayed. The sheet is laid in place, and can be moved around because the liquid keeps it from tacking. I picked pewter metallic. This proves to be a great choice, as the silver goes well with the blue, and it’s a bit darker than straight silver. Plus the metallic pattern is almost exactly the same as that in the Lazer Blue.
The vinyl is moved into place and smoothed out. Note how you can see the ridge of the guide tape under the vinyl. This will be the guide Mark will use to trim the vinyl. T
he metalic in the vinyl comes out in this picture, too.
All the liquid is squeegeed out, which bonds the vinyl to the hood.
Mark then cuts the vinyl. This is where skill and artistry come in. Mark is as good as any pin-striper I’ve known, but with a knife instead of a brush.
And here are the panels complete, ready for the pin stripe.
Mark cut the vinyl into Ľ inch strips to make the pin stripe, and applies them by hand. Quiet! Master Artist at work!
To match the hood stripe, we applied a pin stripe on the side. This stripe is a wide and a narrow stripe to keep with the panel and pinstripe theme on the hood. This stripe is off-the-shelf, but is a very close match in color.
To make the scoop blend into the hood and look a bit less “add-on” I wanted the flange around the bottom of the scoop covered in silver. Here Mark is doing this. To get the edges to roll under and tuck up nicely, they are heated quickly with a heat gun and smoothed over.
This scoop uses 3m tape all the way around the flange. We used the tape, but the sides of the scoop had a bit more arch than the hood. To get the scoop to sit down on the hood, we were afraid the spring in the scoop would pull the vinyl off the hood if we just used the sticky tape. I decided to use 2 pop-rivets on each side (plus we did still use the tape). I measured and pre-drilled the scoop. We then positioned the scoop and marked the position on the hood with tape. Next, the 3M backing on the scoop was pulled, Using the guide tape, we positioned the scoop starting with the back, the lowered it forward onto the hood. Get this right – wherever it hits is where it will be! With my son-in-law pressing the scoop down onto the hood, I match drilled the hood and installed the pop-rivets. I had pre-checked their position to ensure I wasn’t getting into anything on the underside of the hood. Be careful at this point, and don’t let the drill drop free when the bit goes through or you’ll end up with holes in engine parts.
This is the finished product! It came out pretty much like I imagined it when I designed this mod. The color is spectacular in the sun. It almost now looks like a silver car with candy blue over it – that’s how well the metallic in the vinyl matches the paint. Functionally, it moved almost all the noise out of the interior. When you open the right window, you can really hear the intake. With the windows closed, it’s much more subdued. This indicates it’s really drawing air from the scoop. For those of you more interested in noise in the interior than function, feel free to leave the gasketing off, don’t drill the hood and leave the scoop fake. That will give you maximum noise with minimum performance gain!
Next, I plan to cut a 1-piece gasket for the hood and replace the hood blanket with a new one cut a lot more professionally. I have more vinyl on order to do the trunk to match. We’re not sure yet about the roof. More to come!
Jay
Last edited by TommyP; 05-23-2012 at 04:00 PM.
 09-17-2006, 08:07 PM
#3
Senior Member
Originally Posted by CTCOBALTSSS
Thats pretty cool. What are you going to do when it rains? I was always curious about that when it comes to scoops.
with a low scoop like that, believe it or not, the moving car is more than enough to keep the water out of it... any few drops that DO get in just drain out the airbox holes.
some people bend a sheet of aluminum as a cover for the top of the filter.
edit: that looks awesome.
09-17-2006, 08:14 PM
#7
Senior Member
Originally Posted by HackAbuse
BTW, you should have done more than two little holes, I would have cut out a gigantic square!
a lot of times, if you do that, you'll get wrinkling around the corners... round is better, and two or three circles will keep most of the hood in tact.
 09-17-2006, 08:41 PM
#12
Senior Member
Thread Starter
Join Date: 05-17-06
Location: Denver Metro
Posts: 872
Likes: 0
Received 0 Likes
on
0 Posts
Originally Posted by HackAbuse
You would have to submerge the hood in order to hydrolock the engine
09-17-2006, 08:43 PM
#13
Senior Member
Thread Starter
Join Date: 05-17-06
Location: Denver Metro
Posts: 872
Likes: 0
Received 0 Likes
on
0 Posts
Originally Posted by joeworkstoohard
a lot of times, if you do that, you'll get wrinkling around the corners... round is better, and two or three circles will keep most of the hood in tact.
I may well cut out between the holes to make an oval. But I'm concerned about strength of the hood panel. Modern cars are designed to have most of their strength through shape - remove some metal and it gets flimsy.
09-17-2006, 08:44 PM
#14
Originally Posted by LewiSS
I fully agree. It rained pretty good while I was driving home Friday and didn't have any trouble. Nor have I with other similar installations.
 09-17-2006, 08:46 PM
#15
Senior Member
Thread Starter
Join Date: 05-17-06
Location: Denver Metro
Posts: 872
Likes: 0
Received 0 Likes
on
0 Posts
Originally Posted by Mercury
Oh my lord I can't believe you did that....
This took a lot of thought before I took the plunge. But it's MUCH cheaper than the carbon fiber hood.
09-17-2006, 08:49 PM
#16
Senior Member
Originally Posted by LewiSS
I fully agree. It rained pretty good while I was driving home Friday and didn't have any trouble. Nor have I with other similar installations.
 09-17-2006, 09:57 PM
#19
Super job! How would it look if you put the opposite scoop on the drivers side? Might be a bit too wide to look as good as a single scoop. Now if GM would only put their talent to work and come up with a stock hood set up similar to yours.....see if they'll hire you!
09-17-2006, 10:00 PM
#20
Senior Member
Join Date: 09-02-05
Location: Salt Lake, UT
Posts: 5,446
Likes: 0
Received 0 Likes
on
0 Posts
pretty cool idea man!
I think the vinyl is overkill though....
I would have painted the scoop body color... make it look as factory as possible... like one of the old SVO mustangs or some of those other 80's cars that had offset functional scoops.
The carbon fiber with all the vinyl looks a tad ricey...
I think the vinyl is overkill though....
I would have painted the scoop body color... make it look as factory as possible... like one of the old SVO mustangs or some of those other 80's cars that had offset functional scoops.
The carbon fiber with all the vinyl looks a tad ricey...
09-17-2006, 10:10 PM
#21
Senior Member

Join Date: 02-25-06
Location: New York
Posts: 2,704
Likes: 0
Received 0 Likes
on
0 Posts
hey
sorry i like it but 1 scoop looks wierd it looks like some mexi jacked 1 of ur scoops. i seriously think u should do another scoop for just the look level u kno
09-17-2006, 11:07 PM
#22
Premium Member

Join Date: 02-23-05
Location: Florida
Posts: 863
Likes: 0
Received 0 Likes
on
0 Posts
I cringed when I saw the guy cutting the vinyl on your hood, computer cut vinyl would of been much better. I hope he used a REALLY sharp blade and a very light touch, otherwise you're going to have that outline cut into your paint.
Other than that, not bad looking. Although I would of eith covered the scoop with the same vinyl (of course he wouldn't of been able to do that installing the vinyl wet), or painted it blue to match the rest of the car.
Other than that, not bad looking. Although I would of eith covered the scoop with the same vinyl (of course he wouldn't of been able to do that installing the vinyl wet), or painted it blue to match the rest of the car.
09-17-2006, 11:12 PM
#23
Senior Member
Thread Starter
Join Date: 05-17-06
Location: Denver Metro
Posts: 872
Likes: 0
Received 0 Likes
on
0 Posts
Originally Posted by roccobladr
notice any performance inrease with the intake/stock hood to the intake/modified hood?
09-17-2006, 11:15 PM
#24
Senior Member
Thread Starter
Join Date: 05-17-06
Location: Denver Metro
Posts: 872
Likes: 0
Received 0 Likes
on
0 Posts
Originally Posted by rallyyellow06
What about with snow? how are you going to keep all the snow out of there?
 09-17-2006, 11:19 PM
#25
Senior Member
Thread Starter
Join Date: 05-17-06
Location: Denver Metro
Posts: 872
Likes: 0
Received 0 Likes
on
0 Posts
Originally Posted by Cobalter LS
Super job! How would it look if you put the opposite scoop on the drivers side? Might be a bit too wide to look as good as a single scoop. Now if GM would only put their talent to work and come up with a stock hood set up similar to yours.....see if they'll hire you!
Same with the comments on the stripes being too wide. Yes, I'd prefer them to be less so, but they had to be wide enough to pick up the scoop location. As for painting the scoop body color, I guess I wanted some flash
I think it looks better in person than the pics. It's mine, I tell you, mine! I got what I wanted!

Sorry, must be late with my meds. Nurse! Nurse! Where's the med cart!