Electrical: How To: Factory Cruise Control and Remote Radio Control Installation (2007- 2010)
 09-06-2009, 11:33 PM
#1
New Member
Thread Starter

How To: Factory Cruise Control and Remote Radio Control Installation (2007- 2010)
These instructions will explain how to upgrade your 2007-2010 Cobalt to factory cruise control and remote audio controls for the radio.
I would like to thank "Maven" for blazing a trail with his initial post at this link: https://www.cobaltss.net/forums/show...install+cruise
These instructions will work for either Manual or Auto transmission Cobalts. Don't be intimidated by the length. I made it painfully detailed so most can follow.
Tools and supplies required:
3-spoke steering wheel with cruise control and remote radio controls
Basic hand tools
13/16 socket
Test Light
.64mm micro connectors (round tip) – obtain from salvage yard
.64mm micro connectors (square tip) – obtain from salvage yard
Electrical tape
Time Required: 2-3 hours (depending on experience level)
First step is to obtain a three spoke leather steering wheel (without airbag).
You will re-use the airbag from your original wheel.

Ebay is a good source for steering wheels. Expect to pay about $100 plus shipping for a 3-spoke leather wheel with cruise and radio controls.
The following GM vehicles share the same three spoke wheel as the 2007-2010 Cobalt.
07-10 COBALT
06-10 Chevrolet HHR
Step 1 – Remove Steering Wheel and Air Bag
1) Disconnect the negative battery cable and keep the cable separate from the battery terminal during the entire process. Allow the airbag system to discharge for a minimum of five minutes before working on the steering column.
2) Straighten the wheels of your Cobalt by turning the steering wheel to its neutral position. The steering wheel MUST be centered to ensure the SIR (Supplemental Inflatable Restraint) coil assembly remains centered.
a. FYI. The SIR coil is often called a “clock spring”. This component, which is located in the steering column, has several wraps of wire that resembles the spring in a clock. This assembly allows for one end to be connected to the wiring harness for the air bag system and the other end to be connected to the air bag in the steering wheel. The wraps of wire allow the steering wheel to be freely turned to the left or right.
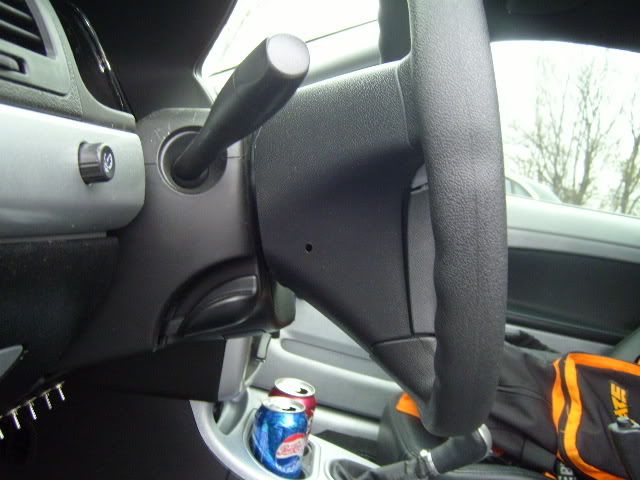
3) You will see 2 small holes behind the steering wheel, one on each side.
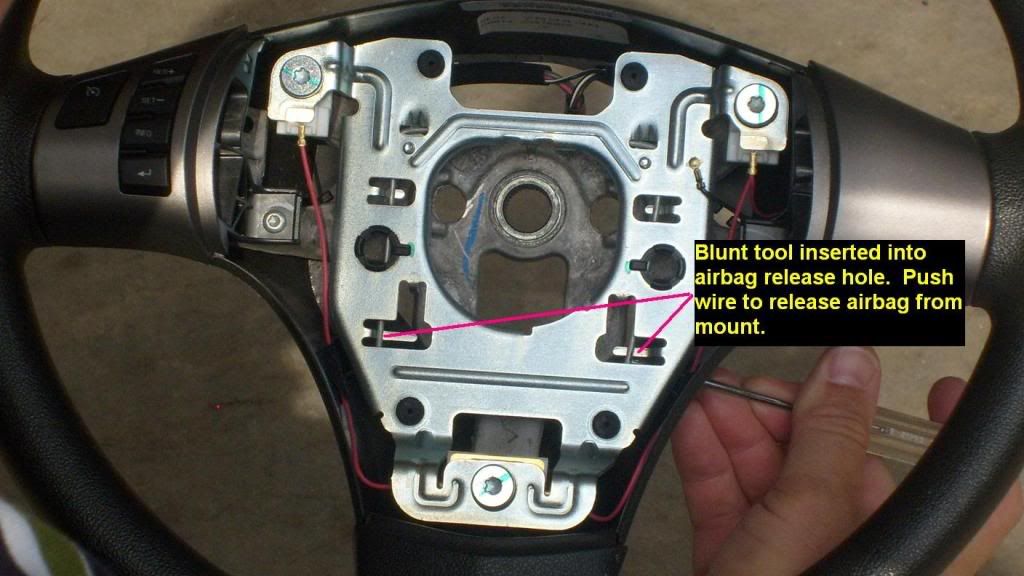
4) Insert a tool with a blunt end into the hole and push the retainer in that holds the airbag.

5) Repeat for the other side.
6) With both sides released, gently pull the airbag assembly away from the wheel.
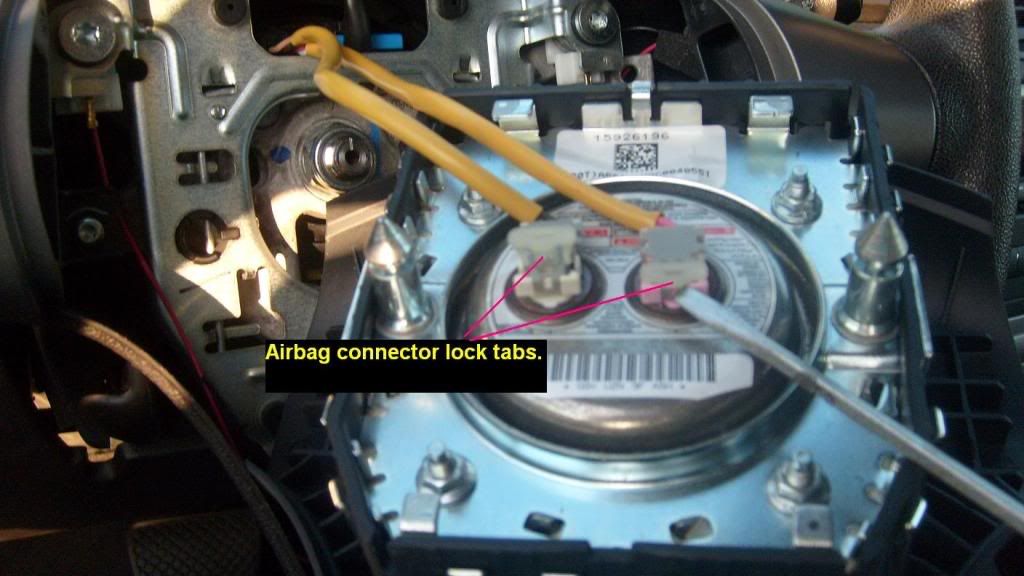
7) Turn the airbag over and pry off the connector lock tabs. Retain for later wheel attachment.
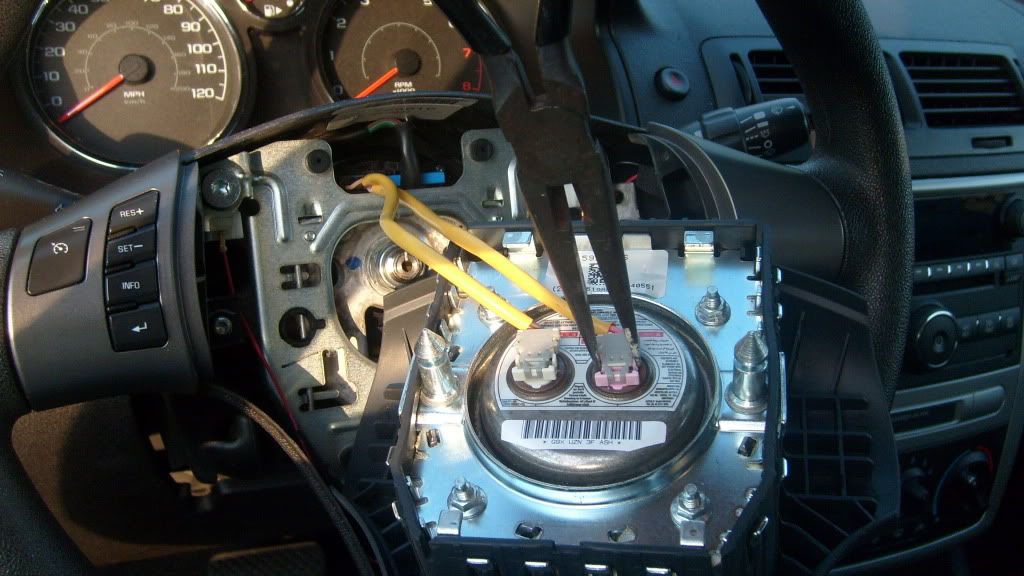
8) With lock tabs removed, depress the release tabs from the two electrical connectors and pull up.
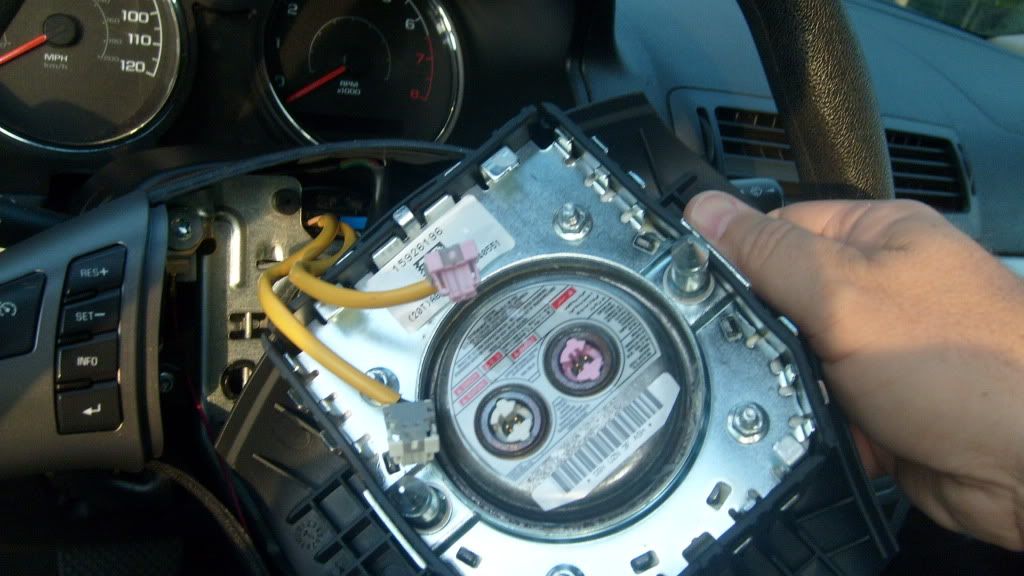
9) With both connectors released, gently lay aside airbag assembly.
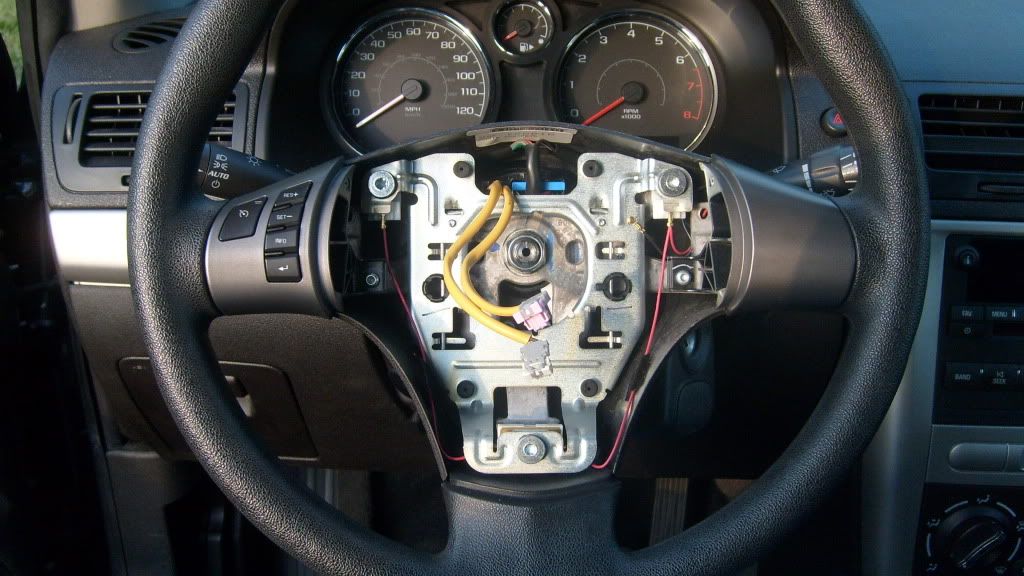
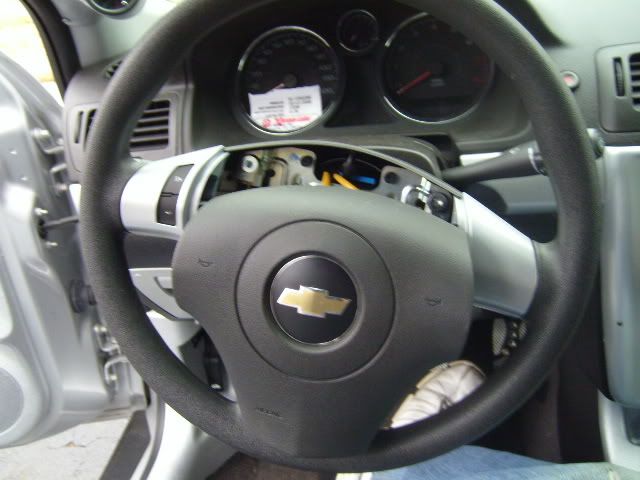
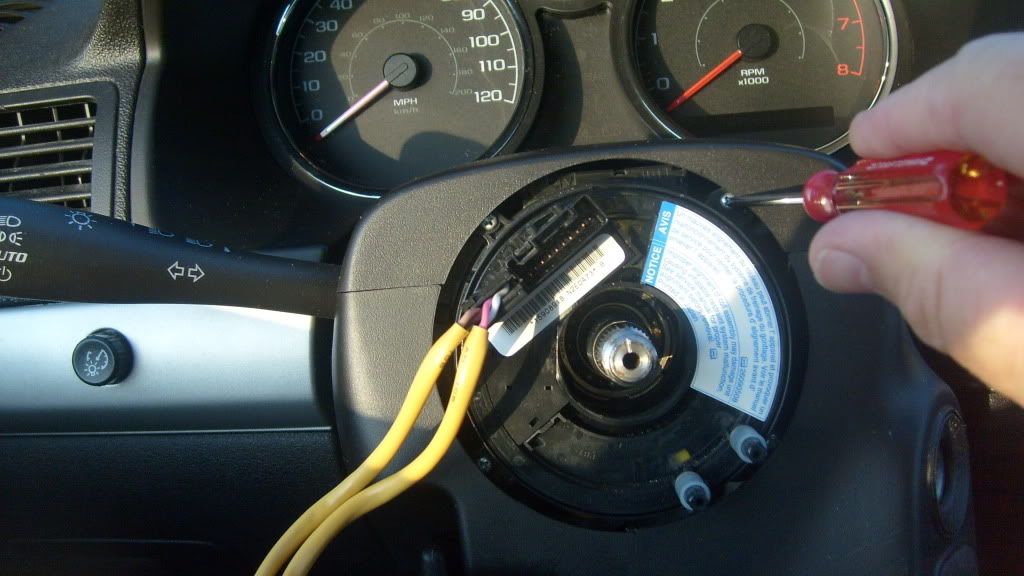
10) Picture of steering wheel with airbag removed.
11) With a 13/16” socket loosen the large nut in the center of the wheel on the steering shaft. Use your knees/thighs to hold the wheel.
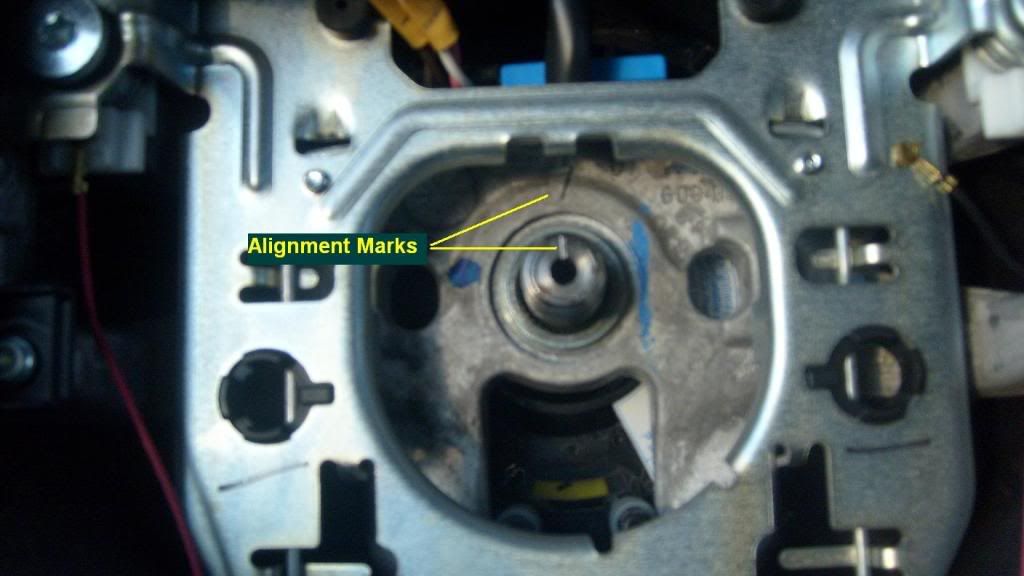
12) With the nut off, note the wheel alignment marks on the steering shaft and steering wheel hub. These will have to be aligned to the same position on re-assembly.
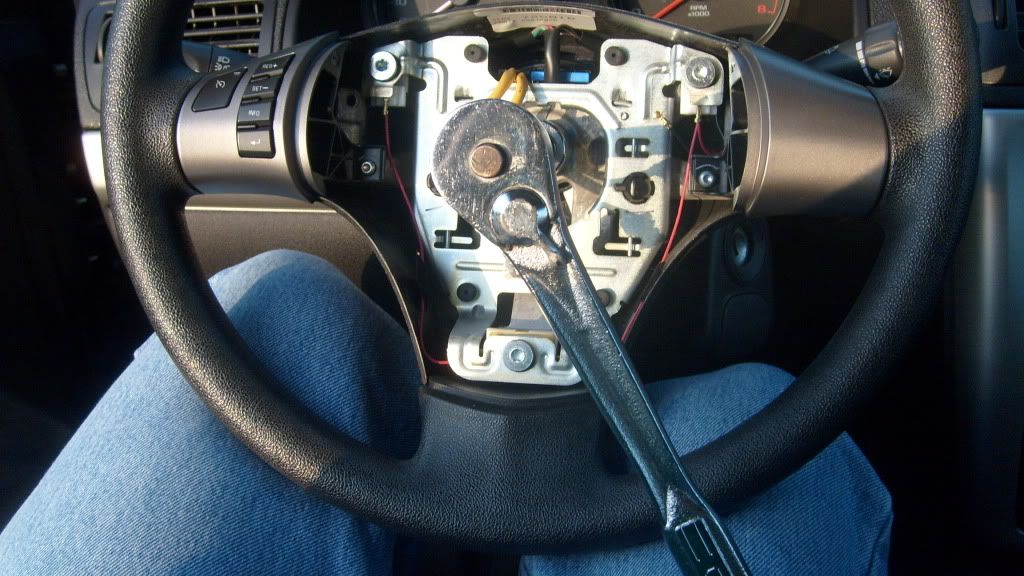
13) Yank the hell on the wheel by rocking between the 9 and 3 o’clock position to free it from the shaft. If you can’t remove the wheel by aggressively pulling on it you will need to rent/buy a steering wheel remover.
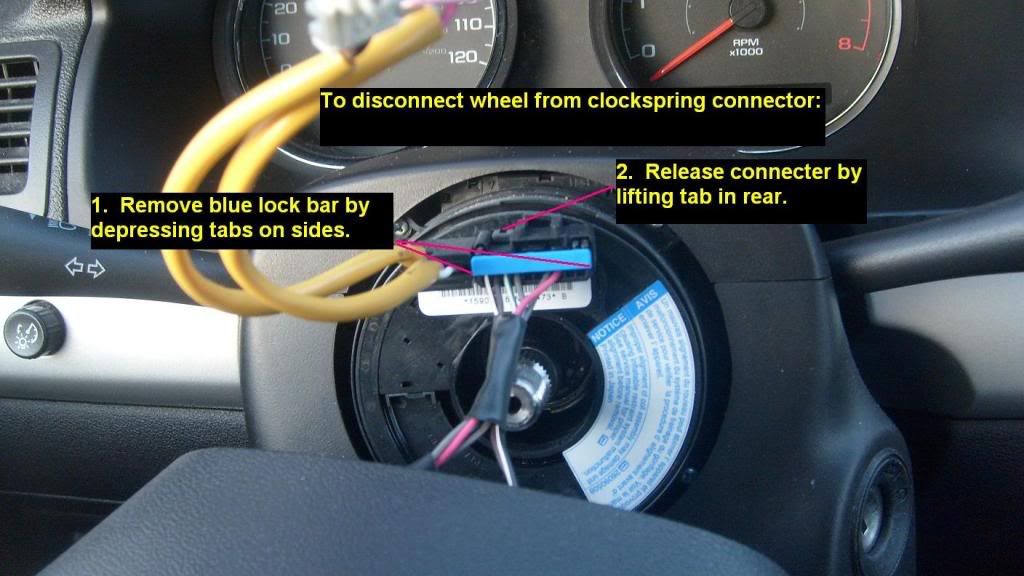
14) When the wheel is free from the shaft carefully disconnect the 11 pin connector that attaches the SIR coil to the back of the wheel. The SIR coil (aka “clock spring”) is the donut shaped disc centered on the steering shaft. The 11-pin connector is on the top of the SIR coil.
Step 2 – Wiring Instructions for Cruise Control Connection

1) There are four wires you will install at the SIR coil connector (two for cruise and two for the audio controls). You will need square-end micro connectors for this task. You can obtain at a salvage yard by harvesting the SIR coil harness from a donor Cobalt, HHR, Malibu, etc.
2) The new steering wheel has the other half of the connector that will mate to the SIR coil. You will have to remove the plastic halves of the steering column cover to access the SIR coil 11 pin connector.
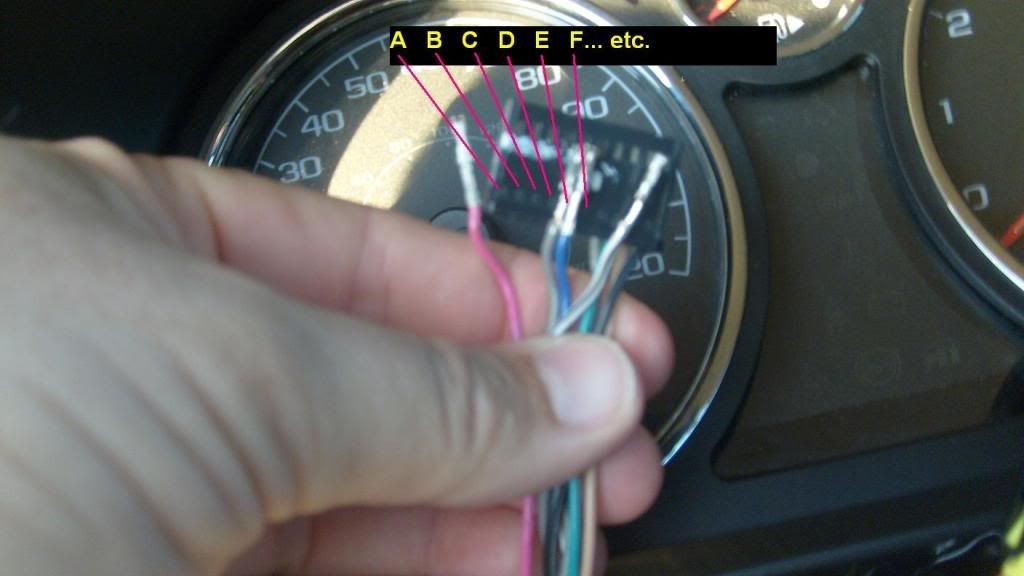
3) Squint hard and look carefully at the 11-pin connector you will release from the steering column. You will see capital letters A through K that correspond to wire slots (these letters are TINY). This connector will require the four square end micro connectors be inserted into the correct wire slots. The 11-pin connector mate from the new leather wheel is pre-wired for factory cruise control and audio controls. No mods to the connector on the new wheel is necessary.
4) The pink and grey wires at terminals C and D are the cruise wires. The pink wire (slot C) is the power source (ignition/ B+) and the grey wire (slot D) is the signal wire that will be connected to your computer (BCM). The dark blue and wht/blk wires at terminals E and F are the audio wires. The dark blue wire (slot E) is the audio Signal wire and the wht/blk wire (slot F) is the 10 Volt Reference wire.
5) The SIR coil connector on the steering shaft has letters A through K also that correspond to its mate on the back of the new wheel. Inserting wires into the steering coil connector is a simple matter of aligning the terminal and inserting until you hear/feel a “click”.
6) You’ll need two 8ft lengths of 22gauge wire. One color pink, the second grey (or whatever you find at the local car parts store). Splice the wires to correspond to the colors (pink and grey) of the micro connectors.
7) From the back of the SIR coil 11 pin connector insert the pink micro terminal into slot “C” and the grey connector into slot “D”..
Step 3 – Wiring Instructions for Steering Wheel Audio Controls
1) Remove radio. (See “How To” for radio removal)https://www.cobaltss.net/forums/show...t=remove+radio

2) The BCM and Radio Connections share the same round terminal ends (.64mm). To obtain the .64mm connectors you can source a salvage yard for a radio or BCM harness from a 2007 and newer Cobalt, HHR, Malibu, etc., and harvest the terminal ends with wire attached.
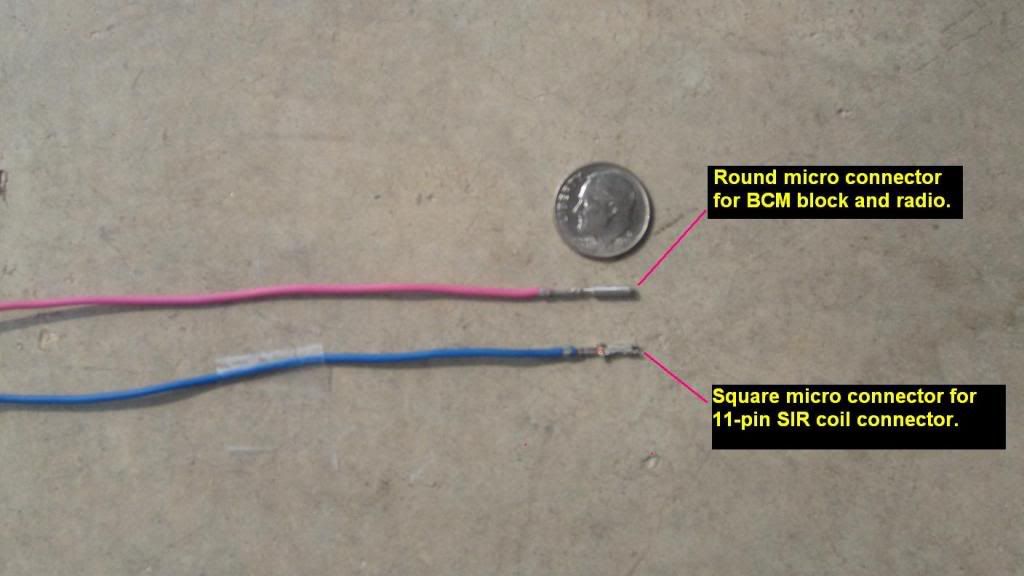
Note: You will require harvesting two types of micro-connector wires from a salvage yard. The square end that will fit into the 11-pin SIR connector only and the round end that will fit into the radio connectors and BCM2 block.
3) You’ll need two 6ft lengths of 22gauge wire. One color dark blue, the second black (or whatever you find at the local car parts store). Insert the two remaining square micro terminals into slots “E” and “F” of the 11 pin SIR connector for the audio controls.
4) Thread the two audio wires from the SIR coil through the radio opening in the dash.
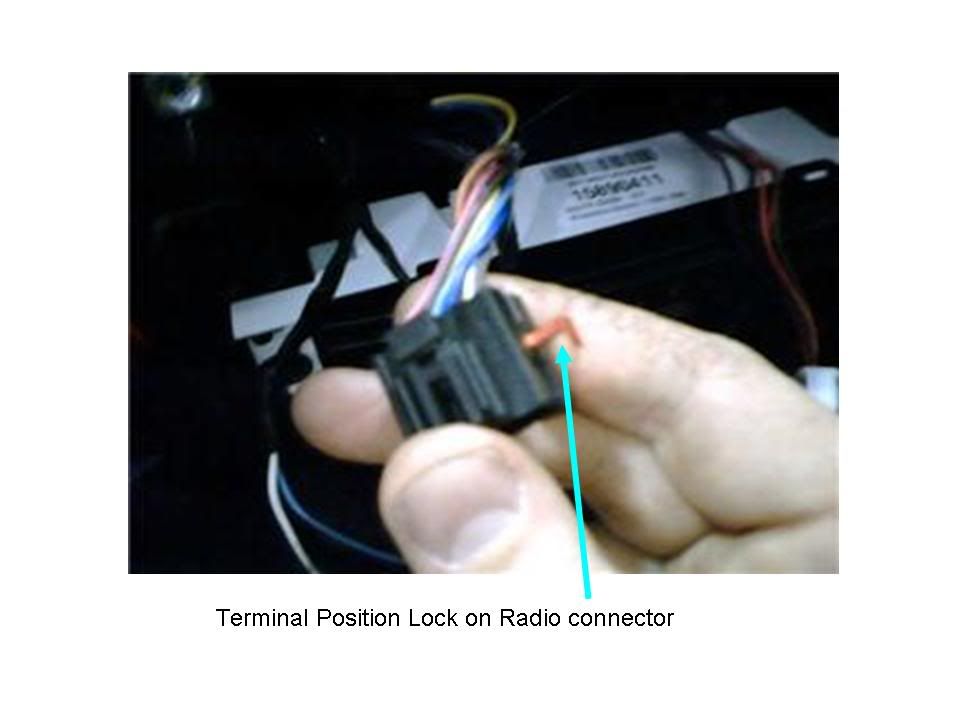
5) Note: Inserting wires into the radio connectors require release of the terminal position lock (colored plastic bar through connector) and insertion of terminal into connector (put lock back afterwards).
6) Insert the dark blue Signal wire (from slot E at SIR coil connector) into pin 11 of radio connector (black 14-way). See picture below for pin orientation.
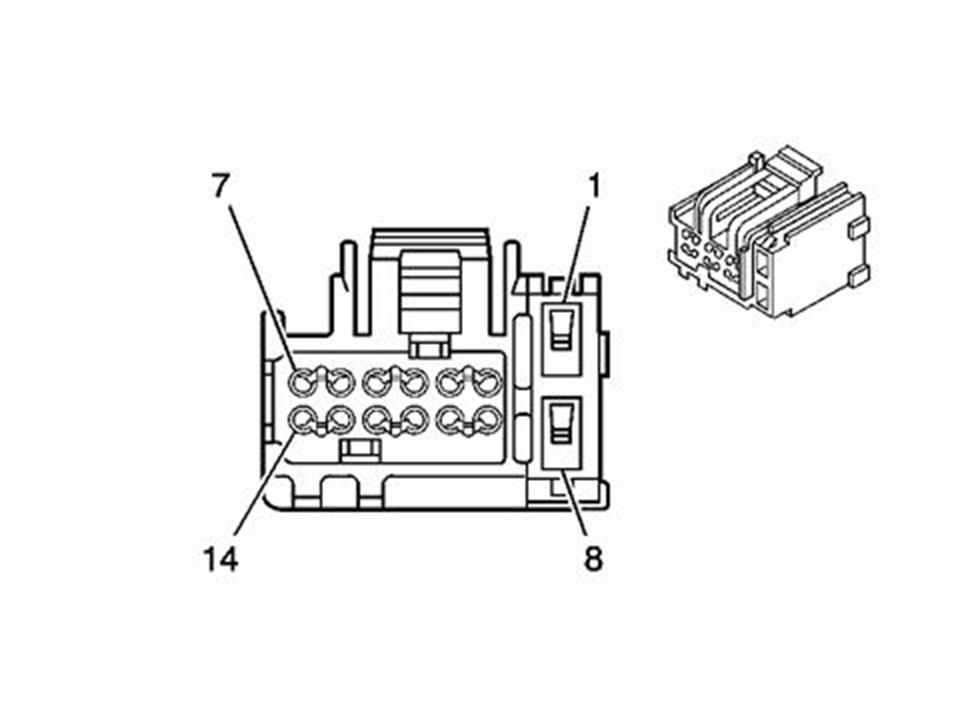
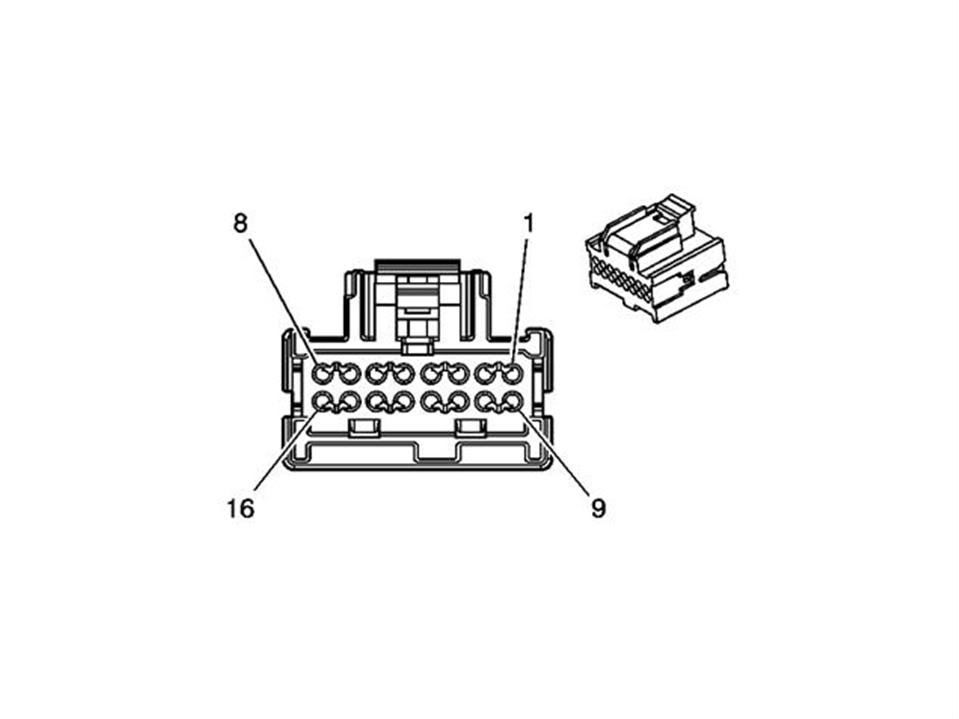
7) Insert the wht/blk 10 Volt Reference wire (from slot F at SIR coil connector) into pin 14 of radio connector #2 (black 16-way). See picture below for pin orientation.
8) Re-install radio.
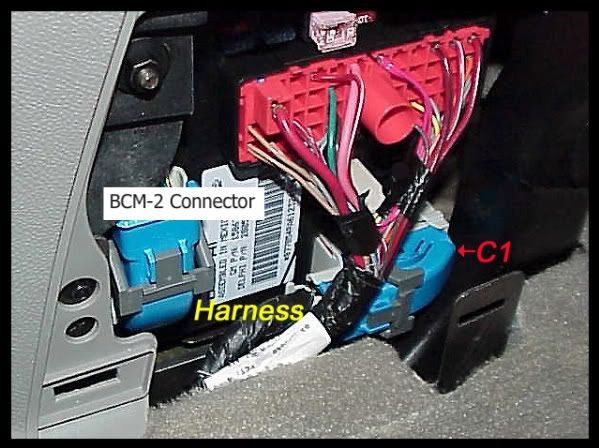
Step 4 – Wiring Instructions for BCM/Fuse Box
1) You can find the BCM (fuse box) on the passenger side of the center console. The plastic panel on the fuse box is hard to get off. There are 3 or 4 clips on the bottom and sides, with prongs on the top. Just pull on the bottom corner nearest the fire wall and it'll come off with enough force. It helps to take off the white plastic border around the fuse panel for better access to the BCM connector.

2) Thread the two wires connected to the “C” (pink) and “D” (grey) 11 pin connector at the SIR coil through the center console emerging at the right side of the fuse block.
3) Splice a .64mm round micro connector to the BCM end of the grey wire (other end connected to “D” terminal of SIR coil).
4) Inserting wires into the BCM connector requires connector shell disassembly as well as lock removal. Unplug Connector #2 from the BCM. Cut off the wire-tie holding the clamp together. Pull the pin retainer clip for access to the wire slots.
5) Locate pin #61 in connector 2 of the BCM. The pins in the BCM connector are not marked. You will have to count the terminals by using the diagram below. As an aid, pin #61 is next to the white/black wire going into location #62.
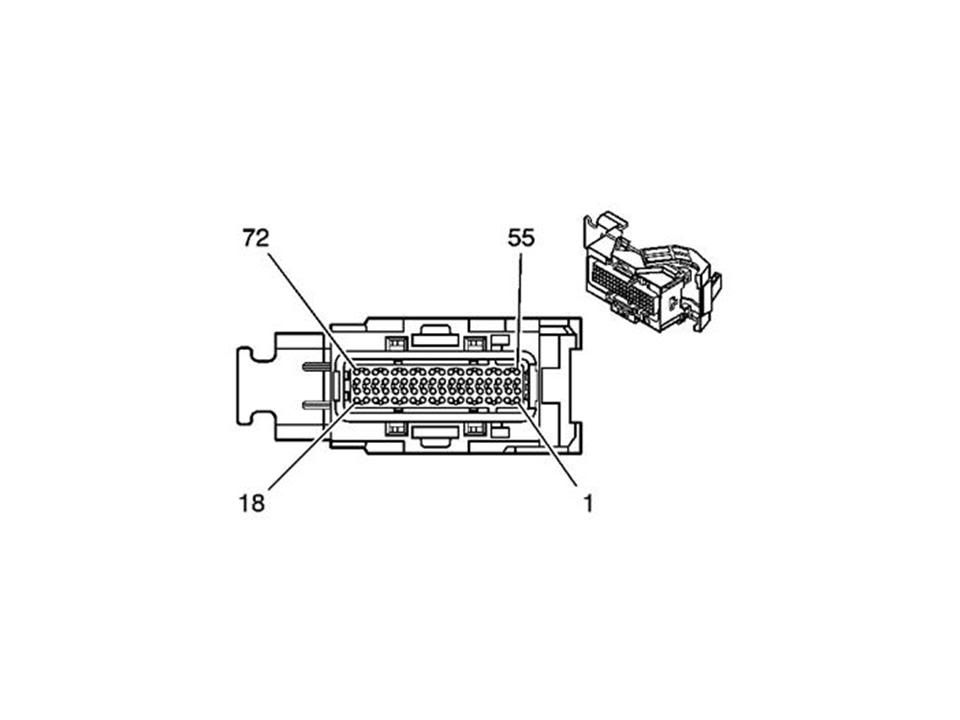
4) Make sure when you insert the gray wire into position 61 that it’s all the way down. Push the connector into the hole with straight-down force using a pair of needle nose pliers.
5) When you think you have the pin all the way in, turn the connector around and make sure you can see the pin flush at the bottom like the others in the connector. Our gray wire should be next to the white/black wire.
6) The next wire is the power source (ignition current) connected to slot “C” back at the steering wheel SIR coil. The ignition source I used was one of the two pink wires coming out of the big C3 connector in the middle of the Body Control Module (BCM/fuse block). They come out of position D7 in the C3 connector. On a 2007 this is on the top row, slot 7. If you have a test light you want to splice into one of the pink wires that has current with the key in the “on” position.
7) Steering wheel install is the reverse of removal. Ensure wheel is aligned to steering shaft as previously noted. Push the air bag module onto the wheel until the latches set.
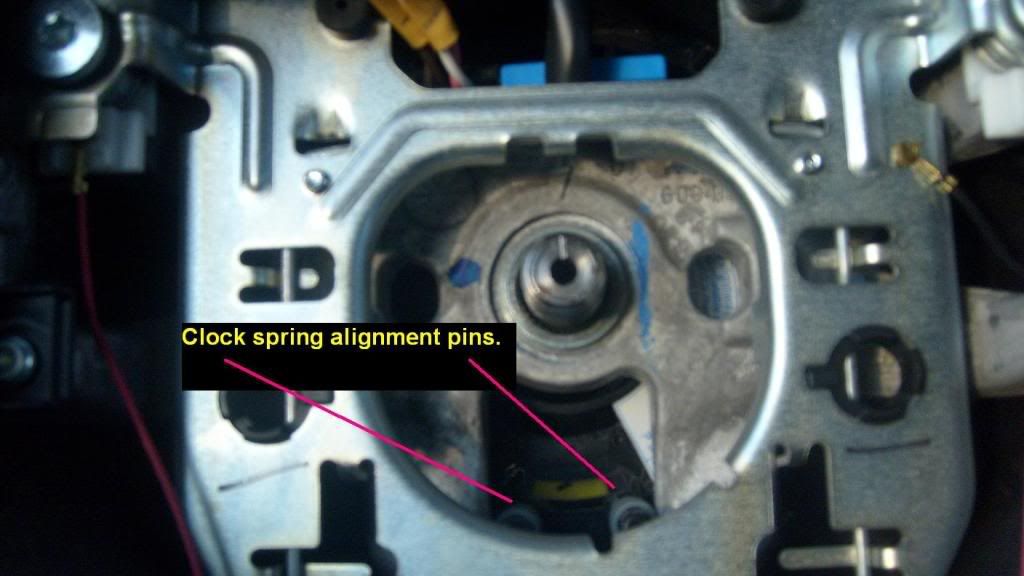
Ensure the clock spring alignment pins are centered at the bottom of the steering wheel before firmly depressing onto the steering shaft.
8) The radio controls will work as soon as the battery is connected. The cruise control requires BCM reconfiguration with a Tech2
9) Go to the dealer (or any garage with a Tech2), fork over $70-$80 for 10 minutes worth of labor and have them program the Body Control Module (BCM) to “turn on” the cruise control option.
10) If your dealer or garage doesn’t know how to configure the BCM for cruise control, print these instructions for them:
1. Using their tech2, build the car.
2. Select Vehicle Control Systems, then navigate to Computer/Integrating Systems.
3. Once in the Computer/Integrating Systems menu select Module Replacement/Setup and follow the instructions on the scan tool.
4. It will ask a bunch of questions regarding the options on the car, one of them will be about the cruise control, just say yes it does have this option.
5. Finish set-up and you're done......takes about 5mins
I would like to thank "Maven" for blazing a trail with his initial post at this link: https://www.cobaltss.net/forums/show...install+cruise
These instructions will work for either Manual or Auto transmission Cobalts. Don't be intimidated by the length. I made it painfully detailed so most can follow.
Tools and supplies required:
3-spoke steering wheel with cruise control and remote radio controls
Basic hand tools
13/16 socket
Test Light
.64mm micro connectors (round tip) – obtain from salvage yard
.64mm micro connectors (square tip) – obtain from salvage yard
Electrical tape
Time Required: 2-3 hours (depending on experience level)
First step is to obtain a three spoke leather steering wheel (without airbag).
You will re-use the airbag from your original wheel.
Ebay is a good source for steering wheels. Expect to pay about $100 plus shipping for a 3-spoke leather wheel with cruise and radio controls.
The following GM vehicles share the same three spoke wheel as the 2007-2010 Cobalt.
07-10 COBALT
06-10 Chevrolet HHR
Step 1 – Remove Steering Wheel and Air Bag
1) Disconnect the negative battery cable and keep the cable separate from the battery terminal during the entire process. Allow the airbag system to discharge for a minimum of five minutes before working on the steering column.
2) Straighten the wheels of your Cobalt by turning the steering wheel to its neutral position. The steering wheel MUST be centered to ensure the SIR (Supplemental Inflatable Restraint) coil assembly remains centered.
a. FYI. The SIR coil is often called a “clock spring”. This component, which is located in the steering column, has several wraps of wire that resembles the spring in a clock. This assembly allows for one end to be connected to the wiring harness for the air bag system and the other end to be connected to the air bag in the steering wheel. The wraps of wire allow the steering wheel to be freely turned to the left or right.
3) You will see 2 small holes behind the steering wheel, one on each side.
4) Insert a tool with a blunt end into the hole and push the retainer in that holds the airbag.
5) Repeat for the other side.
6) With both sides released, gently pull the airbag assembly away from the wheel.
7) Turn the airbag over and pry off the connector lock tabs. Retain for later wheel attachment.
8) With lock tabs removed, depress the release tabs from the two electrical connectors and pull up.
9) With both connectors released, gently lay aside airbag assembly.
10) Picture of steering wheel with airbag removed.
11) With a 13/16” socket loosen the large nut in the center of the wheel on the steering shaft. Use your knees/thighs to hold the wheel.
12) With the nut off, note the wheel alignment marks on the steering shaft and steering wheel hub. These will have to be aligned to the same position on re-assembly.
13) Yank the hell on the wheel by rocking between the 9 and 3 o’clock position to free it from the shaft. If you can’t remove the wheel by aggressively pulling on it you will need to rent/buy a steering wheel remover.
14) When the wheel is free from the shaft carefully disconnect the 11 pin connector that attaches the SIR coil to the back of the wheel. The SIR coil (aka “clock spring”) is the donut shaped disc centered on the steering shaft. The 11-pin connector is on the top of the SIR coil.
Step 2 – Wiring Instructions for Cruise Control Connection
1) There are four wires you will install at the SIR coil connector (two for cruise and two for the audio controls). You will need square-end micro connectors for this task. You can obtain at a salvage yard by harvesting the SIR coil harness from a donor Cobalt, HHR, Malibu, etc.
2) The new steering wheel has the other half of the connector that will mate to the SIR coil. You will have to remove the plastic halves of the steering column cover to access the SIR coil 11 pin connector.
3) Squint hard and look carefully at the 11-pin connector you will release from the steering column. You will see capital letters A through K that correspond to wire slots (these letters are TINY). This connector will require the four square end micro connectors be inserted into the correct wire slots. The 11-pin connector mate from the new leather wheel is pre-wired for factory cruise control and audio controls. No mods to the connector on the new wheel is necessary.
4) The pink and grey wires at terminals C and D are the cruise wires. The pink wire (slot C) is the power source (ignition/ B+) and the grey wire (slot D) is the signal wire that will be connected to your computer (BCM). The dark blue and wht/blk wires at terminals E and F are the audio wires. The dark blue wire (slot E) is the audio Signal wire and the wht/blk wire (slot F) is the 10 Volt Reference wire.
5) The SIR coil connector on the steering shaft has letters A through K also that correspond to its mate on the back of the new wheel. Inserting wires into the steering coil connector is a simple matter of aligning the terminal and inserting until you hear/feel a “click”.
6) You’ll need two 8ft lengths of 22gauge wire. One color pink, the second grey (or whatever you find at the local car parts store). Splice the wires to correspond to the colors (pink and grey) of the micro connectors.
7) From the back of the SIR coil 11 pin connector insert the pink micro terminal into slot “C” and the grey connector into slot “D”..
Step 3 – Wiring Instructions for Steering Wheel Audio Controls
1) Remove radio. (See “How To” for radio removal)https://www.cobaltss.net/forums/show...t=remove+radio
2) The BCM and Radio Connections share the same round terminal ends (.64mm). To obtain the .64mm connectors you can source a salvage yard for a radio or BCM harness from a 2007 and newer Cobalt, HHR, Malibu, etc., and harvest the terminal ends with wire attached.
Note: You will require harvesting two types of micro-connector wires from a salvage yard. The square end that will fit into the 11-pin SIR connector only and the round end that will fit into the radio connectors and BCM2 block.
3) You’ll need two 6ft lengths of 22gauge wire. One color dark blue, the second black (or whatever you find at the local car parts store). Insert the two remaining square micro terminals into slots “E” and “F” of the 11 pin SIR connector for the audio controls.
4) Thread the two audio wires from the SIR coil through the radio opening in the dash.
5) Note: Inserting wires into the radio connectors require release of the terminal position lock (colored plastic bar through connector) and insertion of terminal into connector (put lock back afterwards).
6) Insert the dark blue Signal wire (from slot E at SIR coil connector) into pin 11 of radio connector (black 14-way). See picture below for pin orientation.
7) Insert the wht/blk 10 Volt Reference wire (from slot F at SIR coil connector) into pin 14 of radio connector #2 (black 16-way). See picture below for pin orientation.
8) Re-install radio.
Step 4 – Wiring Instructions for BCM/Fuse Box
1) You can find the BCM (fuse box) on the passenger side of the center console. The plastic panel on the fuse box is hard to get off. There are 3 or 4 clips on the bottom and sides, with prongs on the top. Just pull on the bottom corner nearest the fire wall and it'll come off with enough force. It helps to take off the white plastic border around the fuse panel for better access to the BCM connector.
2) Thread the two wires connected to the “C” (pink) and “D” (grey) 11 pin connector at the SIR coil through the center console emerging at the right side of the fuse block.
3) Splice a .64mm round micro connector to the BCM end of the grey wire (other end connected to “D” terminal of SIR coil).
4) Inserting wires into the BCM connector requires connector shell disassembly as well as lock removal. Unplug Connector #2 from the BCM. Cut off the wire-tie holding the clamp together. Pull the pin retainer clip for access to the wire slots.
5) Locate pin #61 in connector 2 of the BCM. The pins in the BCM connector are not marked. You will have to count the terminals by using the diagram below. As an aid, pin #61 is next to the white/black wire going into location #62.
4) Make sure when you insert the gray wire into position 61 that it’s all the way down. Push the connector into the hole with straight-down force using a pair of needle nose pliers.
5) When you think you have the pin all the way in, turn the connector around and make sure you can see the pin flush at the bottom like the others in the connector. Our gray wire should be next to the white/black wire.
6) The next wire is the power source (ignition current) connected to slot “C” back at the steering wheel SIR coil. The ignition source I used was one of the two pink wires coming out of the big C3 connector in the middle of the Body Control Module (BCM/fuse block). They come out of position D7 in the C3 connector. On a 2007 this is on the top row, slot 7. If you have a test light you want to splice into one of the pink wires that has current with the key in the “on” position.
7) Steering wheel install is the reverse of removal. Ensure wheel is aligned to steering shaft as previously noted. Push the air bag module onto the wheel until the latches set.
Ensure the clock spring alignment pins are centered at the bottom of the steering wheel before firmly depressing onto the steering shaft.
8) The radio controls will work as soon as the battery is connected. The cruise control requires BCM reconfiguration with a Tech2
9) Go to the dealer (or any garage with a Tech2), fork over $70-$80 for 10 minutes worth of labor and have them program the Body Control Module (BCM) to “turn on” the cruise control option.
10) If your dealer or garage doesn’t know how to configure the BCM for cruise control, print these instructions for them:
1. Using their tech2, build the car.
2. Select Vehicle Control Systems, then navigate to Computer/Integrating Systems.
3. Once in the Computer/Integrating Systems menu select Module Replacement/Setup and follow the instructions on the scan tool.
4. It will ask a bunch of questions regarding the options on the car, one of them will be about the cruise control, just say yes it does have this option.
5. Finish set-up and you're done......takes about 5mins
Last edited by kafer79; 01-29-2010 at 09:39 PM. Reason: Update
 10-31-2009, 01:27 PM
#2

VERY IMPORTANT UPDATE...
on my 09 i bought a used ss steering wheel and plugged in it and it worked without adding any wires for the radio... i already had cruise control it mutes the radio track up track down volume up volume down. just thought some of you would like a heads up
on my 09 i bought a used ss steering wheel and plugged in it and it worked without adding any wires for the radio... i already had cruise control it mutes the radio track up track down volume up volume down. just thought some of you would like a heads up
 11-06-2009, 06:28 PM
#9
New Member
Thread Starter
Second sentence of my how-to instruction has the following disclaimer: "I’ve plagiarized from other sources and added my own experience".
I failed to specifically acknowledge two of Maven's photos (pics 18 and 23). Since there is a proprietary sensitivity I will replace.
I failed to specifically acknowledge two of Maven's photos (pics 18 and 23). Since there is a proprietary sensitivity I will replace.
Last edited by kafer79; 11-08-2009 at 01:26 PM.

 11-11-2009, 10:45 PM
#12
New Member
Thread Starter
You will require two styles of "micro connectors"...one has a square head (for install at the wheel) and the other has a round head (for install at the radio and BCM).
The length does not matter as long as you splice enough wire to reach the back of the radio and the BCM-2 connector.
Here's something I discovered tonight from another forum. There appears to be a factory connector that is pre-wired for the cruise and audio controls! Wish I had known about this option before. The part number for the harness is GM PART # 15234343 and can be found at http://www.gmpartsdirect.com for $12 plus shipping.
As a Navy Aviation Mech you should have no problem with this upgrade.
Here's a picture I found of the harness:
11-12-2009, 08:23 AM
#14
You will require two styles of "micro connectors"...one has a square head (for install at the wheel) and the other has a round head (for install at the radio and BCM).
The length does not matter as long as you splice enough wire to reach the back of the radio and the BCM-2 connector.
Here's something I discovered tonight from another forum. There appears to be a factory connector that is pre-wired for the cruise and audio controls! Wish I had known about this option before. The part number for the harness is GM PART # 15234343 and can be found at http://www.gmpartsdirect.com for $12 plus shipping.
As a Navy Aviation Mech you should have no problem with this upgrade.
Here's a picture I found of the harness:
Also what steps does that harness eliminate?
I also did a bit of research and if you don't want to buy a whole new steering wheel you can buy the switches and the covers,
here is what I found
Part Part Number
Steering Wheel Cover w/Cruise Control (Left) 15845807
Steering Wheel Cover w/Radio Control (Right) 15845808
Radio Switch (Buttons) 15942951
Cruise Control Switch (Buttons) 15942950
Last edited by blu3_v1p3r; 11-12-2009 at 12:15 PM.
11-12-2009, 12:40 PM
#15
New Member
Thread Starter
"Is that the harness that plugs into the cruise buttons and the radio buttons?
Also what steps does that harness eliminate?"
Yes, the picture appears to be the connector that you will use at the SIR coil based on the wiring colors. As I have not performed the mod with this connector I can't be for sure. However, check out this link at a HHR forum for details (the wiring and wheel are the same):
http://chevyhhr.net/forums/showthrea...install+cruise
11-15-2009, 11:25 PM
#16
Senior Member

Join Date: 11-20-07
Location: Pittsburgh, Pistolvania
Posts: 2,961
Likes: 0
Received 1 Like
on
1 Post
I'd like to make a note: make sure before doing this to disable your airbag system. It'd be a bad day if something should go off with the module in your lap.
Edit: I did some looking at that HHR forum thread. Apparently, the pins on that harness may differ for the post 2007 cars. Not sure if this applies to the Slobalt/G5, but it might.
OK, Possible part numbers for the harness for 2007+:
http://chevyhhr.net/forums/showpost....&postcount=571
*edited to remove question... I found the answer to it already*.
Last edited by Nighthawk243; 11-17-2009 at 09:00 PM. Reason: Automerged Doublepost
11-22-2009, 10:48 AM
#17
Senior Member

Do any of you guys know the p/n for the wheel trim pieces WITHOUT controls/buttons? I don't like steering wheel controls and been wanting to delete them. Not sure if there is a bezel for the left side without em or not?
11-22-2009, 01:05 PM
#19
Senior Member

Join Date: 04-30-07
Location: Moose Jaw / Regina, Sask
Posts: 2,226
Likes: 0
Received 0 Likes
on
0 Posts
Second sentence of my how-to instruction has the following disclaimer: "I’ve plagiarized from other sources and added my own experience".
I failed to specifically acknowledge two of Maven's photos (pics 18 and 23). Since there is a proprietary sensitivity I will replace.
I failed to specifically acknowledge two of Maven's photos (pics 18 and 23). Since there is a proprietary sensitivity I will replace.
11-22-2009, 03:04 PM
#20
Senior Member

Join Date: 09-09-07
Location: Vancouver, WA
Posts: 1,377
Likes: 0
Received 0 Likes
on
0 Posts
siteing your sources does not work this way. at all. If i wrote a report for school saying "I�ve plagiarized from other sources and added my own experience", i would probably get a zero and possibly get kicked out of the university. Just say, hey i got this picture/ idea from so and so, and that would be enough to keep everyone happy.
and it's rather absurd ya'll are knockin' on him for something so petty.
11-22-2009, 08:08 PM
#21
Senior Member
Join Date: 11-20-07
Location: Pittsburgh, Pistolvania
Posts: 2,961
Likes: 0
Received 1 Like
on
1 Post
Citing your sources does not work this way. at all. If i wrote a report for school saying "I’ve plagiarized from other sources and added my own experience", i would probably get a zero and possibly get kicked out of the university. Just say, hey i got this picture/ idea from so and so, and that would be enough to keep everyone happy.
Anyways, I ordered a 2007 G5 wheel (Leather, Cruise, Radio Controls and OEM harnesses included) from LKQ in Quebec and it should hopefully be here Tuesday. I hope to install it either Thursday (Screw the family...) or Friday and then get the ECU flashed on Saturday.
So far, unless I need to rent a wheel puller, the cost of the project (ECU Flash + Wheel), will be $133 USD.
Last edited by Nighthawk243; 11-22-2009 at 08:12 PM. Reason: Automerged Doublepost
11-22-2009, 10:40 PM
#22
No you won't need a wheel puller, just like he said you can pull the wheel off. When I took mine off, I left the center nut threaded on by a few threads, so when the wheel finally came off it didn't come off and hit me. I just wiggled and pulled on the wheel, and off it came. then just unthreaded the nut and everything was fine.
11-23-2009, 02:59 AM
#25
Senior Member
Join Date: 11-20-07
Location: Pittsburgh, Pistolvania
Posts: 2,961
Likes: 0
Received 1 Like
on
1 Post
No you won't need a wheel puller, just like he said you can pull the wheel off. When I took mine off, I left the center nut threaded on by a few threads, so when the wheel finally came off it didn't come off and hit me. I just wiggled and pulled on the wheel, and off it came. then just unthreaded the nut and everything was fine.
Only for radio controls. The HHR forums posts are primarily about adding radio controls (I guess HHR's usually have cruise, but not all of them have radio controls).
You will need to take it to a dealership (Like I am going to be doing 11AM on Saturday) to get the ECU flashed for cruise. Unless your car was equipped from factory with it, the parameter for cruise is "off" in the ECU and the dealership will need to use the Tech II in order to change it to "on". This usually costs the going labor rate for one hour of time (mine will cost $67.84 for the turn on)
Last edited by Nighthawk243; 11-23-2009 at 02:59 AM. Reason: Automerged Doublepost