Exhaust: How To: GM Performance Parts Extrude Honed Exhaust Manifold Install
 08-06-2007, 07:14 PM
#1
Senior Member
Thread Starter

Join Date: 05-23-06
Location: Racine, Wisconsin
Posts: 1,017
Likes: 0
Received 0 Likes
on
0 Posts
How To: GM Performance Parts Extrude Honed Exhaust Manifold Install
How To: GM Performance Parts Extrude Honed Exhaust Manifold Install
Well I didn’t see a how to for this as of yet and I know the install is kind of tricky, so here you go. This is for the GM Performance Parts exhaust manifold, however, it could be used for any header or manifold.
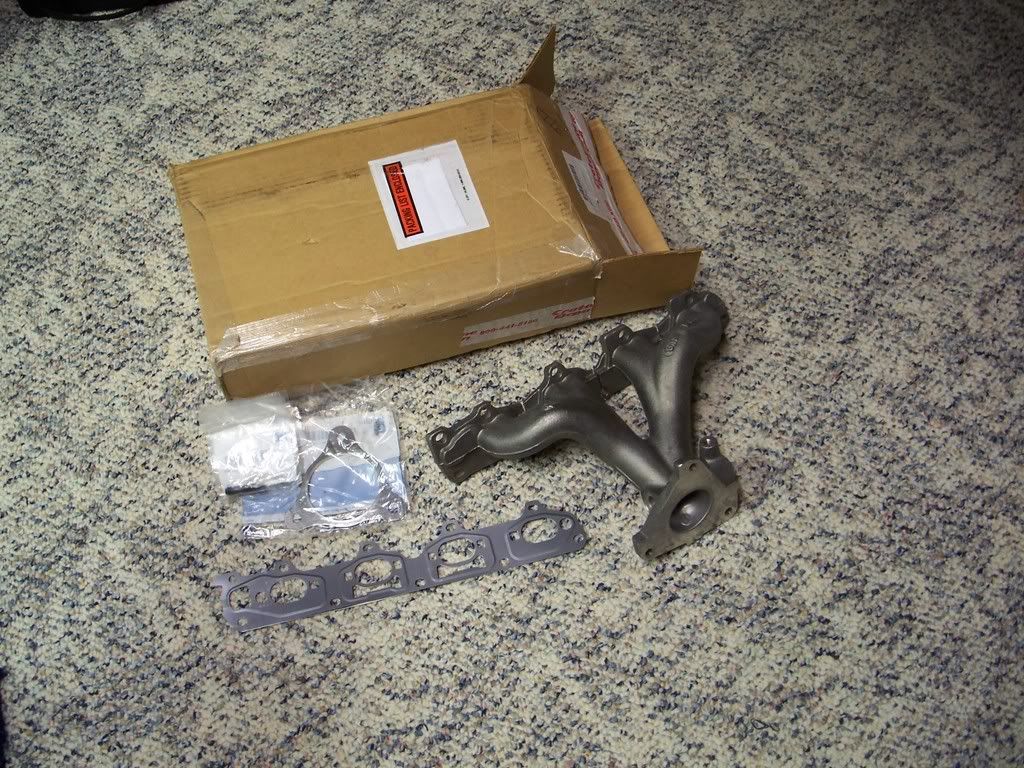
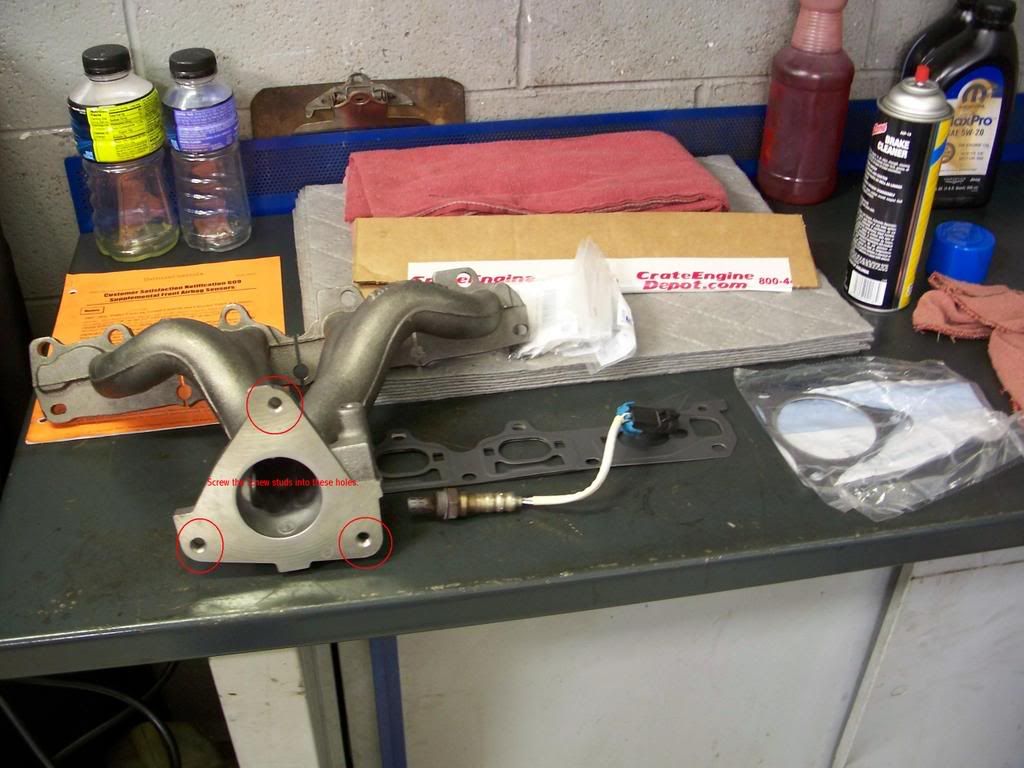
The parts you will need are:
1. GMPP Extrude Honed Exhaust Manifold - Part #19131972
2. Head to Manifold gasket - Part #9230949
3. Manifold to Downpipe gasket - Part #15235773
4. 3 Manifold to downpipe studs - Part #10160364
5. 3 Manifold to downpipe nuts - Part #11517996
Tools that you will need:
1. A lift if possible, but a jack and jack stands will work
2. 3/8” Ratchet and/or 3/8” Air ratchet
3. 3/8” 15mm deep socket
4. 3/8” 13mm deep socket
5. 3/8” E10 External Torx socket
6. 15mm wrench
7. Ľ” Ratchet
8. Ľ” 13mm deep socket
9. O2 Sensor socket
10. Flat blade screwdriver
11. Pliers
12. Fender cover
**Make sure vehicle is cool so you do not burn your self, skin grafts are painful**
Step 1: Lifting the vehicle
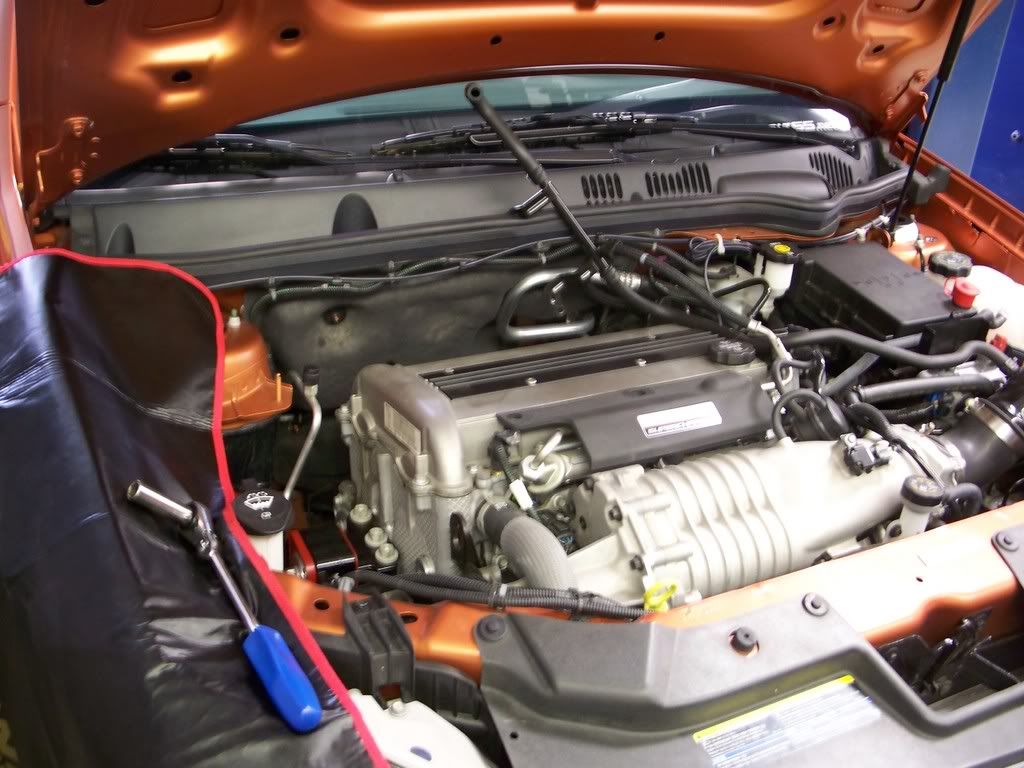
Place vehicle on lift or jack/stands so you can work underneath the vehicle. Make sure vehicle is safely mounted so it will not fall and possibly cause injury.

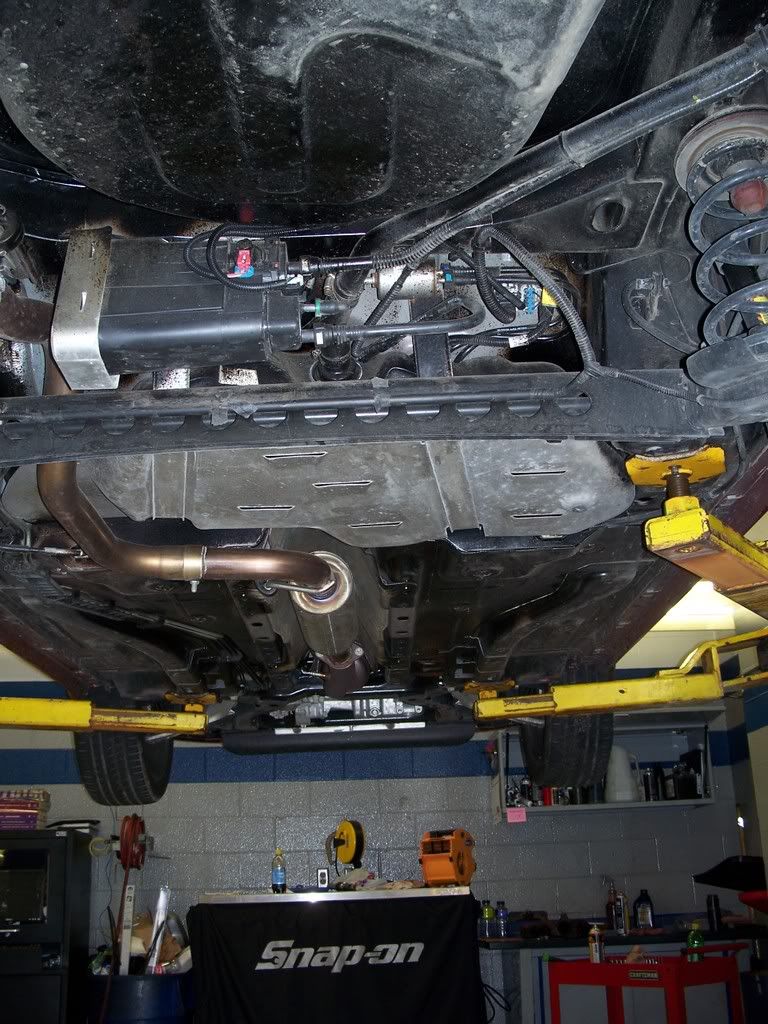
Step 2: Removing the catalytic converter/downpipe
Using an O2 sensor socket, remove the O2 sensor from the downpipe and let it hang loose. Then, using a 15mm socket and 15mm wrench remove the 2 nuts and 2 bolts connecting the downpipe to the rear exhaust section. Next, using a 15mm socket remove the 3 nuts holding the downpipe to the exhaust manifold.
The top bolt may be a bit tricky to reach. Pull pipe backwards and place it off to the side.

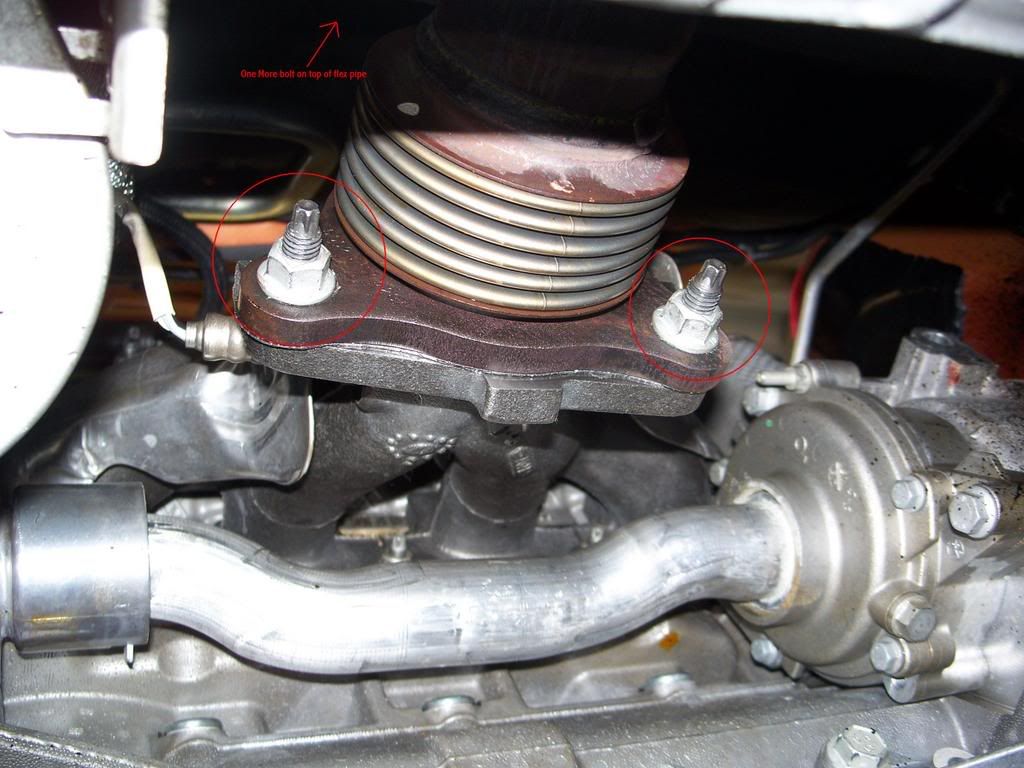
Step 3: Removing the heat shield on the manifold
From the top of the vehicle, using pliers, move the hose clamp on the PCV tube. Remove these 3 13mm nuts/bolts holding the top of the heat shield to the manifold.
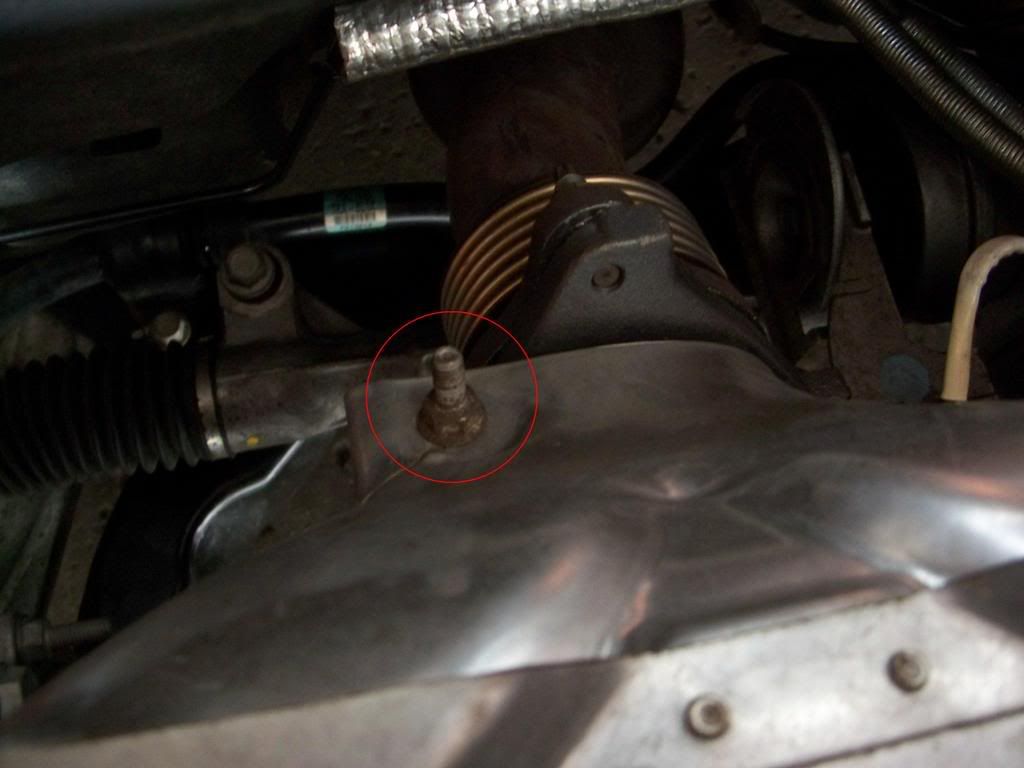
Using a Ľ” ratchet and 13mm socket remove the stud/nut holding the shield to the bottom of the manifold.
Move the PCV tube out of the way.
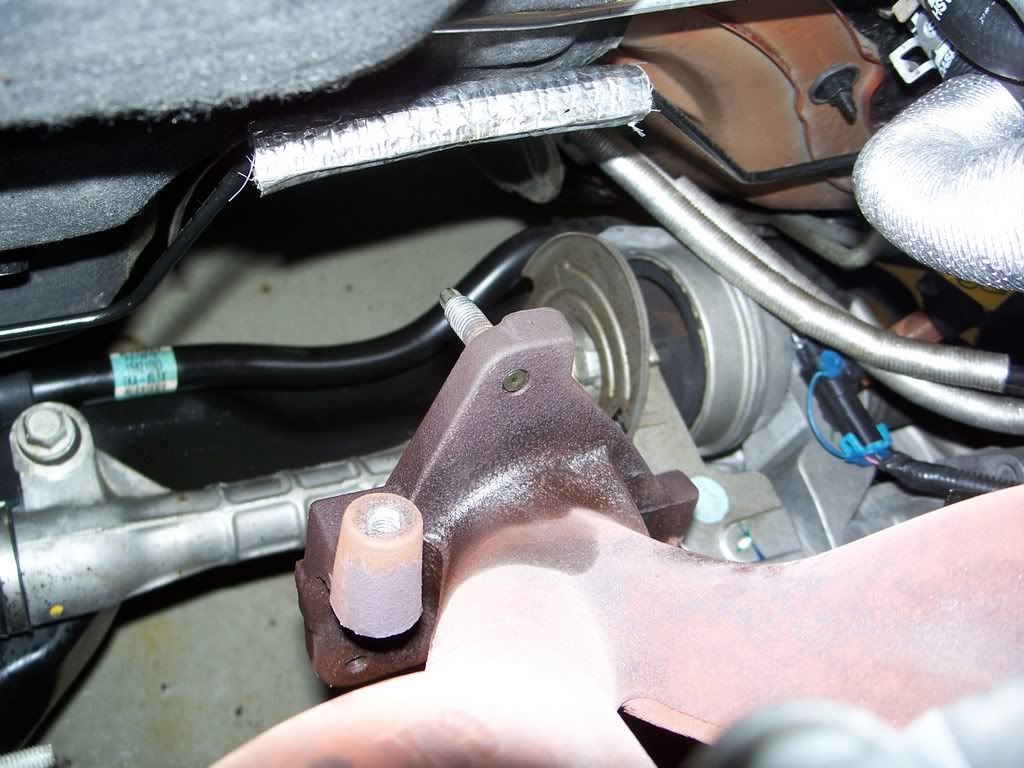
The heat shield should come out now through the top. It should now look like this.
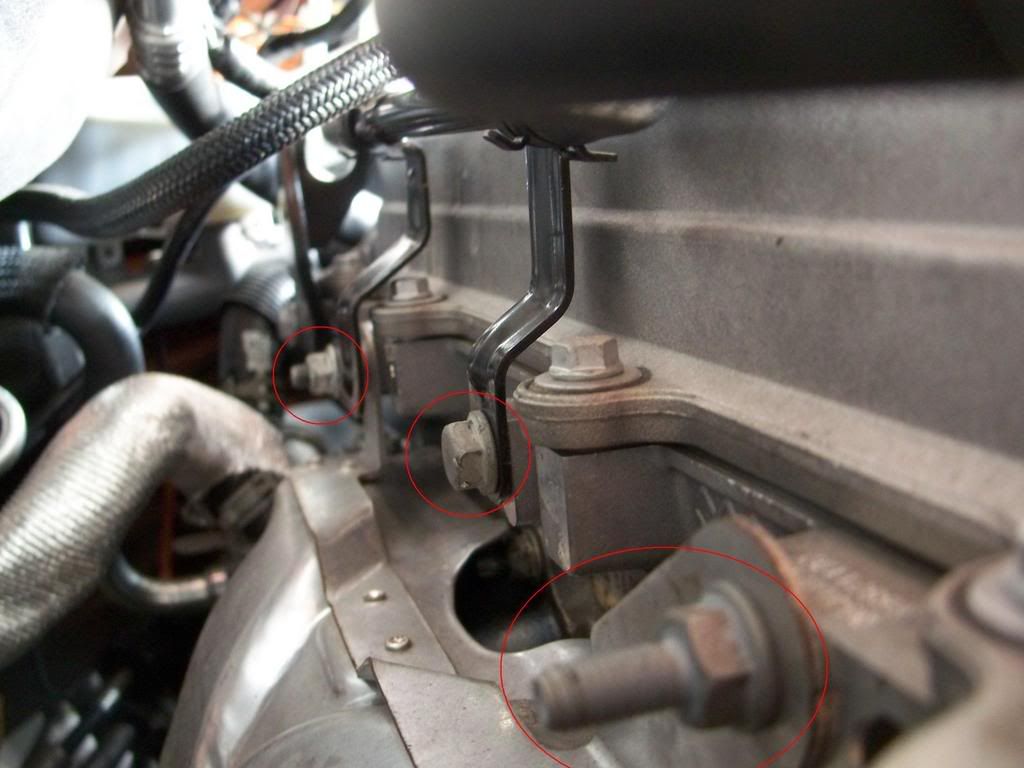
Step 4: Removing the exhaust manifold
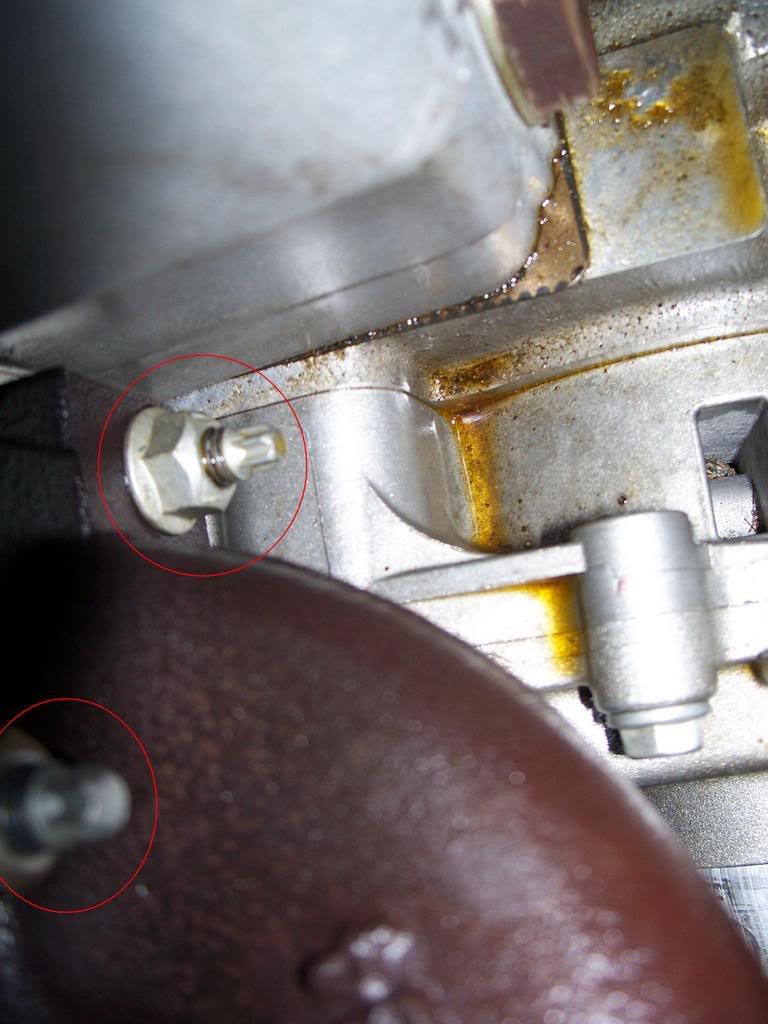
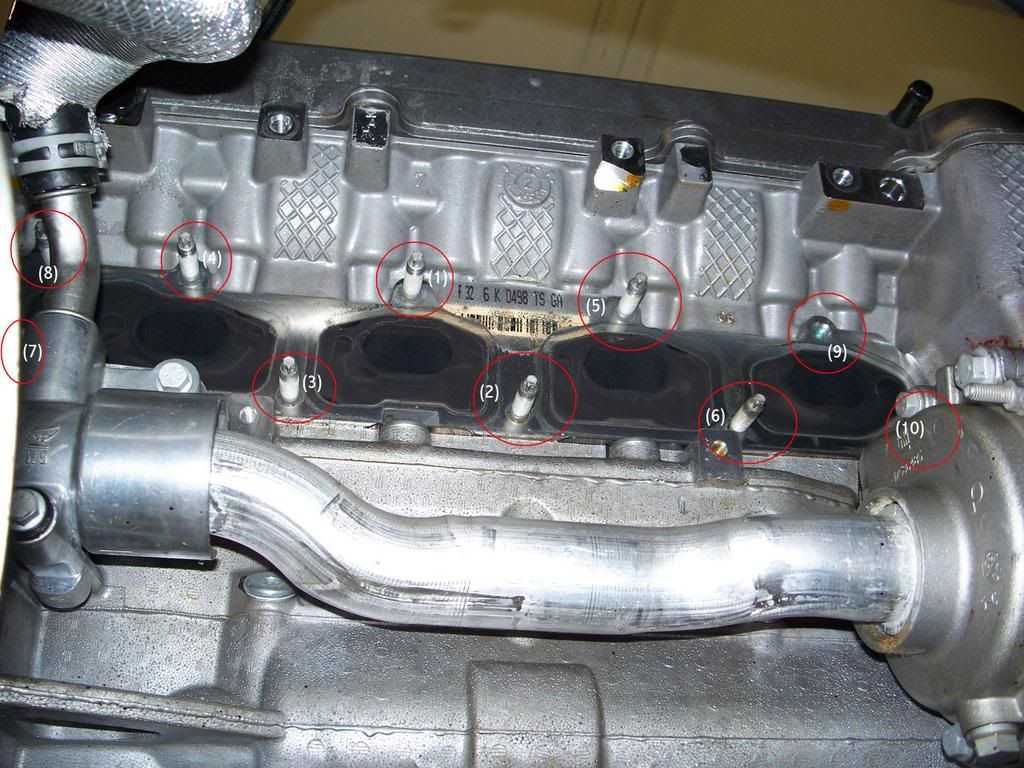
This is the fun part. There are a total of 10 13mm nuts holding the manifold to the head. The 2 on the right side are hard to reach/see, one is right above the water pump and is easiest to reach from the top. Here is a picture of those bolts.

(Here is a picture that shows where the nuts would be with the manifold on. My top right stud came out with the nut, this may not happen with your install.)
Now remove the upstream O2 sensor and unplug its connector.
Then just remove the manifold through the bottom and take off the old gasket. You are now halfway done.
Step 5: Putting it back together
Now you need to install the 3 new studs you have into the new manifold. Using the E10 external torx socket. Snug them up, but do not over tighten them as they may break easy.
Place the new manifold to head gasket on the studs on the head. Now you need to tighten up the nuts in this sequence. They do not need to be gorilla tight, but just snug them up.
Step 6: Reinstalling the downpipe
I reinstalled the manifold heat shield from underneath but you may also put it back on from the top. Just tighten up the nuts//bolts and replace the PCV tube and attach it again with its nuts/bolts. Slide the hose clamp back on.
Place the new downpipe to manifold gasket on the new studs on the manifold. Place the downpipe back on the studs and tighten the nuts on the studs. Then replace the 2 bolts/nuts and gasket on the rear exhaust section to the downpipe. Then reinstall the downstream O2 sensor.
That’s it, your all done. When you start the car, you will notice some smoke, this is just the oils from your hands and in the manifold burning off and is normal. Take her for a test run now and enjoy.
Well I didn’t see a how to for this as of yet and I know the install is kind of tricky, so here you go. This is for the GM Performance Parts exhaust manifold, however, it could be used for any header or manifold.
The parts you will need are:
1. GMPP Extrude Honed Exhaust Manifold - Part #19131972
2. Head to Manifold gasket - Part #9230949
3. Manifold to Downpipe gasket - Part #15235773
4. 3 Manifold to downpipe studs - Part #10160364
5. 3 Manifold to downpipe nuts - Part #11517996
Tools that you will need:
1. A lift if possible, but a jack and jack stands will work
2. 3/8” Ratchet and/or 3/8” Air ratchet
3. 3/8” 15mm deep socket
4. 3/8” 13mm deep socket
5. 3/8” E10 External Torx socket
6. 15mm wrench
7. Ľ” Ratchet
8. Ľ” 13mm deep socket
9. O2 Sensor socket
10. Flat blade screwdriver
11. Pliers
12. Fender cover
**Make sure vehicle is cool so you do not burn your self, skin grafts are painful**
Step 1: Lifting the vehicle
Place vehicle on lift or jack/stands so you can work underneath the vehicle. Make sure vehicle is safely mounted so it will not fall and possibly cause injury.
Step 2: Removing the catalytic converter/downpipe
Using an O2 sensor socket, remove the O2 sensor from the downpipe and let it hang loose. Then, using a 15mm socket and 15mm wrench remove the 2 nuts and 2 bolts connecting the downpipe to the rear exhaust section. Next, using a 15mm socket remove the 3 nuts holding the downpipe to the exhaust manifold.
The top bolt may be a bit tricky to reach. Pull pipe backwards and place it off to the side.
Step 3: Removing the heat shield on the manifold
From the top of the vehicle, using pliers, move the hose clamp on the PCV tube. Remove these 3 13mm nuts/bolts holding the top of the heat shield to the manifold.
Using a Ľ” ratchet and 13mm socket remove the stud/nut holding the shield to the bottom of the manifold.
Move the PCV tube out of the way.
The heat shield should come out now through the top. It should now look like this.
Step 4: Removing the exhaust manifold
This is the fun part. There are a total of 10 13mm nuts holding the manifold to the head. The 2 on the right side are hard to reach/see, one is right above the water pump and is easiest to reach from the top. Here is a picture of those bolts.
(Here is a picture that shows where the nuts would be with the manifold on. My top right stud came out with the nut, this may not happen with your install.)
Now remove the upstream O2 sensor and unplug its connector.
Then just remove the manifold through the bottom and take off the old gasket. You are now halfway done.
Step 5: Putting it back together
Now you need to install the 3 new studs you have into the new manifold. Using the E10 external torx socket. Snug them up, but do not over tighten them as they may break easy.
Place the new manifold to head gasket on the studs on the head. Now you need to tighten up the nuts in this sequence. They do not need to be gorilla tight, but just snug them up.
Step 6: Reinstalling the downpipe
I reinstalled the manifold heat shield from underneath but you may also put it back on from the top. Just tighten up the nuts//bolts and replace the PCV tube and attach it again with its nuts/bolts. Slide the hose clamp back on.
Place the new downpipe to manifold gasket on the new studs on the manifold. Place the downpipe back on the studs and tighten the nuts on the studs. Then replace the 2 bolts/nuts and gasket on the rear exhaust section to the downpipe. Then reinstall the downstream O2 sensor.
That’s it, your all done. When you start the car, you will notice some smoke, this is just the oils from your hands and in the manifold burning off and is normal. Take her for a test run now and enjoy.
Last edited by TommyP; 10-03-2012 at 12:54 PM.
 08-06-2007, 09:21 PM
#2
Banned

Join Date: 06-25-07
Location: Racine, Wisconsin
Posts: 313
Likes: 0
Received 0 Likes
on
0 Posts
Nice job Primo, you should work for Chrysler, their instructions SUCK!!!!!!!!!! Also, beware of the cylinder head as the edges are razor sharp, Gamebay left the part out about cutting his finger on the head.
08-06-2007, 11:33 PM
#5
Senior Member
Thread Starter
Join Date: 05-23-06
Location: Racine, Wisconsin
Posts: 1,017
Likes: 0
Received 0 Likes
on
0 Posts
Its basically a deep well socket with a slit down the side for the O2 sensor's wire to go through. You could probably get one from an autozone or advance auto parts if you want a cheap one. Otherwise you can get a craftsman, snap on, or cornwell one.
08-07-2007, 07:07 AM
#6
Senior Member

Join Date: 09-03-06
Location: Norwood N.C.
Posts: 700
Likes: 0
Received 0 Likes
on
0 Posts
ok thanks + rep given


 08-26-2008, 07:19 PM
#12
New Member
iTrader: (1)

Join Date: 10-11-06
Location: Milan, MI
Posts: 142
Likes: 0
Received 0 Likes
on
0 Posts
yeah is there a specific torque spec for the manifold to head nuts? also is it necessary to use a new gasket when installing a header on instead of the manifold? i purchased a used vibrant header and was hoping to be able to use my stock manifold gasket...any reasons not to? any specific gasket i should use instead? thanks


Thread
Thread Starter
Forum
Replies
Last Post
royce777
Parts
27
09-28-2015 07:11 AM