
Single Pass DIY

Single Pass DIY
K, not quite DIY. My dad did the most of the work. But metal fab is his specialty.
Before I begin I'd like to say this is meant to be an informational thread. Comments and constructive ideas are welcome, this is my first attempt. However don't come in here and spam my thread with how I fail and blah blah blah unless you actually have successfully built a better single pass and are willing to post pictures and reasons why your mani is superior and are willing to share actual info like this forum is meant to do. Which pretty much eliminates 99.99% of ppl on here.
So firstly I marked how I wanted the pipes to come out.

Then I ground out where I wanted to weld the pipes in.
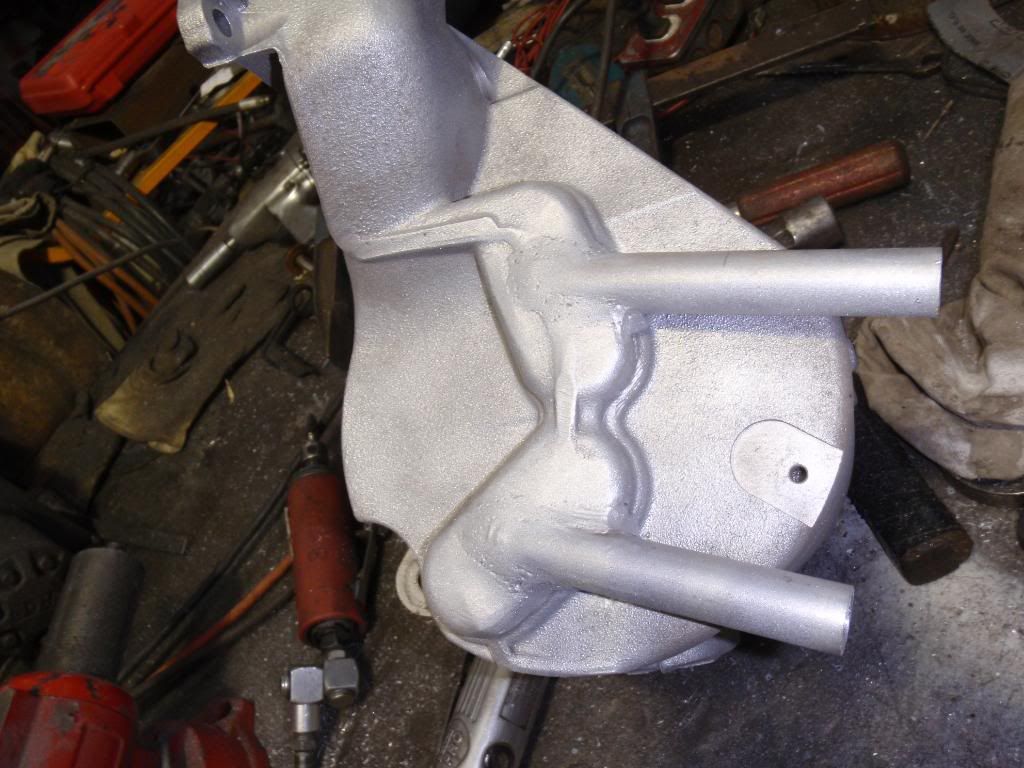
Then welded the pipes on. They still need to be cut to length but I'm going to wait till I size it up in my car to decide where I'll chop em.
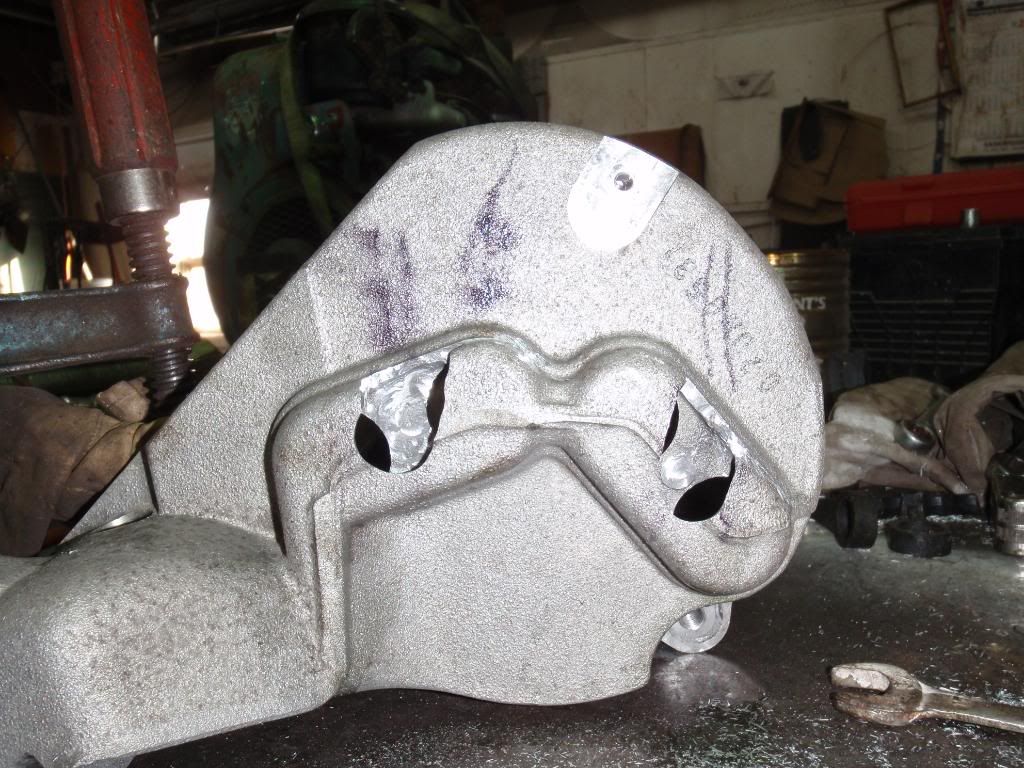
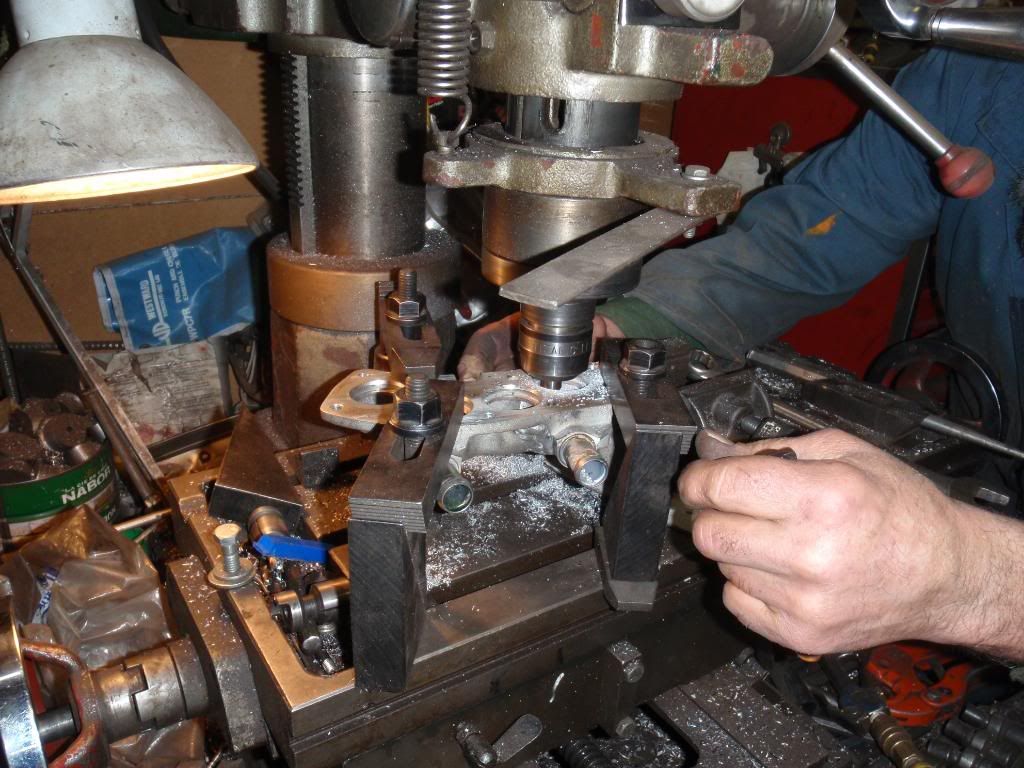
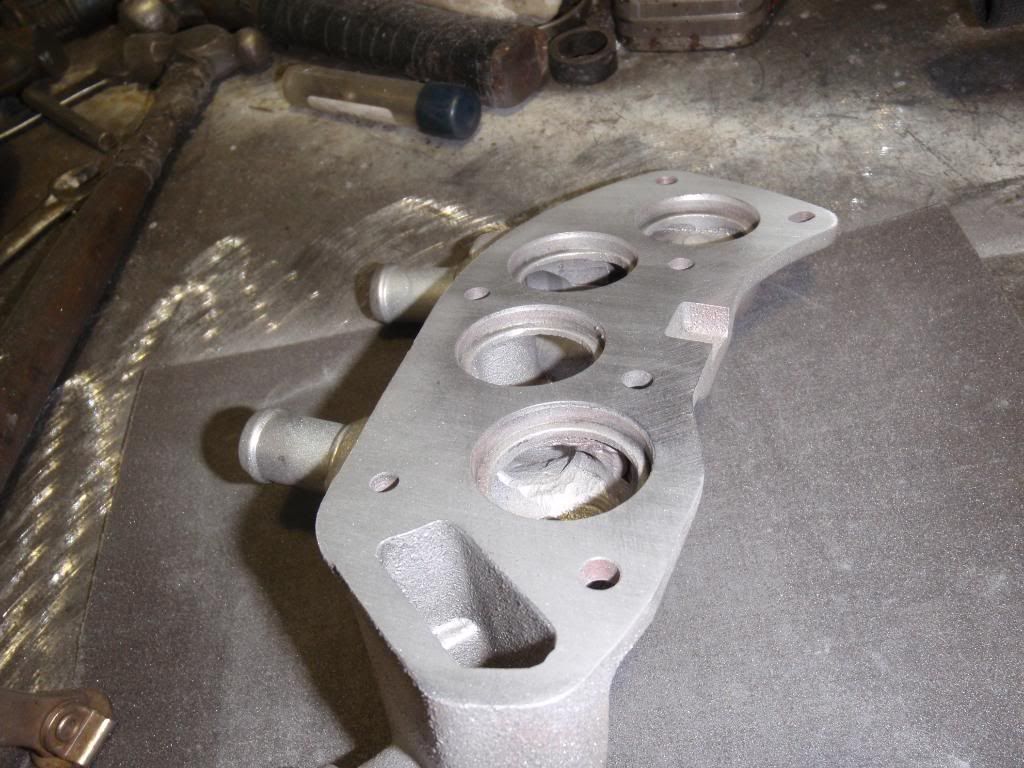
Then we took a stock endplate and built up the one area where we felt there wasn't sufficient enough material to mill out a passage large enough for fluid to pass though.
The most important resource in this process, my father Journeyman Welder, Journeyman Machinist and Journeyman HD Mechanic extraordinaire milling out the passages.
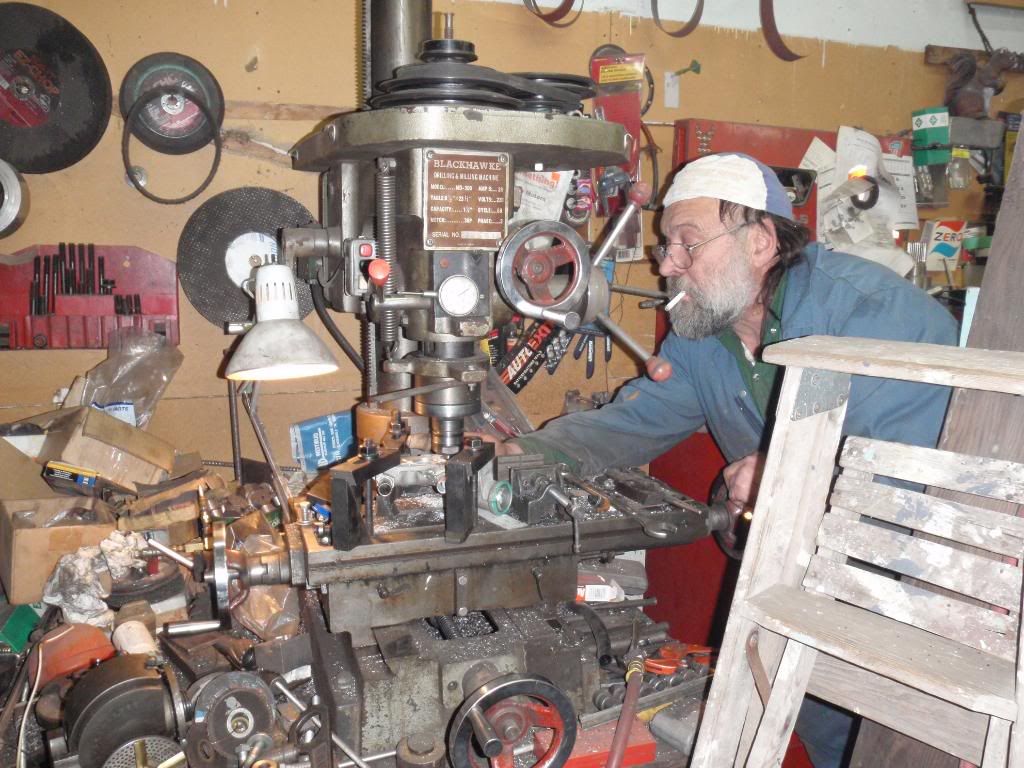
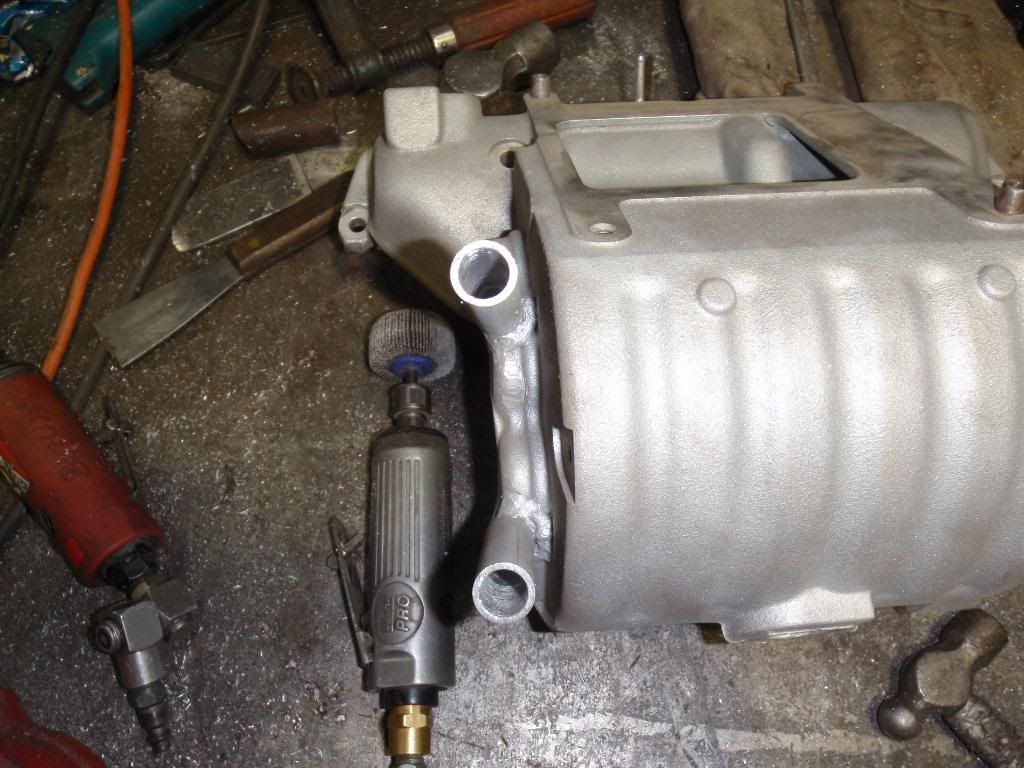
We milled out as much as possible and then finished it off with the die grinder.

I will not have any info on how well this works up for a while as it is winter here and my car is in storage till spring so you'll have to wait till then for that info.
Before I begin I'd like to say this is meant to be an informational thread. Comments and constructive ideas are welcome, this is my first attempt. However don't come in here and spam my thread with how I fail and blah blah blah unless you actually have successfully built a better single pass and are willing to post pictures and reasons why your mani is superior and are willing to share actual info like this forum is meant to do. Which pretty much eliminates 99.99% of ppl on here.
So firstly I marked how I wanted the pipes to come out.
Then I ground out where I wanted to weld the pipes in.
Then welded the pipes on. They still need to be cut to length but I'm going to wait till I size it up in my car to decide where I'll chop em.
Then we took a stock endplate and built up the one area where we felt there wasn't sufficient enough material to mill out a passage large enough for fluid to pass though.
The most important resource in this process, my father Journeyman Welder, Journeyman Machinist and Journeyman HD Mechanic extraordinaire milling out the passages.
We milled out as much as possible and then finished it off with the die grinder.
I will not have any info on how well this works up for a while as it is winter here and my car is in storage till spring so you'll have to wait till then for that info.
Last edited by Flatgod; Dec 28, 2009 at 11:17 PM.

looks awesome, ive been working on this for a while, just getting sum1 to do the machine work has been a pain, gotta get sum1 I can trust. about how much was your total cost on doing this?
l8r,
PD
l8r,
PD


Senior Member
Joined: 02-03-08
Posts: 3,454
Likes: 1
From: Port Perry Ontario
you cant pay your dad enough for the craftsmanship he put in.
The dipstick is no problem, just bend it out of the engine if you bend it in the easy way you risk cracking it at the block end. I had a few dipsticks get away from me until i got it right. And a TVS makes a little harder. It can still bolt to the IM needs a spacer stud. You also MUST cover and insulate the power lead from the alternator to the starter motor the single pass makes that a problematical routing
all other advice is off line

Senior Member
Joined: 11-12-07
Posts: 1,537
Likes: 0
From: Maryland
i had to move the oil dipstick on mine. also agree with qwikredline for the cover on the alt. with the re route of the dipstick, it comes extremly close to the power wire of the alt.
besides all that, you will need some 90* angles to get it to come out then clear the radiator. pain in the ass at first but im sure ull figure it out.
good luck! looks good
besides all that, you will need some 90* angles to get it to come out then clear the radiator. pain in the ass at first but im sure ull figure it out.
good luck! looks good
Senior Member
Joined: 02-03-08
Posts: 3,454
Likes: 1
From: Port Perry Ontario
i had to move the oil dipstick on mine. also agree with qwikredline for the cover on the alt. with the re route of the dipstick, it comes extremly close to the power wire of the alt.
besides all that, you will need some 90* angles to get it to come out then clear the radiator. pain in the ass at first but im sure ull figure it out.
good luck! looks good
besides all that, you will need some 90* angles to get it to come out then clear the radiator. pain in the ass at first but im sure ull figure it out.
good luck! looks good
I'm going to find hoses with nice 90* bends in them. I hate those plastic 90* elbows and want to use as few connections as possible. Thx Qwik for the info on the alt wire.
Senior Member
Joined: 11-12-07
Posts: 1,537
Likes: 0
From: Maryland
i accually used my dual pass endplate, modified slightly.
when i took off the old stock hoses off the stock endplate, save those. they work perfect to get the hoses routed good. you will just need a coupler to extend the rest of the hose. but the hardest part will be done at that pointl.
I had dual pass on my car before so I pretty much butchered all the stock hoses already. I'm running a TVS, meth, optb with dual FMIC (zzp s3 & big cxr). Had a 2.9 on before but switching to 2.8 after this. Killer chiller unit should arrive this week so it will get that as well. Also looking into the phenolic spacer. I just want to be able to run the 2.8 without issue and be done with heatsoak.


Senior Member
Joined: 02-03-08
Posts: 3,454
Likes: 1
From: Port Perry Ontario
I had dual pass on my car before so I pretty much butchered all the stock hoses already. I'm running a TVS, meth, optb with dual FMIC (zzp s3 & big cxr). Had a 2.9 on before but switching to 2.8 after this. Killer chiller unit should arrive this week so it will get that as well. Also looking into the phenolic spacer. I just want to be able to run the 2.8 without issue and be done with heatsoak.


Banned
Joined: 06-23-05
Posts: 8,004
Likes: 0
From: ky
good stuff man... 
i think the dual exchangers is a waste on a regular system, but your single pass system may actually benefit from it.
instead of adding more exchangers, you should look into getting your biggest exchanger coated in TLTD, it's fairly cheap and can increase cooling efficiency up to 30%
i think the dual exchangers is a waste on a regular system, but your single pass system may actually benefit from it.
instead of adding more exchangers, you should look into getting your biggest exchanger coated in TLTD, it's fairly cheap and can increase cooling efficiency up to 30%

The stock H/E is removed and the AC condenser is moved back into the H/E's place. That allows room for the CXR he to be mounted behind the hood latch assembly rather then under it and on the ground, Flashbrandon made a how to for this. Then I mounted the ZZP S3 directly in front of that and hooked them up in sequence. On my old dual pass setup the addition of the ZZP H/E was huge for dropping AIT's.