Dual Pass intercooler


 03-16-2007, 09:37 PM
#177
New Member

Join Date: 02-15-07
Location: pembroke pines florida
Posts: 25
Likes: 0
Received 0 Likes
on
0 Posts
Here is my guide to doing the dual pass.
1) DISCONECT THE BATTERY and raise the front end of the car high enough for you to easily get under it. I normally leave the battery connected when instructions say to disconect it, but you will be using a wrench right next to the starter and from experience it arcs very well. Ask Blown 4-banger as our friend welded a wrench to Blown's starter.
2) Take off the S/C.
3) Remove the hoses from the IC pump and catch the fluid that drains.
4) Remove the IC pump and entire IC pump mounting bracket.
5) Remove the 2 bolts under the intake manifold. They are just barely above the IC mounting bracket bolts and not shown in the GMS3 instructions.
6) Remove the 7 fastners on the top of the manifold and remove.
7) Drain as much of the coolant from the manifold as possible. This will make the removal of the end plate and cores less messy.
8) Remove the bolts from the endplate and remove. It will take some force to pull it off. Be careful not to drop anything. There are 2 brass washers and 1 o-ring per core.
9) Remove the 2 cores. You can chose which ones you want and flip them. Just remember that the inlet has the small hole, the outlet has the large hole. Like the end plate, the cores are difficult to remove. I suggest going to a local Ace Hardware and getting some rubber jaw covers for your pliers to prevent scoreing them. There is a second set of washers and o-rings on the other side of the cores to look out for. The cores will make a horrible scritching sound as you are pulling them out. Just be gentle not to bend the fins.
10) Replace the cores with the small hole as the inlet for your new flow pattern and the large hole for the outlet.
11) Take the end plate to have the fitting welded in.
12) Replace the end plate and torque the bolts to the specs provided in the GMS3 instructions. (link posted in post #36)
13) Now would be a good time IMO to replace the stock intake manifold gasket with the revised version from GM if you haven't already ( http://www.crateenginedepot.com/stor...P1723C137.aspx ) and replace the intake manifold. Replace all the upper and lower fastners only hand tight then torque them according to the GMS3 specs.
14) Replace the IC pump mounting bracket and IC pump.
15) Reconnect all the coolant lines making sure the flow is going the proper direction for how you flipped the cores.
16) Refill and bleed the air from the system. I would suggest adding the extra resevior so you have a good place to bleed and extra coolant to prevent heat soak.
17) Replace the S/C and make sure everything is properly torqued and connected.
18) Take the car off the stands and take her for a spin. The real bennefits are the lower temps that allow you to add more timing to your tune whether it be for pump gas or race gas.
Feel free to ask questions if you need.
03-17-2007, 05:23 AM
#178
Senior Member
Join Date: 10-08-05
Location: AZ
Posts: 5,295
Likes: 0
Received 0 Likes
on
0 Posts
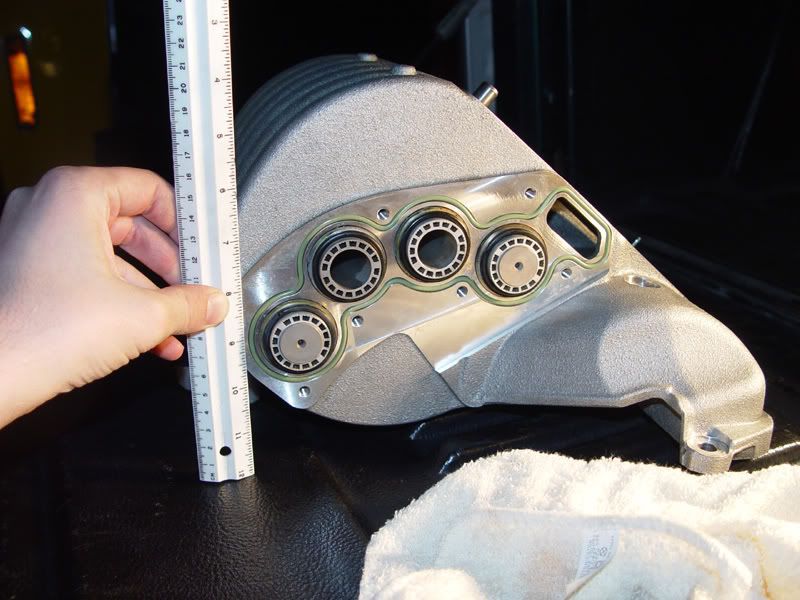
I don't think we are talking about the same bracket. The bracket I am talking about is tucked up under the manifold. If you look in the picture below you will barely see it hiding behind the ruler. You can only reach it from under the car. I'll try to get under my car later and get a pic or 2 if you still need it.
03-17-2007, 09:02 AM
#179
Senior Member
I don't think we are talking about the same bracket. The bracket I am talking about is tucked up under the manifold. If you look in the picture below you will barely see it hiding behind the ruler. You can only reach it from under the car. I'll try to get under my car later and get a pic or 2 if you still need it.
Not true you Simply remove the alternator & It is easily gotten to! Believe that was a 15 mm & The alternator has 3 Bolts that are in the Front that are 10 MM!
03-29-2007, 11:07 PM
#181
I just got my dual-pass endplate back today. The guy at the machine shop even polished the fitting before putting it together. Hopefully I can install it sometime next week. Really looking forward to it!!
Attachment 1602
Attachment 1603
By the way, how do you post large pics in a post??
Attachment 1602
Attachment 1603
By the way, how do you post large pics in a post??
Last edited by ItalianJoe1; 05-16-2007 at 06:24 PM.
03-30-2007, 02:32 AM
#183
Senior Member
Join Date: 10-08-05
Location: AZ
Posts: 5,295
Likes: 0
Received 0 Likes
on
0 Posts
Looks great. I hope it is close enough that it clears the oil filter. I think most are getting the resevior from Crate Engine Depot. Hook the bleeder tube to the top of the stock HE bleeder fitting. Good luck.
03-30-2007, 11:17 AM
#184
Senior Member
Join Date: 06-01-05
Location: Miami
Posts: 3,622
Likes: 0
Received 0 Likes
on
0 Posts
Bill, is this counting the extra reservoir tank, or without it. I completely understand how to do it this way, but would this include the extra tank or not. How would you install the extra tank.
03-30-2007, 12:38 PM
#185
Senior Member
Join Date: 07-08-05
Location: Niceville, FL
Posts: 6,200
Likes: 0
Received 0 Likes
on
0 Posts
I did mine this past weekend and it works great. I used only one Earl's fitting that I modified and then had welded into place. One 90* piece that completly clears the oil filter housing and is not angled at all. I'll have more info and pics after I get a heat exchanger mounted though.
03-30-2007, 03:33 PM
#186
Ok, i just re-read this whole thread, and am still not 100% sure how to bleed the system if all you do is the dual pass. Can you keep adding coolant and the air will work itself out?? I am not really following here. I hope to do the second tank and H/E eventually, but I wanna do this now.
Bump for some help please!!
Bump for some help please!!
Last edited by ItalianJoe1; 03-30-2007 at 03:33 PM. Reason: Automerged Doublepost
03-30-2007, 06:25 PM
#187
Senior Member
 04-03-2007, 03:15 AM
#189
Senior Member
Join Date: 10-08-05
Location: AZ
Posts: 5,295
Likes: 0
Received 0 Likes
on
0 Posts
If you are installing the extra "surge tank" it will bleed itself if you connect the bleed tube of the tank to the bleed fitting on top of the stock Heat Exchanger.
If not open the bleed fitting while refilling the system. Then close it and the refill cap and turn on the pump for a 15-30 seconds, turn it off and open both the refill cap and the bleed fitting. If it has air still the fluid in the refill tube will drop. Repeat until it no longer drops. Then check it again after driving for a day or 2 and repeat if necessary.
Not sure if that is the best way to do it, but it has worked great for me. If anyone has something better please share.
04-03-2007, 02:48 PM
#190
Ok, that makes sense a little. Any more help will be appreciated, i'm going out to get some extra hose right now, will be doing the mod when I get back. Thanks
Ok, all done!! Almost no air in the system either. Made sure to cap the lines as soon as I opened them, only lost what was in the manifold. Still getting the little bubbles out, but all set otherwise. I hope I notice some sort of difference, but this was mainly being done in preparation for the future. Thanks for you help guys.
Anyone interested in me rigging up my old plate for them and selling you a complete dual pass kit?? I'll include the hose, clamps, T fitting, everything you would need. Any takers??
Last edited by ItalianJoe1; 04-03-2007 at 02:48 PM. Reason: Automerged Doublepost
 04-09-2007, 10:41 PM
#193
Senior Member
Alot>>> The Cooler & Better you can Cool the Intake the Longer you will avoid heat soak! Thats why at Stage 3 They recommend that you use it! On a Dyno I wouldn't Notice a drop in Power Like you would, Do to Better cooling!
05-07-2007, 01:08 AM
#194
Senior Member
Join Date: 01-23-06
Location: Grant Park, Illinois
Posts: 1,216
Likes: 0
Received 0 Likes
on
0 Posts
...This all looks pretty simple really. Even option B. Just gotta run a few extra lines. Its just going to be a little time consuming... You only have to be under the car for the 2 bottom manifold gaskets right?
05-07-2007, 10:52 AM
#196
Senior Member
Join Date: 01-23-06
Location: Grant Park, Illinois
Posts: 1,216
Likes: 0
Received 0 Likes
on
0 Posts
after installing the header and having to learn to bend my arm in ways it shouldnt for a few bolts, this shouldnt be too bad.
05-07-2007, 11:54 AM
#197
Senior Member

Join Date: 01-23-06
Location: South Carolina
Posts: 657
Likes: 0
Received 0 Likes
on
0 Posts
Those bottom bolts are pretty much a night mare and you have to remove the water pump just to get to them . You pretty much have to turmn the wrnch quarter tuen flip the wrench then turn another quarter tun till it is out. Pain in the !@#. Oh an I noticed on mine since I have had in for a month now that make sure you extend the top and bottom hoses far enough towards the front of the car so the middle hose does not rub on it . I mabe that mistake and I put a piece of rubber beteen them . Hope it goes good for you and don't forget about the 1/4'' line for OPTION B to connect to the top part of the core and you have to pop the grill fastners back and peel back the grill to see the plug. That where the 1/4'' hose goes.
Have fun I know I did hahhaha ugh.
Have fun I know I did hahhaha ugh.
05-16-2007, 01:49 AM
#198
Junior Member

Join Date: 02-06-06
Location: Hamilton, ON, CA
Posts: 457
Likes: 0
Received 0 Likes
on
0 Posts
anyone notice how in the GM instructions the coolant flows out of the front HE, into the dual pass, out of the dual pass and into the pump
it can't be good flowing hot coolant through the pump all day. The stock system first runs the cold coolant through the pump, then the single pass.
this pump is only rated for 275*F
http://www.lingenfelter.com/store/boschh2ic.html
I just installed this on a buddy's and we ran the coolant first through the pump then the dual pass. He's still driving around to get it bleed correctly so I don't know if it's working correctly or not. But I would say it does.
05-16-2007, 01:55 AM
#199
anyone notice how in the GM instructions the coolant flows out of the front HE, into the dual pass, out of the dual pass and into the pump
it can't be good flowing hot coolant through the pump all day. The stock system first runs the cold coolant through the pump, then the single pass.
this pump is only rated for 275*F
http://www.lingenfelter.com/store/boschh2ic.html
I just installed this on a buddy's and we ran the coolant first through the pump then the dual pass. He's still driving around to get it bleed correctly so I don't know if it's working correctly or not. But I would say it does.
it can't be good flowing hot coolant through the pump all day. The stock system first runs the cold coolant through the pump, then the single pass.
this pump is only rated for 275*F
http://www.lingenfelter.com/store/boschh2ic.html
I just installed this on a buddy's and we ran the coolant first through the pump then the dual pass. He's still driving around to get it bleed correctly so I don't know if it's working correctly or not. But I would say it does.
05-16-2007, 07:23 AM
#200
Senior Member


anyone notice how in the GM instructions the coolant flows out of the front HE, into the dual pass, out of the dual pass and into the pump
it can't be good flowing hot coolant through the pump all day. The stock system first runs the cold coolant through the pump, then the single pass.
this pump is only rated for 275*F
http://www.lingenfelter.com/store/boschh2ic.html
I just installed this on a buddy's and we ran the coolant first through the pump then the dual pass. He's still driving around to get it bleed correctly so I don't know if it's working correctly or not. But I would say it does.
it can't be good flowing hot coolant through the pump all day. The stock system first runs the cold coolant through the pump, then the single pass.
this pump is only rated for 275*F
http://www.lingenfelter.com/store/boschh2ic.html
I just installed this on a buddy's and we ran the coolant first through the pump then the dual pass. He's still driving around to get it bleed correctly so I don't know if it's working correctly or not. But I would say it does.