Dual Pass intercooler

 01-25-2007, 10:18 PM
#102
Senior Member
Join Date: 10-08-05
Location: AZ
Posts: 5,295
Likes: 0
Received 0 Likes
on
0 Posts
The hardest part is drilling the endplate. If you are concerned about that buy the GM Dual pass plate and do the install. It's really not all that hard, just time consuming and requires a mild knowledge of working on cars.
01-25-2007, 10:26 PM
#103
Senior Member
iTrader: (1)
Join Date: 09-12-06
Location: Michigan
Posts: 3,319
Likes: 0
Received 0 Likes
on
0 Posts
i kno how to work on cars. pull it apart put back together with new part. but its the hoses and switchin parts around for the flow thing that confuse and scare me.
01-25-2007, 10:38 PM
#104

I just finished the dualpass endplate and the extra coolant bottle. I used the Ion Redline's stock coolant bottle and put it on the passenger side and made a couple simple brakets to hold it there on the stock studs that stick up there. Haven't been able to see the difference yet on IATs.... Too much damn snow 
01-25-2007, 10:41 PM
#105
Senior Member
Join Date: 10-08-05
Location: AZ
Posts: 5,295
Likes: 0
Received 0 Likes
on
0 Posts
01-25-2007, 11:26 PM
#106
Senior Member


Here is my guide to doing the dual pass.
1) DISCONECT THE BATTERY and raise the front end of the car high enough for you to easily get under it. I normally leave the battery connected when instructions say to disconect it, but you will be using a wrench right next to the starter and from experience it arcs very well. Ask Blown 4-banger as our friend welded a wrench to Blown's starter.
2) Take off the S/C.
3) Remove the hoses from the IC pump and catch the fluid that drains.
4) Remove the IC pump and entire IC pump mounting bracket.
5) Remove the 2 bolts under the intake manifold. They are just barely above the IC mounting bracket bolts and not shown in the GMS3 instructions.
6) Remove the 7 fastners on the top of the manifold and remove.
7) Drain as much of the coolant from the manifold as possible. This will make the removal of the end plate and cores less messy.
8) Remove the bolts from the endplate and remove. It will take some force to pull it off. Be careful not to drop anything. There are 2 brass washers and 1 o-ring per core.
9) Remove the 2 cores. You can chose which ones you want and flip them. Just remember that the inlet has the small hole, the outlet has the large hole. Like the end plate, the cores are difficult to remove. I suggest going to a local Ace Hardware and getting some rubber jaw covers for your pliers to prevent scoreing them. There is a second set of washers and o-rings on the other side of the cores to look out for. The cores will make a horrible scritching sound as you are pulling them out. Just be gentle not to bend the fins.
10) Replace the cores with the small hole as the inlet for your new flow pattern and the large hole for the outlet.
11) Take the end plate to have the fitting welded in.
12) Replace the end plate and torque the bolts to the specs provided in the GMS3 instructions. (link posted in post #36)
13) Now would be a good time IMO to replace the stock intake manifold gasket with the revised version from GM if you haven't already ( http://www.crateenginedepot.com/stor...P1723C137.aspx ) and replace the intake manifold. Replace all the upper and lower fastners only hand tight then torque them according to the GMS3 specs.
14) Replace the IC pump mounting bracket and IC pump.
15) Reconnect all the coolant lines making sure the flow is going the proper direction for how you flipped the cores.
16) Refill and bleed the air from the system. I would suggest adding the extra resevior so you have a good place to bleed and extra coolant to prevent heat soak.
17) Replace the S/C and make sure everything is properly torqued and connected.
18) Take the car off the stands and take her for a spin. The real bennefits are the lower temps that allow you to add more timing to your tune whether it be for pump gas or race gas.
Feel free to ask questions if you need.
01-25-2007, 11:38 PM
#109
Senior Member
Join Date: 10-08-05
Location: AZ
Posts: 5,295
Likes: 0
Received 0 Likes
on
0 Posts
 01-25-2007, 11:42 PM
#110
Senior Member
o damn, ok gotcha.
well when the time comes to where this will be done im letting the both of you know in advance you will be getting some pms regarding this hahaha, hope you guys dont mind!
well when the time comes to where this will be done im letting the both of you know in advance you will be getting some pms regarding this hahaha, hope you guys dont mind!
01-25-2007, 11:49 PM
#112
Senior Member
Join Date: 10-08-05
Location: AZ
Posts: 5,295
Likes: 0
Received 0 Likes
on
0 Posts
That was the original reason for this thread and my post, of course you can PM me about it. I'm pretty sure that the guide I wrote up covers it all, but I'm always willing to modify it if need be to make it more clear. I wish I had the pics for it so you could actually see it, not just read it.
01-25-2007, 11:50 PM
#113
Senior Member
thanks guys, appreciate it!!!!
i may have missed in other posts but can you bump up the timing after this mod is done?
i may have missed in other posts but can you bump up the timing after this mod is done?
Last edited by distillion; 01-25-2007 at 11:50 PM. Reason: Automerged Doublepost
01-25-2007, 11:53 PM
#114
Senior Member
Thread Starter
Join Date: 04-03-06
Location: Mesa, AZ
Posts: 7,571
Likes: 0
Received 0 Likes
on
0 Posts
I would say YES you can. Not much though, maybe 1 or 2 degrees. I got like 1.5 degrees of extra timing outta mine (went from 15 to 16.5 degrees on pump gas)
01-25-2007, 11:59 PM
#116
Senior Member
Join Date: 10-08-05
Location: AZ
Posts: 5,295
Likes: 0
Received 0 Likes
on
0 Posts
Tuning is not needed. You could optimize the tune for the lower temps, but I would rather leave it to allow you more room for heat soak. The bigger the gap from KR, the better IMO.
01-26-2007, 12:03 AM
#119
Senior Member
Thread Starter
Join Date: 04-03-06
Location: Mesa, AZ
Posts: 7,571
Likes: 0
Received 0 Likes
on
0 Posts
That would help A LOT. The extra resevior tank would actually make a HUGE difference. I'm gonna do a resevior tank myself.... only it will be cooled with ice/dry ice 
01-26-2007, 12:15 AM
#120
Senior Member
yer car is gonna be the"coolest" car on this site hahaha
http://www.crateenginedepot.com/stor...P1702C196.aspx
http://www.crateenginedepot.com/stor...P1703C196.aspx
so jap says these come with the plate
did you guys have to use these or what, not sure what the deal is on them.
http://www.crateenginedepot.com/stor...P1702C196.aspx
http://www.crateenginedepot.com/stor...P1703C196.aspx
so jap says these come with the plate
did you guys have to use these or what, not sure what the deal is on them.
Last edited by distillion; 01-26-2007 at 12:15 AM. Reason: Automerged Doublepost
01-26-2007, 12:19 AM
#121
Senior Member
Join Date: 10-08-05
Location: AZ
Posts: 5,295
Likes: 0
Received 0 Likes
on
0 Posts
You can reuse them if they are not damaged. The first is one of the o-ring seals that goes between the endplate and the intake manifold. The other is the gasket that goes on the bypass valve. We just reused the stock ones, no big deal.
The top one surrounds the smooth machined face in this pic.
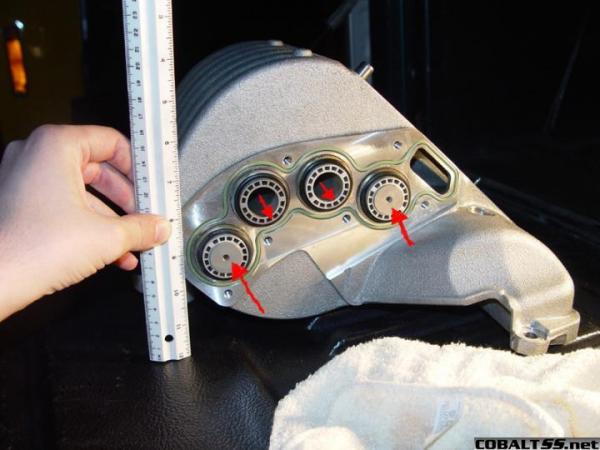
The top one surrounds the smooth machined face in this pic.
 01-26-2007, 07:25 AM
#124
Senior Member
awesome
so then all i need is a hose and a y fitting and eventually my temps will drop a lil with my new found 2.7.
any tips on the best way to bleed the system?, also how thick/long of a hose should i use?
also regarding the pic that shows the cores, what is the BEST sequence in which they should be flipped.
Last edited by distillion; 01-26-2007 at 07:25 AM. Reason: Automerged Doublepost
01-26-2007, 05:05 PM
#125
Senior Member
Thread Starter
Join Date: 04-03-06
Location: Mesa, AZ
Posts: 7,571
Likes: 0
Received 0 Likes
on
0 Posts
awesome
so then all i need is a hose and a y fitting and eventually my temps will drop a lil with my new found 2.7.
any tips on the best way to bleed the system?, also how thick/long of a hose should i use?
also regarding the pic that shows the cores, what is the BEST sequence in which they should be flipped.
so then all i need is a hose and a y fitting and eventually my temps will drop a lil with my new found 2.7.
any tips on the best way to bleed the system?, also how thick/long of a hose should i use?
also regarding the pic that shows the cores, what is the BEST sequence in which they should be flipped.