When you click on links to various merchants on this site and make a purchase, this can result in this site earning a commission. Affiliate programs and affiliations include, but are not limited to, the eBay Partner Network.
My experience with rivet nut inserts did not leave me impressed. The worst is when they don't grab enough to keep from spinning but you don't find out until a bolt is all the way threaded in but then you can't remove the bolt because the nut insert just keeps spinning without a good way to grip it with anything. They are handy when they work right though.
My experience with rivet nut inserts did not leave me impressed. The worst is when they don't grab enough to keep from spinning but you don't find out until a bolt is all the way threaded in but then you can't remove the bolt because the nut insert just keeps spinning without a good way to grip it with anything. They are handy when they work right though.
Yeah, I haven't torqued any high enough to find out. I've mostly used them instead of rivets or in lightly-loaded areas like this. I have heard spinning is a problem.
My experience with rivet nut inserts did not leave me impressed. The worst is when they don't grab enough to keep from spinning but you don't find out until a bolt is all the way threaded in but then you can't remove the bolt because the nut insert just keeps spinning without a good way to grip it with anything. They are handy when they work right though.
Possibly this detail is overlooked: you need to set the tension for how much it deforms the rivnut, if you're slipping nuts than you need to smash it more. I will smash a few rivnuts in the air to make sure the setting is right, you can see how hard the lips are crushing together. For example, last week I used rivnuts on a composite trunk tray, like a thin fiber reinforced plastic, I had to back off tension all the way and even loosen the rivnut on the mandrel to prevent over smashing the lips together because plastic. When I rivnut them i the air, I can see an air gap between the deformed rivnut, so that means tension is greatly reduced.
also, make sure yous using good nut serts. i avoid the aluminum ones completely. with the steel ones ive got some in bulk before that dont have the spline on the outside to bite into the material to keep them from spinning, and well, they always end up spinning. i have a hard time getting them in bulk where i am anyways, so i usually get the Pop brand (red and white package), and i have the least troubles with them.
What installer are you using? My arms aren't well calibrated, but I could back the rivet off to a set distance. I would just need to make sure I have enough thread engagement. As it is, I only squeeze the handles about halfway till the nut bottoms out (on the blind side). When I kept pushing is when i broke the mandrel.
I mostly finished my box and lid last night. I just need to trim a couple of holes in the lid so that I can remove the lid without removing all of the fasteners on one side of the box. I'll take pictures when I do that, the lid alone is pretty boring.
The setter I used was an air powered unit that threaded into the rivet nut which tightened it against an serrated head which prevented the nut body from rotating and crushed the rivet body that way. Only thing i could adjust was air pressure and I gave it everything my garage compressor could muster. 1 out of 6 spun when I tightened the bolt.
What installer are you using? My arms aren't well calibrated, but I could back the rivet off to a set distance. I would just need to make sure I have enough thread engagement. As it is, I only squeeze the handles about halfway till the nut bottoms out (on the blind side). When I kept pushing is when i broke the mandrel.
I mostly finished my box and lid last night. I just need to trim a couple of holes in the lid so that I can remove the lid without removing all of the fasteners on one side of the box. I'll take pictures when I do that, the lid alone is pretty boring.
With this particular tool you can adjust it so that when the handles are fully stroked, it will pull the mandrel inwards a certain distance, deforming the rivnut a certain amount.
With this particular tool you can adjust it so that when the handles are fully stroked, it will pull the mandrel inwards a certain distance, deforming the rivnut a certain amount.
Mine is the Tacklife version of basically the same thing.
Mine is the Tacklife version of basically the same thing.
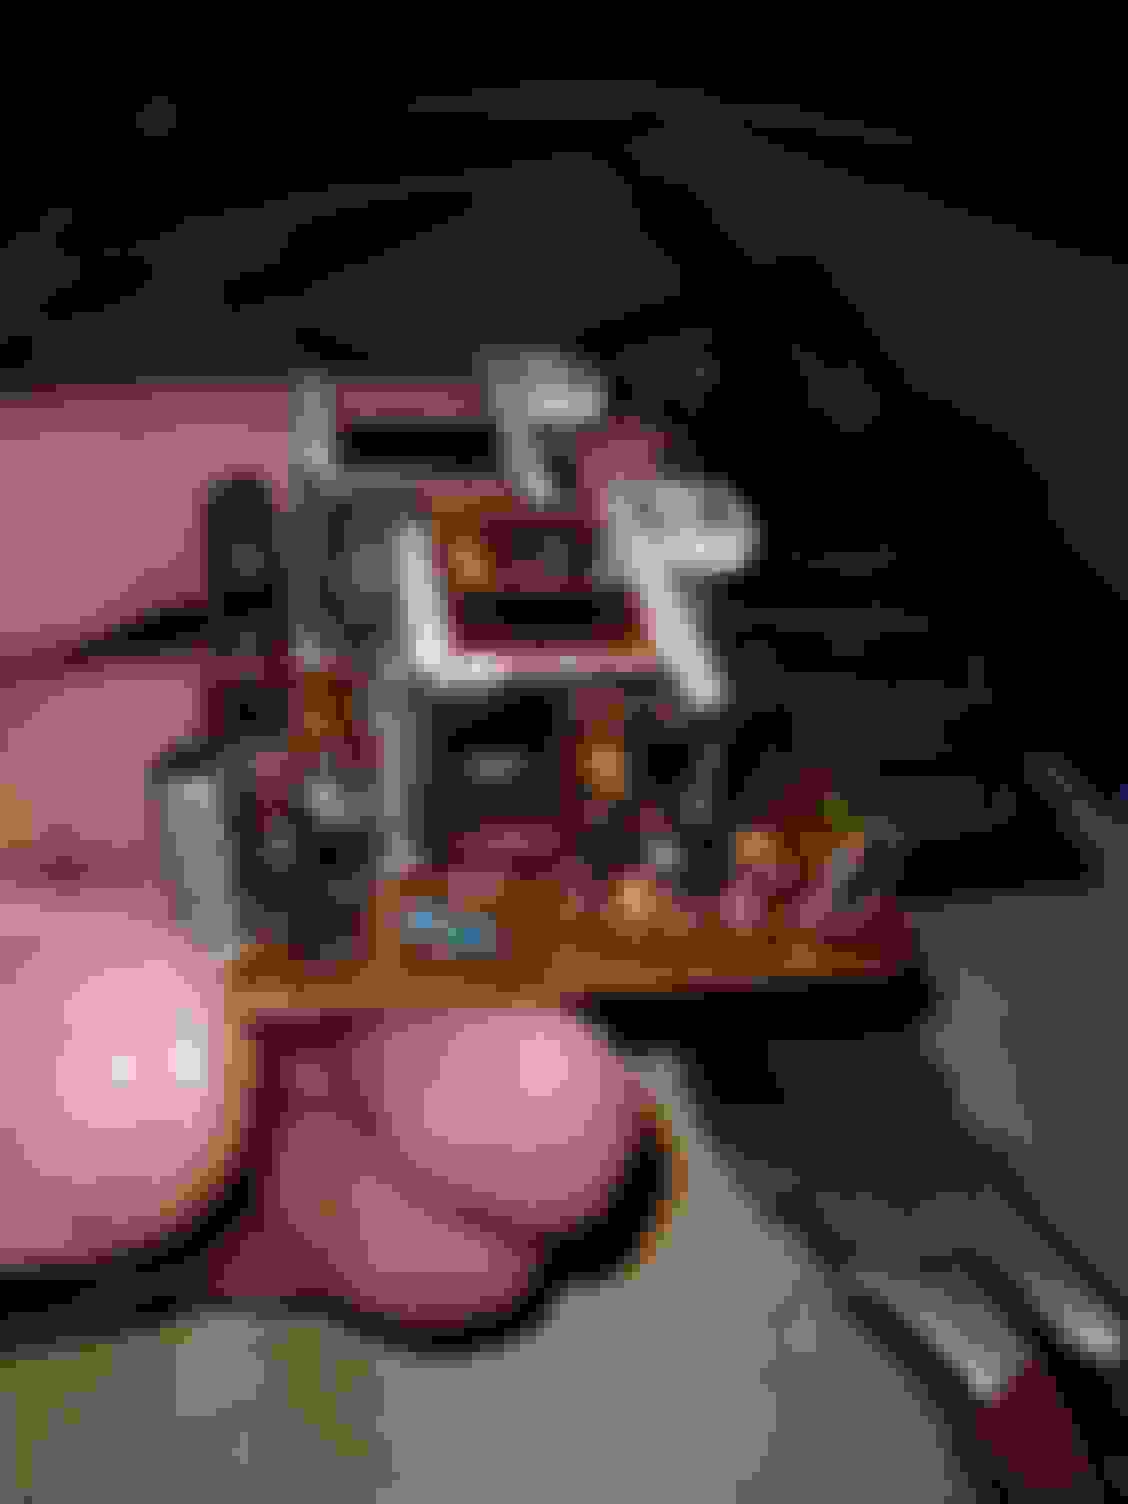
Screw in (righty-tighty) detail pointed out by Blue arrow for less crush [deformation] of the rivnut when doing a full stroke of the handles. Red arrow is locknut. If still too much crush, don't screw rivnut onto the mandrel all the way to reduce crush; as in don't bottom out the threaded insert when screwing onto tool.
Mated the front subframe. I checked clearances and determined for certain I'm doing a side exit exhaust rather than routing the exhaust under the transmission.
Kind of. The younger one has always liked going fast. The older one is more apprehensive. They think speeding is bad so when they think I'm going over the speed limit they'll tell me. Must've been their mom that taught them that. Or when I accelerate they think I'm going too fast.
Made some progress on the wiring tonight. Got the battery cable onto the starter, and a thick wire from there up to my electrical box. Cut some cable to go between the alternator and starter, but I need to crimp an eyelet onto one end of that. Laid out what I want to do in the electrical box. Reconnected all of the engine harness to see what I need to adjust. Looks like the only wires I need to lengthen are the alternator wires.
Looking good, like how everything is getting layed out in the same area and easily accessible. Wish gm would do stuff like that
Right? Thanks for the help, BTW. Most people doing this kit leave the Miata harness untouched so it ends up being a huge rats nest in their box (if they have one). I really think it's time well spent to just clean it up and build your own circuits.
Took it easy yesterday. Did some shopping and did a "flasher mod." It consists of replacing a resistor in the flasher module so that it doesn't "hyperblink" when you use LEDs. The side effect is that it never hyperblinks, but I'm not worried about that, especially with LEDs.


 04-29-2019, 08:31 AM