
2.2 L61 Engine: 2007 2.2L Oil Pressure Gauge Install How-to


Thread Starter
New Member
Joined: 10-26-07
Posts: 174
Likes: 0
From: O'Fallon, Missouri
2007 2.2L Oil Pressure Gauge Install How-to


Parts List:
Oil Pressure Gauge (Electric) Sending Unit (1/8th NPT)
Autometer Adapter (Part # 2278)
Gauge Pillar
20 gauge wiring
Electrical Tape
Optional:
Heat shrink plastic wiring sleeves
Zip Ties
Add-a-Fuse (2)
Fuses
Tool List:
Screwdriver (hex)
Allen Key
Jack
Wire Strippers
Thread Sealer (hi-temp)
Soldering Iron and solder (optional)
Heat Gun (optional)
Clothes Hanger (optional)
STEP ONE: Modifications to Gauge Pillar (If unnecessary, skip to Step 2)
- Using a saw blade, saw off the existing support for the gauge by bending the blade as you follow the contour of the pillar.
- Once the support has been cut off, slide the gauge into the gauge opening on the pillar and mark where the support should be placed.
- Attach the support to the gauge and tighten down using hardware included with gauge. Using a plastic epoxy, attach the support back to the pillar. Let set for 12 to 24 hours, or time length suggested.

STEP TWO: Removing the Old A-Pillar
- The A-pillar is attached using one screw and two metal clips. The screw is located near the top of the A-pillar and is covered. Look for a circle cover. Gently remove the cover (if planning to sell or switch back to stock. The metal clips are located near the middle and bottom of the a-pillar. Gently pull from the top down to pop the clips out of there holders.

- Before installing the new gauge pillar, run your wires down through an opening near the windshield. You can locate the opening by placing a light near the opening on your dash (normally covered by your A-pillar cover) and looking up by your pedals.

- Feed the wire down the opening and grab it from the bottom. This job is easier with a helper. Leave the black (Ground) wire inside the car. We will connect it later.
- Using your helper again. Jack up the car enough for one to crawl around underneath. The outside person should position themselves so they can grab the wire out of the opening in the firewall. The inside person should take the clothes hanger (straightened) and tape the wires to the end. Feed the clothes hanger and wires through the opening in the firewall. Make sure to feed the wires and the hanger near the center because you will be making a hole on the opening on the outside. The outside person should firmly grab the wires then the inside person should pull the hanger back inside the car.
- Run the wires from the opening in the firewall to the fuse box located in the engine bay. We will hook them up later.
- Simply reverse the process of removing the old A-pillar cover. Start from the bottom up. Do not forget to connect your gauge to your wires. Just worry about popping the metal clips in for now, in case you need to remove the gauge pillar again.

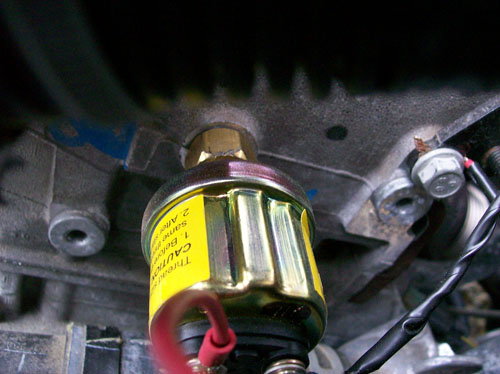
- Find a location that you wish to place the sending unit. I used the top center location for mounting the sending unit. Mainly because it allowed the most space for working and for the unit itself. Using an Allen key, remove the plug (it will be very tight). When removing the plug, if you let your car sit, only a small amount of oil will drip out of the hole. Clean up the excess oil and replace the plug with the Autometer Adapter. (Part # 2278) Make sure to use sealant (Hi-temp) on the adapter.
- Once the adapter is screwed into the head (DO NOT over tighten!) Screw in the Oil Pressure Sending unit (1/8 NPT). I used Hi temp sealant again for the sending unit into the adapter.

STEP SIX: Connecting the Wiring
- Take off the fuse box�s cover. On the back side of the cover you will find a diagram of the fuses. Look for IGN; it should be a 20 amp fuse.
- In my case, I also needed a continuous power source. I chose a blank spot inside the fuse box, checked for power, and placed an Add-a-Fuse in the spot. I also added an Add-a-Fuse to the IGN. For my gauge, it was recommended that a 3 amp fuse(purple) was used for continuous power.

- Using the Add-a-Fuses wires crush connector, I connect both red and yellow (both power in my case) Main power for the gauge was red (connect to IGN in the fuse box *Picture 1*) and accessory power was yellow (connect to blank space in the fuse box *Picture 2*).


- Now connect the sending unit wire (green in my case) to the sending unit. Also connect a ground wire from the sending unit to a ground if necessary. I used a mount used for taking the engine out.
- Inside the car, where the black ground was left before, look on the firewall for a bolt. It should be located up and left to your pedals. Loosen the nut and attach the ground to the bolt and tighten the nut back down.
- Turn the car on; if it does not turn on� check the Add-a-Fuse in the IGN position.
- See if gauge is working: if it is not working� check all grounds and connects to power. Also check to see if a proper connection was made with the sending unit wire and the sending unit itself.
- If the gauge is working properly, check for leaks from the adapter. If oil is leaking from the adapter, turn off the car and tighten the adapter. (DO NOT over tighten!)
Readings:
-Cold start 60 - 85 psi
-Cold Acceleration 60-100 psi
-Warm start 40 � 60 psi
-Warm idle 20 -30 psi
-Warm cruising (70MPH) 32-33 psi

*Reading may vary from car to car. Readings are from my car only.
Extra Notes:
- For your safety, the battery should be disconnected before installing the gauge, or any electrical work.
- I placed the sending unit on the head in the top center location. All locations, but the bottom right can be used. Bottom right plug is for cooling.
- I used red 16 gauge wiring. I color coded each wire for my install. I recommend getting different colored wire for ease of install.
- Modifications had to be done to the gauge pillar to fit the gauge. I also cut off the ends of two plastic screws behind the a-pillar.
- The opening in the firewall on the inside has a slit, but the opening on the outside does not.
- I recommend letting your car cool down and sit for about one to two hours. This will allow the oil to settle into the oil pan
- I needed to add on to the wires from the gauge to the fuse box. I cut about 4' but 5' would have been better.
Last edited by TommyP; Oct 3, 2012 at 01:06 PM.

Senior Member
Joined: 01-09-07
Posts: 740
Likes: 0
From: dallas, texas
is it safe to use a add n fuse though with the ignition. If something shorts with that by by ignition. I am installing my oil guage this weekend and thinking of wiring my ignition wire to the wire for my stereo thats the ignition wire to be safe as that is protected. I have a aftermarket cd player already so it shouldnt be to hard for me to pull overthing back apart and then get the igition wire and soder into it. I know its more work though but i think much safer. Otherwise looks good.
Last edited by CobaltCpe; May 16, 2008 at 09:37 AM.
Thread Starter
New Member
Joined: 10-26-07
Posts: 174
Likes: 0
From: O'Fallon, Missouri
is it safe to use a add n fuse though with the ignition. If something shorts with that by by ignition. I am installing my oil guage this weekend and thinking of wiring my ignition wire to the wire for my stereo thats the ignition wire to be safe as that is protected. I have a aftermarket cd player already so it shouldnt be to hard for me to pull overthing back apart and then get the igition wire and soder into it. I know its more work though but i think much safer. Otherwise looks good.
After doing some research, I seen it recommended by another member on CSS.net. The ignition was the recommended spot in the instructions that came with the gauge, even the add-a-fuse was recommended in the instructions. I haven't had any problems with it as of far, so I think you shouldn't have any problems with it.
As with wiring the gauge along with the radio. That is any idea I had played with by since I have the stock radio still, I didn't want to splice into any factory wiring. So I ran all new wires. Runing with the radio should work fine as well.
Good luck with the install!
Senior Member
Joined: 01-09-07
Posts: 740
Likes: 0
From: dallas, texas
i would randomly check the add n fuse once in awile to make sure the wires are on there good so no short coul happen. Im going to do mine to the ignition wire going to my radio, im going to soder it to it like i did on my last car and had no problems with it for 2 years and then i sold the car. I am just not crazy about the add n fuse on the ignition wire. Good job though on the install.
Senior Member
Joined: 01-22-06
Posts: 8,396
Likes: 0
From: S.FL
now you can do it mechanically rite...? without the electrical sending unit?
bump, is there any reason you would pick electrical over mechanical?
bump, is there any reason you would pick electrical over mechanical?
Last edited by originaladrian; May 17, 2008 at 10:48 AM. Reason: Automerged Doublepost
Senior Member
Joined: 09-08-06
Posts: 3,511
Likes: 2
From: *
Good information. I prefer an electrical gauge over a mechanical gauge just because I don't want the oil coming into the passenger compartment in case of a leak.
Where you positioned the sending unit (in the cylinder head) you will read lower oil pressure than what is in the block. There is a restrictor orifice that reduces the oil pressure to the head. I originally installed my sending unit there too but it drove me crazy because the service manual states the oil pressure minimum is 50 PSI @ 1000RPM. I thought I had an oil problem until I found out about the restriction. I installed a remote sending unit using the Autometer adapter in the original factory sending unit position and a brass tube kit in order to read block pressure. I positioned my original sending unit in the cylinder head -- since it is just a "on-off" switch it is working there without a problem.
https://www.cobaltss.net/forums/general-cobalt-68/how-get-oil-pressure-gauge-work-almost-106584/
Senior Member
Joined: 01-22-06
Posts: 8,396
Likes: 0
From: S.FL
Good information. I prefer an electrical gauge over a mechanical gauge just because I don't want the oil coming into the passenger compartment in case of a leak.
Where you positioned the sending unit (in the cylinder head) you will read lower oil pressure than what is in the block. There is a restrictor orifice that reduces the oil pressure to the head. I originally installed my sending unit there too but it drove me crazy because the service manual states the oil pressure minimum is 50 PSI @ 1000RPM. I thought I had an oil problem until I found out about the restriction. I installed a remote sending unit using the Autometer adapter in the original factory sending unit position and a brass tube kit in order to read block pressure. I positioned my original sending unit in the cylinder head -- since it is just a "on-off" switch it is working there without a problem.
https://www.cobaltss.net/forums/showthread.php?t=106584
Senior Member
Joined: 09-08-06
Posts: 3,511
Likes: 2
From: *
Depends on what oil galley plug you use what your oil pressure will read. If you use one of the three on the cylinder head the pressure will be low ~15-17 PSI at idle to 37 PSI at WOT with engine warm. If you use the original sending unit oil galley hole then you will read ~25 PSI idle, 50 PSI when you push the throttle, and 75 PSI WOT w/warm engine.
Senior Member
Joined: 01-22-06
Posts: 8,396
Likes: 0
From: S.FL
u think i should really worrk abt the oil issue?, kinda am now lol dont really want to deal with installing the electric
Senior Member
Joined: 09-08-06
Posts: 3,511
Likes: 2
From: *
It just depends on what you're concerned with I guess. I wanted to read the block oil pressure. It is not difficult to reposition the original sending unit in the head -- but you do have to take the intake manifold off to make room to remove the original sending unit and install the Autometer adapter (on 2.2 and 2.4 -- I don't have experience on the 2.0)!
Autometer 2278 -- 12 MM thread male X 1/8" NPT female
Autometer 2278 -- 12 MM thread male X 1/8" NPT female
Last edited by Red07SSNA; May 17, 2008 at 11:14 AM. Reason: Automerged Doublepost
Senior Member
Joined: 05-21-06
Posts: 5,577
Likes: 3
From: Gainesville, FL
It just depends on what you're concerned with I guess. I wanted to read the block oil pressure. It is not difficult to reposition the original sending unit in the head -- but you do have to take the intake manifold off to make room to remove the original sending unit and install the Autometer adapter (on 2.2 and 2.4 -- I don't have experience on the 2.0)!
i'm not 100% sure why he needed constant power...
Last edited by joeworkstoohard; May 17, 2008 at 11:15 AM. Reason: Automerged Doublepost
Senior Member
Joined: 09-08-06
Posts: 3,511
Likes: 2
From: *
Senior Member
Joined: 01-22-06
Posts: 8,396
Likes: 0
From: S.FL
wait hold on, i just connected a volt meter to the 48 wire from my ecu (blk/tan) it was giving me a ton of different #s the seemed to correspond with a signal wire not just an on off. even thru accelerating, i press the gas, the #s go down. you sure? i kno the manuel says on off but it might still be a signal wire just the L61 ECU only uses it as on off.
Senior Member
Joined: 09-08-06
Posts: 3,511
Likes: 2
From: *
wait hold on, i just connected a volt meter to the 48 wire from my ecu (blk/tan) it was giving me a ton of different #s the seemed to correspond with a signal wire not just an on off. even thru accelerating, i press the gas, the #s go down. you sure? i kno the manuel says on off but it might still be a signal wire just the L61 ECU only uses it as on off.
I checked the switch with an Ohmeter too when I started this -- try it, all I got was continuity/no-continuity.
Senior Member
Joined: 01-22-06
Posts: 8,396
Likes: 0
From: S.FL
The definition of the sending unit is in the factory service manual as only an Off/On switch. The diagnostics for it are just to check the Off/On feature. What could be coming from the ECM might be fluctuating but the switch is only supposed to be Off/On. I haven't had any problems or DTCs since installing the factory sending unit in my cylinder head either.
I checked the switch too when I started this with an Ohmeter -- try it, all I got was continuity/no-continuity.
I checked the switch too when I started this with an Ohmeter -- try it, all I got was continuity/no-continuity.
actually, i can give u an idea if its a real signal by taking a video of the signal wire hooked up to a narrowband later, then u guys can tell me if it looks like a real fuel pressure signal, i dont have an electric fuel pressure guage on hand only mechanical.
i was just talking to lil_kano and he informed me tht many of the sensors changed from 05-06 models so i very well might have a real signal. more info coming later
Last edited by originaladrian; May 17, 2008 at 02:31 PM. Reason: Automerged Doublepost
Senior Member
Joined: 09-08-06
Posts: 3,511
Likes: 2
From: *
i just tried it on the signal wire 48, for the on off fuel pressure and i had a number that seemed to correspond with fuel pressure, it was fluctuating a bit but evened out for the most part when my car was warmed up, then as i pressed the throttle the numbers went lower to abt 7 then back up when i released. i tried to get a video but there is way to much sun in south florida to capture a voltmeter screen on video broad daylight
actually, i can give u an idea if its a real signal by taking a video of the signal wire hooked up to a narrowband later, then u guys can tell me if it looks like a real fuel pressure signal, i dont have an electric fuel pressure guage on hand only mechanical.
i was just talking to lil_kano and he informed me tht many of the sensors changed from 05-06 models so i very well might have a real signal. more info coming later
Senior Member
Joined: 01-22-06
Posts: 8,396
Likes: 0
From: S.FL
ya oil pressure, iv been mixing them up all day, fuel pressure would be easy, just use the shrader valve on the fuel rail. but no, its giving a wierd signal, so im not going to use it. its def not a switched source tho. if it was it would be one thing or the other, this wire sweeps the signal. but idk, im not gona mess with it. i just need tht adapter to come in the mail
Thread Starter
New Member
Joined: 10-26-07
Posts: 174
Likes: 0
From: O'Fallon, Missouri
My gauge uses it to remember which color I had my gauge set to last. It has 7 colors plus two coloring changing presets. The continuous power is only hooked up to a 3 amp fuse though so it isn't a huge deal.
Senior Member
Joined: 09-08-06
Posts: 3,511
Likes: 2
From: *
Thanks!