2.0 LSJ Engine: how to Rebuild IC pump
#1
Senior Member
Thread Starter
how to Rebuild IC pump
Its known that the Ic Pump fails on the Cobalt SS and Ion redline. As well as the svt lightning and svt cobra uses the same pump and has the same problem. In the past the only fis was the Hammer fix, or replacing it.
What causes the failure are the brushes in the motor wearing out or carbon dust causing the brushes to get stuck on there guides and not make contact with the armature.
If you don’t understand the above statement then maybe this fix isn’t for you.
this will require fabrication and soldering skills. Its kind of like replacing brushes on alternators, starters or RC car motors.
Your gonna need >
String
Soldering iron
Solder
Rosin Flux (even if you use flux core solder.)
Small to medium standard screwdriver (“flat head is a engine not a tool” My auto shop teacher for high school)
Needle nose pliers small.
13MM socket/retched or gear wrench
¾ hose coupler.
Vice grips.
Now I’m not going to go into detail on how to remove the ic pump form the car , its pretty self explanatory once you look at it , but that’s what the 13mm ,hose coupler and vice grips are for.
Your going to need to jack the car up of have it on ramps. Two 13mm bolts hold the pump on. Use the vice grips for the spring hose clamps.(I replaced my spring claps with screw type clamps)
When you get the pump off connect to two open hoses together with the coupler . that way you can still drive the car if you need to, just don’t do any long high speed runs cause the intercooler is no longer functional
Heres the pump.
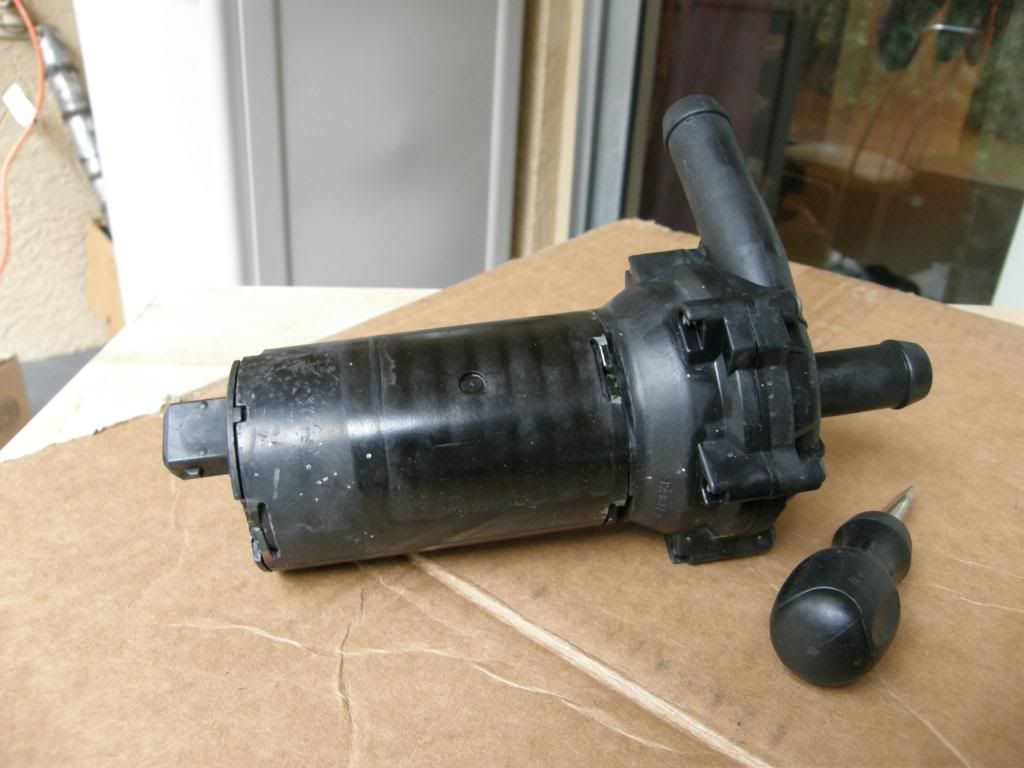
ne the back are (motor side ) there are three sets of tabs.
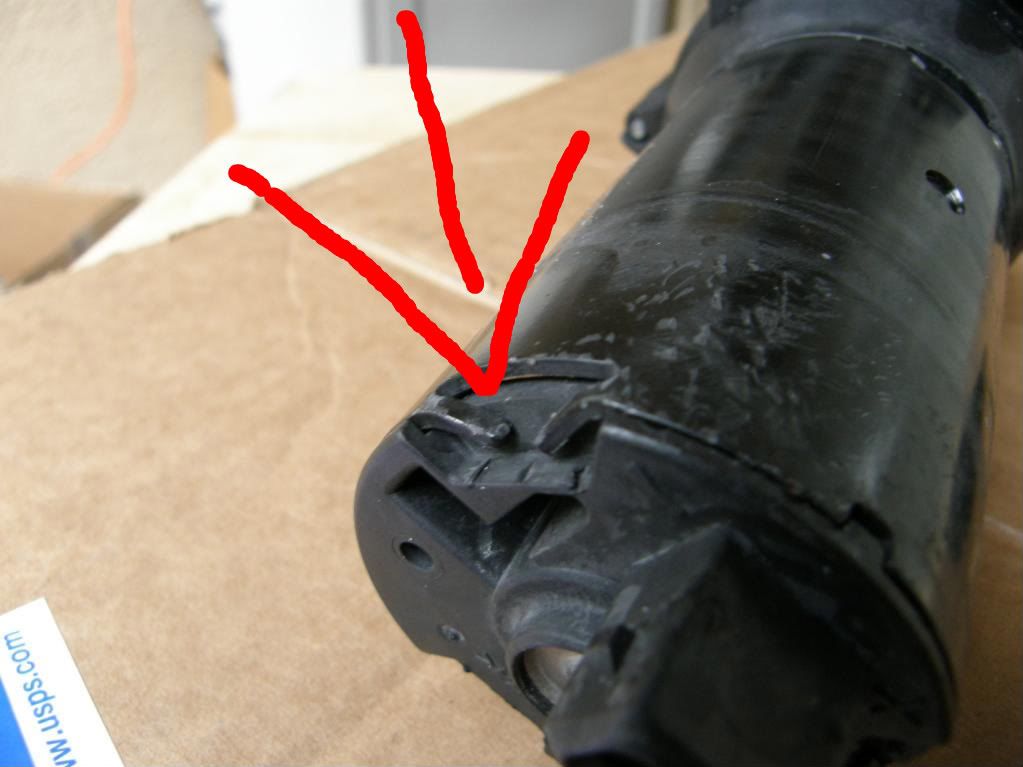
Bend the tabs up(just enough to clear the cap) with a screw driver or needle nose pliers .Once all the tabs are bent up pray the cap form the body with a standard screwdriver. There will be some resistance due to the rubber o-ring .
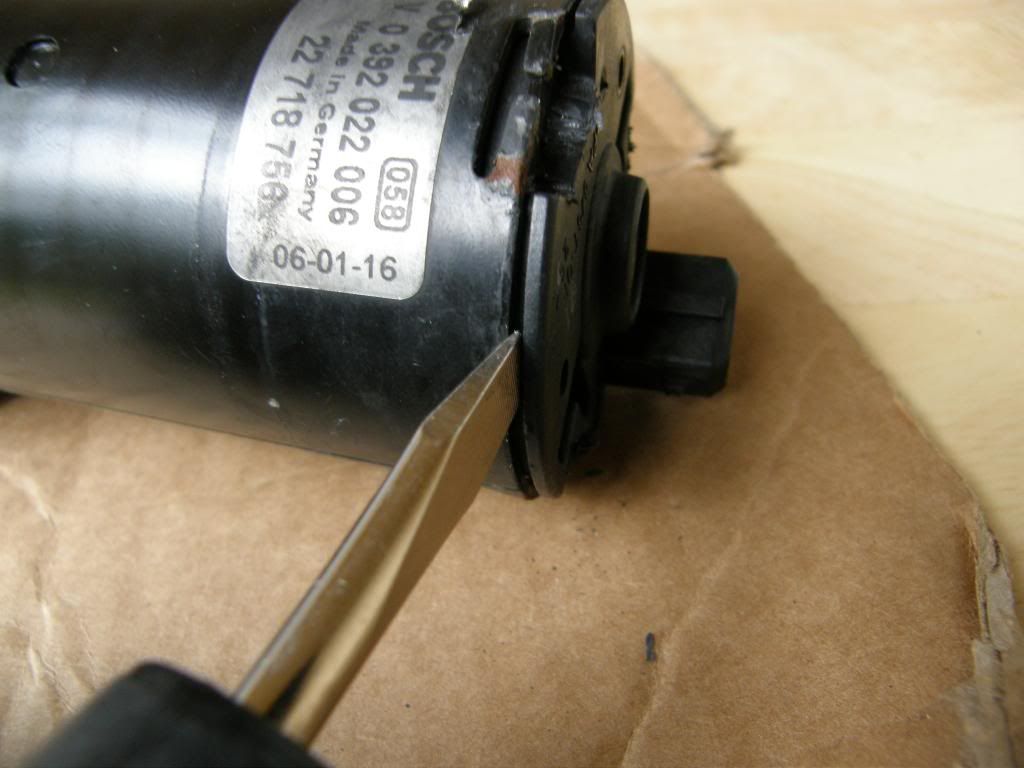
Once you get this far the Brushes will be stuck on the end bearing. And it will feel like it might break, almost like its spring loaded, with some finagling they should come free.
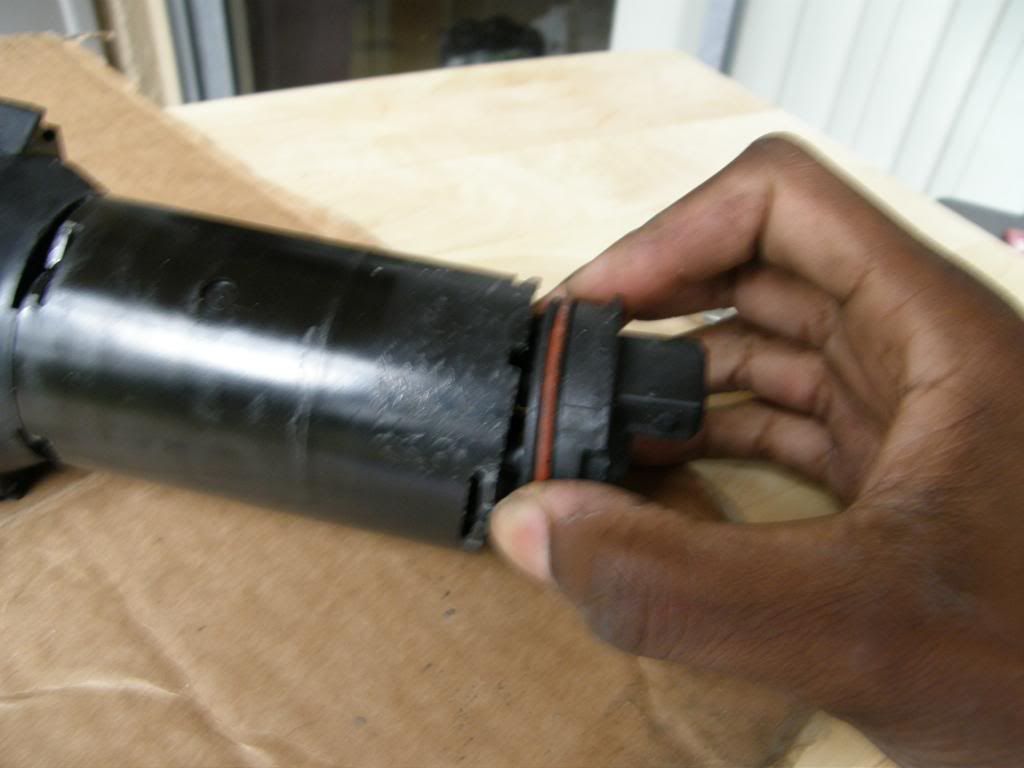
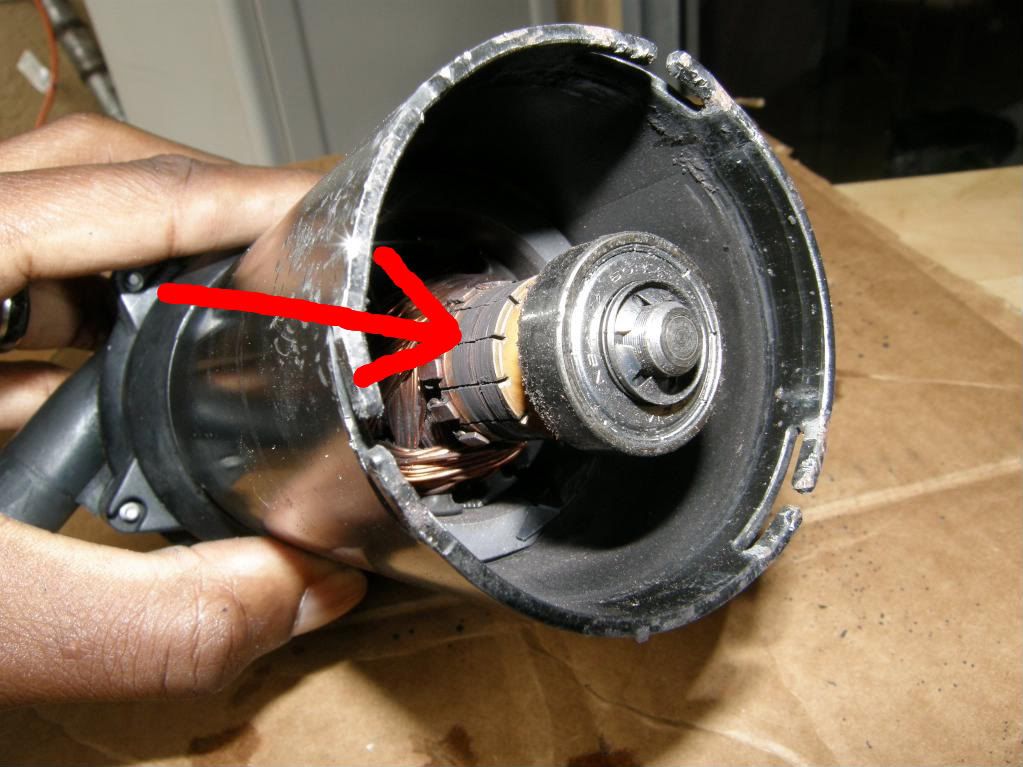
Heres the end of the motor with the cap removed, you can see were the armature was starting to develop a grove were the brush turned sideways. While you have it open take some isopropyl alcohol and q-tips and clean the armature
Here is the end cap. The Brushes are worn down to the nub. Now if your brushes aren’t worn all the way down , you may just be able to clean out the inside and resalable the motor. But since its apart might as well change them.
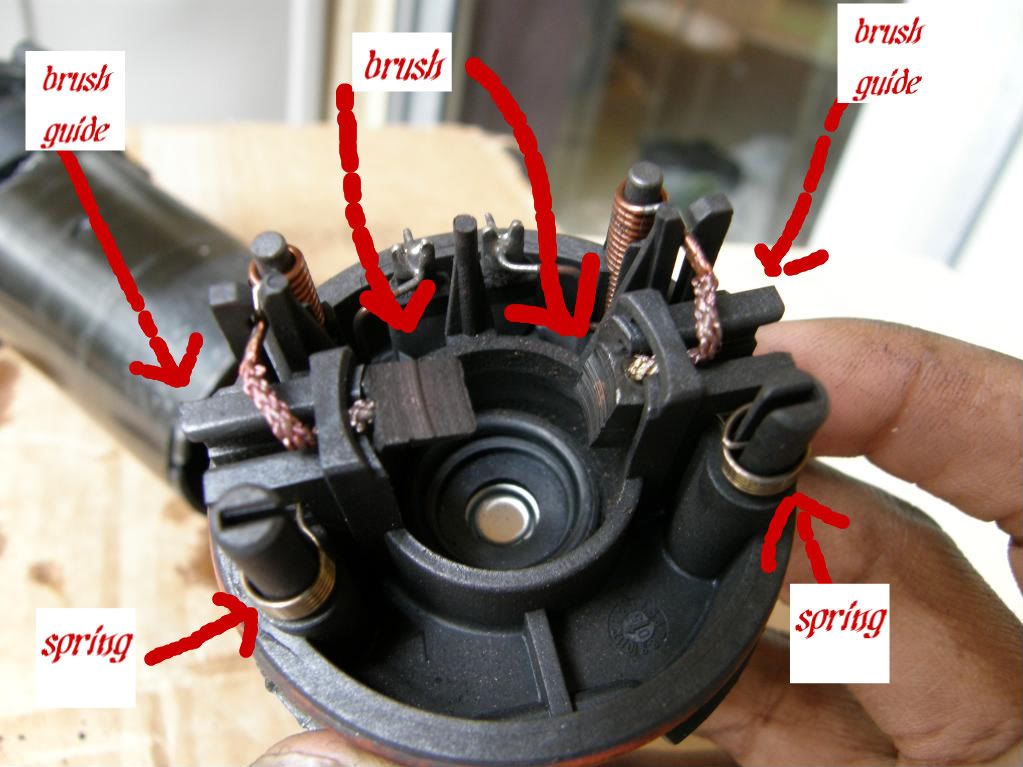
Use your needle nose pliers to pull the spring back out of the brush guide then with your other hand slide the spring up the post and off, the brush can then be removed from the guide.. It helps if you have a vice to hold the cap.

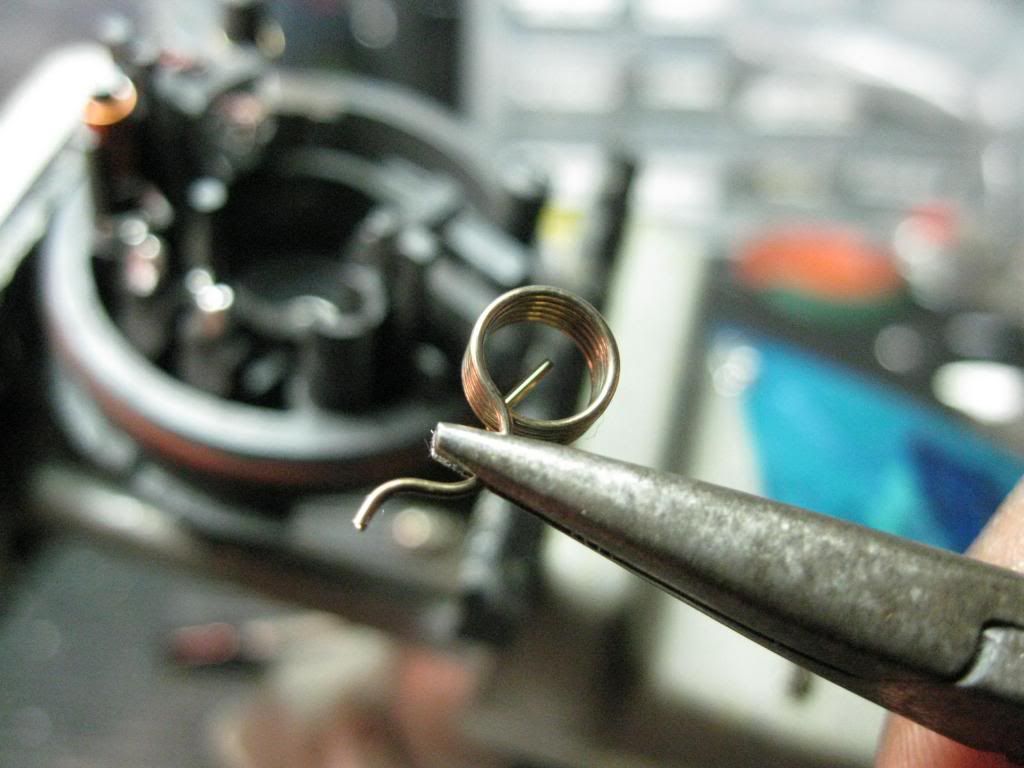
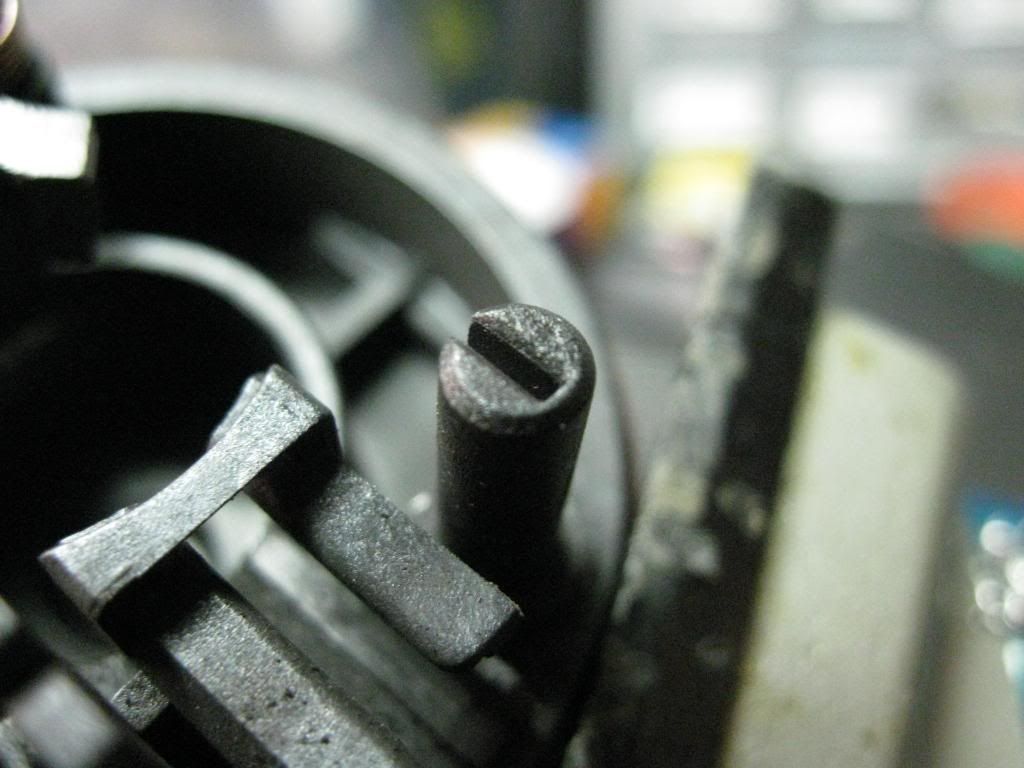
Now place cap in vice, and with your soldering iron heat the solder joint . leave the solder , it will be reused later. use your needle nose pliers to lift the tab out of the hot solder.
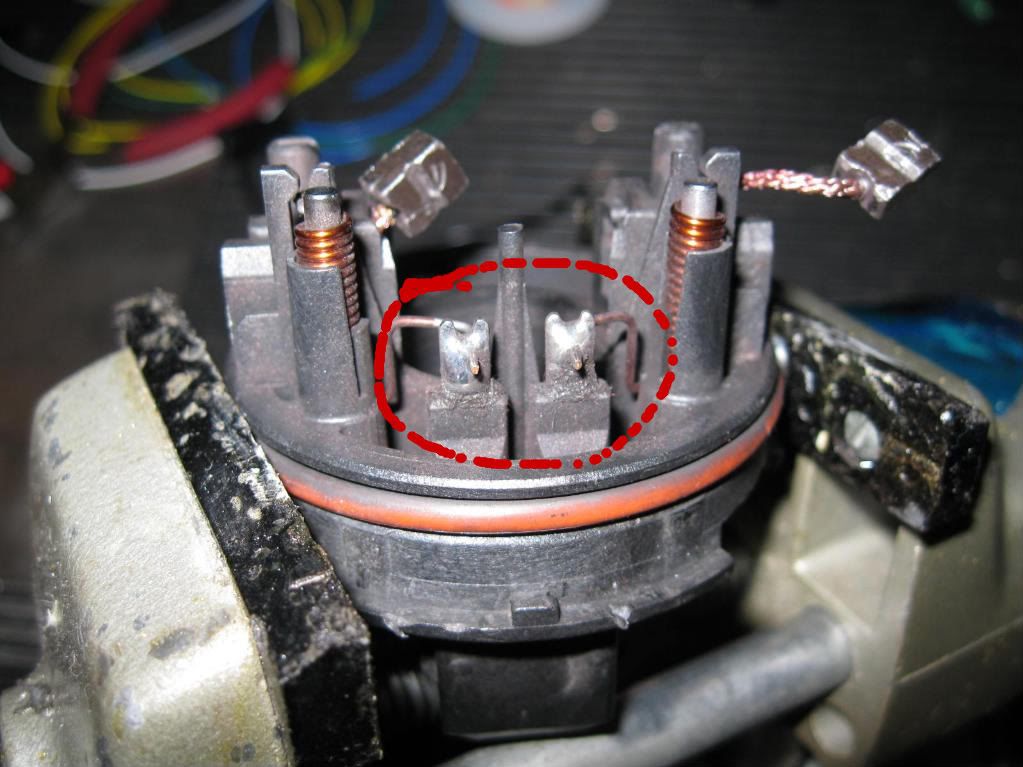

Lift the whole assembly out of the cap.
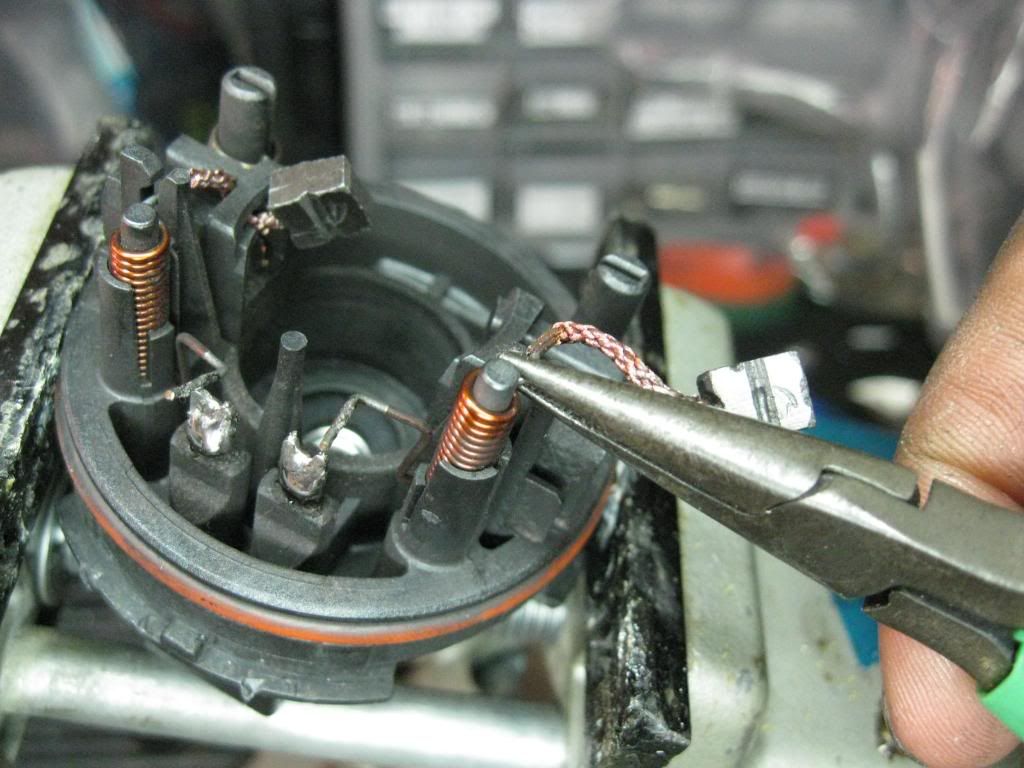

At this point you need new brushes. I would tell you part number I used, but every ACE hardware Carrey different stock. Take you cap and find a bursh that will fit in the cap. Or one that alittle larger then it can be shaped to fit with a file, or drimle. I happened to find a burhs that fit like a glove but the lead was on the wrong side.

New brush in brush guide. The brush it a little long so I cut it down and filed to the right length. Since the lead is on the back and not the top , you must be sure to make sure the lead wont touch the body of the motor.

Now take your brush assembly and place it in a vice. The lead is hard soldered to the coil. So I just cut the lead at the post. And soldered the new brush lead to it.

New brush in the cap. Note the safety wire holding the brush in place.
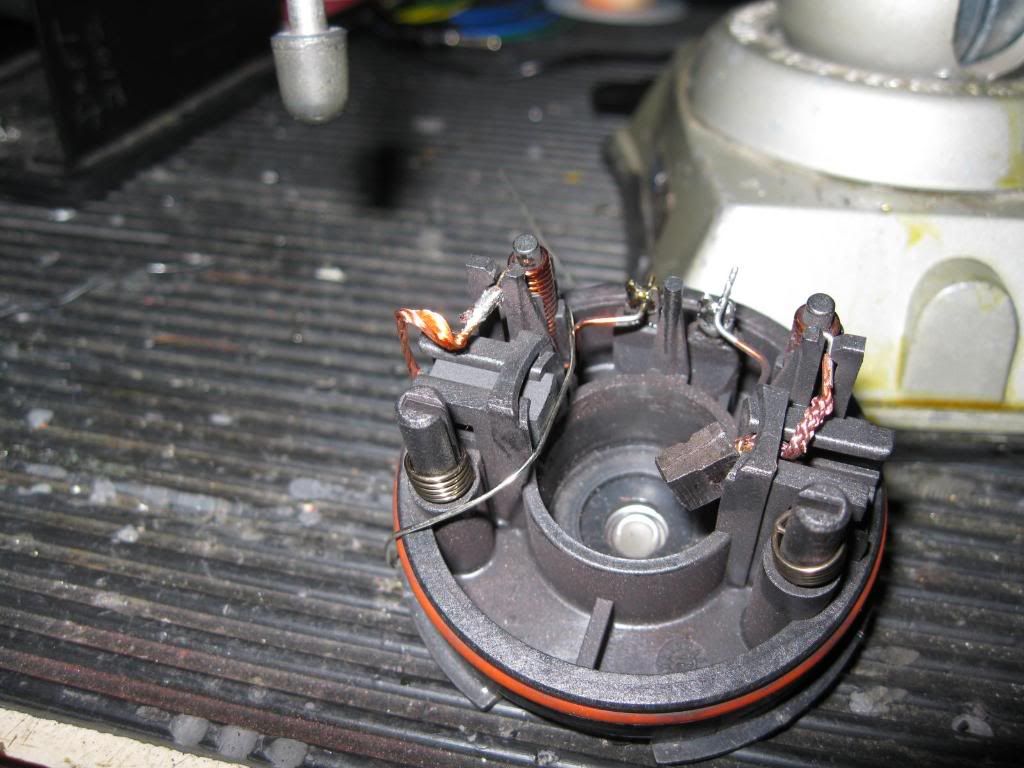
Put everything back together in the cap in reveres order. The spring will be off center due to the lead being in the rear.

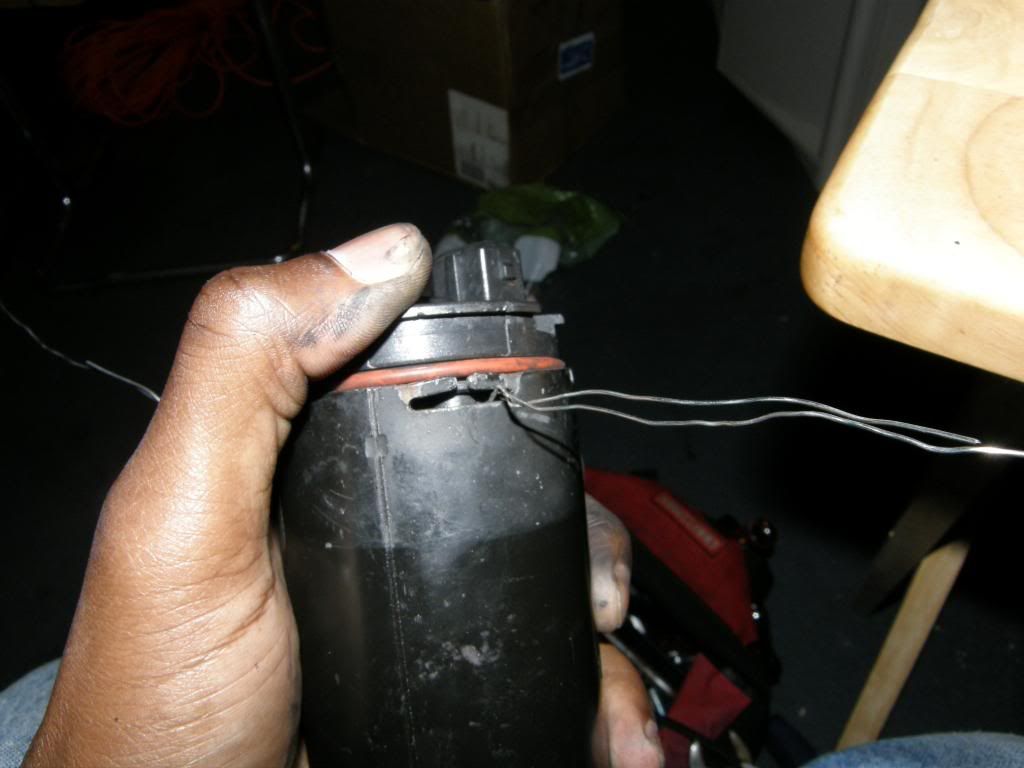
Now when you go to put the cap back on the motor , take string , or thin safety wire and loop it around back of the spring. This is so you can remove spring tension and slide the brushes past the end bearing.
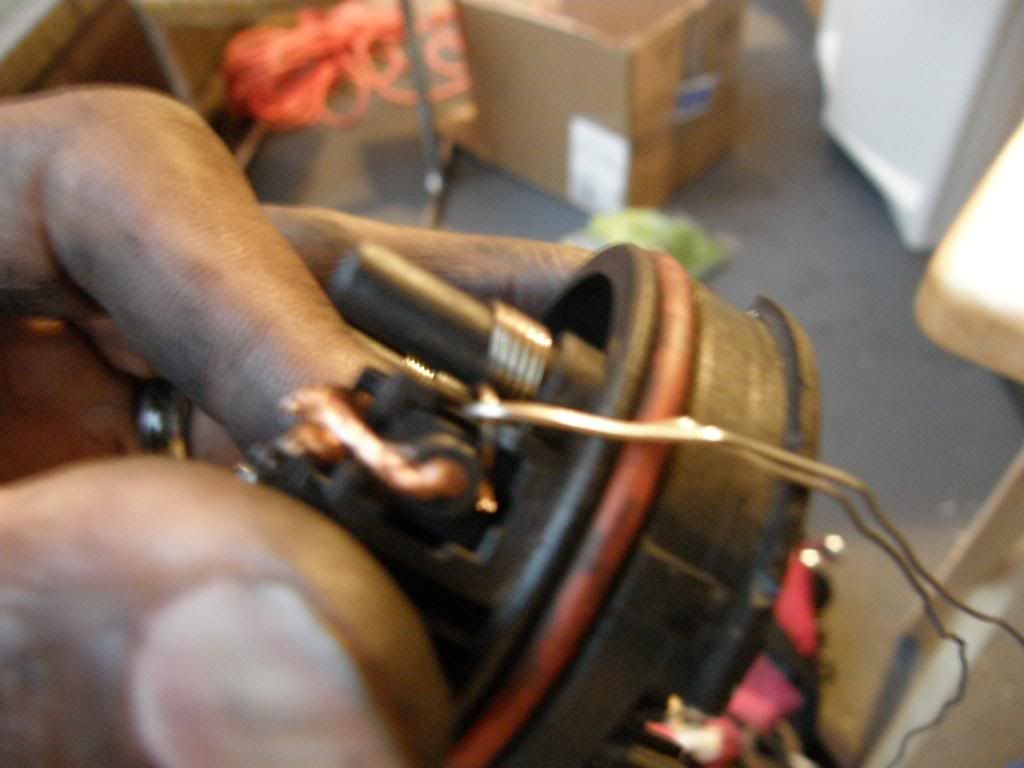
Once the brushes are past the bearing remove the sting. There is a notch and guide on the cap and motor , make sure they are lined up.
 [/
[/
What causes the failure are the brushes in the motor wearing out or carbon dust causing the brushes to get stuck on there guides and not make contact with the armature.
If you don’t understand the above statement then maybe this fix isn’t for you.
this will require fabrication and soldering skills. Its kind of like replacing brushes on alternators, starters or RC car motors.
Your gonna need >
String
Soldering iron
Solder
Rosin Flux (even if you use flux core solder.)
Small to medium standard screwdriver (“flat head is a engine not a tool” My auto shop teacher for high school)
Needle nose pliers small.
13MM socket/retched or gear wrench
¾ hose coupler.
Vice grips.
Now I’m not going to go into detail on how to remove the ic pump form the car , its pretty self explanatory once you look at it , but that’s what the 13mm ,hose coupler and vice grips are for.
Your going to need to jack the car up of have it on ramps. Two 13mm bolts hold the pump on. Use the vice grips for the spring hose clamps.(I replaced my spring claps with screw type clamps)
When you get the pump off connect to two open hoses together with the coupler . that way you can still drive the car if you need to, just don’t do any long high speed runs cause the intercooler is no longer functional
Heres the pump.

ne the back are (motor side ) there are three sets of tabs.

Bend the tabs up(just enough to clear the cap) with a screw driver or needle nose pliers .Once all the tabs are bent up pray the cap form the body with a standard screwdriver. There will be some resistance due to the rubber o-ring .

Once you get this far the Brushes will be stuck on the end bearing. And it will feel like it might break, almost like its spring loaded, with some finagling they should come free.

Heres the end of the motor with the cap removed, you can see were the armature was starting to develop a grove were the brush turned sideways. While you have it open take some isopropyl alcohol and q-tips and clean the armature

Here is the end cap. The Brushes are worn down to the nub. Now if your brushes aren’t worn all the way down , you may just be able to clean out the inside and resalable the motor. But since its apart might as well change them.

Use your needle nose pliers to pull the spring back out of the brush guide then with your other hand slide the spring up the post and off, the brush can then be removed from the guide.. It helps if you have a vice to hold the cap.


Now place cap in vice, and with your soldering iron heat the solder joint . leave the solder , it will be reused later. use your needle nose pliers to lift the tab out of the hot solder.


Lift the whole assembly out of the cap.


At this point you need new brushes. I would tell you part number I used, but every ACE hardware Carrey different stock. Take you cap and find a bursh that will fit in the cap. Or one that alittle larger then it can be shaped to fit with a file, or drimle. I happened to find a burhs that fit like a glove but the lead was on the wrong side.

New brush in brush guide. The brush it a little long so I cut it down and filed to the right length. Since the lead is on the back and not the top , you must be sure to make sure the lead wont touch the body of the motor.

Now take your brush assembly and place it in a vice. The lead is hard soldered to the coil. So I just cut the lead at the post. And soldered the new brush lead to it.

New brush in the cap. Note the safety wire holding the brush in place.

Put everything back together in the cap in reveres order. The spring will be off center due to the lead being in the rear.

Now when you go to put the cap back on the motor , take string , or thin safety wire and loop it around back of the spring. This is so you can remove spring tension and slide the brushes past the end bearing.

Once the brushes are past the bearing remove the sting. There is a notch and guide on the cap and motor , make sure they are lined up.
 [/
[/
#7
Anybody have any idea where to get these brushes besides ace? I want to do it but the only ACE hardware that I know of close to me is just a little mom and pop sized shop, so I doubt that they will have it. I figure I'll try this before I spend 120 bucks on a new one.
#9
Senior Member
Thread Starter
"If you don’t understand the above statement then maybe this fix isn’t for you.this will require fabrication and soldering skills"
The people that don't like spending unnecessary money and have the tools and skill can fix theres for 6 bucks.
The people that don't like spending unnecessary money and have the tools and skill can fix theres for 6 bucks.
Last edited by phatnackySS; 09-22-2010 at 12:20 PM.
#11
New Member
Join Date: 07-15-09
Location: Russia, Yekaterinburg
Posts: 122
Received 0 Likes
on
0 Posts
sorry dude ... but i dont see o-ring on your pictures
When i rebuild brushes - i placed back o-ring into brushes. And all was ok after 3 times

I'm shoked ... my stock brushes broked on 50000 MI

When i rebuild brushes - i placed back o-ring into brushes. And all was ok after 3 times


I'm shoked ... my stock brushes broked on 50000 MI

#15
New Member
Join Date: 07-15-09
Location: Russia, Yekaterinburg
Posts: 122
Received 0 Likes
on
0 Posts
#16
Junior Member
I just rebuilt mine. I found that milwaukee sawzall brushes work the best. Any "real" hardware store will know when you request those. you will have to sand them down a bit since they are long. Worked like a charm.
#17
Junior Member
For those of you that need part numbers:
Milwaukee brush number: 22180910. you will have to sand these down.
The bearing on the end if needed: 6082Z, I am using a 608ZZ. Skateboard shops carry these. Go Figure.
The pushnut on the end of the bearing can be sized up at any hardware store. I used a 1/4" pushnet
Milwaukee brush number: 22180910. you will have to sand these down.
The bearing on the end if needed: 6082Z, I am using a 608ZZ. Skateboard shops carry these. Go Figure.
The pushnut on the end of the bearing can be sized up at any hardware store. I used a 1/4" pushnet
Last edited by megaman311; 01-03-2012 at 03:14 PM.
#18
thanks for publish such a great and colorful blog..i like it very much..must say,very innovative ideas of your and its great implementation...thank u again for publish it.it is a new thing hope people like it.....a good blog with good topic.....posts will contribute more in this topic very soon.....Excellent blog! Thank you so much for providing such an useful and interesting information. Please, keep the great work up!
#20
New Member
Join Date: 01-24-12
Location: Conroe area
Posts: 161
Likes: 0
Received 0 Likes
on
0 Posts
Excellent write up! I did things slightly different like not removing the pump at all. I simply useda really short flat head screwdriver to bend the prongs and then genlty pried it out.
Here are my brushes..... or what appears to be brushes lol

Trust me you can get it out and back in easily without removing the whole pump. Also 727's post shows a push washer placed in the middle of the brushes. Do that super easy and worked for me first try, just go slow until you feel the washer hit the bearing and the shove it on the quickly. Thanks for that tip 727.
Also chicago electric brushes for the 4" cheap grinder at harbor freight works as well. I happened to have a dead grinder with good brushes in it already warn down to a perfect length.
All in all it took me, with a hot engine, 20 min. Just jack up the car leave the pump in there and simply have at the end but being carefull as it is plastic and you can damage it fairly easily.
Here are my brushes..... or what appears to be brushes lol

Trust me you can get it out and back in easily without removing the whole pump. Also 727's post shows a push washer placed in the middle of the brushes. Do that super easy and worked for me first try, just go slow until you feel the washer hit the bearing and the shove it on the quickly. Thanks for that tip 727.
Also chicago electric brushes for the 4" cheap grinder at harbor freight works as well. I happened to have a dead grinder with good brushes in it already warn down to a perfect length.
All in all it took me, with a hot engine, 20 min. Just jack up the car leave the pump in there and simply have at the end but being carefull as it is plastic and you can damage it fairly easily.
#24
Senior Member
iTrader: (2)
Rebuilt mine. Took at least 5 times longer to get the stupid hoses off the pump than it did to replace the brushes.
Couldnt find thread so I used some 8lb Powerpro braided fishing line I had laying around to hold the brushes in. Bad idea. Usually thread break as soon as you apply power to an electric motor but the damn fishing line was too strong and I had to pull the pump apart again to break it so the pump would work.
Oh well lesson learned.
The following users liked this post:
phatnackySS (12-21-2015)
Thread
Thread Starter
Forum
Replies
Last Post
roth
Problems/Service/Maintenance
2
09-26-2015 12:16 PM


