Electrical: How To: 5 minute LED in DoorHandles
 01-29-2008, 02:03 AM
#1
Senior Member
Thread Starter

Join Date: 06-12-06
Location: Surrey, B.C.
Posts: 2,458
Likes: 0
Received 0 Likes
on
0 Posts

What You Need:
Phillips Screwdriver
Flathead Screwdriver
2- 12V LEDs
Electrical Tape
Step 1:
Take your Flathead Screwdriver and gently pry up the bottom of the handle tab and lift it out, from there there are two Philips screws....unscrew both then put them in cupholder.
The handle is held in with pressure clips so pull the assembly out (doesnt take that much)
Step 2:
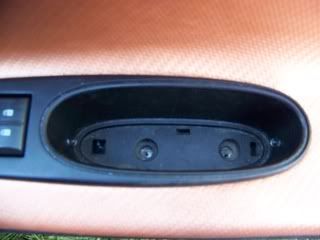
On the drivers side there should be 3 wring harnesses.... one for the power mirros, one for the power door locks, and the third for your power windows
Use the one with the power windows.... take the positive wire or your 12V led and stick it in the harness in WITH the skinny GREY wire, then stick the negative in the harness in with the only fat black wire (no soldering or tapping or even splicing required) once they are both in (you need to slide them in pretty good, its a tight fit) then tape your two wires to the rest of the wires. turn on your interior lights to test LEDs
Step 3:
Feed the led through the (back) screw hole (the only two screws you had to take out so far. put the handle assembly on and Screw the front philips screw back on tight. screw the back one on with the little space you have left petween the wire and the screw, DONT TIGHTEN THIS ONE TIGHT AS IT MAY DAMAGE YOUR LEDS WIRING. adjust the lenth of wire you have left of the led so it should sit flat in your hadle with minimal wiring showing, put the tab that covers the screws back on and your DONE!
Enjoy!

https://www.cobaltss.net/gallery/fil...8/dsc00038.jpg
https://www.cobaltss.net/gallery/fil...8/dsc00037.jpg

 06-15-2008, 12:55 AM
#4
Senior Member

Join Date: 05-10-06
Location: Beverly Hills, Florida
Posts: 1,068
Likes: 0
Received 0 Likes
on
0 Posts
06-15-2008, 11:08 AM
#5
Senior Member
Thread Starter
Join Date: 06-12-06
Location: Surrey, B.C.
Posts: 2,458
Likes: 0
Received 0 Likes
on
0 Posts
thanks guys! i had no idea this was approved lol, i created it months ago and never thought to check!
As for the comment of step three, i stated everything so if you had this printed out or had it on your lappy tappy(laptop) in you car you will know what to do at that point, so as confusing as it sounds this takes 5 mins each side and if you follow the previous steps then the next step will be clear
As for the comment of step three, i stated everything so if you had this printed out or had it on your lappy tappy(laptop) in you car you will know what to do at that point, so as confusing as it sounds this takes 5 mins each side and if you follow the previous steps then the next step will be clear
 06-15-2008, 11:30 AM
#7
Senior Member
Thread Starter
Join Date: 06-12-06
Location: Surrey, B.C.
Posts: 2,458
Likes: 0
Received 0 Likes
on
0 Posts
06-15-2008, 11:40 AM
#9
Senior Member
Thread Starter
Join Date: 06-12-06
Location: Surrey, B.C.
Posts: 2,458
Likes: 0
Received 0 Likes
on
0 Posts
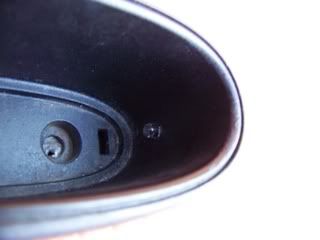
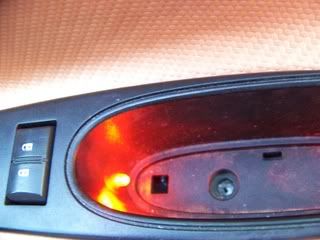
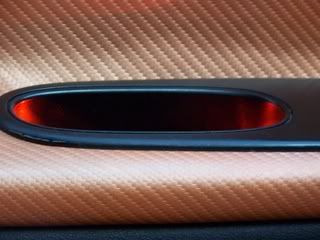
i supose i could get some, unfortunatley i have no pics right now but i will as soon as possible, picture what the inside of your handle looks like, with a little led coming out of the side of the screw cover tab...... you can only see it if you lean in to look at the inside of your handle
06-15-2008, 07:04 PM
#10
New Member

Join Date: 01-19-08
Location: Eglin AFB Flordia
Posts: 194
Likes: 0
Received 0 Likes
on
0 Posts
Its cleared up, but I gave up, drilled 3 holes hot glued the LEDs into place, Wired them, and in a few minute im running a wire to my switch in the dash.....Thanks for the How too.....It got my imagination rollin!!!
Jay B
Jay B
06-24-2008, 02:42 PM
#11
Senior Member
Thread Starter
Join Date: 06-12-06
Location: Surrey, B.C.
Posts: 2,458
Likes: 0
Received 0 Likes
on
0 Posts

 06-27-2008, 08:42 AM
#16
New Member
Join Date: 01-19-08
Location: Eglin AFB Flordia
Posts: 194
Likes: 0
Received 0 Likes
on
0 Posts
I actually drilled mine in, I ran two power wires into the doors and used the ground you meantioned in here, it looks good......And it was that shitty running the wires, it was pretty simple.\
Jay B
Jay B
06-28-2008, 10:32 AM
#17
Senior Member
Thread Starter
Join Date: 06-12-06
Location: Surrey, B.C.
Posts: 2,458
Likes: 0
Received 0 Likes
on
0 Posts
 07-01-2008, 12:19 AM
#18
New Member
Join Date: 01-19-08
Location: Eglin AFB Flordia
Posts: 194
Likes: 0
Received 0 Likes
on
0 Posts
07-02-2008, 03:35 PM
#19
Senior Member

Join Date: 05-16-07
Location: austin, tx
Posts: 620
Likes: 0
Received 0 Likes
on
0 Posts
i did mine the other day. instead of doing the way in the how to. i drilled a 2 holes using a dremel and wired 2 leds seperatley then connected them and splice them with the grey and black wire. they come on when the lights are on. and its cool they dim with the control that dims the gauge cluster.
07-02-2008, 04:25 PM
#20
Senior Member
Thread Starter
Join Date: 06-12-06
Location: Surrey, B.C.
Posts: 2,458
Likes: 0
Received 0 Likes
on
0 Posts
i did mine the other day. instead of doing the way in the how to. i drilled a 2 holes using a dremel and wired 2 leds seperatley then connected them and splice them with the grey and black wire. they come on when the lights are on. and its cool they dim with the control that dims the gauge cluster.
07-02-2008, 04:31 PM
#21
Senior Member
Join Date: 05-16-07
Location: austin, tx
Posts: 620
Likes: 0
Received 0 Likes
on
0 Posts
yea i used your how to. it was just that i couldnt get them to say on. i probably didnt push them in to far. so i just spliced them. but great how to. it was very helpful. ill get some tonight
07-03-2008, 08:19 AM
#23
Senior Member
Join Date: 05-16-07
Location: austin, tx
Posts: 620
Likes: 0
Received 0 Likes
on
0 Posts
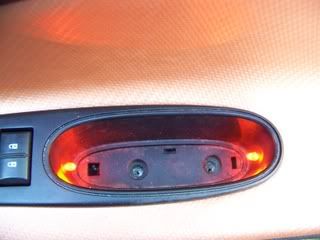
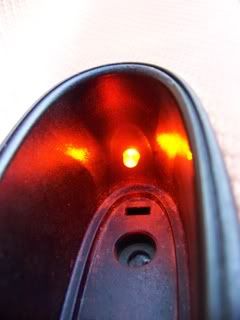
i had gotten orange ones. and they are sweet. these pics were takin in tha day time. i need to get night shots
Last edited by orngebalt; 07-03-2008 at 08:24 AM. Reason: moved pics to different folder
