2.0 LNF Engine: How To: Install GM Stage 1 LNF Kit (GMS1)
 12-19-2011, 11:20 PM
#1
New Member
Thread Starter

Join Date: 04-18-10
Location: Ohio
Posts: 10
Likes: 0
Received 0 Likes
on
0 Posts
How To: Install GM Stage 1 LNF Kit (GMS1)
For those who are new to this one: GMS1 is a kit developed by GM’s Performance Division that you can install/have installed that, among several other improvements, will add 20-30 hp and will maintain all your factory warranties as if it were an original factory-installed option. Click here for specifics.
A NEW adapter harness kit for complete plug and play install, exclusively available from CrateEngineDepot.com (CED), makes it so no wire cutting, splicing, or soldering is required anymore! Get in and out from underneath your hood in less than 30 minutes, or save on dealer install costs (see notes at bottom of post)!
p.s. I’m not associated with CED – just a very satisfied customer! This is my first post here on CobaltSS.net, but I’ve been lurking around here since I bought my ’09 Cobalt SS about a year and a half ago. I’ve benefited much thanks to all the generous help of all the other friendly contributors on this forum, so now it’s time for me to give back. (Sorry for the cruddy looking pictures here, though – best my cheap camera could do.)
NOTE: these instructions were written based on my 2009 Cobalt SS. Slight variations exist from these if you are installing on a Solstice or Sky instead (refer to original kit instructions for details). Either way, all you are really doing here with this kit is simply replacing the factory MAP and TMAP sensors with a couple of upgraded TMAP sensors, then flashing the car’s ECM with new programming via your dealer. Simple!
PREPARATIONS:
1) Purchase a 2007-2010 Cobalt, Solstice, Sky, HHR 2.0 LNF Engine Stage 1 Turbo Upgrade Kit, SKU #19212670HK from CrateEngineDepot.com . If you happen to buy the kit from another source, you can still buy CED’s harnesses (pictured below) separately: SKU #19212670H

2) Fill your tank with Premium fuel (required after kit is installed) at your next opportunity before installing the kit.
3) Call your dealer and schedule an appointment for the ECM calibration flash, or if you prefer, to have the entire kit installed. Give them the part number for the kit upon request, i.e., #19212670.
If you’re having your dealer do the entire install for you, then that’s it! Enjoy! Otherwise, continue…
BEFORE THE INSTALL:
1) Gather tools you will need:
-torque wrench capable of as little as 22 lb-in (1.83 ft-lb)
-10mm socket
-9/32” socket (or might be 7mm, I’m not sure)
-18” socket wrench extension bar(s)
-Phillips head socket (or an 18” long Phillips screwdriver lol)
-magnetic pickup tool, or other method of securing a bolt while maneuvering it into/out of place
-dremel tool (preferred), or handheld file and wire brush
-plastic baggie and rubberband (not required but helpful)
-red Loctite 262
-a little clean motor oil
2) Remove one bolt (10mm socket) from MAP sensor on top of engine and clean any thread sealant (Loctite) off of it. A dremel with a wire wheel makes doing this super easy. Replace bolt if you plan to keep driving your car before the install.
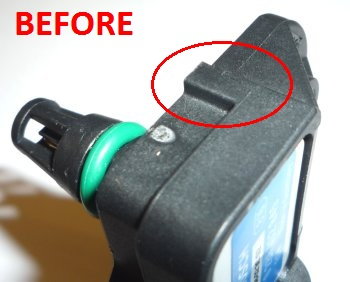
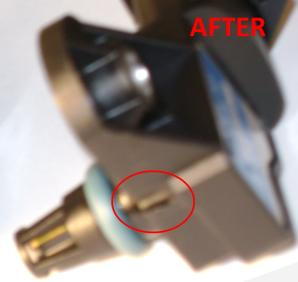
3) Take one of the new TMAP sensors, cover the open sensor port by using the plastic baggie and rubberband, then dremel or file off the plastic boss as shown in the before/after picture below. Clean off any plastic filings then remove baggie and rubberband.
4) Remove green O-rings from both of the new TMAP sensors. A small flat tool may be necessary to gently pry them off.
5) Check the new, blue O-rings for any cracks or other damage, then wet each with clean motor oil and slide one onto each of the new TMAP sensors. I was able to use only my fingers to do this. If you must use a tool, be very careful not to scratch or otherwise damage the O-ring!
6) Attach the new CED wire harness which has a four prong connector at the opposite end to the new TMAP sensor you modified in step #3 above. Attach remaining wire harness (with a three prong connector at the opposite end) to the other new TMAP sensor.
INSTALL:
1) Use extension bar and Philips head socket to remove existing lower TMAP sensor from intercooler pipe in front of the engine. Use a magnetic pickup tool, or other method of securing a bolt while maneuvering it out of place or it may drop inside the cooling fan – don’t be like me and learn this the hard way! Unplug this sensor and set aside.
2) Plug new wire harness with four prong connector into engine connector from previous step.
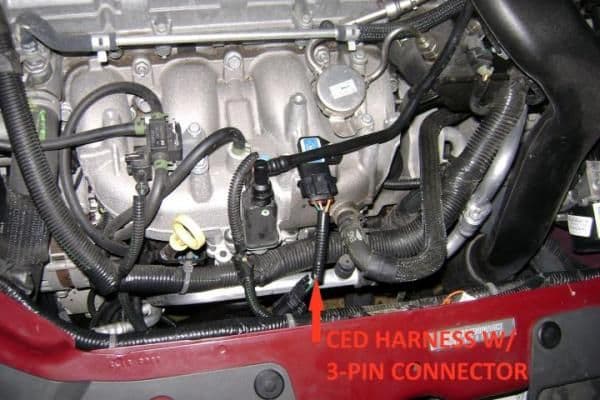
3) Insert new TMAP sensor into intercooler pipe with connector facing towards engine. Route the harness wiring coming out of the sensor towards driver’s side of the engine:
4) Add Loctite to new TMAP bolt from kit, then use it to fasten new TMAP sensor to intercooler pipe (9/32” socket). Again, use a magnetic pickup tool, or other method of securing a bolt while maneuvering it into place. Torque to 2.5 N-m (22 lb-in, or 1.83 ft-lb). I couldn’t tell for sure, but I think these threads on the intercooler pipe may be plastic, so be VERY careful not to over-torque!!
5) Remove bolt(s) from existing MAP sensor on top of engine and remove and unplug sensor.
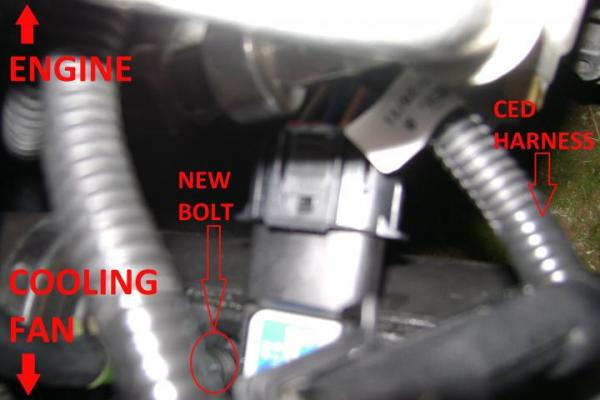
6) Insert remaining new TMAP sensor into top of engine with connector facing away from engine:
7) Add Loctite to the bolt you cleaned up in step #2 from ‘Before the Install,’ then use it to fasten the new TMAP sensor to top of engine. Torque to 10 N-m (89 lb-in, or 7.42 ft-lb).
8) Plug new wire harness with three prong connector into engine connector from previous step.
9) Attach ‘Premium Fuel Required’ to inside of the fuel door and new emissions sticker to underneath the hood next to the current emissions sticker.
AFTER THE INSTALL:
1) Do not drive the car EXCEPT to the dealer for your scheduled ECM flash!!! Drive gently (i.e., stay out of boost). Ignore the check engine light if it turns on while you are driving it. Mine didn’t come on, but it won’t until after the second ignition cycle – and I started mine up after the install and drove straight to the dealer without restarting.
2) When you arrive at the dealer, give them the original instruction booklet from the kit with the proper calibration p/n circled or highlighted on page #5. They will need page #1 included, which has a unique authorization code, as well as a kit serial number that can be found on the outside of the box or on the parts check off sheet included with the kit. So, that is in total three codes/numbers they will need from you.
NOTES:
1) Standard dealer installation charge for entire kit is billed at 2 hours ($88/hr at my dealer). However, I wonder if they would only charge for 1 hour if you hand them these wiring harnesses from CED to use? You will be charged 1 hour already just to have them flash the ECM, but mine was finished in 30 minutes or less, so I wonder if they could’ve squeezed the entire install into that 1 hour they billed me for… in which case there would be no savings in cost when doing any of the install yourself. Anyone who knows the answer to this PM me and I’ll update this post. Either way you do it, what’s left on your factory warranties will remain intact!
2) I used blue Loctite instead of red because I wanted to be able to undo my work in case something got screwed up. This may come back to haunt me some late night when I’m out in the middle of nowhere…
3) If you lose your new TMAP bolt during the install (like I did), another can be ordered from your dealer for around $3 – just give him the part number for the bolt.
4) If you need new or replacement O-rings, you cannot order them from the dealer, but CED has them available for purchase.
(I was looking for them before CED started supplying them, so I asked for help from Bill Duncan, GM HPVO engineer, username More_Torque_More_HP on this forum, who generously supplied me with all the specs I needed. Speaking of Bill, there’s lots of excellent detailed information from him about this GMS1 kit that can be found on GMTunerSource.com .)
5) One of my hesitations with installing this kit was the Premium fuel requirement. However, many who have installed it report a slight increase in MPGs, so that will help offset the added fuel cost. For me, I figure I’m only spending at worst about $70 more per year of ownership in added fuel costs, meaning my total fuel costs go up by only about 6% (again, worst case – meaning, if there’s no improvement in mpg). So, it’s definitely worth it to get that much more enjoyment out of the other 94% of the cash you’re sending off to OPEC anyway. I based this calculation on 10k miles/year, 28mpg, $3.5/gallon regular, $0.20/gallon more for premium. (Ironically, that 6% figure just goes down the higher gas prices go since premium is fixed at about $0.20 more than regular. So, it’s closer to only 4% if regular gas costs as much as $4.5/gallon.)
6) Driving experience so far since installing the kit: the added power feels AMAZING! I didn’t really think this car needed any more power and this kit might be overkill, but this really does take it to a new level of fun. Normal driving, I find first gear seems a little easier to operate smoothly now. This is my first manual tranny and after a year and a half of driving now, I still thought I sucked at getting first gear to operate smoothly a lot of the time. Now it seems a lot easier and if this were the only improvement it would make this kit entirely worth it to be able to better enjoy driving it around town. Other people have reported no difference with 1st gear, so it may just be better suited now to my crappy shifting or something, who knows. The engine has a slight bit more growly sound to it, too. I don’t notice much difference in the sound of the turbo (w/ factory intake), but I think I might be barely hearing the bypass valve go off now which I don’t remember hearing before. Boost now goes up almost to 25 psi.
7) I’m a mechanical engineer and am not afraid to get my hands dirty, but the whole reason I bought a Cobalt SS was to get the most performance straight from the dealer for the lowest cost of ownership amongst the competition (source: Edmunds.com TCO). Adding this kit with the harness from CED is a no-brainer if you’re like me and not looking to hack up and tweak your poor car to death and want to maintain it as factory looking, behaving and warrantied as possible. Win! There have also been many reports from others who have had problems with their GMS1 install because of bad connections in the wiring they spliced together when doing it without CED’s harnesses.
8) Finally, a BIG thanks to Tom from CED, username CrateEngineDepot on this forum, for his extremely professional and generous help with getting me installed and running!
A NEW adapter harness kit for complete plug and play install, exclusively available from CrateEngineDepot.com (CED), makes it so no wire cutting, splicing, or soldering is required anymore! Get in and out from underneath your hood in less than 30 minutes, or save on dealer install costs (see notes at bottom of post)!
p.s. I’m not associated with CED – just a very satisfied customer! This is my first post here on CobaltSS.net, but I’ve been lurking around here since I bought my ’09 Cobalt SS about a year and a half ago. I’ve benefited much thanks to all the generous help of all the other friendly contributors on this forum, so now it’s time for me to give back. (Sorry for the cruddy looking pictures here, though – best my cheap camera could do.)
NOTE: these instructions were written based on my 2009 Cobalt SS. Slight variations exist from these if you are installing on a Solstice or Sky instead (refer to original kit instructions for details). Either way, all you are really doing here with this kit is simply replacing the factory MAP and TMAP sensors with a couple of upgraded TMAP sensors, then flashing the car’s ECM with new programming via your dealer. Simple!
PREPARATIONS:
1) Purchase a 2007-2010 Cobalt, Solstice, Sky, HHR 2.0 LNF Engine Stage 1 Turbo Upgrade Kit, SKU #19212670HK from CrateEngineDepot.com . If you happen to buy the kit from another source, you can still buy CED’s harnesses (pictured below) separately: SKU #19212670H
2) Fill your tank with Premium fuel (required after kit is installed) at your next opportunity before installing the kit.
3) Call your dealer and schedule an appointment for the ECM calibration flash, or if you prefer, to have the entire kit installed. Give them the part number for the kit upon request, i.e., #19212670.
If you’re having your dealer do the entire install for you, then that’s it! Enjoy! Otherwise, continue…
BEFORE THE INSTALL:
1) Gather tools you will need:
-torque wrench capable of as little as 22 lb-in (1.83 ft-lb)
-10mm socket
-9/32” socket (or might be 7mm, I’m not sure)
-18” socket wrench extension bar(s)
-Phillips head socket (or an 18” long Phillips screwdriver lol)
-magnetic pickup tool, or other method of securing a bolt while maneuvering it into/out of place
-dremel tool (preferred), or handheld file and wire brush
-plastic baggie and rubberband (not required but helpful)
-red Loctite 262
-a little clean motor oil
2) Remove one bolt (10mm socket) from MAP sensor on top of engine and clean any thread sealant (Loctite) off of it. A dremel with a wire wheel makes doing this super easy. Replace bolt if you plan to keep driving your car before the install.
3) Take one of the new TMAP sensors, cover the open sensor port by using the plastic baggie and rubberband, then dremel or file off the plastic boss as shown in the before/after picture below. Clean off any plastic filings then remove baggie and rubberband.
4) Remove green O-rings from both of the new TMAP sensors. A small flat tool may be necessary to gently pry them off.
5) Check the new, blue O-rings for any cracks or other damage, then wet each with clean motor oil and slide one onto each of the new TMAP sensors. I was able to use only my fingers to do this. If you must use a tool, be very careful not to scratch or otherwise damage the O-ring!
6) Attach the new CED wire harness which has a four prong connector at the opposite end to the new TMAP sensor you modified in step #3 above. Attach remaining wire harness (with a three prong connector at the opposite end) to the other new TMAP sensor.
INSTALL:
1) Use extension bar and Philips head socket to remove existing lower TMAP sensor from intercooler pipe in front of the engine. Use a magnetic pickup tool, or other method of securing a bolt while maneuvering it out of place or it may drop inside the cooling fan – don’t be like me and learn this the hard way! Unplug this sensor and set aside.
2) Plug new wire harness with four prong connector into engine connector from previous step.
3) Insert new TMAP sensor into intercooler pipe with connector facing towards engine. Route the harness wiring coming out of the sensor towards driver’s side of the engine:
4) Add Loctite to new TMAP bolt from kit, then use it to fasten new TMAP sensor to intercooler pipe (9/32” socket). Again, use a magnetic pickup tool, or other method of securing a bolt while maneuvering it into place. Torque to 2.5 N-m (22 lb-in, or 1.83 ft-lb). I couldn’t tell for sure, but I think these threads on the intercooler pipe may be plastic, so be VERY careful not to over-torque!!
5) Remove bolt(s) from existing MAP sensor on top of engine and remove and unplug sensor.
6) Insert remaining new TMAP sensor into top of engine with connector facing away from engine:
7) Add Loctite to the bolt you cleaned up in step #2 from ‘Before the Install,’ then use it to fasten the new TMAP sensor to top of engine. Torque to 10 N-m (89 lb-in, or 7.42 ft-lb).
8) Plug new wire harness with three prong connector into engine connector from previous step.
9) Attach ‘Premium Fuel Required’ to inside of the fuel door and new emissions sticker to underneath the hood next to the current emissions sticker.
AFTER THE INSTALL:
1) Do not drive the car EXCEPT to the dealer for your scheduled ECM flash!!! Drive gently (i.e., stay out of boost). Ignore the check engine light if it turns on while you are driving it. Mine didn’t come on, but it won’t until after the second ignition cycle – and I started mine up after the install and drove straight to the dealer without restarting.
2) When you arrive at the dealer, give them the original instruction booklet from the kit with the proper calibration p/n circled or highlighted on page #5. They will need page #1 included, which has a unique authorization code, as well as a kit serial number that can be found on the outside of the box or on the parts check off sheet included with the kit. So, that is in total three codes/numbers they will need from you.
NOTES:
1) Standard dealer installation charge for entire kit is billed at 2 hours ($88/hr at my dealer). However, I wonder if they would only charge for 1 hour if you hand them these wiring harnesses from CED to use? You will be charged 1 hour already just to have them flash the ECM, but mine was finished in 30 minutes or less, so I wonder if they could’ve squeezed the entire install into that 1 hour they billed me for… in which case there would be no savings in cost when doing any of the install yourself. Anyone who knows the answer to this PM me and I’ll update this post. Either way you do it, what’s left on your factory warranties will remain intact!
2) I used blue Loctite instead of red because I wanted to be able to undo my work in case something got screwed up. This may come back to haunt me some late night when I’m out in the middle of nowhere…
3) If you lose your new TMAP bolt during the install (like I did), another can be ordered from your dealer for around $3 – just give him the part number for the bolt.
4) If you need new or replacement O-rings, you cannot order them from the dealer, but CED has them available for purchase.
(I was looking for them before CED started supplying them, so I asked for help from Bill Duncan, GM HPVO engineer, username More_Torque_More_HP on this forum, who generously supplied me with all the specs I needed. Speaking of Bill, there’s lots of excellent detailed information from him about this GMS1 kit that can be found on GMTunerSource.com .)
5) One of my hesitations with installing this kit was the Premium fuel requirement. However, many who have installed it report a slight increase in MPGs, so that will help offset the added fuel cost. For me, I figure I’m only spending at worst about $70 more per year of ownership in added fuel costs, meaning my total fuel costs go up by only about 6% (again, worst case – meaning, if there’s no improvement in mpg). So, it’s definitely worth it to get that much more enjoyment out of the other 94% of the cash you’re sending off to OPEC anyway. I based this calculation on 10k miles/year, 28mpg, $3.5/gallon regular, $0.20/gallon more for premium. (Ironically, that 6% figure just goes down the higher gas prices go since premium is fixed at about $0.20 more than regular. So, it’s closer to only 4% if regular gas costs as much as $4.5/gallon.)
6) Driving experience so far since installing the kit: the added power feels AMAZING! I didn’t really think this car needed any more power and this kit might be overkill, but this really does take it to a new level of fun. Normal driving, I find first gear seems a little easier to operate smoothly now. This is my first manual tranny and after a year and a half of driving now, I still thought I sucked at getting first gear to operate smoothly a lot of the time. Now it seems a lot easier and if this were the only improvement it would make this kit entirely worth it to be able to better enjoy driving it around town. Other people have reported no difference with 1st gear, so it may just be better suited now to my crappy shifting or something, who knows. The engine has a slight bit more growly sound to it, too. I don’t notice much difference in the sound of the turbo (w/ factory intake), but I think I might be barely hearing the bypass valve go off now which I don’t remember hearing before. Boost now goes up almost to 25 psi.
7) I’m a mechanical engineer and am not afraid to get my hands dirty, but the whole reason I bought a Cobalt SS was to get the most performance straight from the dealer for the lowest cost of ownership amongst the competition (source: Edmunds.com TCO). Adding this kit with the harness from CED is a no-brainer if you’re like me and not looking to hack up and tweak your poor car to death and want to maintain it as factory looking, behaving and warrantied as possible. Win! There have also been many reports from others who have had problems with their GMS1 install because of bad connections in the wiring they spliced together when doing it without CED’s harnesses.
8) Finally, a BIG thanks to Tom from CED, username CrateEngineDepot on this forum, for his extremely professional and generous help with getting me installed and running!


 02-17-2012, 04:02 PM
#8
New Member
Thread Starter
Join Date: 04-18-10
Location: Ohio
Posts: 10
Likes: 0
Received 0 Likes
on
0 Posts
If you are referring to the step where you remove that plastic boss from one of the new TMAP sensors, then yes, it is necessary. I tried to find a way to do it without that step, but it's not possible - at least not on the Cobalts. There's a plastic boss on the intercooler pipe that sticks up and won't allow the new sensor to mount flush without mod'ing the sensor this way. I suppose you could try to remove the boss on the pipe instead, but that would be more work than mod'ing the sensor.
 12-14-2012, 07:40 PM
#11
New Member
Thread Starter
Join Date: 04-18-10
Location: Ohio
Posts: 10
Likes: 0
Received 0 Likes
on
0 Posts
12-14-2012, 07:45 PM
#12
New Member
Thread Starter
Join Date: 04-18-10
Location: Ohio
Posts: 10
Likes: 0
Received 0 Likes
on
0 Posts
12-19-2012, 07:59 PM
#13
New Member
Thread Starter
Join Date: 04-18-10
Location: Ohio
Posts: 10
Likes: 0
Received 0 Likes
on
0 Posts
Can't figure out how to edit my original post, so here's updated links from that post:
Specifics on GMS1
19212670HK at CED
19212670H at CED
O-rings at CED
Specifics on GMS1
19212670HK at CED
19212670H at CED
O-rings at CED
 05-14-2013, 08:15 AM
#15
New Member
Thread Starter
Join Date: 04-18-10
Location: Ohio
Posts: 10
Likes: 0
Received 0 Likes
on
0 Posts
Sorry, missed your post until now. I read someone say that will happen, but it didn't seem to happen to me. However, I drove it real careful straight to the dealer just a few miles away right after installing the sensors.
07-27-2013, 10:21 PM
#16
New Member

Join Date: 12-03-12
Location: Pennsylvania
Posts: 2
Likes: 0
Received 0 Likes
on
0 Posts
my boost is erratic with this system... avg 20.2-22.4 psi spikes to 22.8-23.2 but never 25. i do have the digital read out, more accurate or less... dont know. anyways runs great most the time... some days better then others.
07-30-2013, 12:25 AM
#17
New Member
Thread Starter
Join Date: 04-18-10
Location: Ohio
Posts: 10
Likes: 0
Received 0 Likes
on
0 Posts
08-27-2013, 03:16 PM
#18
New Member

Join Date: 08-27-13
Location: wisconsin
Posts: 4
Likes: 0
Received 0 Likes
on
0 Posts
limp mode?
How can you tell if there was a reflash done? With this kit 19212670 besides the sticker? I Just got the car and 20 days later lots of codes and goes into limp mode clear codes drives fine for days then codes start popping back in then limp mode. did check for intercooler and hose leaks looks ok.thanks
08-30-2013, 11:12 PM
#19
New Member
Thread Starter
Join Date: 04-18-10
Location: Ohio
Posts: 10
Likes: 0
Received 0 Likes
on
0 Posts
How can you tell if there was a reflash done? With this kit 19212670 besides the sticker? I Just got the car and 20 days later lots of codes and goes into limp mode clear codes drives fine for days then codes start popping back in then limp mode. did check for intercooler and hose leaks looks ok.thanks
I've heard others who didn't use this kit having all sorts of problems due to bad or corroded solders of the wires, but since this kit doesn't require soldering, perhaps it's a loose or bad connector.
09-02-2013, 11:25 AM
#20
New Member

Join Date: 11-10-12
Location: Godfrey,Il
Posts: 3
Likes: 0
Received 0 Likes
on
0 Posts
Ok,so I've had the car since November of last year,and have been learning about these cars since then,the GMS1 had previously been installed prior to me buying the car, has been throwing the P0236 for awhile now,and been slowly trying to find out what the problem is,recently performed a boost leak test,thought i'd found the problem,but wasen't it,so just today I pulled the bottom MAP out,and after reading about the O-ring problem,I looked and low and behold there was a green one still on there,so i ordered 2 just in case the top one needs one also,also there what looks to be grey silicone on the bottom of the sensor,like it wasn't sealing or something,my question is is the silicone needed on these sensors,or should i peel it off and just put it back on?,and could this be the problem of the code it's throwing?
Thanks
Thanks
09-04-2013, 07:03 PM
#21
New Member
Thread Starter
Join Date: 04-18-10
Location: Ohio
Posts: 10
Likes: 0
Received 0 Likes
on
0 Posts
I don't recall seeing anything like that - post a picture of it, perhaps? Also, you can compare with the pics of the sensors I put in my original post, if that helps...
09-16-2013, 09:43 AM
#22
Senior Member
iTrader: (1)

Join Date: 07-23-08
Location: Plymouth, WI
Posts: 1,104
Likes: 0
Received 0 Likes
on
0 Posts
Step 3 may not apply if your not using the stock intercooler piping. My ZZP pipe is smooth so they sensors fit tight and flush so I didnt need to remove the plastic. ZZP also sell the 3bar map sensors and harnesses with correct washers already on them. Link below.
GM ACDelco - GM Stage 1 Sensors #
GM ACDelco - GM Stage 1 Sensors #
09-16-2017, 12:04 AM
#24

Step 3 may not apply if your not using the stock intercooler piping. My ZZP pipe is smooth so they sensors fit tight and flush so I didnt need to remove the plastic. ZZP also sell the 3bar map sensors and harnesses with correct washers already on them. Link below.
GM ACDelco - GM Stage 1 Sensors #
GM ACDelco - GM Stage 1 Sensors #
09-16-2017, 12:31 PM
#25

Yes, the sensors are the same ones a GM dealer would install. I think I might have had to use a washer for the screw to secure it in place but didn't have to file down anything.

Thread
Thread Starter
Forum
Replies
Last Post
Sean Cummings
Problems/Service/Maintenance
34
03-09-2018 12:26 AM