Appearance: How To: Install SS/SC Front and Rear Lip on ss/na!!!
#76
Makesure the clip picture is the "c" looking clip. The picture for the front bumper lower deflector shows a pic of the clip. It would be the same for the rear. Don't remember calling them "lower deflector retainer nut" Isnt that for the area at the ends of the bumper or the middle area where it connects to the area where the ss/na grille connects? Oh btw for you guys doing this project your gonna need more than just the 14 clips
#79
Senior Member
iTrader: (2)
Join Date: 11-24-07
Location: Waldorf, Maryland
Posts: 3,210
Likes: 0
Received 0 Likes
on
0 Posts
So, my rear and front lip are both installed and painted. My shop is waiting for the paint to dry overnight and then the bumpers are being put back on tomorrow. I saw both rear and front bumpers today with the lips attached and I can't wait to get rid of this rental base Cobalt. I just want mine back! 
#80
Senior Member
iTrader: (1)
Join Date: 12-16-07
Location: S.A
Posts: 4,442
Likes: 0
Received 0 Likes
on
0 Posts
So, my rear and front lip are both installed and painted. My shop is waiting for the paint to dry overnight and then the bumpers are being put back on tomorrow. I saw both rear and front bumpers today with the lips attached and I can't wait to get rid of this rental base Cobalt. I just want mine back! 
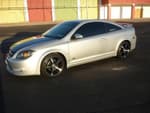
now it looks like this..

#83
Senior Member
iTrader: (1)
Join Date: 10-23-05
Location: Pittsburgh, PA
Posts: 8,761
Likes: 0
Received 0 Likes
on
0 Posts
So, if you're lazy and you don't want to take the bumper off, you CAN still install the front lip. I just did. lol. I didn't have a Dremel either. I used a basic drill. lol. Sounds insane, but it worked. As an FYI. If you want more details, post or pm.
#85
Senior Member
iTrader: (1)
Join Date: 10-23-05
Location: Pittsburgh, PA
Posts: 8,761
Likes: 0
Received 0 Likes
on
0 Posts
Nope, the outside. Still jacked the car up a bit so I wasn't lying down while doing it. If you look closely on the 2.4 front bumper, there is a little line that spans the width of the bumper. It's the same line that's "marked" inside. So I just took a few stabs at it and tried getting the positions right. After a few missed attempts, it all fit in well. I had a slight problem initially with it being centered, but I got it worked out. Looks great. I don't even actually have any of those 12 clips in at the moment (waiting for them in the mail), but I have the 4 pieces under the grille fastened, as well as the 4 on either side. It hasn't moved at all, even after highway driving. I noticed you can throw most of the clips in from inside the bumper by simply removing both headlights only. You can see them right inside there. So I will do that as soon as they come in. I can throw up a few pics if you'd like. I don't have any of the holes I drilled, but that was a pain. lol. Obviously very ghetto-fabbed, but it worked. I simply drilled holes where I wanted the tabs to fit in, then just connected and smoothed them all so the tabs fit in. I used a drill bit very slightly bigger than the tab it's self so it was snug. Hey, it worked. So who cares? lol I'd say with great certainty that it took longer that way, but with select tools, you do what you have to.. It all fits nicely and is in the correct positioning. And not to mention it looks sexy now.. haha Much more complete than the stock set-up..
I even used the time to also blackout my a and c pillars..
I even used the time to also blackout my a and c pillars..
#86
Wait! You drilled in the bumper blindedly. You said you took a few stabs at it? Did you look at the tabs on the lip and measured them on the bumper. Sounds like you eyeballed
#87
Senior Member
iTrader: (1)
Join Date: 10-23-05
Location: Pittsburgh, PA
Posts: 8,761
Likes: 0
Received 0 Likes
on
0 Posts
That's basically what I did. I just more or less duct taped the lip to the bumper - under the little line. Then marked about how big I needed each tab to be right on the line. I then drilled each hole, connected all holes, and smoothed each section inside as well. After doing this for each one, it slid right in. Ass backwards, but I was on a time restraint, and I couldn't risk any complications with bumper removal/reinstallation. Had to leave for work. lol.
#96
New Member
Join Date: 03-02-08
Location: Columbus Oh.. Ohio State University
Posts: 123
Likes: 0
Received 0 Likes
on
0 Posts
I just ordered the parts .. Grills, Front lip and back.. Next step is to get them painted and attached... Does anyone have the Part # ? It was never given
#100
Senior Member
Thread Starter
Join Date: 09-10-06
Location: CLEVELAND, OHIO
Posts: 1,891
Likes: 0
Received 0 Likes
on
0 Posts
Haven't been on here in a long time, was checking out the photos from this thread on my new Christmas gift (iPad!). Have a lot of you guys done this now? Happy holidays, cheers!

