Appearance: How To: Install new quarter window
#1
New Member
Thread Starter
Join Date: 05-01-07
Location: California
Posts: 83
Likes: 0
Received 0 Likes
on
0 Posts
Awhile back my driverside quarter window got broken. I won't say how, but just know that it involved a fight and flying alcohol bottles and a very lucky aim.
I called some glass shops and it turns out that for a new window, installed was around $365!
Next stop ebay.... I found one from a G5 for $35 shipped.
So then the glass shop said around $100 to install that one. Me, being the do-it-yourselfer that I am, decided to install it myself. I figured if for no other reason than to give you guys a good write up, save some money and an excuse to buy window weld and fill my stock tranny mounts.
DISCLAIMER: If you have any doubts that you are able to do this, then let a pro do it. I'm not responsible if your window falls out on you. Also, don't be a ******* like me and go out to do this in flip flops and khaki shorts. You will step on glass and get hurt.
LIST OF MATERIALS:
Masking Tape
Razor Blade (2 or 3 of them)
3M Window Weld ($17 at autozone, look in the RTV section)
Windex
Paper Towels or regular Towels
1 Broken window
1 replacement window
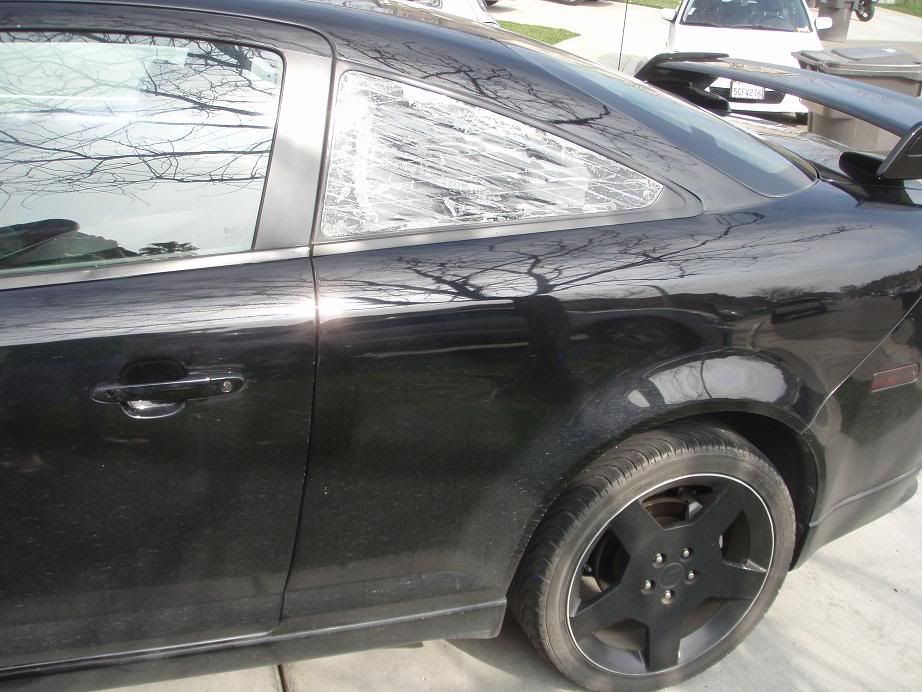
So here it is. This is the window, taped up with packing tape. I'm embarassed to say how long I drove around like this, but just know that it works extremely well for way too long.
If your window gets broken, do this asap. It kept water and moisture out of my car for a LONG time, even in rainy and snowy conditions.

The first step is to remove the backseat so you don't fill it with anymore glass or accidently drip eurathane in it. This is pretty simple. I didn't take pics, but you basically lift up the back edge of the seat first, then you push horizontal and rearward on the front of the seat to release the latches. Then it lifts out.
Next is to remove the old window. If you were doing this with a good window that wasn't broken, you would need special tools to do it without messing up the car or the window.
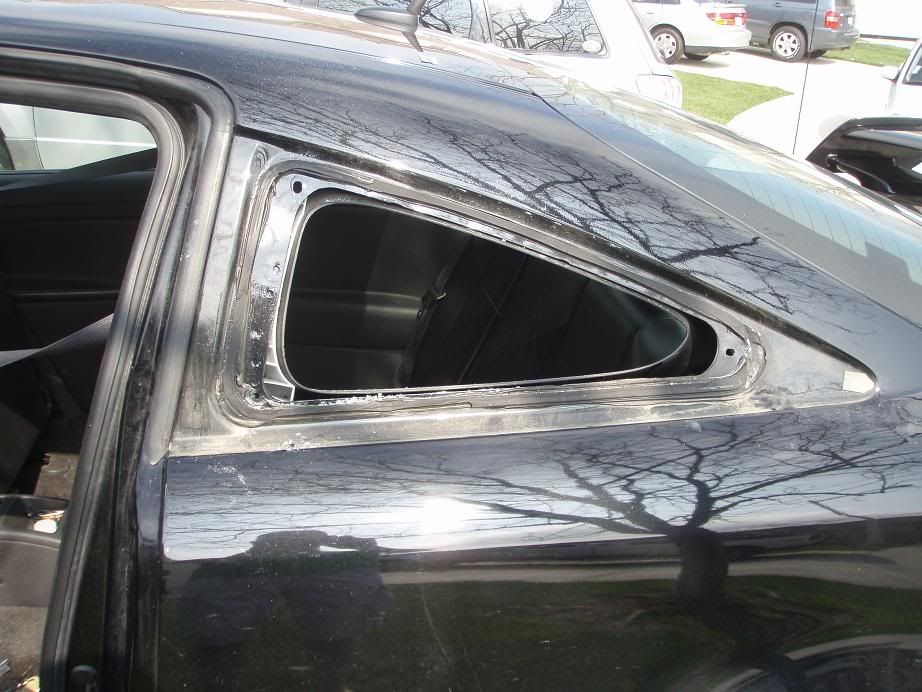
But, since mine was broken already, I just grabbed the rear corner and pulled, cutting eurathane with a razor blade as I went. After it gets started, you can just rip it off. But beware, this will make it start raining glass. So, be careful. Once it is out, you will have a layer of old eurathane around the hole. Like this:

You need to leave some of this on the car. The Window Weld will bond to it and use it to seal the new window. I basically took a razor blade and trimmed 2/3 of it off. I left a bead about an 1/8 thick all the way around.
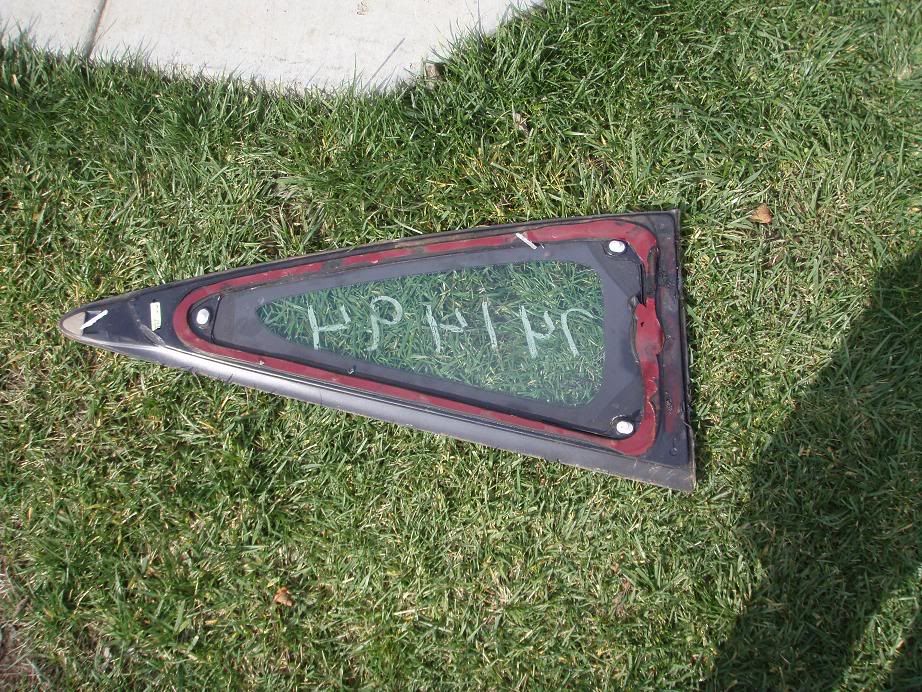
Since my new window is out of a wrecked G5, it has some old eurathane left on it as well. It appears to have been removed by a professional using some sort of tool that melts the eurathane as it cuts it. I don't think there was much left on the G5, because there is red paint left on the window, which tells me they cut it pretty close to the metal.

I'm assuming that Window Weld won't stick to red paint, so I also trimmed about 2/3 of the eurathane off the window. If you read the directions on the can of Window Weld, it says to leave some of the original eurathane on both sides to give it something to bond to.
I didn't get pics of the next couple steps because I didn't want to handle my camera after my hands got messy.
Then I dry fitted the window in the car, to make sure I cut down enough eurathane that the window would sit all the way down where its supposed to. There are plastic clips on the back of the window that lock the window in place, so be careful not to seat it all the way down, or you'll have to fight with them to pull it back off. If the two halves of the eurathane are hitting, you need to trim more off. Just keep trimming until it sits nice and tight.
The next step is to clean both surfaces. I just used windex and a rag. Pretty simple.
Then I took some wide masking tape and layed it down on the quarter panel in case I dripped Window Weld.
Then I took my caulking gun and layed down a bead of Window Weld around the new window. I just layed it right on top of what was already there. I did the same on the car. Each bead was about 1/4 inch thick. I used my finger to push it down into low spots where I cut more off, etc.
Then I took the window and seated it, VERY CAREFULLY. Once the two halves of eurathane touch each other, you are going to have a mess on your hands if you try to pull it back apart. That is why the dry fit step is important.
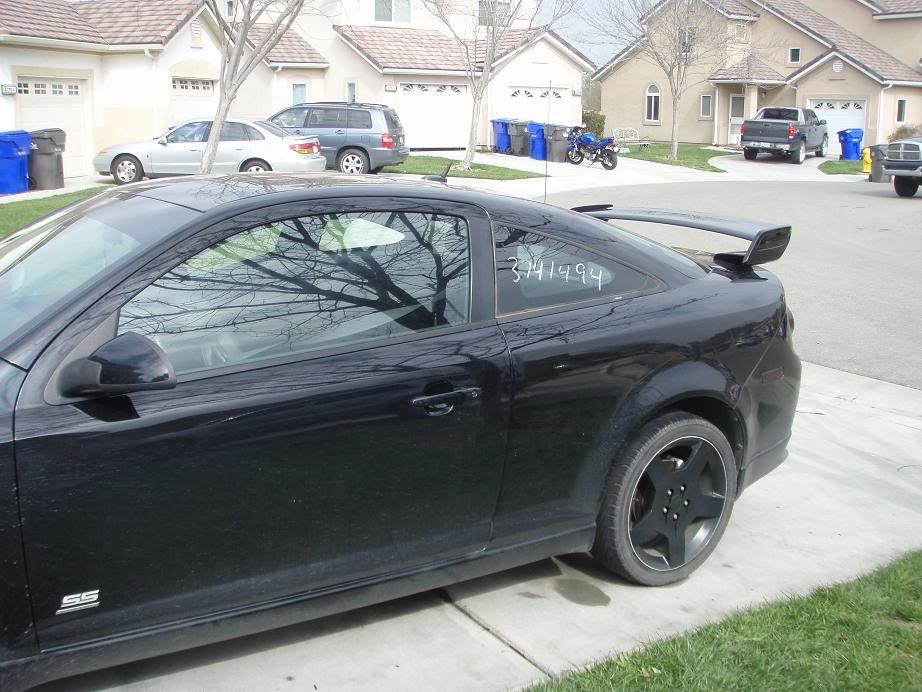
Keep some direct pressure for a couple minutes and make sure you pressed hard enough to engage the plastic clips that hold the window in. It should look like this when you're done.

Wait 24 hours before washing it and enjoy!
I called some glass shops and it turns out that for a new window, installed was around $365!
Next stop ebay.... I found one from a G5 for $35 shipped.
So then the glass shop said around $100 to install that one. Me, being the do-it-yourselfer that I am, decided to install it myself. I figured if for no other reason than to give you guys a good write up, save some money and an excuse to buy window weld and fill my stock tranny mounts.
DISCLAIMER: If you have any doubts that you are able to do this, then let a pro do it. I'm not responsible if your window falls out on you. Also, don't be a ******* like me and go out to do this in flip flops and khaki shorts. You will step on glass and get hurt.
LIST OF MATERIALS:
Masking Tape
Razor Blade (2 or 3 of them)
3M Window Weld ($17 at autozone, look in the RTV section)
Windex
Paper Towels or regular Towels
1 Broken window
1 replacement window
So here it is. This is the window, taped up with packing tape. I'm embarassed to say how long I drove around like this, but just know that it works extremely well for way too long.
If your window gets broken, do this asap. It kept water and moisture out of my car for a LONG time, even in rainy and snowy conditions.

The first step is to remove the backseat so you don't fill it with anymore glass or accidently drip eurathane in it. This is pretty simple. I didn't take pics, but you basically lift up the back edge of the seat first, then you push horizontal and rearward on the front of the seat to release the latches. Then it lifts out.
Next is to remove the old window. If you were doing this with a good window that wasn't broken, you would need special tools to do it without messing up the car or the window.
But, since mine was broken already, I just grabbed the rear corner and pulled, cutting eurathane with a razor blade as I went. After it gets started, you can just rip it off. But beware, this will make it start raining glass. So, be careful. Once it is out, you will have a layer of old eurathane around the hole. Like this:

You need to leave some of this on the car. The Window Weld will bond to it and use it to seal the new window. I basically took a razor blade and trimmed 2/3 of it off. I left a bead about an 1/8 thick all the way around.
Since my new window is out of a wrecked G5, it has some old eurathane left on it as well. It appears to have been removed by a professional using some sort of tool that melts the eurathane as it cuts it. I don't think there was much left on the G5, because there is red paint left on the window, which tells me they cut it pretty close to the metal.

I'm assuming that Window Weld won't stick to red paint, so I also trimmed about 2/3 of the eurathane off the window. If you read the directions on the can of Window Weld, it says to leave some of the original eurathane on both sides to give it something to bond to.
I didn't get pics of the next couple steps because I didn't want to handle my camera after my hands got messy.
Then I dry fitted the window in the car, to make sure I cut down enough eurathane that the window would sit all the way down where its supposed to. There are plastic clips on the back of the window that lock the window in place, so be careful not to seat it all the way down, or you'll have to fight with them to pull it back off. If the two halves of the eurathane are hitting, you need to trim more off. Just keep trimming until it sits nice and tight.
The next step is to clean both surfaces. I just used windex and a rag. Pretty simple.
Then I took some wide masking tape and layed it down on the quarter panel in case I dripped Window Weld.
Then I took my caulking gun and layed down a bead of Window Weld around the new window. I just layed it right on top of what was already there. I did the same on the car. Each bead was about 1/4 inch thick. I used my finger to push it down into low spots where I cut more off, etc.
Then I took the window and seated it, VERY CAREFULLY. Once the two halves of eurathane touch each other, you are going to have a mess on your hands if you try to pull it back apart. That is why the dry fit step is important.
Keep some direct pressure for a couple minutes and make sure you pressed hard enough to engage the plastic clips that hold the window in. It should look like this when you're done.

Wait 24 hours before washing it and enjoy!
Last edited by TommyP; 10-03-2012 at 12:30 PM. Reason: forgot to add list of required materials
#5
Senior Member
iTrader: (2)
Join Date: 05-10-08
Location: Kure Beach, NC
Posts: 11,788
Likes: 0
Received 0 Likes
on
0 Posts
so the molding around that window is all apart of the glass and cannot be removed correct? im curious as im repainting my car and wanted to know if I can take that window moldin goff or if I have to mask it up
#6
New Member
Thread Starter
Join Date: 05-01-07
Location: California
Posts: 83
Likes: 0
Received 0 Likes
on
0 Posts
Thats right, the rubber trim around the window is in fact attached to the glass. You can't take it off.
Thanks for the props guys, I appreciate it. It took some time to convince the wife that I wouldn't screw it up. I told her that if I messed it up, or it leaked, etc. That I would never again tinker with my car.
So, luckily for me, it worked out. It has rained several times since I've finished it, and I've logged about 500 miles. So far no water or air leaks, and it hasn't fallen out yet... So that is good.
Thread
Thread Starter
Forum
Replies
Last Post


