Appearance: HOW TO: TINT YOUR LIGHTS in 10 steps
 05-31-2006, 02:34 AM
#1
HOW TO: TINT YOUR LIGHTS in 10 steps
EDIT: FINAL PICS ADDED --- Also added pics of Braking during the day and at night with the tinted lights
Alright ladies, today I’m going to teach you how to tint your friggen lights so you will stop asking how! This can be applied to tail lights, side markers or even to add eyelids to your headlights. I strongly recommend removing the lights from the car before tinting and I would not recommend this strategy for tinting your windows. Make sure you’re doing this in a well ventilated area so you do not die from the fumes.
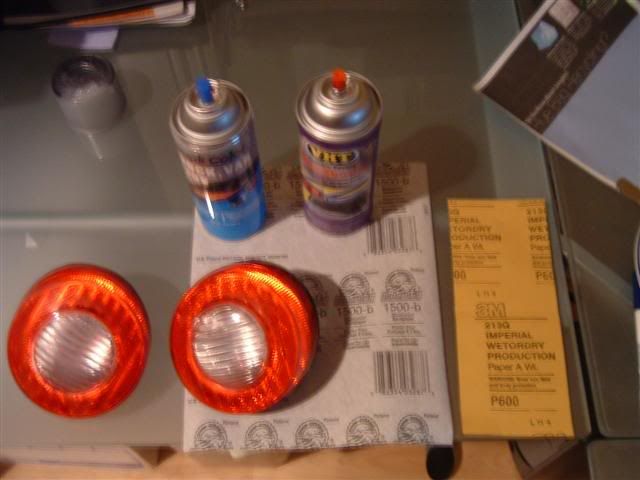
Materials Needed:
1. Nightshades or Krylon Crystal Clear Translucent Spraypaint
2. Duplicolor Clear Coat
3. 1500-2000 Grit Sandpaper (optional)
4. 600 Grit Sandpaper
5. Paper towels
6. Painters Tape
7. Soapy sponge
8. Ventilated area.

forums//showthread.php?t=22207"]Click Here to See the Differences Between the VHT Nite Shades and the Krylon Crystal Clear Tint Spray[/SIZE]
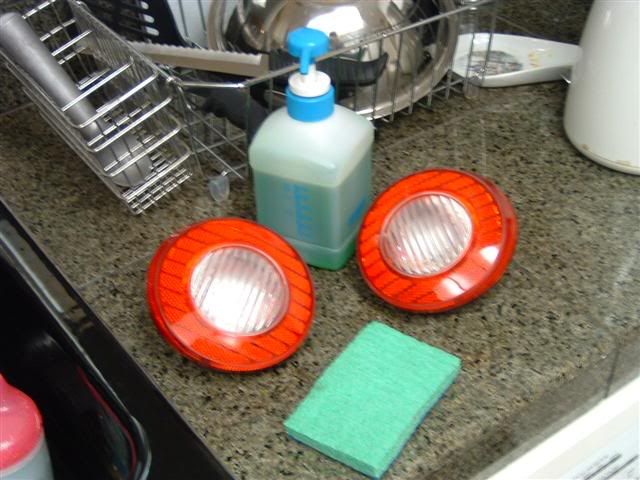
Step 1: Using the Soapy sponge scrub the lights clean. Wipe all traces of the soap off with a damp rag. Be sure not to get the electrical components wet.
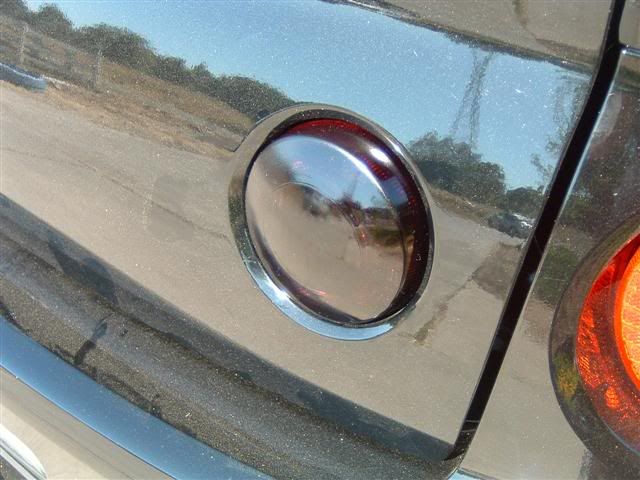
Step 2: Using the 600 grit sandpaper, evenly sand the light in the desired areas you wish to tint.

Step 3: Use the wet rag to wipe away any plastic debris removed during the sanding process.
Step 4: Tape off any areas on the lights you do not wish to be tinted. (Not applied to this specific tinting session) The use of a sharp razorblade works wonders when making precise cuts.
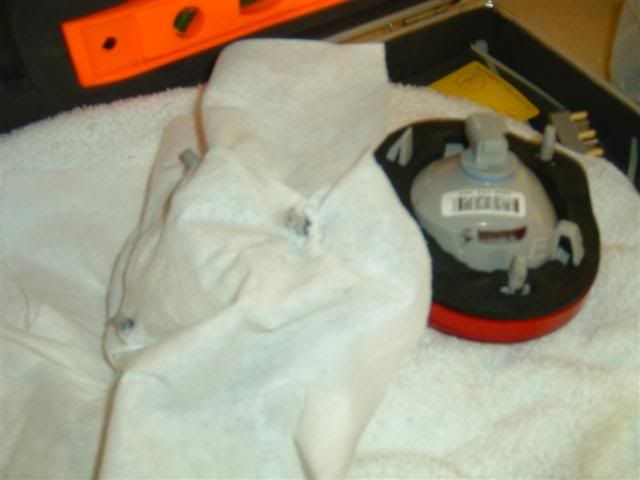
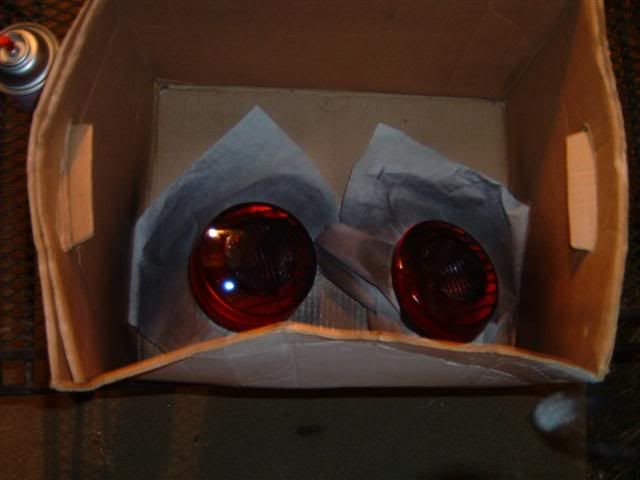
Step 5: Tape a paper towel or newspaper or whatever (or just jam it through the protruding plastic apparatuses such as I did) around the parts/pieces of the lights you do not wish to be painted (i.e. the back housing of the lights)
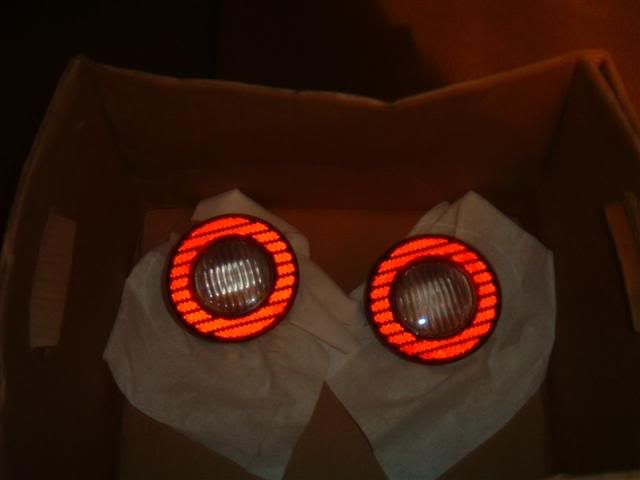
Step 6: Place the lights in an area you don’t give a **** about (large cardboard box or lying newspaper down works well if you don’t want to get paint on your floor/table)
Step 7: Shake dat ****…. Shake your tint spray for about a good minute or so to make sure the spray is evenly mixed and not pasty. Once you are done making crude gestures with the can, you may now apply the tint.
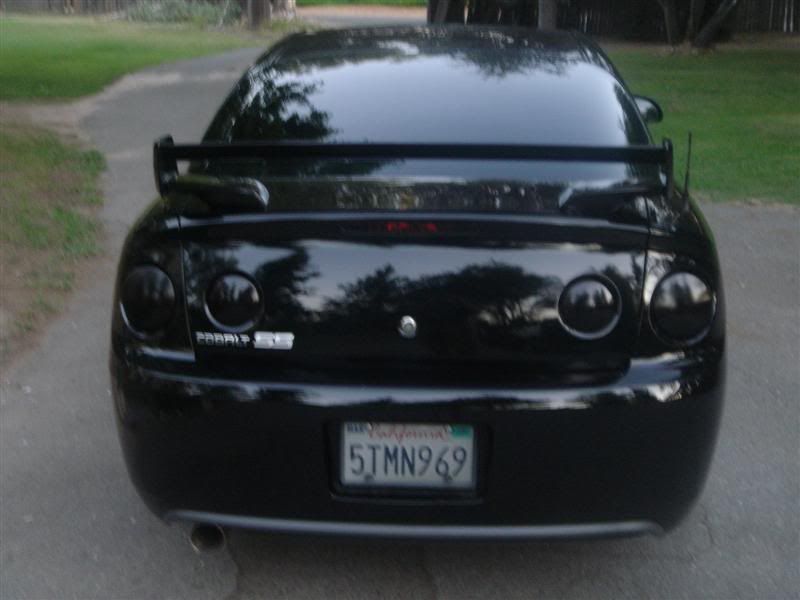
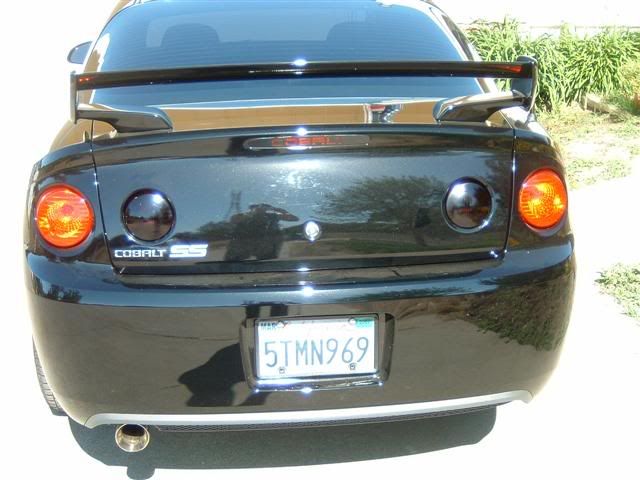
Step 8: Hold the can UPRIGHT… approximately 12-15inches away from the lights and with a steady fanning motion apply a basic coat. Don’t go too thick on the coats. After you are done with your first coat, the lights should look something like this:
Step 9: wait approximately 15-20 minutes between each coat and sand with 1500-2000 grit sandpaper… if desired…. To remove any imperfections in the paint job (dust specs, shitty paint job, etc.) Apply as many coats as you wish until desired darkness is reached.
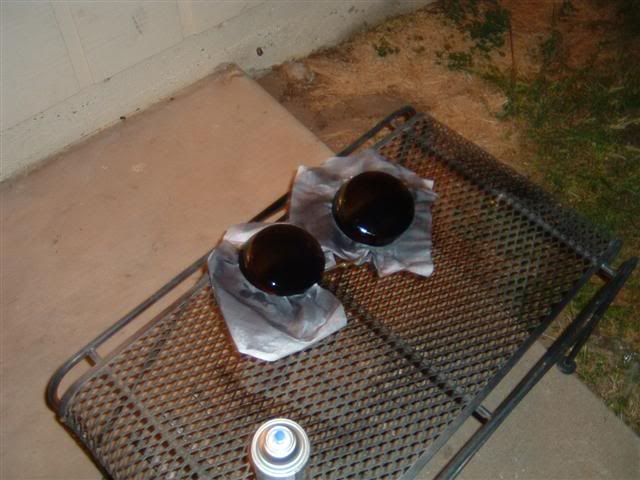
Step 10: after letting the final coat of nightshades dry for 30 minutes or so, apply clear coat in the same manner as the tint spray. I’d recommend a good 2-3 coats of clear coat. Let the lights dry for a few hours after the process is complete. You may now reinstall your lights!
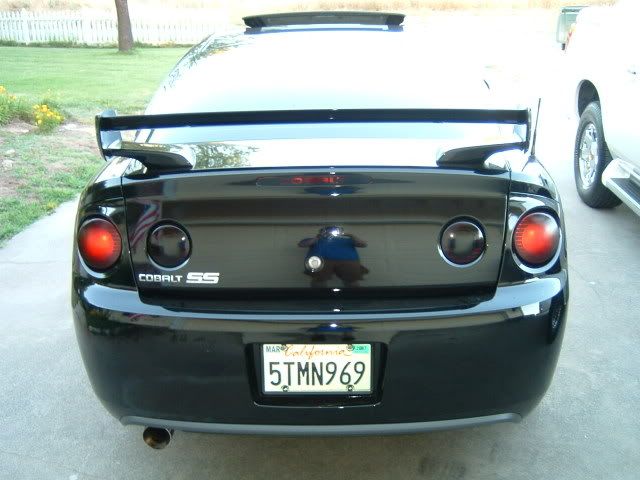
Brake lights during they day:
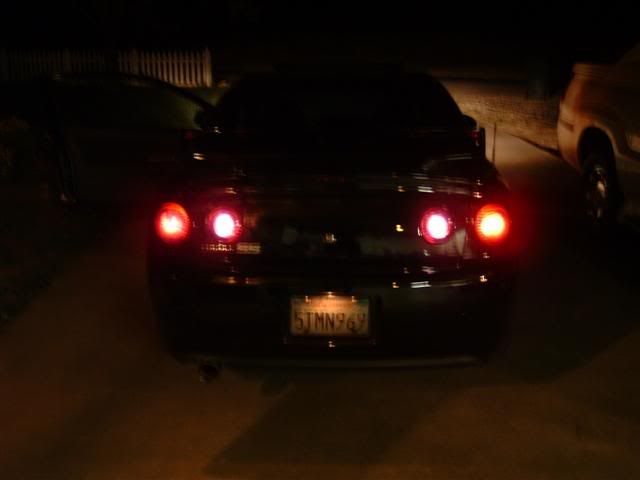
Brake lights and reverse lights at night
The clearcoat allows you to wax the lights just as if they were part of the body and adds a nice shine.
Note: tinting your taillights and side markers is most likely illegal in your state/province. Do not come bitching at me if you get pulled over and issued a fix it ticket.
Alright ladies, today I’m going to teach you how to tint your friggen lights so you will stop asking how! This can be applied to tail lights, side markers or even to add eyelids to your headlights. I strongly recommend removing the lights from the car before tinting and I would not recommend this strategy for tinting your windows. Make sure you’re doing this in a well ventilated area so you do not die from the fumes.
Materials Needed:
1. Nightshades or Krylon Crystal Clear Translucent Spraypaint
2. Duplicolor Clear Coat
3. 1500-2000 Grit Sandpaper (optional)
4. 600 Grit Sandpaper
5. Paper towels
6. Painters Tape
7. Soapy sponge
8. Ventilated area.
forums//showthread.php?t=22207"]Click Here to See the Differences Between the VHT Nite Shades and the Krylon Crystal Clear Tint Spray[/SIZE]
Step 1: Using the Soapy sponge scrub the lights clean. Wipe all traces of the soap off with a damp rag. Be sure not to get the electrical components wet.
Step 2: Using the 600 grit sandpaper, evenly sand the light in the desired areas you wish to tint.
Step 3: Use the wet rag to wipe away any plastic debris removed during the sanding process.
Step 4: Tape off any areas on the lights you do not wish to be tinted. (Not applied to this specific tinting session) The use of a sharp razorblade works wonders when making precise cuts.
Step 5: Tape a paper towel or newspaper or whatever (or just jam it through the protruding plastic apparatuses such as I did) around the parts/pieces of the lights you do not wish to be painted (i.e. the back housing of the lights)
Step 6: Place the lights in an area you don’t give a **** about (large cardboard box or lying newspaper down works well if you don’t want to get paint on your floor/table)
Step 7: Shake dat ****…. Shake your tint spray for about a good minute or so to make sure the spray is evenly mixed and not pasty. Once you are done making crude gestures with the can, you may now apply the tint.
Step 8: Hold the can UPRIGHT… approximately 12-15inches away from the lights and with a steady fanning motion apply a basic coat. Don’t go too thick on the coats. After you are done with your first coat, the lights should look something like this:
Step 9: wait approximately 15-20 minutes between each coat and sand with 1500-2000 grit sandpaper… if desired…. To remove any imperfections in the paint job (dust specs, shitty paint job, etc.) Apply as many coats as you wish until desired darkness is reached.
Step 10: after letting the final coat of nightshades dry for 30 minutes or so, apply clear coat in the same manner as the tint spray. I’d recommend a good 2-3 coats of clear coat. Let the lights dry for a few hours after the process is complete. You may now reinstall your lights!
Brake lights during they day:
Brake lights and reverse lights at night
The clearcoat allows you to wax the lights just as if they were part of the body and adds a nice shine.
Note: tinting your taillights and side markers is most likely illegal in your state/province. Do not come bitching at me if you get pulled over and issued a fix it ticket.
Last edited by Beck; 09-03-2006 at 05:05 PM.


 05-31-2006, 07:26 PM
#11
Originally Posted by biniecki
i did all 4 lights in the back and the 2 reflectors with just one can
 05-31-2006, 08:23 PM
#15
Senior Member

Join Date: 07-11-05
Location: Yonkers NY
Posts: 1,122
Likes: 0
Received 0 Likes
on
0 Posts
Originally Posted by JackD
If you put less coats of the night shades on will you get less of a tent?
I want just a touch of a tent yours are darker than what I want.
I want just a touch of a tent yours are darker than what I want.
06-02-2006, 01:48 AM
#19
****update*****
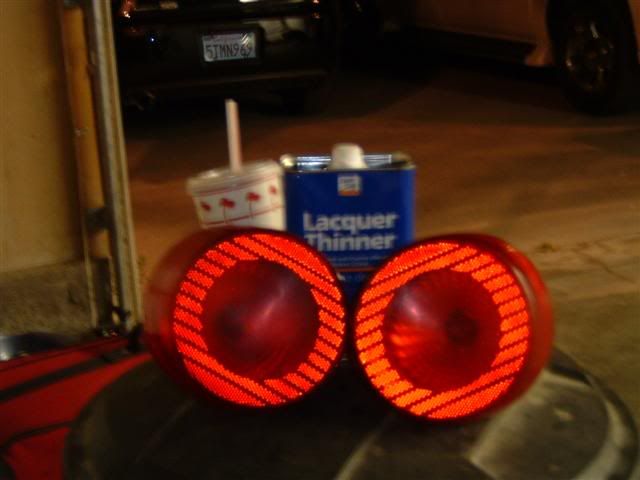
K i tinted the brake lights and a ****** bug landed in them and fucked the whole thing up. I went to home depot, bought some lacquer thinner and applied it to the tinted brake lights with a rag and the tint came off easily.
Here's a pic of both lights tinted and me in reverse
the light still shines through and mine were freakin dark. However i left the 3rd brake light untinted for safety reasons
Here's the lacquer thinner i used and the outcome of the tail lights after detinting. They look good as new (and my in-n-out cup ):
):
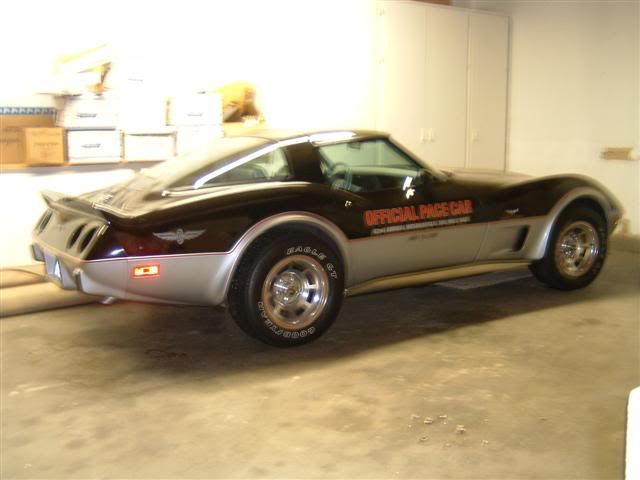
and here's a random shot of the stingray vette 25th anniversary indy 500 pace car sittin in my garage:
Here's a pic of both lights tinted and me in reverse
the light still shines through and mine were freakin dark. However i left the 3rd brake light untinted for safety reasons
Here's the lacquer thinner i used and the outcome of the tail lights after detinting. They look good as new (and my in-n-out cup
):and here's a random shot of the stingray vette 25th anniversary indy 500 pace car sittin in my garage:


