
Interior: HOW TO: Vinyl Wrap Tim


Thread Starter
Senior Member
Joined: 08-05-06
Posts: 1,552
Likes: 0
From: long island
HOW TO: Vinyl Wrap Trim
Tools you will need
-Vinyl (whatever color or style you want)
- razor
- screwdriver
- blow dryer
First remove the trim piece you want to cover use a screw driver to remove the clips holding it on, tug hard on in
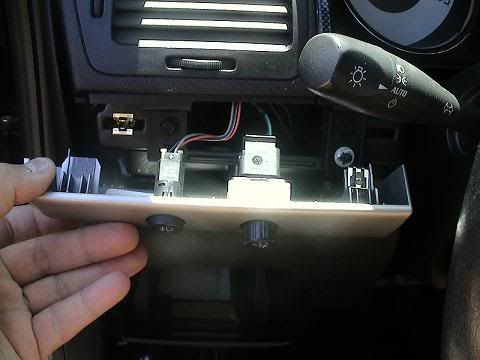
Disconnect all the wiring and remove the buttons
Next cut out a piece of vinyl larger than the piece that you are covering

Place it loosely on top of the piece you are going to cover
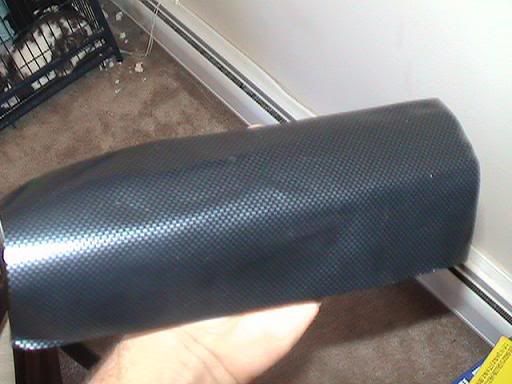
Using a blow dryer shrink the vinyl around the piece. Keep moving the blow dryer as to not melt the vinyl

It will look like this.. Push out any air bubbles that may be under the vinyl. Also smooth it out over the surface by heating the piece up with the blow dryer
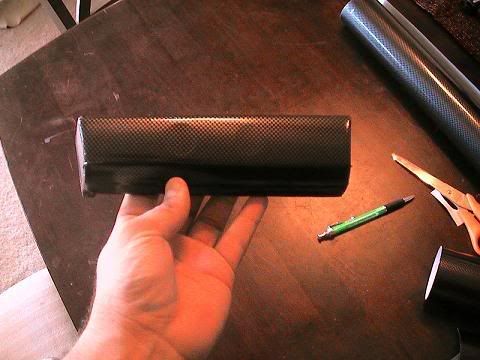
Now trim off any extra you may have remember to wrap it behind the back of the piece first so that all ends are covered.. Heat the ends up to stretch it over so it doesn�t bind up
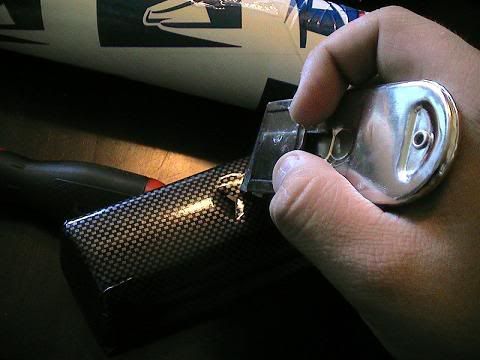
Using a razor cut slits into the holes where the buttons were and using the blow dryer push the flaps inside

Install the buttons and heat the vinyl back up to shrink the vinyl around the edges of the buttons
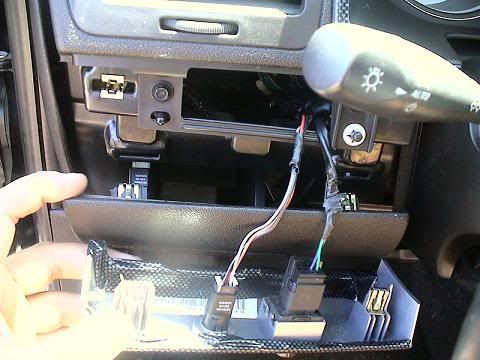
Rein tall the trim piece, just push hard to get the clips back in..I pulled out the bottom trim piece so that it will fit better
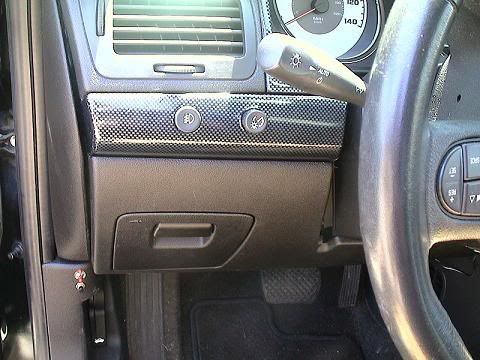


Here is the finial product . If you see any more air bubbles use a pin and poke a small hole in the vinyl and push out the air.. Next I will be clear coating it. Also the radio trim pieces will take a long time took me about 45min to and hour wrapping and trimming all the buttons
I like it and that�s all that matters so please don�t bash I think it looks a lot better than my old CF trim kit that I bought online that only covered parts of the trim pieces..
-Vinyl (whatever color or style you want)
- razor
- screwdriver
- blow dryer
First remove the trim piece you want to cover use a screw driver to remove the clips holding it on, tug hard on in
Disconnect all the wiring and remove the buttons
Next cut out a piece of vinyl larger than the piece that you are covering
Place it loosely on top of the piece you are going to cover
Using a blow dryer shrink the vinyl around the piece. Keep moving the blow dryer as to not melt the vinyl
It will look like this.. Push out any air bubbles that may be under the vinyl. Also smooth it out over the surface by heating the piece up with the blow dryer
Now trim off any extra you may have remember to wrap it behind the back of the piece first so that all ends are covered.. Heat the ends up to stretch it over so it doesn�t bind up
Using a razor cut slits into the holes where the buttons were and using the blow dryer push the flaps inside
Install the buttons and heat the vinyl back up to shrink the vinyl around the edges of the buttons
Rein tall the trim piece, just push hard to get the clips back in..I pulled out the bottom trim piece so that it will fit better
Here is the finial product . If you see any more air bubbles use a pin and poke a small hole in the vinyl and push out the air.. Next I will be clear coating it. Also the radio trim pieces will take a long time took me about 45min to and hour wrapping and trimming all the buttons
I like it and that�s all that matters so please don�t bash I think it looks a lot better than my old CF trim kit that I bought online that only covered parts of the trim pieces..
Last edited by TommyP; May 23, 2012 at 01:38 PM.

Thread Starter
Senior Member
Joined: 08-05-06
Posts: 1,552
Likes: 0
From: long island
ive had it on for about 3 1/2 months and i havent had any problems and my car is NEVER in the shade.. if you feel like it may come off you can apply anytype of spray glue to the back side of it
Thread Starter
Senior Member
Joined: 08-05-06
Posts: 1,552
Likes: 0
From: long island
lol HAHAHH i NEVER noticed that lol i'll se if i can change that ... HAHAHAH ROFL
ok all fixed
ok all fixed
Last edited by c0baltic; Jul 12, 2007 at 10:35 PM. Reason: Automerged Doublepost

New Member
Joined: 07-21-07
Posts: 7
Likes: 0
From: NJ
pep boys here doesn't have it, i ended up getting marine grade leather (vinyl) from a fabric shop. turned out really nice, just requires a little more patience because you don't just stick it on, you have to glue it on the back.


Senior Member
Joined: 01-09-07
Posts: 740
Likes: 0
From: dallas, texas
hey can you give me a link to what you bought so i can read the description about it so i can get maybe the same thing because that sure looks nice. Theres alot of stuff on ebay so i just want to make sure im getting the same material that you got.
Thread Starter
Senior Member
Joined: 08-05-06
Posts: 1,552
Likes: 0
From: long island


Banned
Joined: 09-13-06
Posts: 1,696
Likes: 0
From: USA
i might get some from murrays. nice
hey can u get a close up shot of the center trim piece. the murrays stuff is only so wide and long and wont cover the whole thing.
hey can u get a close up shot of the center trim piece. the murrays stuff is only so wide and long and wont cover the whole thing.
Last edited by Delta2.2; Aug 23, 2007 at 06:54 PM. Reason: Automerged Doublepost

Senior Member
Joined: 05-24-07
Posts: 703
Likes: 0
From: Calgary, Alberta, Canada
Follow up question:
On Your climate controls I've seen the new 07's with the black climate controls - did you paint yours and just tape off the symbols? I ask cause they look different hence why I was curious cause I've been toying with that idea as well since its really not a hard thing to do.
On Your climate controls I've seen the new 07's with the black climate controls - did you paint yours and just tape off the symbols? I ask cause they look different hence why I was curious cause I've been toying with that idea as well since its really not a hard thing to do.
Thread Starter
Senior Member
Joined: 08-05-06
Posts: 1,552
Likes: 0
From: long island
It was done with one peice.. i just cit and X into the middle and wrapped it under then trim.. no seams what so ever.. and as for the climet control i cheated on that i have the stock silver trim but what i used, was my old Cf overlays i bought from some no name company.. it wa alot easier than cutting it out

Thread
Thread Starter
Forum
Replies
Last Post