Appearance: Make HALO LED Replacement bulbs.
 03-02-2010, 02:34 AM
#1
Senior Member
Thread Starter
iTrader: (2)

Join Date: 05-30-08
Location: Strongsville OHIO
Posts: 1,409
Likes: 0
Received 0 Likes
on
0 Posts
Make HALO LED Replacement bulbs.
10 easy steps to making replacement Halo LED bulbs.
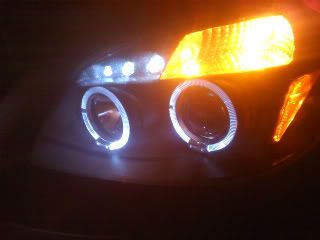
My projectors were sold to me in "perfect working condition"... all the halos were bunt out...the only place selling these online wants $25 plus shipping per bulb, so i decided to make my own.
Tools:
Needle-nose plyers ( with dire cutters or another tool to splice wires)
electrical tape
scissors
Required: purchase at least 8 3mm LED bulbs of your color choice. I decided to go bright white to match my eyelid LEDs. I bought 30 of them on ebay for $5 shipped from Hong Kong.
1.) Remove the halo wiring harness, rubber headlight seals and small rubber peice that holds the stock bulb. set aside or toss the factory bulb, it is no longer needed.


2.) Make sure you have the rubber headlight seals and small ribber peices on each pair of wires.

3.) Thread the wires through the small rubber peice that holds the stock bulb. to do so, cut the slits of the rubber peice, make them wider, in order to get them through. once the wires are through, splice them and set everything aside for now.

4.) Take out two 3mm LEDs, test them to see which prong works with which wire color, In my case the longer prong worked with the white wire and the shorter prong worked with the black wire to complete a curcuit... VERY IMPORTANT because it will not work the other way there is a positive and negative and has to be matched up with the positive and negative wire to work.

5.) Take two of the same sides (both positive or both negatives) and bend them.

6. Twist them to secure them tightly together.

7. Twist the spliced wire around the prongs, make sure you are using the correct corresponding wire, secure the spliced wire by benging up the end tips of the prongs. this way if you are pulling on them during installation they will not slip out. (do this for both sides)

8. Tape the wires, making sure there isnt any bare wire so the negative and positive wont touch

9. Bend and form to represent the stock bulb with each LED facing away from one another, push the wires back down into the small subber peice (this is where it really helps to have the slits for the wire cut to allow the peice to slide up easily.

10. Go wire them up and install them.
My projectors were sold to me in "perfect working condition"... all the halos were bunt out...the only place selling these online wants $25 plus shipping per bulb, so i decided to make my own.
Tools:
Needle-nose plyers ( with dire cutters or another tool to splice wires)
electrical tape
scissors
Required: purchase at least 8 3mm LED bulbs of your color choice. I decided to go bright white to match my eyelid LEDs. I bought 30 of them on ebay for $5 shipped from Hong Kong.
1.) Remove the halo wiring harness, rubber headlight seals and small rubber peice that holds the stock bulb. set aside or toss the factory bulb, it is no longer needed.
2.) Make sure you have the rubber headlight seals and small ribber peices on each pair of wires.
3.) Thread the wires through the small rubber peice that holds the stock bulb. to do so, cut the slits of the rubber peice, make them wider, in order to get them through. once the wires are through, splice them and set everything aside for now.
4.) Take out two 3mm LEDs, test them to see which prong works with which wire color, In my case the longer prong worked with the white wire and the shorter prong worked with the black wire to complete a curcuit... VERY IMPORTANT because it will not work the other way there is a positive and negative and has to be matched up with the positive and negative wire to work.
5.) Take two of the same sides (both positive or both negatives) and bend them.
6. Twist them to secure them tightly together.
7. Twist the spliced wire around the prongs, make sure you are using the correct corresponding wire, secure the spliced wire by benging up the end tips of the prongs. this way if you are pulling on them during installation they will not slip out. (do this for both sides)
8. Tape the wires, making sure there isnt any bare wire so the negative and positive wont touch
9. Bend and form to represent the stock bulb with each LED facing away from one another, push the wires back down into the small subber peice (this is where it really helps to have the slits for the wire cut to allow the peice to slide up easily.
10. Go wire them up and install them.
Last edited by TommyP; 10-03-2012 at 12:30 PM.


Thread
Thread Starter
Forum
Replies
Last Post
DANRICKARD
Problems/Service/Maintenance
8
10-01-2015 12:08 AM