Appearance: Paint Chip and Scratch Repair
 04-01-2006, 04:15 PM
#1
Senior Member
Thread Starter
Join Date: 05-20-05
Location: Brampton, Ontario
Posts: 2,009
Likes: 0
Received 0 Likes
on
0 Posts
OK guys the cure to the cancer of flying or stones.
I found this stuff called Langka ( LANGKA Paint Chip and Scratch Repair )
I must say this stuff is incredible. I've tried tons of things and ways to fix these paint chips, and the only methods that actually come out half decent are the ones that take FOREVER to do.
that is until I found this stuff and gave it a try. and I must say, beautiful and smooth, only the actual chip was painted when i was finished.
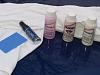
here is what you you need:
1. Factory Paint ( bought at any dealer )
2. Clean tightly woven cloth, ( I use an old T-Shirt )
3. Langka repair Kit ( bought at the link provided above )
Steps:
01. First clean the area which needs to be repaired ( soup and water and make sure to rinse well )
02. Dry off car ( I love Mr. Clean Auto-dry )
03. Sparingly apply Pre-paint solution to small area of the cloth, and clean area where the chip or deep scratch is located.
Before


04. With clean area or separate cloth dry these areas.
05. Shake the factory touch up paint very well before use.
06. Apply a large drop of paint over the chip.
**** don't be afraid, don't worry about the paint outside the chip or scratch. your goal is to ensure that there is enough paint over the chip, so that when the paint dries, it has still filled the chip completely.
( as you can see once i saw that it worked I got out of hand and fixed every one I saw )


07. I found for best results, let the paint dry for 2 day's ( but if you must get it done sooner 3 hours is enough time to let it completely dry)
08. Know take the provided plastic card from the kit, and place it in the cloth.
***** make sure the surface if smooth ei: no wrinkles
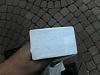
09. Apply a small blob of "The Blob Eliminator" on the cloth wrapped card
10. Rub over touched up surface in a circular motion until touch up paint is no longer on the factory paint.
add more Blob Eliminator if the surface starts to dry ( you shouldn't need to much )
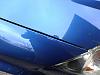
11. Once the surface is smooth and the touch up paint is smooth with the factory paint, clean off repaired surface with a clean area of the cloth.
After

12. Next take the paint sealer apply sparingly to a clean cloth
13. Apply paint sealer to repaired areas, and let it dry like you would with a wax,
14. Clean off paint sealer with clean cloth ( lightly buff if you like )
if you want further protection you can wax the car after 24 hours.
and now your baby is Beautiful again.
Special Notes:
Metallic Paints
For all of us with Metallic paints, this repair is a little more of a bitch. basically if you want a perfect job, so that you won't see the repaired, we must apply a light coat of paint let it dry for an 1/2 hour, then apply another, and let it dry until the paint chip is filled. then complete steps 7 on.
now if you just want ti fill the chip to protect the car it is not necessary, I only suggest this for purely cosmetic reasons.
if you look at the pictures under step 11 you can see how much darker thick blobs of the metallic paint dries.
Rust
If you have rust signs where the chip is, go out and buy a fiber glass Pen, this will allow you to clean out the rust without damaging the good Paint around the chip or scratch. do this before you start Step 1.
like I said this stuff is amazing, and you don't even have to try hard to paint, be lazy and put a blob and it will look great when finished.
Hope you guy's will enjoy this stuff as much as I do.
I found this stuff called Langka ( LANGKA Paint Chip and Scratch Repair )
I must say this stuff is incredible. I've tried tons of things and ways to fix these paint chips, and the only methods that actually come out half decent are the ones that take FOREVER to do.
that is until I found this stuff and gave it a try. and I must say, beautiful and smooth, only the actual chip was painted when i was finished.
here is what you you need:
1. Factory Paint ( bought at any dealer )
2. Clean tightly woven cloth, ( I use an old T-Shirt )
3. Langka repair Kit ( bought at the link provided above )

Steps:
01. First clean the area which needs to be repaired ( soup and water and make sure to rinse well )
02. Dry off car ( I love Mr. Clean Auto-dry )
03. Sparingly apply Pre-paint solution to small area of the cloth, and clean area where the chip or deep scratch is located.
Before


04. With clean area or separate cloth dry these areas.
05. Shake the factory touch up paint very well before use.
06. Apply a large drop of paint over the chip.
**** don't be afraid, don't worry about the paint outside the chip or scratch. your goal is to ensure that there is enough paint over the chip, so that when the paint dries, it has still filled the chip completely.
( as you can see once i saw that it worked I got out of hand and fixed every one I saw )


07. I found for best results, let the paint dry for 2 day's ( but if you must get it done sooner 3 hours is enough time to let it completely dry)
08. Know take the provided plastic card from the kit, and place it in the cloth.
***** make sure the surface if smooth ei: no wrinkles

09. Apply a small blob of "The Blob Eliminator" on the cloth wrapped card
10. Rub over touched up surface in a circular motion until touch up paint is no longer on the factory paint.
add more Blob Eliminator if the surface starts to dry ( you shouldn't need to much )
11. Once the surface is smooth and the touch up paint is smooth with the factory paint, clean off repaired surface with a clean area of the cloth.
After


12. Next take the paint sealer apply sparingly to a clean cloth
13. Apply paint sealer to repaired areas, and let it dry like you would with a wax,
14. Clean off paint sealer with clean cloth ( lightly buff if you like )
if you want further protection you can wax the car after 24 hours.
and now your baby is Beautiful again.

Special Notes:
Metallic Paints
For all of us with Metallic paints, this repair is a little more of a bitch. basically if you want a perfect job, so that you won't see the repaired, we must apply a light coat of paint let it dry for an 1/2 hour, then apply another, and let it dry until the paint chip is filled. then complete steps 7 on.
now if you just want ti fill the chip to protect the car it is not necessary, I only suggest this for purely cosmetic reasons.
if you look at the pictures under step 11 you can see how much darker thick blobs of the metallic paint dries.
Rust
If you have rust signs where the chip is, go out and buy a fiber glass Pen, this will allow you to clean out the rust without damaging the good Paint around the chip or scratch. do this before you start Step 1.
like I said this stuff is amazing,
and you don't even have to try hard to paint, be lazy and put a blob and it will look great when finished. Hope you guy's will enjoy this stuff as much as I do.
Last edited by TommyP; 05-19-2012 at 09:01 PM.
 04-01-2006, 05:01 PM
#4
Senior Member
Join Date: 10-08-05
Location: AZ
Posts: 5,295
Likes: 0
Received 0 Likes
on
0 Posts
Very nice. I might have to order that for my mom. She go some pretty nasty chips on hers from freeway construction, and the dealer gave her a small jar of the factory touch up already.
04-01-2006, 05:06 PM
#5
Senior Member

Join Date: 08-17-05
Location: albany OR
Posts: 741
Likes: 0
Received 0 Likes
on
0 Posts
After. Your post was vary informative. I get a lot of chips because I drive a lot and Oregon is famous for paint chips. I will more then likly have to get some parts painted do to the sand blasting affect I get.
04-01-2006, 05:29 PM
#6
Senior Member
Thread Starter
Join Date: 05-20-05
Location: Brampton, Ontario
Posts: 2,009
Likes: 0
Received 0 Likes
on
0 Posts
lol I know what what you mean, I do a lot of highway driving, and these trucks toss up everything.
hell when I had my cavi, i had a cement truck start spraying a cement mist while he was driving. it took me weeks to get it all off my car
hell when I had my cavi, i had a cement truck start spraying a cement mist while he was driving. it took me weeks to get it all off my car

 04-03-2006, 07:59 AM
#9
Senior Member
Join Date: 03-30-06
Location: Exit 29, NY
Posts: 3,014
Likes: 0
Received 0 Likes
on
0 Posts
This is awsome. I have never seen anything fill in chips that good. I mean u cant even tell. Totally awsome find. Luckily I dont have any chips on my brand new 06*Knock on wood*
later
later
 04-03-2006, 08:26 AM
#12
Senior Member
Thread Starter
Join Date: 05-20-05
Location: Brampton, Ontario
Posts: 2,009
Likes: 0
Received 0 Likes
on
0 Posts
if you run your nail across it, and it catches then yes.
it needs to be deep enough for the paint to fill.
but for surface scratch your probably better off wet sanding the area.
it needs to be deep enough for the paint to fill.
but for surface scratch your probably better off wet sanding the area.
04-03-2006, 08:28 AM
#13
Banned

Join Date: 03-30-05
Posts: 6,980
Likes: 0
Received 0 Likes
on
0 Posts
Originally Posted by player_1
if you run your nail across it, and it catches then yes.
it needs to be deep enough for the paint to fill.
but for surface scratch your probably better off wet sanding the area.
it needs to be deep enough for the paint to fill.
but for surface scratch your probably better off wet sanding the area.

 04-26-2006, 10:22 PM
#15
Senior Member

Join Date: 06-05-05
Location: Fort Collins, CO
Posts: 2,303
Likes: 0
Received 0 Likes
on
0 Posts
I'm not that impressed by this "Kit". There are still dimples in the paint where the chips were or the new paint is a slightly different color. This is why a clear bra is worht its money.
05-02-2006, 12:11 AM
#16
Senior Member

Originally Posted by Chevypowered
I'm not that impressed by this "Kit". There are still dimples in the paint where the chips were or the new paint is a slightly different color. This is why a clear bra is worht its money.
05-02-2006, 08:02 AM
#17
Senior Member
Thread Starter
Join Date: 05-20-05
Location: Brampton, Ontario
Posts: 2,009
Likes: 0
Received 0 Likes
on
0 Posts
I'm surprised that you said that there were dimple left over the chip.
did you use the card and a tightly woven cloth, the blod eliminator should have completly removed all the excess paint, in fact if you don't pay attention you'll remove all the paint the you used to fill the chip.
as far as the clour goes, there is very little you can do, but at least, you've filled the chips and you don't have to worry about rusting there.
anyone else use this yet?
05-02-2006, 08:40 AM
#19
Senior Member

Join Date: 01-15-05
Location: Ottawa
Posts: 5,126
Likes: 0
Received 0 Likes
on
0 Posts
Nice job Playa, I just wish GM would have put on higher quality paint so we don't have as many problem with paint as we do. The front of my car looks sand blasted and I stay off gravel and dirt road and avoid trunks on the highway like the plague.
05-02-2006, 08:42 AM
#20
Senior Member
Join Date: 06-05-05
Location: Fort Collins, CO
Posts: 2,303
Likes: 0
Received 0 Likes
on
0 Posts
Originally Posted by biniecki
Well he said he did a quick job and just put alot of paint on at once. If you do many small coats it should turn out better. Im thinking about trying this for $50 compared to paying around $450 to have my bumper repainted. Also i hate bras. I had one on a thunderbird and it did more damage to the paint than what wouldve happened with out it. Will never put a bra on another car. If you plan to keep it on for the life of your car then they are ok but i personally dont want to do that.
Clear bras are virtually invisible and peel off when you don't want them any more. I love the result from the two cars i've had them on and wouln't own a car without it.
05-02-2006, 09:20 AM
#21
Senior Member
Thread Starter
Join Date: 05-20-05
Location: Brampton, Ontario
Posts: 2,009
Likes: 0
Received 0 Likes
on
0 Posts
I've never been crazy about the clear bras.
first if you get a cheap one, they start to turn yellow on you, but if you spend the money and get a good one that doesn't fade, you have the problem my parents had, wher the paint under the bra is like new( which is great ) but the paint that is not covered fade wit hall the weather and sun damage, and then you have two shades of your colour.
and the bug deflector / rock gaurds, don't help much either.
thats why I decided not to get any of those, and just put that money to repainting my car in a couple of years.
the repair kit is mainly to cover the big chips and scratches so the car doesn't start to rust.
05-07-2006, 11:33 AM
#22
Senior Member
Join Date: 01-02-05
Location: Winnipeg, MB
Posts: 833
Likes: 0
Received 0 Likes
on
0 Posts
Cool beans!
I've got a paint chip that was on my car when I took delivery. Been wrestling with the dealer to fix it, and they're going to, but taking it to them and giving up my car for a day for just a chip is a pain in the ass. Looks like they already tried to touch it up once with touch up paint but it's flaking out and some of the chip is exposed again.
Do you think I'm safe to try to pre-clean the area with maybe a soft toothbrush and get out what I can, go crazy with the touch up paint and then use this kit to remove the excess? I'm worried about new touch up paint not wanting to stick to any old touch up paint that's already in the chip.
I'll just tell the dealer they can give me some free touch up paint instead of having to fix it and I'll do it myself
 05-11-2006, 10:18 AM
#24
Senior Member
Thread Starter
Join Date: 05-20-05
Location: Brampton, Ontario
Posts: 2,009
Likes: 0
Received 0 Likes
on
0 Posts
if you do it yourself, buy a fiberglass pen, from Canadian Tire ( if the the chip has been exposed for long period of time) and sand it with the pen so your sure you've removed the oxidized surface.
rinse it real well then use the cleaner and a cloth over the chip.
then go crazy with the paint, and let it dry for a couple of days. then finish it off with the rest of the pic's. Post a before and after pic if you like as well.
rinse it real well then use the cleaner and a cloth over the chip.
then go crazy with the paint, and let it dry for a couple of days. then finish it off with the rest of the pic's. Post a before and after pic if you like as well.
05-29-2006, 07:12 PM
#25
Member

Join Date: 05-19-05
Location: Bethlehem, PA
Posts: 224
Likes: 0
Received 0 Likes
on
0 Posts
so has anyone else used this stuff yet? The threads been dead for a couple weeks but instead of acting like the proverbial 'noob' i actually did a search!!! I got a mean paint chip on the front of my hood, have no idea what do with it or whether or not I can get the dealer to fix it up cheap. Give me some opinions of this product or other ideas.