2.4 LE5 Engine: How To: Beck’s 2.4L Supercharged Build Walkthrough
 10-16-2007, 02:30 PM
#1
Beck’s LE5 Supercharged Build Walkthrough
Big thanks to Ethan, Thurman, Dave, Chris, Crystal, Jim, Pat, Rebel Autoworx, Senior Brown and Dan for their help with the install and tuning of this monster
Parts List:
Eaton M62 Supercharger
Supercharger Gasket
Stock LSJ Intake Manifold
Intake Manifold Bottom Mount
Intake Manifold Gasket (Part #12597855)
2.5 Bar Map/Intake Temp Sensor (on upper left of LSJ manifold)
2.5 Bar Pigtail (Part #88988320)
Bosch/LSJ Intercooler Pump
Intercooler Pump Wiring Pigtail or Butt Connecters
Intercooler Pump Mounting Bracket (rebelautoworx.com)
Cobra Heat Exchanger (Used from a 03 Mustang Cobra)
Cobra Heat Exchanger Brackets (custom or bwoodyperformance.com)
42.5# Injectors (recommended)
Injector Harness
Wideband Air/Fuel Ratio Gauge (THIS IS NOT AN OPTIONAL ITEM!!!)
Boost/Vacuum Gauge
Stage 2 Belt (Part# 12597993; requires one rib be cut off)
Custom Idler Pulley with Mounting Bracket (rebelautoworx.com)
Extended Upper Radiator Hose
Coolant Reservoir Tank (Cobalt or Ion Recommend)
NGK Copper Spark Plugs (Part# LFR6A-11)
SS/SC intake
10ft. x ľ” I.D. Hose
10ft x Ľ” I.D. Hose
4ft. x ˝” I.D. Hose
Small and Large Hose clamps.
3 x 1/8th NPT Ľ” Barb Fittings
Self Tapping Sheet Metal Screws (Mounting H/E brackets)
6M 25mm Bolts
6M 90mm Studs with Locking Nuts
8M 50mm Bolts
Water Wetter Coolant
1/8th NPT Drill Tap
21/64th Drill bit (for the 1/8th tap)
20 gauge wiring
Zip Ties
Electrical Tape
Plastic Wiring Sleeves
Optional:
LSJ Throttle Body (requires rewiring)
Aero Force Interceptor Gauge
Gauge Pillar
Oil Pressure Gauge
Notes:
• A 2 bar map sensor will work instead of a 2.5 bar map sensor, however the 2.5 bar map sensor from the LSJ will also read intake manifold temps.
• Stock LSJ Injectors will work not work for this setup. The IDC will be too high.
• The stock LSJ belt may also be used with this setup, however it may require a larger idler pulley and there is no guarantee on the fitment of the larger idler on the rebel bracket.
• I’ve heard that the stock LE5 Injector harness will work with the 42.5lb Injectors however I cannot confirm this.
Tool List:
Wrench Set
Spark Plug Socket
Drill with Assorted Bit Sizes.
Soldering Iron (optional)
Screwdrivers
Jack
2x Jack Stands
Creeper (optional)
Grinding Tool
Vice Grips
Box Knife
Teflon Tape
Allen keys
Clearing up some Common Misconceptions:
1. You DO NOT need the LSJ Alternator for this setup, however you will need to cut one rib off the stage two belt
2. You’ll need to rewire the Throttle Body pigtail if you decide to use the LSJ throttle Body. (see below for how to)
3. This is not a BOLT ON, this setup will require a tune, and is unsafe to even attempt to drive if it is not tuned.
Preparation:
1. I highly recommend removing the front bumper, headlights, headlight mounting brackets, front wheels and fender lining, REMOVAL OF THESE ITEMS ARE UP TO YOU TO FIGURE OUT, HOWEVER THEY’RE ALL PRETTY SIMPLE.
2. If you plan on using a LSJ intake you will need to remove the windshield wiper fluid reservoir from the driver’s side fender.
3. You will need to cut open the stock engine wiring harness and relocated the MAF and Throttle Body Wires to the other side of the engine compartment. Allow Plenty of slack in the wiring, they can always be tucked away later.
4. I also would recommend setting up two tables in your workspace. The first with all the items that need to go on the car, and the second for the items you take off the car.
5. Stock the fridge with drinks and snacks, this will take a while!
6. If you are not already using fully synthetic motor oil, you should probably switch over before installing your supercharger. The LE5 requires 5 quarts of 5W-30
Removal of stock components will be up to you (intake/intake manifold/throttle body/etc) if you cannot figure these out you should hire a professional to install this kit.
STEP ONE: Replacing the Spark Plugs
• Using a 10mm Wrench, remove the four bolts securing the coil packs (one bolt for each coil pack)
• Next, remove the coil packs from the valve cover
• Using a spark plug deep socket, an extension and a ratchet, remove one spark plug at a time. After removing one, immediately replace it with the NGK Copper Plugs. Tighten firmly.
• After all four spark plugs have been replaced, reinsert the coil packs into the valve cover and retighten then four 10mm bolts holding them in place.
STEP TWO: Replacing the Injectors
• Using a 10mm Socket, remove the two bolts on the fuel rail.
• Carefully pull up on either end of the fuel rail and wiggle slightly. The Fuel rail along with all four injectors should pop out.
• Remove the wiring harness and the metal clips around the top of each injector
• Lay a towel down over the engine and hold the fuel rail over a small bucket. Wiggle the bottom most injector while pulling and it should pop right out. Let the excess fuel from the fuel rail drain into the bucket.
• Once the fuel rail has drained, remove the rest of the injectors in the same manner as the first.
• Lube the o-rings on the new injectors with motor oil. After oiling, insert one injector at a time into the fuel rail.
• Once all four of the new injectors are in the fuel rail, reinstall the metal securing clips and plug in your new wiring harness to each injector.
• DO NOT reinstall the fuel rail back into the engine at this time, as it will need to come out in order to put the supercharger on the intake manifold, so it is best to just set it aside in the engine compartment.
STEP THREE: Installing the Lower Intake Manifold
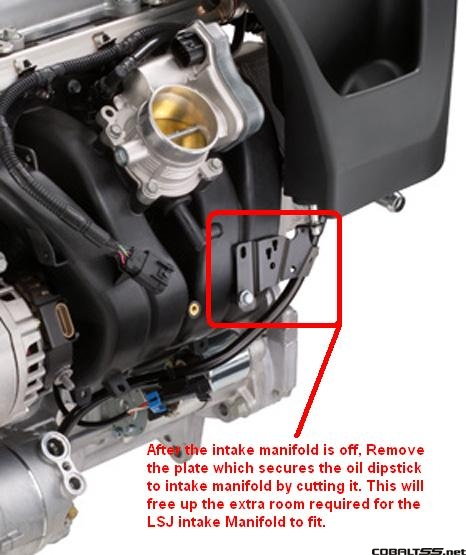
• With the stock intake manifold out, cut off the bracket that attaches the dipstick to the old LE5 intake manifold. (This will get in the way of the new intake manifold if not removed)
• Next, you will need to take the lower intake manifold mounting bracket and drill the upper two (non threaded) holes larger (I cannot remember the drill bit size, but the hole needs to be large enough to fit an 8M bolt)
• Once these holes are drilled you will need to bolt the bracket to the engine using the two 8M bolts listed in the parts section.
• Next slide the intake manifold along with its gasket into place. The bottom of the intake manifold should line up with the bracket. Once the intake manifold is properly positioned with its gasket, insert the two 6m studs into the lower middle holes of the flange.
STEP FOUR: Installing and Wiring the Intercooler Pump
Pretty simple. On the front of the block under the intake manifold there will be a few holes that will match up with the mounting bracket. INstall the back side of the bracket first, then place the pump in the bracket, and install the other side of the bracket. Use two butt connectors on the prongs. One of the prongs is labeled positive, the other negative. using the butt connectors, run a wire from the positive to the "fuel pump" fuse and run the negative wire to a ground.
STEP FIVE: Installing and Plumbing the Heat Exchanger
• The intercooler pump 'outlet' needs to be facing upwards. How you route the hoses is up to you, however in order for the system to flow correctly you need to follow the diagram below

STEP SIX: Installing the Idler Assembly
• Simply remove the black bracket on the engine above the alternator by removing the two bolts ( I believe they’re a 14mm bolt)
• Before installing the idler assembly, the idler bracket from rebel autoworx will require some grinding. The inside corner of the bracket by the lower bolt (closest to the pulley) will need some heavy grinding. We had to actually cut the head of the bolt as well to get the belt to slip over the pulley
• Once you have your corners ground down and rounded, you may install the bracket using the stock bolts.

STEP SEVEN: Installing the Blower

STEP EIGHT: Installing the Throttle Body
Four bolts on the S/C housing, pretty self explanitory. Make sure there's a rubber gasket present on the s/c housing side. If you're using the stock tb you may need to drill the bolt holes on the TB a little larger. If using the stock TB make sure its centered on the blower and there are no leaks.
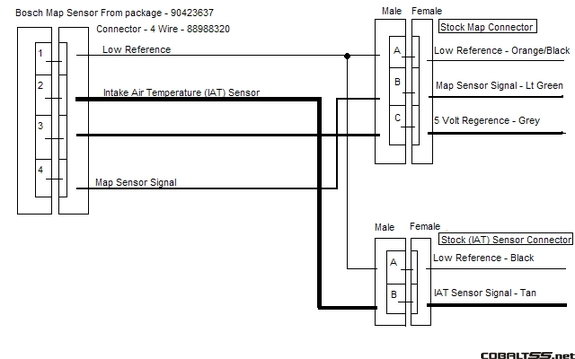
STEP NINE: Wiring the Map Sensor
SEE THE DIAGRAM BELOW: Basically you'll need to cut two wires from the stock MAP sensor (which is located on the fuel injector harness) and splice them into the new map sensor pig tail. Next take two wires from the MAF (see diagram for which to cut) and splice them into the appropriate wires on the new MAP pigtail.
STEP TEN: Bleeding the Heat Exchanger
Find a how to on an aftermarket heat exchanger install for this step lol.
STEP ELEVEN: Connecting Various Vacuum Lines
Attach the valve cover breather to the intake, Brake booster attaches to the throttle body, the other larger hose attaches to the blower housing. The boost bypass valve does not need to be connected to anything other than the one line that runs to the blower housing. Do not plug the other hole on the bypass valve just let it be. Attach the new upper radiator hose and besure the overflow from the engine coolant tank is connected.
Getting your AEM Wideband to work with HP Tuners:
Wiring up the LSJ Throttle Body:

The following wires need to be swapped:
Yellow <--> Brown
Tan <--> Dark Grey
Blue w/ Black Stripe <--> Tan w/ White Stripe
The green and purple wires remain untouched.
There are two tan wires, however if you look closely one has a white stripe its pretty difficult to see.
The larger throttle body needs to be tuned with HPTuners. It threw off my entire A/F by about 1.0 leaner.
Note that I am also throwing the P2101 Code (which is a common code to see after porting a tb etc. This code can be disabled via hpt since it does not affect performance whatsoever)
Big thanks to Ethan, Thurman, Dave, Chris, Crystal, Jim, Pat, Rebel Autoworx, Senior Brown and Dan for their help with the install and tuning of this monster
Parts List:
Eaton M62 Supercharger
Supercharger Gasket
Stock LSJ Intake Manifold
Intake Manifold Bottom Mount
Intake Manifold Gasket (Part #12597855)
2.5 Bar Map/Intake Temp Sensor (on upper left of LSJ manifold)
2.5 Bar Pigtail (Part #88988320)
Bosch/LSJ Intercooler Pump
Intercooler Pump Wiring Pigtail or Butt Connecters
Intercooler Pump Mounting Bracket (rebelautoworx.com)
Cobra Heat Exchanger (Used from a 03 Mustang Cobra)
Cobra Heat Exchanger Brackets (custom or bwoodyperformance.com)
42.5# Injectors (recommended)
Injector Harness
Wideband Air/Fuel Ratio Gauge (THIS IS NOT AN OPTIONAL ITEM!!!)
Boost/Vacuum Gauge
Stage 2 Belt (Part# 12597993; requires one rib be cut off)
Custom Idler Pulley with Mounting Bracket (rebelautoworx.com)
Extended Upper Radiator Hose
Coolant Reservoir Tank (Cobalt or Ion Recommend)
NGK Copper Spark Plugs (Part# LFR6A-11)
SS/SC intake
10ft. x ľ” I.D. Hose
10ft x Ľ” I.D. Hose
4ft. x ˝” I.D. Hose
Small and Large Hose clamps.
3 x 1/8th NPT Ľ” Barb Fittings
Self Tapping Sheet Metal Screws (Mounting H/E brackets)
6M 25mm Bolts
6M 90mm Studs with Locking Nuts
8M 50mm Bolts
Water Wetter Coolant
1/8th NPT Drill Tap
21/64th Drill bit (for the 1/8th tap)
20 gauge wiring
Zip Ties
Electrical Tape
Plastic Wiring Sleeves
Optional:
LSJ Throttle Body (requires rewiring)
Aero Force Interceptor Gauge
Gauge Pillar
Oil Pressure Gauge
Notes:
• A 2 bar map sensor will work instead of a 2.5 bar map sensor, however the 2.5 bar map sensor from the LSJ will also read intake manifold temps.
• Stock LSJ Injectors will work not work for this setup. The IDC will be too high.
• The stock LSJ belt may also be used with this setup, however it may require a larger idler pulley and there is no guarantee on the fitment of the larger idler on the rebel bracket.
• I’ve heard that the stock LE5 Injector harness will work with the 42.5lb Injectors however I cannot confirm this.
Tool List:
Wrench Set
Spark Plug Socket
Drill with Assorted Bit Sizes.
Soldering Iron (optional)
Screwdrivers
Jack
2x Jack Stands
Creeper (optional)
Grinding Tool
Vice Grips
Box Knife
Teflon Tape
Allen keys
Clearing up some Common Misconceptions:
1. You DO NOT need the LSJ Alternator for this setup, however you will need to cut one rib off the stage two belt
2. You’ll need to rewire the Throttle Body pigtail if you decide to use the LSJ throttle Body. (see below for how to)
3. This is not a BOLT ON, this setup will require a tune, and is unsafe to even attempt to drive if it is not tuned.
Preparation:
1. I highly recommend removing the front bumper, headlights, headlight mounting brackets, front wheels and fender lining, REMOVAL OF THESE ITEMS ARE UP TO YOU TO FIGURE OUT, HOWEVER THEY’RE ALL PRETTY SIMPLE.
2. If you plan on using a LSJ intake you will need to remove the windshield wiper fluid reservoir from the driver’s side fender.
3. You will need to cut open the stock engine wiring harness and relocated the MAF and Throttle Body Wires to the other side of the engine compartment. Allow Plenty of slack in the wiring, they can always be tucked away later.
4. I also would recommend setting up two tables in your workspace. The first with all the items that need to go on the car, and the second for the items you take off the car.
5. Stock the fridge with drinks and snacks, this will take a while!
6. If you are not already using fully synthetic motor oil, you should probably switch over before installing your supercharger. The LE5 requires 5 quarts of 5W-30
Removal of stock components will be up to you (intake/intake manifold/throttle body/etc) if you cannot figure these out you should hire a professional to install this kit.
STEP ONE: Replacing the Spark Plugs
• Using a 10mm Wrench, remove the four bolts securing the coil packs (one bolt for each coil pack)
• Next, remove the coil packs from the valve cover
• Using a spark plug deep socket, an extension and a ratchet, remove one spark plug at a time. After removing one, immediately replace it with the NGK Copper Plugs. Tighten firmly.
• After all four spark plugs have been replaced, reinsert the coil packs into the valve cover and retighten then four 10mm bolts holding them in place.
STEP TWO: Replacing the Injectors
• Using a 10mm Socket, remove the two bolts on the fuel rail.
• Carefully pull up on either end of the fuel rail and wiggle slightly. The Fuel rail along with all four injectors should pop out.
• Remove the wiring harness and the metal clips around the top of each injector
• Lay a towel down over the engine and hold the fuel rail over a small bucket. Wiggle the bottom most injector while pulling and it should pop right out. Let the excess fuel from the fuel rail drain into the bucket.
• Once the fuel rail has drained, remove the rest of the injectors in the same manner as the first.
• Lube the o-rings on the new injectors with motor oil. After oiling, insert one injector at a time into the fuel rail.
• Once all four of the new injectors are in the fuel rail, reinstall the metal securing clips and plug in your new wiring harness to each injector.
• DO NOT reinstall the fuel rail back into the engine at this time, as it will need to come out in order to put the supercharger on the intake manifold, so it is best to just set it aside in the engine compartment.
STEP THREE: Installing the Lower Intake Manifold
• With the stock intake manifold out, cut off the bracket that attaches the dipstick to the old LE5 intake manifold. (This will get in the way of the new intake manifold if not removed)
• Next, you will need to take the lower intake manifold mounting bracket and drill the upper two (non threaded) holes larger (I cannot remember the drill bit size, but the hole needs to be large enough to fit an 8M bolt)
• Once these holes are drilled you will need to bolt the bracket to the engine using the two 8M bolts listed in the parts section.
• Next slide the intake manifold along with its gasket into place. The bottom of the intake manifold should line up with the bracket. Once the intake manifold is properly positioned with its gasket, insert the two 6m studs into the lower middle holes of the flange.
STEP FOUR: Installing and Wiring the Intercooler Pump
Pretty simple. On the front of the block under the intake manifold there will be a few holes that will match up with the mounting bracket. INstall the back side of the bracket first, then place the pump in the bracket, and install the other side of the bracket. Use two butt connectors on the prongs. One of the prongs is labeled positive, the other negative. using the butt connectors, run a wire from the positive to the "fuel pump" fuse and run the negative wire to a ground.
STEP FIVE: Installing and Plumbing the Heat Exchanger
• The intercooler pump 'outlet' needs to be facing upwards. How you route the hoses is up to you, however in order for the system to flow correctly you need to follow the diagram below
STEP SIX: Installing the Idler Assembly
• Simply remove the black bracket on the engine above the alternator by removing the two bolts ( I believe they’re a 14mm bolt)
• Before installing the idler assembly, the idler bracket from rebel autoworx will require some grinding. The inside corner of the bracket by the lower bolt (closest to the pulley) will need some heavy grinding. We had to actually cut the head of the bolt as well to get the belt to slip over the pulley
• Once you have your corners ground down and rounded, you may install the bracket using the stock bolts.
STEP SEVEN: Installing the Blower
STEP EIGHT: Installing the Throttle Body
Four bolts on the S/C housing, pretty self explanitory. Make sure there's a rubber gasket present on the s/c housing side. If you're using the stock tb you may need to drill the bolt holes on the TB a little larger. If using the stock TB make sure its centered on the blower and there are no leaks.
STEP NINE: Wiring the Map Sensor
SEE THE DIAGRAM BELOW: Basically you'll need to cut two wires from the stock MAP sensor (which is located on the fuel injector harness) and splice them into the new map sensor pig tail. Next take two wires from the MAF (see diagram for which to cut) and splice them into the appropriate wires on the new MAP pigtail.
STEP TEN: Bleeding the Heat Exchanger
Find a how to on an aftermarket heat exchanger install for this step lol.
STEP ELEVEN: Connecting Various Vacuum Lines
Attach the valve cover breather to the intake, Brake booster attaches to the throttle body, the other larger hose attaches to the blower housing. The boost bypass valve does not need to be connected to anything other than the one line that runs to the blower housing. Do not plug the other hole on the bypass valve just let it be. Attach the new upper radiator hose and besure the overflow from the engine coolant tank is connected.
Getting your AEM Wideband to work with HP Tuners:
Wiring up the LSJ Throttle Body:
The following wires need to be swapped:
Yellow <--> Brown
Tan <--> Dark Grey
Blue w/ Black Stripe <--> Tan w/ White Stripe
The green and purple wires remain untouched.
There are two tan wires, however if you look closely one has a white stripe its pretty difficult to see.
The larger throttle body needs to be tuned with HPTuners. It threw off my entire A/F by about 1.0 leaner.
Note that I am also throwing the P2101 Code (which is a common code to see after porting a tb etc. This code can be disabled via hpt since it does not affect performance whatsoever)
Last edited by Beck; 08-05-2008 at 04:10 PM.


 10-31-2007, 01:43 AM
#6

seriously...you really are amazing...
im curious why the new plugs are necessary? or are they just colder plugs? would the 2.2 need a plug change as well?
i gotta try n figure out how much of this stuff will be needed for my application...i know i can ditch things such as the MAP sensor, as im going a different route (AEM FIC, clamp maf/map sensor and use the FIC's onboard map sensor for tuning)
also i need to fnd out if i need to rewire my throttle body connector as well, as i have a 2.0 TB for my L61, and finally, i need to find out if this applies to the L61 as well:
as the holes might be different sizes between our two engines.
at any rate, this is amazing and will definitely make a good source of information, parts i still need (hoses and T fittings mostly), and problems i will run in to
im curious why the new plugs are necessary? or are they just colder plugs? would the 2.2 need a plug change as well?
i gotta try n figure out how much of this stuff will be needed for my application...i know i can ditch things such as the MAP sensor, as im going a different route (AEM FIC, clamp maf/map sensor and use the FIC's onboard map sensor for tuning)
also i need to fnd out if i need to rewire my throttle body connector as well, as i have a 2.0 TB for my L61, and finally, i need to find out if this applies to the L61 as well:
• Next, you will need to take the lower intake manifold mounting bracket and drill the upper two (non threaded) holes larger
at any rate, this is amazing and will definitely make a good source of information, parts i still need (hoses and T fittings mostly), and problems i will run in to
11-07-2007, 05:43 PM
#8
New Member

Join Date: 10-21-07
Location: Kentucky, North Carolina
Posts: 20
Likes: 0
Received 0 Likes
on
0 Posts
So, the finished product, when should we see some dyno #'s and pics? It looks like a very exciting build. And FYI, Pontiacs and Chevys are both GM, sharing the same platform has been common since the late 80's, such as the cavalier-sunbird, cav-sunfire, cobalt-G5(?)
11-07-2007, 06:40 PM
#9
Senior Member

Join Date: 05-08-07
Location: Lakeland, Florida
Posts: 2,039
Likes: 0
Received 0 Likes
on
0 Posts
So, the finished product, when should we see some dyno #'s and pics? It looks like a very exciting build. And FYI, Pontiacs and Chevys are both GM, sharing the same platform has been common since the late 80's, such as the cavalier-sunbird, cav-sunfire, cobalt-G5(?)
 11-07-2007, 06:51 PM
#11
can you get a pic of the lower manifold bracket? im a little confused what your talking about right there.
that is my only complaint on this how-to...a lack of pictures. otherwise, its amazing...plus at the end of the day, an explanation without pics is still better than no explanation at all.
that is my only complaint on this how-to...a lack of pictures. otherwise, its amazing...plus at the end of the day, an explanation without pics is still better than no explanation at all.
11-07-2007, 08:01 PM
#12
like i said its still a work in progress. I didnt take any pics of the bracket, because its kinda hard to see in the first place. maybe i'll try to get under the car and snap a few if i can. i'll try to integrate some more pictures in.

 11-08-2007, 11:12 AM
#16
Senior Member

This winter will be the collecting of all the parts, and come spring, this guide will be sitting on my tool bench i can tell you that much. Awesome job.
01-01-2008, 01:13 PM
#18
Senior Member
Join Date: 03-07-05
Location: San Pedro/PV
Posts: 1,733
Likes: 0
Received 0 Likes
on
0 Posts
seriously...you really are amazing...
im curious why the new plugs are necessary? or are they just colder plugs? would the 2.2 need a plug change as well?
also i need to fnd out if i need to rewire my throttle body connector as well, as i have a 2.0 TB for my L61, and finally, i need to find out if this applies to the L61 as well: as the holes might be different sizes between our two engines.
at any rate, this is amazing and will definitely make a good source of information, parts i still need (hoses and T fittings mostly), and problems i will run in to
The plugs are actually OEM Subaru STi plugs. They're a colder plug, and made of copper which is better for boosted applications. You will definitely want to change out your plugs even if it's a 2.2. And more than likely, you will have to re-wire your TB as well. It's not that difficult though.

 01-13-2008, 11:36 AM
#22
Member

Join Date: 05-09-07
Location: punta gorda, fl
Posts: 347
Likes: 0
Received 0 Likes
on
0 Posts
well im going to go with this setup with my 2.4l sedan, i still need to read more and get some more parts, and find someone to tune mine, because thats the biggest thing. once i find someone that can tune it i will get all the parts. the only bad thing is i still got so many questions, and i dont understand everything.
 01-13-2008, 02:26 PM
#25
Senior Member
Join Date: 03-07-05
Location: San Pedro/PV
Posts: 1,733
Likes: 0
Received 0 Likes
on
0 Posts
well im going to go with this setup with my 2.4l sedan, i still need to read more and get some more parts, and find someone to tune mine, because thats the biggest thing. once i find someone that can tune it i will get all the parts. the only bad thing is i still got so many questions, and i dont understand everything.