Powell's take on replacing bad control arm bushings.

 09-19-2015, 09:08 AM
#202

This is not rocket science, and if you dont want to bother with the tools, going to a machine shop or a NAPA like Colordude suggested is really easy. If a GM dealer has the cab service tool its easy as well.
Clean the bore of the arm before replacing the cab. A correctly sized wire wheel brush on a drill takes three nanoseconds. Loctite bearing fit is recommended for installation along with freezing the cabs in advance. BUT THis thread was posted by me to discuss getting the arms out when the center sleeve is seized on the cab bolt, not replacing the cabs. Thats another subject and like I said, if you bought cabs you should have instructions, If not email me I send them out.
09-19-2015, 10:02 AM
#203
Senior Member
iTrader: (6)

the cab does not care which way it takes to get out. I have full instructions including sizing for tools needed to press out the cab, which you receive automatically ( should be) when you buy our parts. If you buy our parts from CED you may have to ask for instructions.
This is not rocket science, and if you dont want to bother with the tools, going to a machine shop or a NAPA like Colordude suggested is really easy. If a GM dealer has the cab service tool its easy as well.
Clean the bore of the arm before replacing the cab. A correctly sized wire wheel brush on a drill takes three nanoseconds. Loctite bearing fit is recommended for installation along with freezing the cabs in advance. BUT THis thread was posted by me to discuss getting the arms out when the center sleeve is seized on the cab bolt, not replacing the cabs. Thats another subject and like I said, if you bought cabs you should have instructions, If not email me I send them out.
09-04-2016, 10:12 PM
#204

Team,
Found this post a little too late.
Friday I got Powell's TCABS and decided to install them today.
Unfortunately I screwed up with the captive nuts from both sides.
Fortunately, I was able to resolve the passenger side and now the control arm is out. Yay!
Now for the driver side, but the problem is that there are the brake lines so I am unable to reach the captive nut easily.
Therefore, tomorrow, since it is holiday, I'm gonna take down the cradle so I can deal with this nuisance.
Question: does anyone have the torque specs for all the bolts required to be removed for the cradle to go down?
Thank you very much everyone. This post is really helpful.
09-05-2016, 07:10 AM
#205

Team, Found this post a little too late. Friday I got Powell's TCABS and decided to install them today. Unfortunately I screwed up with the captive nuts from both sides. Fortunately, I was able to resolve the passenger side and now the control arm is out. Yay! Now for the driver side, but the problem is that there are the brake lines so I am unable to reach the captive nut easily. Therefore, tomorrow, since it is holiday, I'm gonna take down the cradle so I can deal with this nuisance. Question: does anyone have the torque specs for all the bolts required to be removed for the cradle to go down? Thank you very much everyone. This post is really helpful.
09-05-2016, 01:24 PM
#206
Just to be sure... The solution by removing the cradle is only if you were able to unscrew the bolt from the captive nut, right? Otherwise how is the cradle supposed to come out if the captive nut is stuck? Thanks.
09-06-2016, 10:41 PM
#207
You can wedge something in the basket to try and keep the nut from spinning.
The cradle bolts are not a static 150 lb ft, at least not on the '09.
It's 74 lb ft(100 Nm) plus an additional 180 degrees. I had to use a 2' breaker bar to do it, it was tough.
The cradle bolts are not a static 150 lb ft, at least not on the '09.
It's 74 lb ft(100 Nm) plus an additional 180 degrees. I had to use a 2' breaker bar to do it, it was tough.
09-06-2016, 11:24 PM
#208
I tried every imaginable home available thing I could use: hammer, heat, vise grip, almost a full can of PB.
It won't come out.
Fortunately, I managed to contact Mr. John Powell, and he gave me the unfortunate advise of cutting it with a sawzall. Well, I guess I'll have to go shopping tomorrow.
Anyway, thanks for the torque information.
09-19-2016, 12:24 PM
#210
Junior Member
 09-20-2016, 06:20 PM
#211
Junior Member

Join Date: 11-06-07
Location: Boston
Posts: 461
Likes: 0
Received 0 Likes
on
0 Posts
Does anyone have a solid picture of the subframe showing which bolts need to be removed?
I'm weary of doing this with a jack and jack stands but have no choice. The main bolts seem to be the front and rear transmission mounts along with the two bolts covered by the wheel wells and whatever the radiator is sitting on. Do I need to remove anything else for the subframe to come out??
I've searched long and hard for info on the subframe removal.... maybe it is just as easy as it looks and that's why no one has bothered to post info on it here?
09-20-2016, 10:31 PM
#212
Does anyone have a solid picture of the subframe showing which bolts need to be removed?
I'm weary of doing this with a jack and jack stands but have no choice. The main bolts seem to be the front and rear transmission mounts along with the two bolts covered by the wheel wells and whatever the radiator is sitting on. Do I need to remove anything else for the subframe to come out??
I've searched long and hard for info on the subframe removal.... maybe it is just as easy as it looks and that's why no one has bothered to post info on it here?
I'm weary of doing this with a jack and jack stands but have no choice. The main bolts seem to be the front and rear transmission mounts along with the two bolts covered by the wheel wells and whatever the radiator is sitting on. Do I need to remove anything else for the subframe to come out??
I've searched long and hard for info on the subframe removal.... maybe it is just as easy as it looks and that's why no one has bothered to post info on it here?
09-21-2016, 09:11 AM
#213
Here is a picture of the subframe:
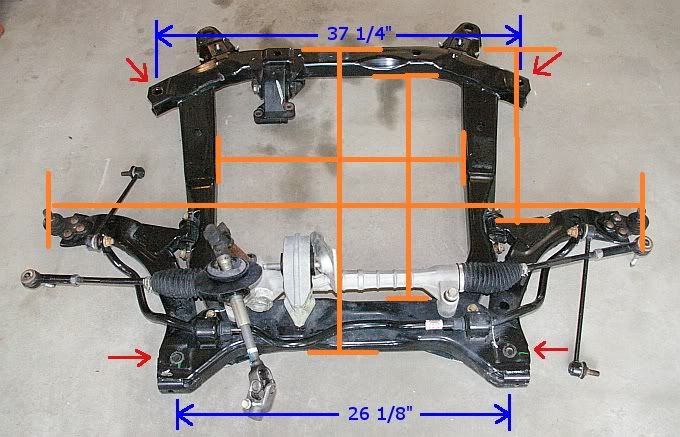
If you looke under your car, you will definitively see this square piece. The arrows show where the main bolts are. The front bolts are hidden by plastic covers that must be removed so they can be reached. The rear ones are part of what holds the CAB rear bushings.
However, there are other bolts that you need to remove to lower it:
- the steering rack has two bolts, really hard to reach and really long. You must remove those. (Lock your steering wheel). Watch out when removing the driver side bolt, as braking pipes are on the way. (The picture shows the rack and you can see the passenger bolt).
- the front engine mount cross bolt (easy).
- the three rear subframe to engine mount (they form a triangle shape right in the middle of the rear part of the subframe) (the picture shows the rear mount fixed to the frame, but you want to leave it mounted on the engine).
When I lowered the subframe, the radiator also started to lower too. I did not want to have it hanging through the pipes, so I attached it with some cords to any available spot under the hood. The radiator is supported by the subframe through two brackets on each side. These do not need to be unscrewed as the rubber in the middle pops out. If it does not because it is seized, just unscrew the bolts of the brackets from the subframe.
To lower the subframe, I placed a jack stand in the rear middle and a jack in the front.
Lower the jack and go for lower the rear side after. Or vice-versa...
Good luck.
09-21-2016, 09:22 AM
#214

can also use portions of the clutch job PDF to see how to unhook some of the other items attached to the subframe.
https://www.dropbox.com/s/jq62irsocv...lt_SS.pdf?dl=0
https://www.dropbox.com/s/jq62irsocv...lt_SS.pdf?dl=0
09-22-2016, 11:05 AM
#215
Junior Member
Join Date: 11-06-07
Location: Boston
Posts: 461
Likes: 0
Received 0 Likes
on
0 Posts
Here is a picture of the subframe:

If you looke under your car, you will definitively see this square piece. The arrows show where the main bolts are. The front bolts are hidden by plastic covers that must be removed so they can be reached. The rear ones are part of what holds the CAB rear bushings.
However, there are other bolts that you need to remove to lower it:
- the steering rack has two bolts, really hard to reach and really long. You must remove those. (Lock your steering wheel). Watch out when removing the driver side bolt, as braking pipes are on the way. (The picture shows the rack and you can see the passenger bolt).
- the front engine mount cross bolt (easy).
- the three rear subframe to engine mount (they form a triangle shape right in the middle of the rear part of the subframe) (the picture shows the rear mount fixed to the frame, but you want to leave it mounted on the engine).
When I lowered the subframe, the radiator also started to lower too. I did not want to have it hanging through the pipes, so I attached it with some cords to any available spot under the hood. The radiator is supported by the subframe through two brackets on each side. These do not need to be unscrewed as the rubber in the middle pops out. If it does not because it is seized, just unscrew the bolts of the brackets from the subframe.
To lower the subframe, I placed a jack stand in the rear middle and a jack in the front.
Lower the jack and go for lower the rear side after. Or vice-versa...
Good luck.
If you looke under your car, you will definitively see this square piece. The arrows show where the main bolts are. The front bolts are hidden by plastic covers that must be removed so they can be reached. The rear ones are part of what holds the CAB rear bushings.
However, there are other bolts that you need to remove to lower it:
- the steering rack has two bolts, really hard to reach and really long. You must remove those. (Lock your steering wheel). Watch out when removing the driver side bolt, as braking pipes are on the way. (The picture shows the rack and you can see the passenger bolt).
- the front engine mount cross bolt (easy).
- the three rear subframe to engine mount (they form a triangle shape right in the middle of the rear part of the subframe) (the picture shows the rear mount fixed to the frame, but you want to leave it mounted on the engine).
When I lowered the subframe, the radiator also started to lower too. I did not want to have it hanging through the pipes, so I attached it with some cords to any available spot under the hood. The radiator is supported by the subframe through two brackets on each side. These do not need to be unscrewed as the rubber in the middle pops out. If it does not because it is seized, just unscrew the bolts of the brackets from the subframe.
To lower the subframe, I placed a jack stand in the rear middle and a jack in the front.
Lower the jack and go for lower the rear side after. Or vice-versa...
Good luck.
Is there a way to remove just the subframe without all of the steering rack stuff? I'm going to try to get this done this weekend. Thanks again for the great advice!

 09-27-2016, 06:44 PM
#222
Junior Member
Join Date: 11-06-07
Location: Boston
Posts: 461
Likes: 0
Received 0 Likes
on
0 Posts
It seems to me like there is NO WAY to drop the cradle without getting the trailing bolt out? (that is the reason for needing to remove the cradle in the first place)
Can someone clear this up for me??
Can someone clear this up for me??
09-28-2016, 11:53 AM
#223
10-03-2016, 03:01 PM
#224
Junior Member
Join Date: 11-06-07
Location: Boston
Posts: 461
Likes: 0
Received 0 Likes
on
0 Posts
I just finally got this done over the weekend. Rip the cage off and vice grip the nut - took us 12ish hours but I totally refinished my subframe overnight so its now rust free!
10-11-2016, 02:04 PM
#225

However:
The point of this procedure is that the bolt can get rusted into the inner sleeve of the bushing. That, along with the little metal retaining clip that hold the bolt in place during the assembly of your car in Lordstown, can prevent the bolt from coming out when you turn it... which in turn pops the captive nut. By removing the entire subframe WITH the bolt still in place inside the bushing sleeve, you save the captive nut and then can proceed to pound or press the rusted bolt out of the sleeve with a hammer or press.