
GMPP Stage 3 with N2O 56k warning


Thread Starter
New Member
Joined: 03-25-06
Posts: 64
Likes: 0
From: Show Low, AZ
GMPP Stage 3 with N2O 56k warning
GMPP Stage 3 with N2O …………..See: https://www.cobaltss.net/forums/2-0l-lsj-performance-tech-47/gmpp-stage-3-c-76479/ for GMPP Stage 3 with A/C
Images below show details of my GM Stage 3 with DynoTune 50 dry shot. A special thanks to Crate Engine Depot for their superb service and for including the "Nitrous control wires". I provided no images of “Dual Pass” install as that has had excellent posts previously.
I am not responsible for any modifications you make to your vehicle. The following images show what works for me on my 06 SS/SC.
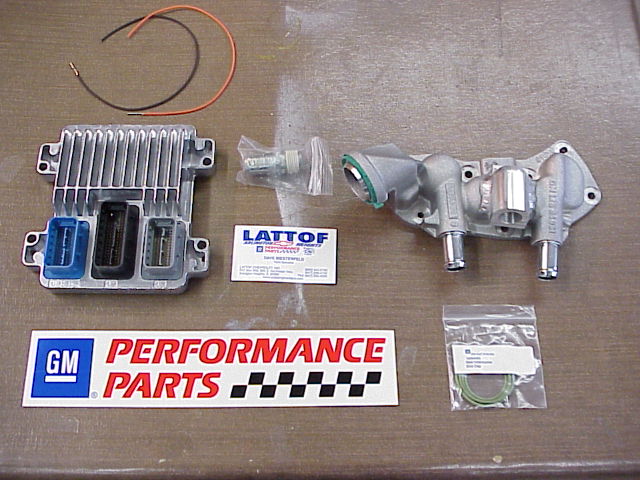
Stage 3 less pulley. Note two wires for PCM Nitrous control. CED supplied wires with Stage 3 kit.
I opted for Dual Pass option A. My air bleed method is shown here. I ordered option B reservoir and cap but after planning my install decided that I would go with option A.

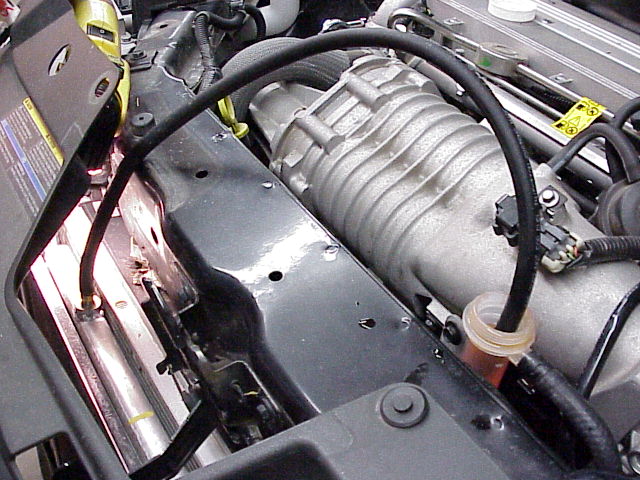
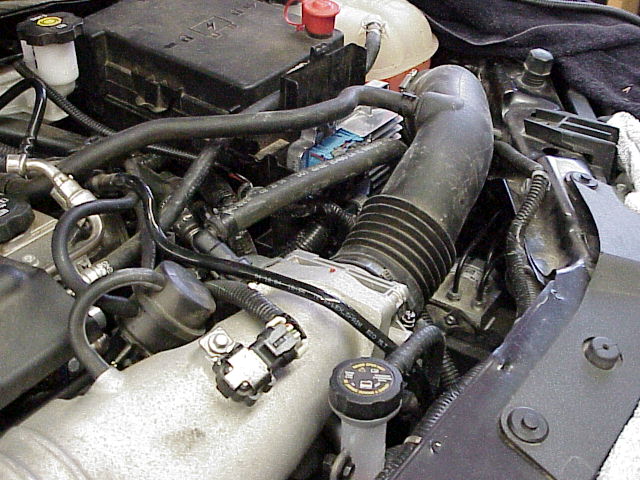
Nitrous nozzle located in underside of air intake tube
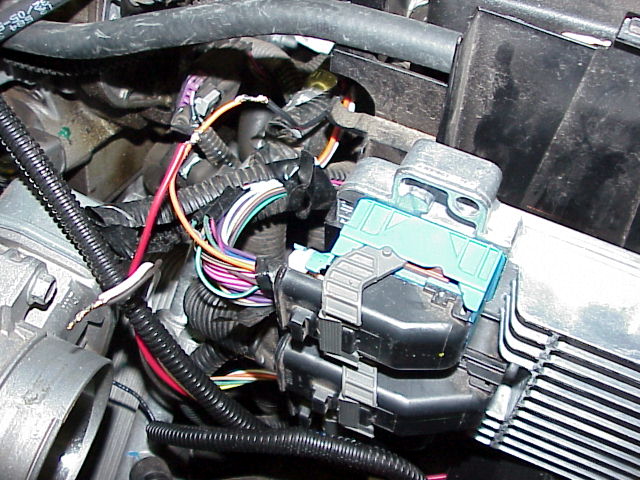
Black Stage 3 wire solder spliced to white wire which is ground for Nitrous relay. Terminal end of black wire that came with CED Stage 3 is installed in PCM C3 pin location 16. Orange/Amber Stage 3 wire solder spliced to Red wire which is the 12V Ignition/WOT supply to the Nitrous relay. This orange/amber wire is also solder spliced to a black wire from the WOT switch supplying 12V to both the nitrous relay and PCM nitrous trigger input. The terminal end of the orange wire that came with the CED Stage 3 is installed in PCM C1 pin location 42. Stage 3 PCM controls and grounds the Nitrous relay as well as fuel mixture and ignition timing for 50 Shot Dry Nitrous operation.
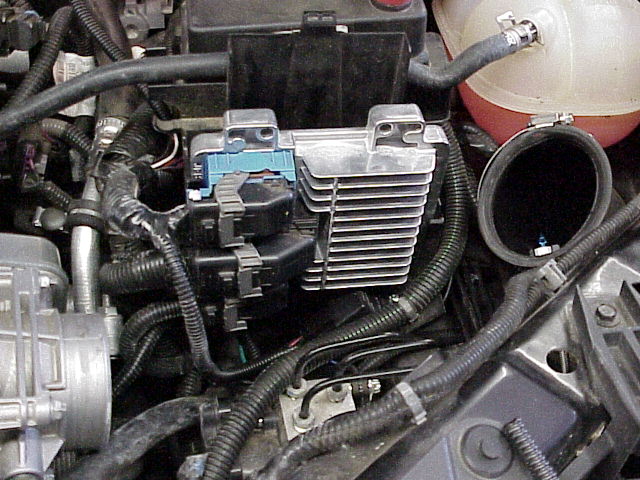
Completed PCM Nitrous wiring
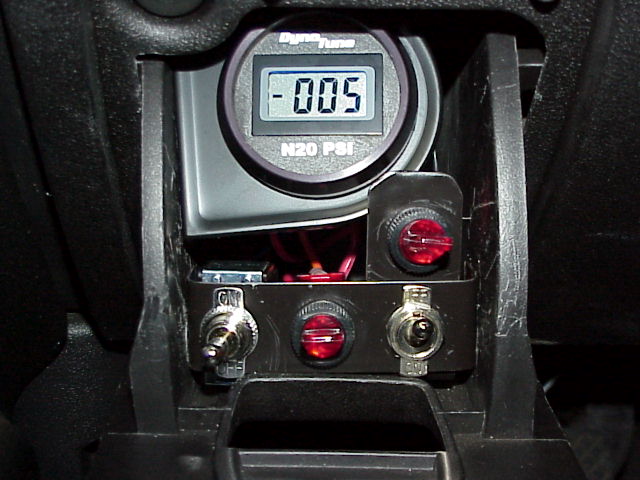
Nitrous controls in storage compartment to the left of steering column. Nitrous pressure gauge, switch identification lower L to R = Remote bottle opener, Bottle warmer, Stage 3 A/C clutch. Upper right switch is Nitrous arming switch. A/C switch is purposely mounted “upside down” so that all switches in the “up” position for maximum performance requested. Micro switch activated by throttle pedal at WOT is not shown. When this storage compartment is closed, there is no visible evidence of Nitrous controls.
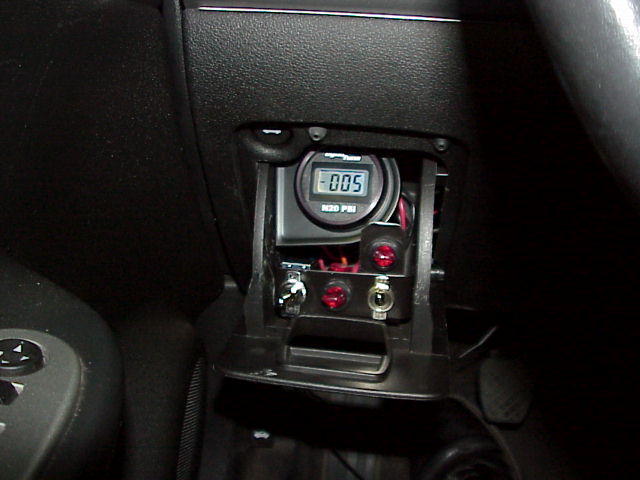
Another view of Nitrous controls in storage compartment.
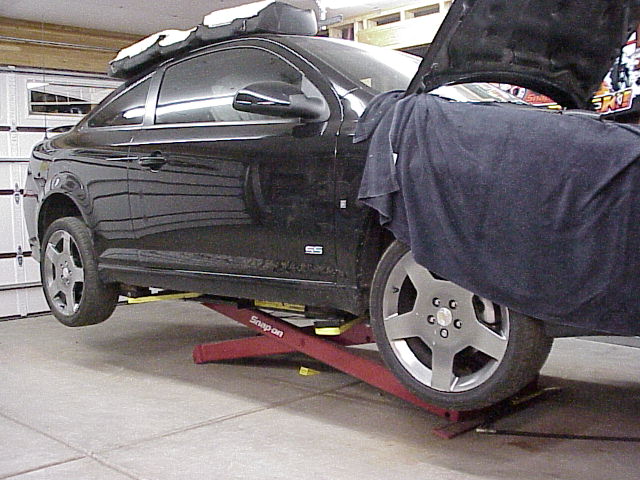
Cobalt in my garage on hoist to run Nitrous line under vehicle (Caution! do not run Nitrous supply line in passenger compartment). Back seat cushion removed to run Nitrous wiring loom from trunk to control area.
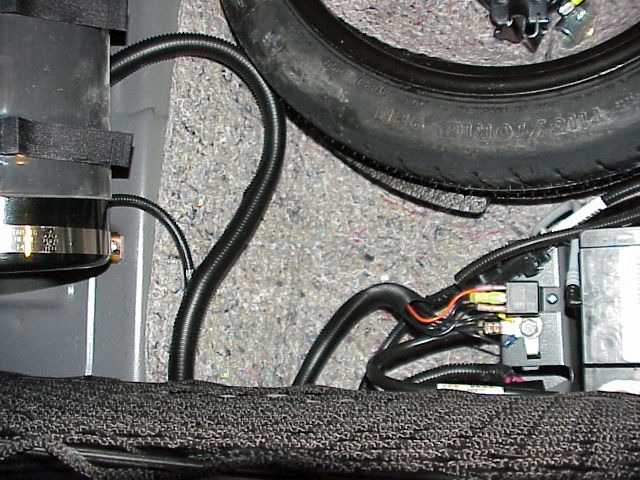
Nitrous bottle warmer relay and wiring

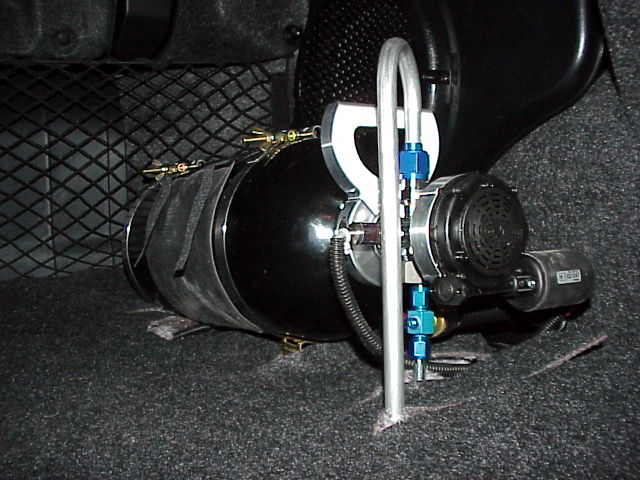
Nitrous bottle installed with blow down tube, bottle warmer and wiring.
View looking from folded down rear seat back showing electric remote bottle opener and blow down tube.
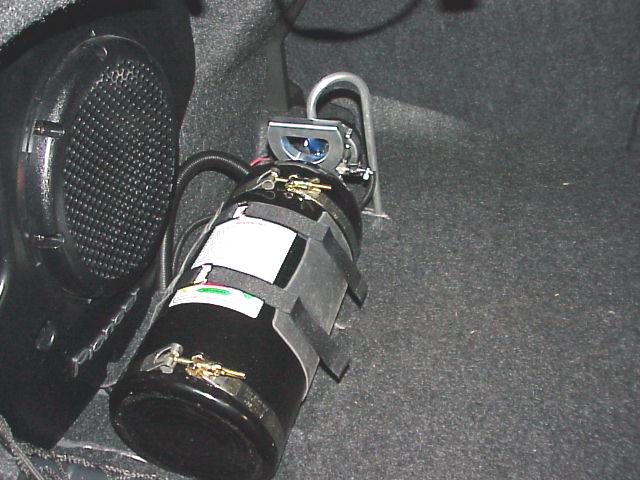
Completed Nitrous bottle install view. Blow down tube is necessary since Cobalt trunk is not sealed from passenger compartment.
Nitrous installation completed. No visual indication of Nitrous.
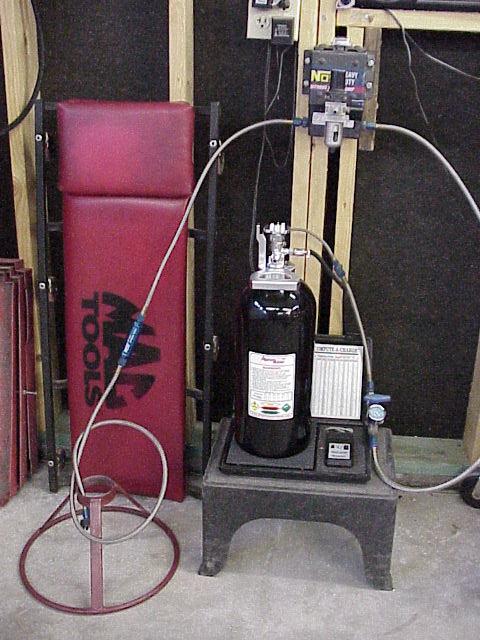
Nitrous tank fill station in my garage awaiting the 64LB source tank. There is no local Nitrous dealer to fill your tank.
Images below show details of my GM Stage 3 with DynoTune 50 dry shot. A special thanks to Crate Engine Depot for their superb service and for including the "Nitrous control wires". I provided no images of “Dual Pass” install as that has had excellent posts previously.
I am not responsible for any modifications you make to your vehicle. The following images show what works for me on my 06 SS/SC.
Stage 3 less pulley. Note two wires for PCM Nitrous control. CED supplied wires with Stage 3 kit.
I opted for Dual Pass option A. My air bleed method is shown here. I ordered option B reservoir and cap but after planning my install decided that I would go with option A.
Nitrous nozzle located in underside of air intake tube
Black Stage 3 wire solder spliced to white wire which is ground for Nitrous relay. Terminal end of black wire that came with CED Stage 3 is installed in PCM C3 pin location 16. Orange/Amber Stage 3 wire solder spliced to Red wire which is the 12V Ignition/WOT supply to the Nitrous relay. This orange/amber wire is also solder spliced to a black wire from the WOT switch supplying 12V to both the nitrous relay and PCM nitrous trigger input. The terminal end of the orange wire that came with the CED Stage 3 is installed in PCM C1 pin location 42. Stage 3 PCM controls and grounds the Nitrous relay as well as fuel mixture and ignition timing for 50 Shot Dry Nitrous operation.
Completed PCM Nitrous wiring
Nitrous controls in storage compartment to the left of steering column. Nitrous pressure gauge, switch identification lower L to R = Remote bottle opener, Bottle warmer, Stage 3 A/C clutch. Upper right switch is Nitrous arming switch. A/C switch is purposely mounted “upside down” so that all switches in the “up” position for maximum performance requested. Micro switch activated by throttle pedal at WOT is not shown. When this storage compartment is closed, there is no visible evidence of Nitrous controls.
Another view of Nitrous controls in storage compartment.
Cobalt in my garage on hoist to run Nitrous line under vehicle (Caution! do not run Nitrous supply line in passenger compartment). Back seat cushion removed to run Nitrous wiring loom from trunk to control area.
Nitrous bottle warmer relay and wiring
Nitrous bottle installed with blow down tube, bottle warmer and wiring.
View looking from folded down rear seat back showing electric remote bottle opener and blow down tube.
Completed Nitrous bottle install view. Blow down tube is necessary since Cobalt trunk is not sealed from passenger compartment.
Nitrous installation completed. No visual indication of Nitrous.
Nitrous tank fill station in my garage awaiting the 64LB source tank. There is no local Nitrous dealer to fill your tank.
Last edited by mcwarren; Sep 23, 2007 at 08:44 AM.


Thread Starter
New Member
Joined: 03-25-06
Posts: 64
Likes: 0
From: Show Low, AZ
"Oh and are you worried about the bass rattling the N20 tank?"
You figured out the stealth secret to my "sleeper"
"Very nice, as a young tech starting in the business, I hope to have your knowledge one day."
Congratulations on your choice of career. It's great to see some new blood in the profession. Take advantage of every training opportunity presented to you and you will become one of the best and you will for sure surpass me with the new technology coming online. Good Luck in you chosen profession.
"I love how you just slotted it into that little empty spot we have. Good Job."
It seemed the best place to hide it and have the controls accessible. Thanks for the "attaboy".
"looks sweet how much did it run you"
All components from DynoTune. 50 shot system $269.00, Digital N2O gauge $169.00, Bottle warmer $129.00, Remote bottle opener $219.00, Blow down kit $29.00, for a total system price of $815.00. Thanks for the "attaboy".

Senior Member
Joined: 01-23-06
Posts: 657
Likes: 0
From: South Carolina
AHHHHHHH!!!!!!!! YESSSSSSSS!!!!!!! THANK YOU MCWarren.
I have had the Stage 3 for about 7 months but don't have the nitrous yet and have been asking everyone in the world what wires yuo have to hook into and you solved it. Thanks you so much man .Only problem is that I did not buy the kit as a complete assembly so I did not get the two wires. Can you make these wires easliy and how did you know it was PCM C3 pin location 16 and PCM C1 pin location 42 to hook into?
Also haveyou tried it out yet and how were you able to make the A/C enabled with Stage 3 PCM.

Thread Starter
New Member
Joined: 03-25-06
Posts: 64
Likes: 0
From: Show Low, AZ
AHHHHHHH!!!!!!!! YESSSSSSSS!!!!!!! THANK YOU MCWarren.
I have had the Stage 3 for about 7 months but don't have the nitrous yet and have been asking everyone in the world what wires yuo have to hook into and you solved it. Thanks you so much man .Only problem is that I did not buy the kit as a complete assembly so I did not get the two wires. Can you make these wires easliy and how did you know it was PCM C3 pin location 16 and PCM C1 pin location 42 to hook into?
Also haveyou tried it out yet and how were you able to make the A/C enabled with Stage 3 PCM.
I have had the Stage 3 for about 7 months but don't have the nitrous yet and have been asking everyone in the world what wires yuo have to hook into and you solved it. Thanks you so much man .Only problem is that I did not buy the kit as a complete assembly so I did not get the two wires. Can you make these wires easliy and how did you know it was PCM C3 pin location 16 and PCM C1 pin location 42 to hook into?
Also haveyou tried it out yet and how were you able to make the A/C enabled with Stage 3 PCM.
See my earlier post on how I enabled A/c with Stage 3 at: https://www.cobaltss.net/forums/showthread.php?t=76479
wow hella clean, how does she pull now? any plans on a dyno?
Senior Member
Joined: 03-01-06
Posts: 6,088
Likes: 1
From: Westchester, New York
that is sick i cant wait to get my dual pass installed and hopefullly order the NOS intercooler spray kit and try that out, i dont wanna get the wet or dry shots, just intercooler spray


Thread Starter
New Member
Joined: 03-25-06
Posts: 64
Likes: 0
From: Show Low, AZ
Am I missing something or is yours a SS 2.4L. I dont see a supercharged badge and I noticed the lowpro wing and the 17" rims. WTF?
where are ur solenoids located andwhere did u tap into the fuel from. do u have pictures of both???
its a dry shot... no fuel needed, the stage 3 pcm controls it and has support for a 50 shot


Junior Member
Joined: 06-21-06
Posts: 431
Likes: 1
From: NM
so when u r running ur car w/ all switches in the up pos. and u go WOT does the n2o still cutoff 500 revs short of redline and by doing this did u bump redline to 7250 seeing as the springs are 7250 max duration and in stg3 u can bump up in 250 increments all the way to 8k if ur head has some work also if u were to bump up the increment would the shutoff tothe n20 still be 500 short of redline or would it stay at 6500k? but if u dont mind me askin are u planning a build to allow full function of ur stg3 PCM, U have A/C uhave n20 and i was just wondering if u were gonna be the first to go all out for the GM stg 3 and actually tell us fellow cobalt guys how a fully functionable sstg 3 feels. well being a tech for GM u could probably also get cheaper parts from them and have abuild like no other in america  the intended GM way and i bet ur motor will last wen others turn to ****
  thanks
the intended GM way and i bet ur motor will last wen others turn to **** 


I just ordered my Stage 3 and will be installing it along with my new/used engine.
Great two threads you've made on the nitrous install and A/C over-ride. I'd love to hear how the Stage 3 is holding up thus far?
I also sent you a PM about buying your option B kit, I saw you weren't going to use it.
Have a good one!
Great two threads you've made on the nitrous install and A/C over-ride. I'd love to hear how the Stage 3 is holding up thus far?
I also sent you a PM about buying your option B kit, I saw you weren't going to use it.
Have a good one!
Thread Starter
New Member
Joined: 03-25-06
Posts: 64
Likes: 0
From: Show Low, AZ
I just ordered my Stage 3 and will be installing it along with my new/used engine.
Great two threads you've made on the nitrous install and A/C over-ride. I'd love to hear how the Stage 3 is holding up thus far?
I also sent you a PM about buying your option B kit, I saw you weren't going to use it.
Have a good one!
Great two threads you've made on the nitrous install and A/C over-ride. I'd love to hear how the Stage 3 is holding up thus far?
I also sent you a PM about buying your option B kit, I saw you weren't going to use it.
Have a good one!
PM sent
