


Timing Chain Tensioner: The REAL How-To


I am assuming that this link would cover all the ecotec motors?
http://www.crateenginedepot.com/pdfs/12608580INS.pdf
http://www.crateenginedepot.com/pdfs/12608580INS.pdf
http://www.crateenginedepot.com/pdfs/12608580INS.pdf
http://www.crateenginedepot.com/pdfs/12608580INS.pdf
takes me 5 minutes to put new style upgraded one on, including opening and closing hood.


Im not trying to troll but this is from GM. I also know that there is an updated tensioner out. I believe this is for the old one.
1. Disconnect the negative battery cable. Refer to Battery Negative Cable Disconnection and Connection .
2. Remove the camshaft cover. Refer to Camshaft Cover Replacement .
3. Remove the timing chain tensioner.
4. Remove the seal from the tensioner.
Installation Procedure
1. Inspect the timing chain tensioner. If the timing chain tensioner, O-ring seal, or washer is damaged, replace the timing chain tensioner or O-ring seal as applicable.
2. Measure the timing chain tensioner assembly from end to end. If the timing chain tensioner is to be replaced, a new tensioner should be supplied in the fully compressed non-active state. A tensioner in the compressed state will measure 72 mm (2.83 in) (a) from end to end. A tensioner in the active state will measure 85 mm (3.35 in) (a) from end to end.
3. If the timing chain tensioner is not in the compressed state, perform the following steps:
3.1 Remove the piston assembly from the body of the timing chain tensioner by pulling it out.
3.2 Install the J 45027-2 (2) into a vise.
3.3 Install the notch end of the piston assembly into the J 45027-2 (2).
3.4 Using the J 45027-1 (1), turn the ratchet cylinder into the piston.
4. Inspect the bore of the tensioner body for dirt, debris, and damage. If any damage appears, replace the tensioner. Clean dirt or debris out with a lint-free cloth.
5. Install the compressed piston assembly back into the timing chain tensioner body until it stops at the bottom of the bore. Do not compress the piston assembly against the bottom of the bore. If the piston assembly is compressed against the bottom of the bore, it will activate the tensioner, which will then need to be reset again.
6. At this point the tensioner should measure approximately 72 mm (2.83 in) (a) from end to end. If the tensioner does not read 72 mm (2.83 in) (a) from end to end, repeat steps 3–5.
7. Inspect to ensure all dirt and debris is removed from the timing chain tensioner threaded hole in the cylinder head.
Caution: Refer to Fastener Caution .
Note: Ensure the timing chain tensioner seal is centered throughout the torque procedure to eliminate the possibility of an oil leak.
8. Install the timing chain tensioner assembly. Tighten the timing chain tensioner to 75 N·m (55 lb ft).
9. The timing chain tensioner is released by compressing the tensioner 2 mm (0.079 in) which will release the locking mechanism in the ratchet. To release the timing chain tensioner, use a suitable tool with a rubber tip on the end. Feed the tool down through the cam drive chest to rest on the cam chain. Then give a sharp jolt diagonally downwards to release the tensioner.
10. Install the camshaft cover. Refer to Camshaft Cover Replacement .
11. Connect the negative battery cable. Refer to Battery Negative Cable Disconnection and Connection .
1. Disconnect the negative battery cable. Refer to Battery Negative Cable Disconnection and Connection .
2. Remove the camshaft cover. Refer to Camshaft Cover Replacement .
3. Remove the timing chain tensioner.
4. Remove the seal from the tensioner.
Installation Procedure
1. Inspect the timing chain tensioner. If the timing chain tensioner, O-ring seal, or washer is damaged, replace the timing chain tensioner or O-ring seal as applicable.
2. Measure the timing chain tensioner assembly from end to end. If the timing chain tensioner is to be replaced, a new tensioner should be supplied in the fully compressed non-active state. A tensioner in the compressed state will measure 72 mm (2.83 in) (a) from end to end. A tensioner in the active state will measure 85 mm (3.35 in) (a) from end to end.
3. If the timing chain tensioner is not in the compressed state, perform the following steps:
3.1 Remove the piston assembly from the body of the timing chain tensioner by pulling it out.
3.2 Install the J 45027-2 (2) into a vise.
3.3 Install the notch end of the piston assembly into the J 45027-2 (2).
3.4 Using the J 45027-1 (1), turn the ratchet cylinder into the piston.
4. Inspect the bore of the tensioner body for dirt, debris, and damage. If any damage appears, replace the tensioner. Clean dirt or debris out with a lint-free cloth.
5. Install the compressed piston assembly back into the timing chain tensioner body until it stops at the bottom of the bore. Do not compress the piston assembly against the bottom of the bore. If the piston assembly is compressed against the bottom of the bore, it will activate the tensioner, which will then need to be reset again.
6. At this point the tensioner should measure approximately 72 mm (2.83 in) (a) from end to end. If the tensioner does not read 72 mm (2.83 in) (a) from end to end, repeat steps 3–5.
7. Inspect to ensure all dirt and debris is removed from the timing chain tensioner threaded hole in the cylinder head.
Caution: Refer to Fastener Caution .
Note: Ensure the timing chain tensioner seal is centered throughout the torque procedure to eliminate the possibility of an oil leak.
8. Install the timing chain tensioner assembly. Tighten the timing chain tensioner to 75 N·m (55 lb ft).
9. The timing chain tensioner is released by compressing the tensioner 2 mm (0.079 in) which will release the locking mechanism in the ratchet. To release the timing chain tensioner, use a suitable tool with a rubber tip on the end. Feed the tool down through the cam drive chest to rest on the cam chain. Then give a sharp jolt diagonally downwards to release the tensioner.
10. Install the camshaft cover. Refer to Camshaft Cover Replacement .
11. Connect the negative battery cable. Refer to Battery Negative Cable Disconnection and Connection .

I know took me about 5 minutes as well. People get so confused bc they read the instructions for the old style tensioner. Maybe people that had problems installing a new tensioner didn't have the most up to date one. There is no spring in the new one to set.



i bought a new up to date tensioner from CEd a few months back, noise went away, then came back, but you can only hear it if the car was recently started and drove for like 1-2 miles, then idles. noise goes away after it is driven any longer and only comes back if the car sits for a few hours. no codes, so ill perfoamnce. the noise is simular the one i had before the tensioner repalced, but it is not as loud. im thinking its just a cobalt thing? lol idk



Thread Starter
Senior Member
Joined: 01-28-11
Posts: 734
Likes: 1
From: Rochester Hills, MI
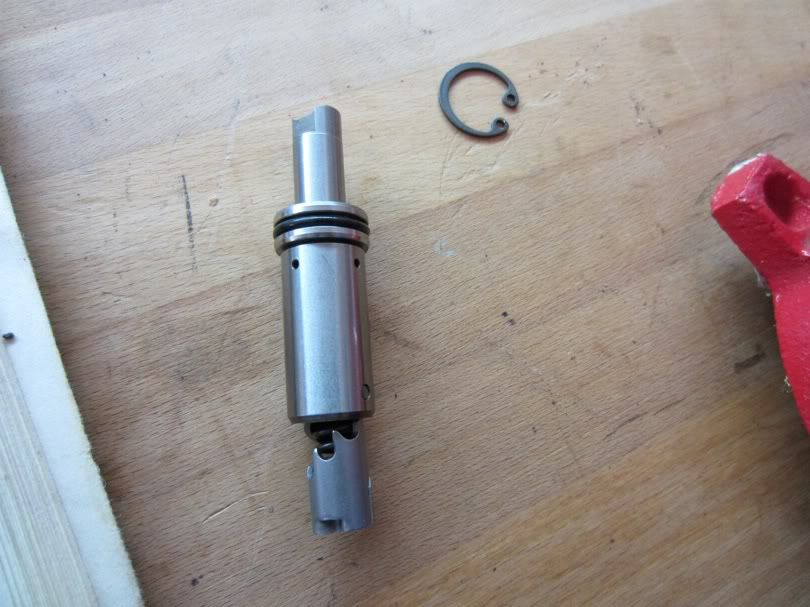
im not sure if its just the disassembled view, but this appears to be the old style tensioner which requires the jolt to the chain guide. the new style tensioner doesn't require a jolt to the guide. it's not the installation of the new style tensioner that can cause issues, but the removal of the tensioner without keeping tension on the chain.

im not sure if its just the disassembled view, but this appears to be the old style tensioner which requires the jolt to the chain guide. the new style tensioner doesn't require a jolt to the guide. it's not the installation of the new style tensioner that can cause issues, but the removal of the tensioner without keeping tension on the chain.

Yeah.... I'm one of those guys who had to change his intake valves... But my ticking noise was created because the bolt in the head on the front-upper most chain guide had come lose and fallen out ( dont ask me how ) and the guide kept moving all over the place bouncing off the head and block.
Yeah.... I'm one of those guys who had to change his intake valves... But my ticking noise was created because the bolt in the head on the front-upper most chain guide had come lose and fallen out ( dont ask me how ) and the guide kept moving all over the place bouncing off the head and block.

Thread
Thread Starter
Forum
Replies
Last Post