
so i got what i deserved

Thread Starter
Senior Member
Joined: 01-31-09
Posts: 1,413
Likes: 0
From: depew, ny
so i got what i deserved
i went cheap and bought the ebay obx header and downpipe, and the flange is bent. too bad i dident know till after i put it on. at first i thought it was the gasket, so i took it off and changed that. still was leaking so i put the stock one. PITA!
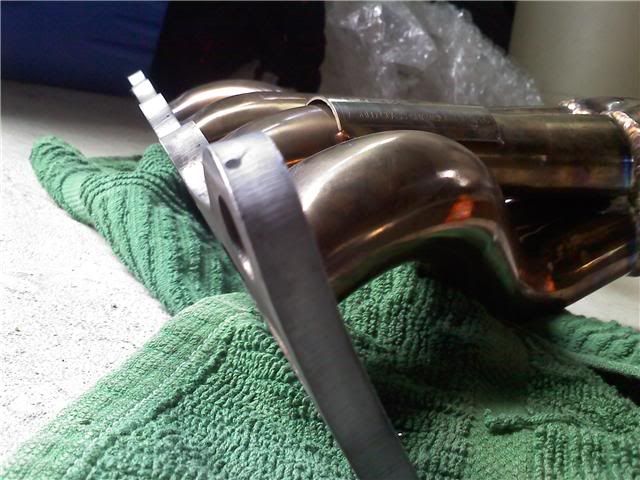
not sure if it came like that, or if it happened when i put it on
if i get my money back, ill buy a zzp setup
not sure if it came like that, or if it happened when i put it on
if i get my money back, ill buy a zzp setup


Senior Member
Joined: 10-28-08
Posts: 5,068
Likes: 0
From: New Milford, NJ
wow, just get it warrantied, i bought a obx a year or 2 ago, worked perfectly, not one problem, hell the local who has it now is still running it, going strong with no issues since it was installed
also did you follow the proper trq order for the exhaust nuts? there is a specific order to tighten them in to preven warpage
also did you follow the proper trq order for the exhaust nuts? there is a specific order to tighten them in to preven warpage
Last edited by Jn2; Sep 17, 2009 at 05:46 PM. Reason: Automerged Doublepost

New Member
Joined: 09-12-09
Posts: 67
Likes: 0
From: USA
Looks like poor manufacturing to me. My guess is that theyn'd destress the welds or had it in a jig to tack it then fully welded it on a bench. poor workman ship. All though it most likley TIG'ed still stress builds up in the structure.
You might be able to fix it if you bolted down to a heavy steel flat bench to (like inch thick)
put a rose bub to it cherry red the slowly cool down with cold air, nor water, the shock might due more damage.
You might be able to fix it if you bolted down to a heavy steel flat bench to (like inch thick)
put a rose bub to it cherry red the slowly cool down with cold air, nor water, the shock might due more damage.
Last edited by Cigar Hero; Sep 17, 2009 at 05:54 PM. Reason: Automerged Doublepost

Junior Member
Joined: 04-18-07
Posts: 431
Likes: 0
From: Apache Junction, AZ
When I got my 4:2:1 header for my wife's 2003 Sunfire 2.2 Ecotec, I had to do A LOT of tweeking to it.
I first noticed the ports had slight difference in size thanks to weld blobs, and tube alignment.
-I dremilled these all to the same size and shape.
Then I noticed that the gaskets did not line up 100%.
-I had to dremil these gaskets to allow the bolts to go through and just as importantly not obstruct air flow. Some material was in the flow pathways! Not any more.
I then took the flange and placed it on my dining room table and notice a slight rocking.
I knew it was warpage.
So I then took it outside to place it on a flat object against the flange and look at the sun.
I could see a little light peering through. It was upsetting, but I knew I could get the flange flat.
-I found the areas that were the problem and ground them down.
-Then I took heavy grit sandpaper and rubbed the flange back and forth on the concrete until there was no more rocking.
-I than used finer grit paper to get the rougness out.
-The drill with a brass attachement was then used.
-I finally went through it all with a honing tip.
After this, no more rocking, it was flat to all flat surfaces and all the gaskets fit and line up with the bolts. All ports match too. All burrs and excess weld blobs are gone.
I knew when I got this off E-bay that it was going to be a project and not a slap it on out of the box.
The good thing is, I didn't spend $350+ on it and was willing to use some elbow grease.

Junior Member
Joined: 04-18-07
Posts: 431
Likes: 0
From: Apache Junction, AZ
The problem is, you got a shop with several people working there and some do good and some don't.
There is also the factor that E-bay sells a lot of no name, or rip-off model headers so who knows half the time if it is a clone or the real deal. Well, I guess if it the real deal, it actually fits out of the box, lol.
Mine needed help, but the price reflected this.
There is also the factor that E-bay sells a lot of no name, or rip-off model headers so who knows half the time if it is a clone or the real deal. Well, I guess if it the real deal, it actually fits out of the box, lol.
Mine needed help, but the price reflected this.


Senior Member
Joined: 10-31-08
Posts: 1,022
Likes: 0
From: Texas
I bought my OBX header off of a guy that decided to upgrade to ZZP, and a week later when I was talking to him the subject of the headers came up and he said he hated the new one he had.
Oh well, I've heard mixed reviews.

Senior Member
Joined: 09-25-08
Posts: 5,384
Likes: 0
From: Depew, NY
Off of George Urban by Transit. Save for good parts man. I've worked on a lot of the fast Cobalt's in this area and you're best off saving and not skipping on cheap parts.
Thread Starter
Senior Member
Joined: 01-31-09
Posts: 1,413
Likes: 0
From: depew, ny

Thread
Thread Starter
Forum
Replies
Last Post
NGalaxyTimmyo
2.0L LSJ Performance Tech
37
Feb 9, 2006 11:26 AM