
Building my turbo LSJ Q and A

Building my turbo LSJ Q and A
I am adding pics daily to make this a helpful thread.
Moar to come...
About the parts/car
With Zrated's help I have so far picked up.
Diamond Pistons
Trend Wrist Pins
Total Seal Rings
New Rod Bearings and Bolts
ARP head studs
GM head gasket
I was able to score a head with the following. Ported head (street, moderate), 3 Angle Valve Job, Vitton Valve Seals, 20� Super Flo. Ferrea Intake Valves, 22� Flo. Ferrea Exhaust Valves, Stock LSJ Cams, at 15000 miles.
Running a 20G turbo with 60's. I have 80's and a brfps on order.
Questions
TTY bolts on the stock rod caps with new bolts are 18ft lbs plus 100 degrees?
ARP Head studs are torqued to 35 65 85 from center bolts out to the edges of the head?
New stock Head gasket need copper gasket spray or not?
Pre-lube piston rings, wrist pin, bearings with what or if at all?
When the surfaces were removed both the used head and my block look filthy from the old head gasket, how do i clean that off to have a prepped surface for the new head gasket?
I have a cylinder ball 240 grit hone from a mechanic friend to remove the cylinder glaze. 10 cycles up and down through the entire cylinder should remove the glaze correct?
Timing gear chain and tensioner have no signs of wear, engine was never upgraded to anything other than stock pulley size and in perfect order. After removing balancer, cover, is it as simple as getting cyl 1 at tdc and putting colored chain mark on the crank? I zip tied the cams to the chain at tdc so the marks up top are good. How do I orient the cams to be in phase since its a different head?
Anything else I am forgetting? Doing this all myself. Been wrenching and fabricating for about 13 years...
Funniest clip ever.
The Fast and the Furious - Dominic Toretto - YouTube
Last edited by c130aviator; Sep 10, 2012 at 09:05 PM. Reason: correctness


Senior Member
Joined: 10-10-10
Posts: 1,848
Likes: 0
From: Eagan, MN
and arp studs are 80-80-80
and lube everything with assembly lube. and then buy break in oil for your first 2 oil changes @ 500 and 1500 then regular synthetic
and lube everything with assembly lube. and then buy break in oil for your first 2 oil changes @ 500 and 1500 then regular synthetic
Last edited by BankerBalt; Sep 6, 2012 at 09:03 PM. Reason: Automerged Doublepost
I thought with head bolts you torque them all down at a lower torque first, then move up in torque so that the head is given equal pressure across the surface before final torque.
Brad Penn break in oil or any old dyno oil will do right?
Thanks.
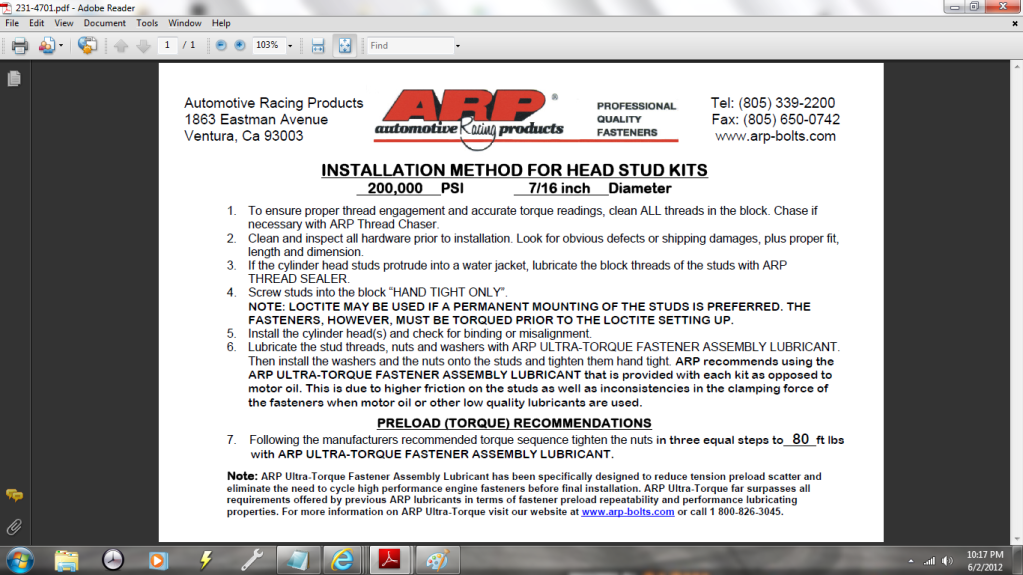
This is straight from ARP so I am guessing this is the right one below.
Originally Posted by ARP
INSTALLATION METHOD FOR HEAD STUD KITS
190,000 Psi 7/16-inch Diameter
[1] To ensure proper thread engagement and accurate torque readings, clean and re-tap ALL threads in the block. Re-tap only if necessary.
[2] Clean and inspect all hardware prior to installation. Look for obvious defects or shipping damages, plus proper fit, length, and dimension.
[3] a. If cylinder head studs protrude into water jacket, lubricate the block threads of the studs with ARP THREAD SEALER.
b. If cylinder head studs protrude into blind hole, lubricate the threads, nuts & washers with ARP MOLY ASSEMBLY LUBRICANT or 30wt motor oil.
c. Screw studs into the block "HAND TIGHT ONLY".
Note: LOCTITE MAY BE USED IF A PERMANENT MOUNTING OF THE STUDS IS PREFERED. THE FASTENERS, HOWEVER, MUST BE TORQUED PRIOR TO THE LOCTITE SETTING UP.
[4] Install cylinder heads and check for binding or misalignment.
[5] ARP recommends using the ARP MOLY LUBRICANT or at the very least, a good quality Moly Lubricant as opposed to motor oil. This is due to higher friction on the studs as well as inconsistencies in the clamping force of the fasteners when motor oil (or low quality lubricant) is used.
PRELOAD (TORQUE) RECOMMENDATIONS:
(A) Torque values are based on 75% of the fasteners yield strength. Use the manufacturers torque sequence but do not use the engine manufacturers torque specs. Torque the nuts to 70 ft lbs for ARP MOLY ASSEMBLY LUBRICANT (or ARP THREAD SEALER) or torque to 85 ft lbs with 30wt motor oil.
(B) Due to the expansion rate of ALUMINUM, it is recommended that the torque should be 65 ft lbs with ARP MOLY ASSEMBLY LUBRICANT (or ARP THREAD SEALER).
Last edited by c130aviator; Sep 6, 2012 at 11:27 PM.
So there are more TTY bolts to worry about. With the cams, you must replace the cam gear bolts and the crank bolts due to resetting timing. because with a ported head the cams will get moved around and there is just no way around this.

i use normal mobil 1 first oil change to get all the **** out and then i use amsoil break in oil for another 500-1000 then i go to full synthetic amsoil..pricey but worth it IMO
Diamond Pistons recommends regular grade oil for new piston rings.
I am going to break it in for 1000 miles with dyno oil and then go back to royal purple through out the engine and tranny.
Last edited by c130aviator; Sep 10, 2012 at 07:49 PM.
ill never use royal purple..used it on my buddies eclipse and it was jus **** oil..after using amsoil ill never go back to normal oils..i use it in my engine and trans and love it i feel it runs alot smoother IMO
if i had a local dealer I would try it but just dont have time to wait for stuff like that, I am moving out of state in 3 weeks and I need my car drivable so I can trailer it behind my Penske.


Got my head in today, oh my word this thing is awesome, the amount of space opened up on the intake side is incredible. 1mm at the opening in both length and width and then opens up to over 3mm in all directions moving into the valves. if that makes any sense. Anyway. Pistons should be here tomorrow and then the build begins!
Senior Member
Joined: 03-12-07
Posts: 1,585
Likes: 1
From: Columbus, Ohio
TTY bolts on the stock rod caps with new bolts are 18ft lbs plus 100 degrees?
I believe this is correct, although I'd have to check it out once more.
ARP Head studs are torqued to 35 35 65 from center bolts out to the edges of the head?
Torque to 80 ft/lbs by 3 equal steps such as 30-60-80.
New stock Head gasket need copper gasket spray or not?
I did not use any copper spray on my head gasket. It is a MLS (multi-layer steel with rubberized cylinder liners).
Pre-lube piston rings, wrist pin, bearings with what or if at all?
Yes, everything needs lube. Pistons, rods, bearings, etc need some assembly lube, coat the cylinder walls with engine oil or WD-40.
When the surfaces were removed both the used head and my block look filthy from the old head gasket, how do i clean that off to have a prepped surface for the new head gasket?
The right answer is to get it cleaned at a machine shop or even milled, but in the interest of a budget build, I have gotten away with a bunch of latex gloves, brake cleaner, and some steel wool. Patience will help.
I have a cylinder ball 240 grit hone from a mechanic friend to remove the cylinder glaze. 10 cycles up and down through the entire cylinder should remove the glaze correct?
10 should be more than enough for removing the glaze/finish. Remember, if you leave the ball hone in there too long, it will start taking away material from the sleeve itself, which, as thin as our sleeves are, is not a good thing. Plus, it may increase piston-to-cylinder-wall clearance, which may be a cracked sleeve in your future. Only a few strokes with the ball hone will do.
Timing gear chain and tensioner have no signs of wear, engine was never upgraded to anything other than stock pulley size and in perfect order. After removing balancer, cover, is it as simple as getting cyl 1 at tdc and putting colored chain mark on the crank? I zip tied the cams to the chain at tdc so the marks up top are good. How do I orient the cams to be in phase since its a different head?
Guides usually don't go bad, but I would get a new chain and tensioner assembly. I've seen quite a few even within the past year have chains that ended up stretching. This includes mine. It's not terribly expensive, and it's good insurance for peace of mind.
Anything else I am forgetting? I am going to install this stuff Saturday with the help of a good ASE mechanic friend of mine.
You should be good with this. I can be of some help if you need it. Call/text at (419) 544-3634. Just make sure it's after the Buckeyes game.
With forged Pistons, stock forged rods, and aforementioned mods. Where do you think my next weak link is at? The sleeves were supposedly good on the 750 hp ecotec build in this article and there were head gasket issues at 600 hp. GM Racing Ecotec Engine - Birth Of The Ultimate Import Fighter? - Turbo Magazine
I am not looking for anything too beast-mode, say 400-425 reliably?
Most of it depends on your builder and the tune. I've seen near-stock cars blow up, and high horsepower cars on mostly stock parts. It's all in how you build and tune it. I would say you're fine at 400ish, but don't be surprised if there is some components of the build that don't last as long. Sleeves are your weak point now.
TennPenn thank you for your help. Your writeup is a huge help. For those looking for more references here is the build.
How-To : Piston Install (LSJ)
and Chapter 6 is the chapter that you deal with in the build book for building with pistons.
GMTunerSource.com - LSJ Build Book - LSJ Build Book
How-To : Piston Install (LSJ)
and Chapter 6 is the chapter that you deal with in the build book for building with pistons.
GMTunerSource.com - LSJ Build Book - LSJ Build Book


How to set ring gaps
I have a table with applications from Total Seal. Shown here.

There are many ways to set the rings up but what you have to do is take Bore x recommended Ring gap in thousands of an inch and you get your gapped amount.
Example 1.
If you take our 3.385 x the Blown Gas Top Ring (.0055) you get .018 ... this is what you need to have the gap filed to.
Take a file and stick it in a vice. Then rub the ring off slowly in an inward direction and square to the sides.
Blown or Turbo Gas* should be used for typical superchargers or turbos.
Total Seal and Diamond Recommend top ring be .024 and Bottom Ring be .014
So if we reverse the math on the ring gaps that would be .024 / bore size or 3.385 equals .007 on the Total seal table picture and .014 / bore size or 3.385 equals .0041 on the total seal table picture.
That is the application right between Nitros over 150 and up to 150. So there recommendation for our big turbo cars (my 400+ horsepower turbo) is to go between big power nitros numbers.
If this is confusing, call total seal.
I have a table with applications from Total Seal. Shown here.
There are many ways to set the rings up but what you have to do is take Bore x recommended Ring gap in thousands of an inch and you get your gapped amount.
Example 1.
If you take our 3.385 x the Blown Gas Top Ring (.0055) you get .018 ... this is what you need to have the gap filed to.
Take a file and stick it in a vice. Then rub the ring off slowly in an inward direction and square to the sides.
Blown or Turbo Gas* should be used for typical superchargers or turbos.
Total Seal and Diamond Recommend top ring be .024 and Bottom Ring be .014
So if we reverse the math on the ring gaps that would be .024 / bore size or 3.385 equals .007 on the Total seal table picture and .014 / bore size or 3.385 equals .0041 on the total seal table picture.
That is the application right between Nitros over 150 and up to 150. So there recommendation for our big turbo cars (my 400+ horsepower turbo) is to go between big power nitros numbers.
If this is confusing, call total seal.
So sick of getting PM's and posts from vendors on here trying to sell stuff at a "discount". I buy my stuff direct and spend less than the sale price. I used to sell product on forums, now I see why people got irritated with all the

Onto the build...
Build Day 1
Honed my cylinders, I borrowed one from O'reilleys and then took it back. Cost FREE. There areent any marks on the cylinders that are felt by fingernail so no worries there. Also the lines in the wall can only be removed with a bore but I dont feel its neccessary at this stage of my build. You can proceed if you dont feel anything with your nail in the cylinder from what I have read.
Hone Deglaze tip.
Use motor oil on the cylinders by applying sparingly with your hands and on the Hone stones. Afterwards spray everyting down with mineral oil or wd40, make sure you attend to your crank to get all that crap off of it. CRANKS get CRANKY when there super polished surfaces get crap on them. Be careful that you dont bust your oil squirters if you did not remove them. They will break a stone or snap themselves off, didnt hit them so not sure how bad you have to hit them, just pay attention.
Cylinder marks.

Installing spirolox retaining springs. I was baffled when I started this,the springs were un bareable to get started. I soon figured out and read online that you can seperate them a bit and work them into the hole. Very easy once you get them started. Be careful not to marr up the wrist pin hole.
Step 1 pull them apart just a bit, dont damage them by pulling too much.

Work one end into the reccess very carefully and start on the opposite side of the spirolox to work the metal down into the cut out.

Using a screwdriver go along to where the spring last stopped and continue to work in a way that will allow you to feed the spirolox in about a quarter at a time.

Bam! dONE, use assembly grease on everything that moves!

See that GM stamp? It goes to the front of the engine towards the intercooler if you will. Orient your "F stamp" on the pistons toward timing and the GM on the rod towards the front.

Should look like this.

Here you can see the F marking, make sure you orient the rod and the piston in the correct positions.

WRIST PINS install. Funny thing here. The LSJ wrist pins are beast, if you want to reuse them by all means go ahead. I used the new ones just because they are new, lighter (less moving mass), and are as thick as the top of the LSJ Rods at the thinnest point. Strength benifits can be debated, but man GM used some biggin's for wrist pins.


My beauties all assembled, lubed and waiting to go in.

Installing and gapping rings. The Total seal rings are aweome. A little about what I learned while installing them. The top ring is hard hard hard steel. It takes forever to use a file to remove the required material. I used .024 top ring. The 2nd ring is soft and took just a few strokes to get to the desired .014. Dont beat yourself up if you are off by .002 or if you misjudged. The rings heat up and expand and the gap is not as big as you think. I got them all right except one top ring I got crazy with on a die grinder (No. 4 Cyl) and went .031 or something like that, its still a tiny gap and I am admitting mistakes to make the next guy that attempts this not feel completly inept. Crap happens, its a build, have fun with it.
use a feeler gauge while the ring is installed in the cylinder to gap your rings the easy way.

Use a file or a bench grinder but take off very small amounts at a time. Check and check and Check. I spent most of my day setting up rings.

Do yourself a favor and get all the specialty tools you can, get a ring install tool (7 bucks), get a piston/ring compressor (rental tool, free), get assebly lube (6~ bucks).

After you have compressed and installed all your pistons with the "F" marks lining up to the left (towards timing chain) and the GM marks towards the front of the car on the Rods...
... clean the head and vaccuum as you scrape, it will keep debris from gunking up your oil and coolant passages.

Shineeeeee.

More tips. Those shiney pistons get nicked by rings, grease from assembly, and markings just from handling. Again dont beat yourself up about it. They are going into a motor that is going to blow them up thousands of times. Your little marks aint gonna hurt them. ENJOY.
More tomorrow, had to go to work.
Honed my cylinders, I borrowed one from O'reilleys and then took it back. Cost FREE. There areent any marks on the cylinders that are felt by fingernail so no worries there. Also the lines in the wall can only be removed with a bore but I dont feel its neccessary at this stage of my build. You can proceed if you dont feel anything with your nail in the cylinder from what I have read.
Hone Deglaze tip.
Use motor oil on the cylinders by applying sparingly with your hands and on the Hone stones. Afterwards spray everyting down with mineral oil or wd40, make sure you attend to your crank to get all that crap off of it. CRANKS get CRANKY when there super polished surfaces get crap on them.
Cylinder marks.
Installing spirolox retaining springs. I was baffled when I started this,the springs were un bareable to get started. I soon figured out and read online that you can seperate them a bit and work them into the hole. Very easy once you get them started. Be careful not to marr up the wrist pin hole.
Step 1 pull them apart just a bit, dont damage them by pulling too much.
Work one end into the reccess very carefully and start on the opposite side of the spirolox to work the metal down into the cut out.
Using a screwdriver go along to where the spring last stopped and continue to work in a way that will allow you to feed the spirolox in about a quarter at a time.
Bam! dONE, use assembly grease on everything that moves!
See that GM stamp? It goes to the front of the engine towards the intercooler if you will. Orient your "F stamp" on the pistons toward timing and the GM on the rod towards the front.
Should look like this.
Here you can see the F marking, make sure you orient the rod and the piston in the correct positions.
WRIST PINS install. Funny thing here. The LSJ wrist pins are beast, if you want to reuse them by all means go ahead. I used the new ones just because they are new, lighter (less moving mass), and are as thick as the top of the LSJ Rods at the thinnest point. Strength benifits can be debated, but man GM used some biggin's for wrist pins.
My beauties all assembled, lubed and waiting to go in.
Installing and gapping rings. The Total seal rings are aweome. A little about what I learned while installing them. The top ring is hard hard hard steel. It takes forever to use a file to remove the required material. I used .024 top ring. The 2nd ring is soft and took just a few strokes to get to the desired .014. Dont beat yourself up if you are off by .002 or if you misjudged. The rings heat up and expand and the gap is not as big as you think. I got them all right except one top ring I got crazy with on a die grinder (No. 4 Cyl) and went .031 or something like that, its still a tiny gap and I am admitting mistakes to make the next guy that attempts this not feel completly inept. Crap happens, its a build, have fun with it.
use a feeler gauge while the ring is installed in the cylinder to gap your rings the easy way.
Use a file or a bench grinder but take off very small amounts at a time. Check and check and Check. I spent most of my day setting up rings.
Do yourself a favor and get all the specialty tools you can, get a ring install tool (7 bucks), get a piston/ring compressor (rental tool, free), get assebly lube (6~ bucks).
After you have compressed and installed all your pistons with the "F" marks lining up to the left (towards timing chain) and the GM marks towards the front of the car on the Rods...
... clean the head and vaccuum as you scrape, it will keep debris from gunking up your oil and coolant passages.
Shineeeeee.
More tips. Those shiney pistons get nicked by rings, grease from assembly, and markings just from handling. Again dont beat yourself up about it. They are going into a motor that is going to blow them up thousands of times. Your little marks aint gonna hurt them. ENJOY.
More tomorrow, had to go to work.
Thank you sir, just wasnt getting the answers I needed. I figured as I scoured the internet for answers I would post up for others looking to do the same. Lots of variables in a build like this but not undoable for a shadetree at all. Time and patience is key.
indeed it is i agree 100%..it took me awhile to source all the parts for my build researching wut pieces work well with certain setups and everything but couldnt be happier...do you do your own tuning?