ADVANCED Performance Modifications For advanced modification topics only.

RWD LSJ Truck Build

Thread Tools
 
Search this Thread
 
Old 12-07-2014, 09:20 AM
  #51  
Senior Member
iTrader: (6)
 
ECaulk's Avatar
 
Join Date: 07-19-10
Location: Houston, Texas
Posts: 26,574
Received 836 Likes on 733 Posts
Awesome build. Are you planning on running a much larger heat exchanger than what the cobalts come with stock?
Old 12-07-2014, 09:14 PM
  #52  
New Member
Thread Starter
iTrader: (6)
 
ChrisR1S's Avatar
 
Join Date: 08-06-09
Location: Virginia
Posts: 178
Likes: 0
Received 0 Likes on 0 Posts
Originally Posted by ECaulk
Awesome build. Are you planning on running a much larger heat exchanger than what the cobalts come with stock?
Thanks man. Initially I'll be running the stock exchanger. I've got much more room in the front of my truck than in the cobalt. I'll place the heat exchanger directly behind the grill and I'll have enough space that I could even theoretically place a fan directly behind the exchanger if I chose to and not interfere with the ac condenser and radiator. If IAT2s are too high I'll upgrade to a larger one but for now I don't see the need immediately. As far as cooling mods I've got a dp endplate, phenolic im spacer, option b, and meth whenever I want to tune for it.
Old 12-07-2014, 09:35 PM
  #53  
Senior Member
iTrader: (6)
 
ECaulk's Avatar
 
Join Date: 07-19-10
Location: Houston, Texas
Posts: 26,574
Received 836 Likes on 733 Posts
Originally Posted by ChrisR1S
Thanks man. Initially I'll be running the stock exchanger. I've got much more room in the front of my truck than in the cobalt. I'll place the heat exchanger directly behind the grill and I'll have enough space that I could even theoretically place a fan directly behind the exchanger if I chose to and not interfere with the ac condenser and radiator. If IAT2s are too high I'll upgrade to a larger one but for now I don't see the need immediately. As far as cooling mods I've got a dp endplate, phenolic im spacer, option b, and meth whenever I want to tune for it.
I know only a bit about the LSJ's but everything I remember is the stock system needs more fluid, so even a secondary tank would be helpful. I'm sure someone will correct me if i'm wrong
Old 12-07-2014, 10:24 PM
  #54  
New Member
Thread Starter
iTrader: (6)
 
ChrisR1S's Avatar
 
Join Date: 08-06-09
Location: Virginia
Posts: 178
Likes: 0
Received 0 Likes on 0 Posts
Originally Posted by ECaulk
I know only a bit about the LSJ's but everything I remember is the stock system needs more fluid, so even a secondary tank would be helpful. I'm sure someone will correct me if i'm wrong
More fluid volume does indeed have its benefits. With the option b tank and all the extra plumbing with my rwd setup I'll have a bit more fluid capacity than a stock setup.
Old 12-08-2014, 11:47 AM
  #55  
Senior Member
iTrader: (1)
 
BlackielawlessSS's Avatar
 
Join Date: 10-03-13
Location: Haslet, TX
Posts: 18,492
Received 287 Likes on 265 Posts
DANGA! RANGA! Nice build! I dig it!
Old 12-08-2014, 12:15 PM
  #56  
Senior Member
iTrader: (4)
 
InfraRedline's Avatar
 
Join Date: 08-22-08
Location: Alpharetta, GA
Posts: 7,190
Likes: 0
Received 6 Likes on 5 Posts
Good stuff! Keep us updated as you accomplish more. This is fun to watch.
Old 12-09-2014, 02:33 PM
  #57  
New Member
Thread Starter
iTrader: (6)
 
ChrisR1S's Avatar
 
Join Date: 08-06-09
Location: Virginia
Posts: 178
Likes: 0
Received 0 Likes on 0 Posts
Originally Posted by InfraRedline
Good stuff! Keep us updated as you accomplish more. This is fun to watch.
Thanks for all the positives everyone! It's going slower than I'd like but we're making progress. More updates:

Here's the clutch disc I'll be running. Yes it's an XTD, yes it came from eBay for $50. However I know people who run them without issues in an array of vehicles so I'm not too worried. If something happens XTD does have a warranty policy. The clutch is stage 2or3 (can't remember) 6 puck for a 90 Toyota supra. I couldn't use my gmpp clutch disc because the spline count on my r154 is different than the cobalt. Discs are the same size so all should mesh together just fine.
Name:  20141207_121926.jpg
Views: 1212
Size:  129.4 KB

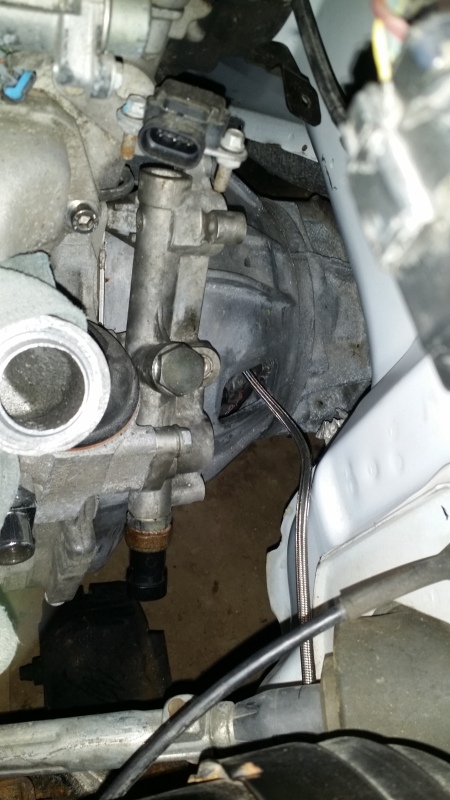
I got my braided -3an clutch line made up and ran. All I have left is to do is secure it to the firewall to satisfy my ocd.[URL=http://smg.photobucket.com/user/ChrisR1S/media/Mobile%20Uploads/20141207_120136.jpg.html]Name:  20141207_120136.jpg
Views: 1276
Size:  154.0 KB[/URLName:  20141207_120115.jpg
Views: 1229
Size:  152.5 KB

Here you can see the transmission mount resting on my aftermarket transmission crossmember. Gotta figure out how I want to mount it.Name:  20141207_120151.jpg
Views: 1219
Size:  136.6 KB

Fuel line adapter for an ls1 fits perfectly for anyone wondering. I am trading out the -6an straight pushlock fitting for a 90 fitting. Name:  20141207_125121.jpg
Views: 1258
Size:  156.5 KB
heater hoses mocked up. Anyone know if the orientation of the hoses coming from the lsj matters? I don't see why it would..Name:  20141207_142418.jpg
Views: 1272
Size:  179.1 KB

And just one showing how it's all currently sitting. Motor has the 10 degree tilt to the side as it should and it won't be tilted back as bad once trans mount is done. Name:  IMG_20141207_125208.jpg
Views: 1273
Size:  211.2 KB
Old 12-09-2014, 02:56 PM
  #58  
Senior Member
iTrader: (16)
 
blueLNFftw's Avatar
 
Join Date: 07-22-12
Location: Florida
Posts: 10,397
Received 84 Likes on 69 Posts
Ballin!
Old 12-09-2014, 03:03 PM
  #59  
Senior Member
iTrader: (2)
 
jonathan923's Avatar
 
Join Date: 01-07-09
Location: Queens, NY
Posts: 7,881
Likes: 0
Received 1 Like on 1 Post
simply awesome. will you have enough space in the back to run a actual pipe for the intake? very nicely done so far man. props! love projects like these!
Old 12-09-2014, 03:04 PM
  #60  
Senior Member
iTrader: (4)
 
InfraRedline's Avatar
 
Join Date: 08-22-08
Location: Alpharetta, GA
Posts: 7,190
Likes: 0
Received 6 Likes on 5 Posts
That's looking really good. Definitely have to appreciate the work that has been put into it so far!
Old 12-09-2014, 07:38 PM
  #61  
New Member
Thread Starter
iTrader: (6)
 
ChrisR1S's Avatar
 
Join Date: 08-06-09
Location: Virginia
Posts: 178
Likes: 0
Received 0 Likes on 0 Posts
Originally Posted by jonathan923
simply awesome. will you have enough space in the back to run a actual pipe for the intake? very nicely done so far man. props! love projects like these!
Thanks! I won't have room behind the motor no. The elbows are to get my intake piping either above the engine or beside it on the driver side. Right now I can do either. But I need to route coolant lines, oil lines, and have the trans mount complete before I can truly see whatll work best.
Ive pondered going above the motor along the firewall and using the opening where the ecu was (hole to left of motor) to give fresh air but I don't know if it'll be feasible or even worth it
Old 12-10-2014, 01:44 AM
  #62  
Senior Member
 
Mendomar06's Avatar
 
Join Date: 02-13-11
Location: Tri-Cities, WA
Posts: 2,471
Likes: 0
Received 1 Like on 1 Post
I am digging this!!!
Old 12-10-2014, 02:28 AM
  #63  
Senior Member
iTrader: (2)
 
armcclure's Avatar
 
Join Date: 01-10-11
Posts: 3,894
Received 20 Likes on 17 Posts
Just make sure bottom of oil pan is parallel with the ground. The kappa bell clocks the motor for this so as long as the trans is straight you should be golden.
Old 12-10-2014, 05:18 AM
  #64  
New Member
Thread Starter
iTrader: (6)
 
ChrisR1S's Avatar
 
Join Date: 08-06-09
Location: Virginia
Posts: 178
Likes: 0
Received 0 Likes on 0 Posts
Originally Posted by armcclure
Just make sure bottom of oil pan is parallel with the ground. The kappa bell clocks the motor for this so as long as the trans is straight you should be golden.
Golden. Kappa mounts have it sitting perfect other than my oil drain being over top my crossmember. Oh well lol
Old 12-10-2014, 08:21 AM
  #65  
Senior Member
iTrader: (2)
 
68nova200's Avatar
 
Join Date: 11-05-07
Location: NJ
Posts: 2,404
Likes: 0
Received 1 Like on 1 Post
Originally Posted by ChrisR1S
Golden. Kappa mounts have it sitting perfect other than my oil drain being over top my crossmember. Oh well lol
put a fumoto drain valve on it with a hose and youll be fine.
Old 12-10-2014, 01:54 PM
  #66  
New Member
Thread Starter
iTrader: (6)
 
ChrisR1S's Avatar
 
Join Date: 08-06-09
Location: Virginia
Posts: 178
Likes: 0
Received 0 Likes on 0 Posts
Originally Posted by 68nova200
put a fumoto drain valve on it with a hose and youll be fine.
I was thinking something along those lines..maybe a 90 degree an fitting in place of the drain plug routed to a bracket with a plug on the crossmember or bottom of frame rail for easy access. No one likes to have to jack their ride up for oil changes lol
Old 12-10-2014, 03:01 PM
  #67  
Junior Member
 
Viperoni's Avatar
 
Join Date: 04-18-14
Location: Mississauga, ON, Canada
Posts: 424
Received 7 Likes on 7 Posts
Great work, this is a sweet project!
Old 12-11-2014, 12:40 AM
  #68  
Senior Member
iTrader: (5)
 
andrewcarr1993's Avatar
 
Join Date: 10-23-12
Location: Clarence, NY
Posts: 5,142
Likes: 0
Received 2 Likes on 2 Posts
No one likes to jack their ride up? Maybe with a pickup but normal cobalts don't have a choice, I can't even fit the ramps we have and I'm only on YYZ.

Anyways though, looks amazing and can't wait to see it up and running. I believe Powell mentioned the best setup would be a Griffin with a 5 gallon holding tank.
Old 12-12-2014, 06:08 PM
  #69  
New Member
Thread Starter
iTrader: (6)
 
ChrisR1S's Avatar
 
Join Date: 08-06-09
Location: Virginia
Posts: 178
Likes: 0
Received 0 Likes on 0 Posts
Originally Posted by andrewcarr1993
No one likes to jack their ride up? Maybe with a pickup but normal cobalts don't have a choice, I can't even fit the ramps we have and I'm only on YYZ.

Anyways though, looks amazing and can't wait to see it up and running. I believe Powell mentioned the best setup would be a Griffin with a 5 gallon holding tank.
This things worse than my cobalt was, I have to remove the bumper to get it on the car trailer and before I can jack it up I have to drive onto 2x4s lol. I have been reading into a large holding tank to increase volume. Seems the cobra guys have good results doing so. I think that an a killer chiller setup would be ****.

Here's my exciting Friday night:Name:  IMG_20141212_175814.jpg
Views: 1217
Size:  145.9 KB

Anybody wanna help figure the wiring part out? Hahaha
Old 12-12-2014, 07:53 PM
  #70  
Moderator
Platinum Member
Moderator
iTrader: (1)
 
Slowbalt2000's Avatar
 
Join Date: 05-15-11
Location: Livonia, MI
Posts: 27,413
Received 584 Likes on 519 Posts
What do you need help with
Old 12-12-2014, 09:06 PM
  #71  
New Member
Thread Starter
iTrader: (6)
 
ChrisR1S's Avatar
 
Join Date: 08-06-09
Location: Virginia
Posts: 178
Likes: 0
Received 0 Likes on 0 Posts
Originally Posted by Slowbalt2000
What do you need help with
Not sure yet. Think I've got the standalone wiring figured out but I guess I won't know till I'm ready to fire it up.

I'm under the impression that I'll have to supply ground, +12 volt constant, keyed +12 volt, a "main relay" for the pcm, a relay for the fuel pump, and that should allow the engine to crank.

I've got pcm pinouts in front of me and all the lsj wiring schematics from alldata spread out here getting it all labeled. I'll take it to the truck and route it all tomorrow and get it ready to wire up a fuse/relay box.
Old 12-13-2014, 11:03 AM
  #72  
New Member
Thread Starter
iTrader: (6)
 
ChrisR1S's Avatar
 
Join Date: 08-06-09
Location: Virginia
Posts: 178
Likes: 0
Received 0 Likes on 0 Posts
Originally Posted by Slowbalt2000
What do you need help with
Name:  2014-12-13104828.jpg
Views: 1235
Size:  239.3 KB

The plug circled in red, it's in the same bundle as the evap purge solenoid. Same style plug as the for the coil harness. I need someone with an lsj to look at their car and tell me what it goes to. It's wires are intertwined everywhere.
Pink wire goes to fuse box, red w black stripe goes to ac pressure line, lime green goes to a 2 wire plug(other wire is pink that goes to fuse box as well) that I have no clue what it's for either, light blue goes to I think an Iat sensor, tan goes to pcm plug c3 pin 10 which is signal for boost gauge, dark green goes to pcm plug c2 pin 58 which is for an 02 sensor. Haven't chased the others down yet
Old 12-13-2014, 02:16 PM
  #73  
Moderator
Platinum Member
Moderator
iTrader: (1)
 
Slowbalt2000's Avatar
 
Join Date: 05-15-11
Location: Livonia, MI
Posts: 27,413
Received 584 Likes on 519 Posts
Sounds like another piece to the harness plugs into there. You dont see it on your schematics?
Old 12-13-2014, 03:27 PM
  #74  
New Member
Thread Starter
iTrader: (6)
 
ChrisR1S's Avatar
 
Join Date: 08-06-09
Location: Virginia
Posts: 178
Likes: 0
Received 0 Likes on 0 Posts
Originally Posted by Slowbalt2000
Sounds like another piece to the harness plugs into there. You dont see it on your schematics?
Not from anything I got from alldata. Wish I had a service manual to reference
Old 12-13-2014, 03:38 PM
  #75  
Senior Member
iTrader: (2)
 
TStone's Avatar
 
Join Date: 02-21-11
Location: Dayton, Ohio
Posts: 3,311
Likes: 0
Received 7 Likes on 7 Posts
Coil pack harness and throttle body are the same style plug...... There's also a connector up against the firewall that I believe is the same.

That plug should be the one up against the firewall. I believe it goes inside the car to the IP stuff

Last edited by TStone; 12-13-2014 at 03:38 PM. Reason: Automerged Doublepost


Quick Reply: RWD LSJ Truck Build


All times are GMT -4. The time now is 12:20 PM.