
High rise, low rise, or no rise? Results!

Thread Starter
Senior Member
iTrader: (4)
Joined: 10-19-07
Posts: 2,805
Likes: 2
From: South Mississippi
Okay so I had a thread a few weeks ago with a poll where everyone voted on which type of wing should go on my car. High rise, low rise, or no rise? Well, the majority voted for me to keep the high rise, but paint it black. The runner up was to go wingless. Well... I'll let you see for yourself.
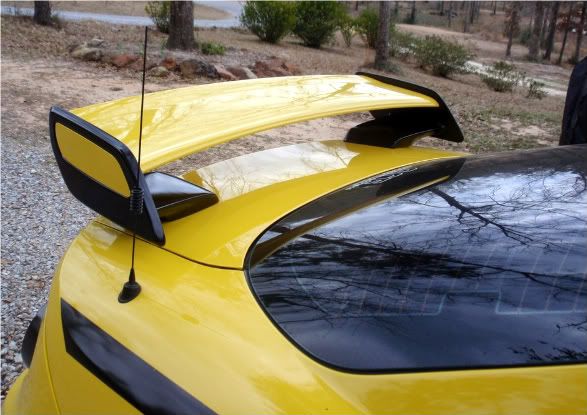
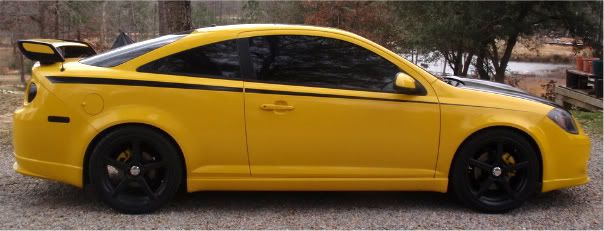
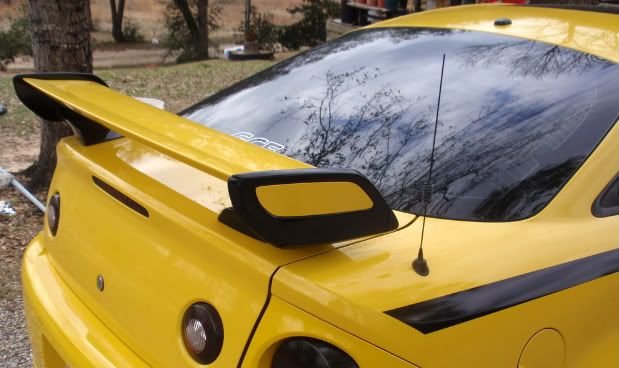

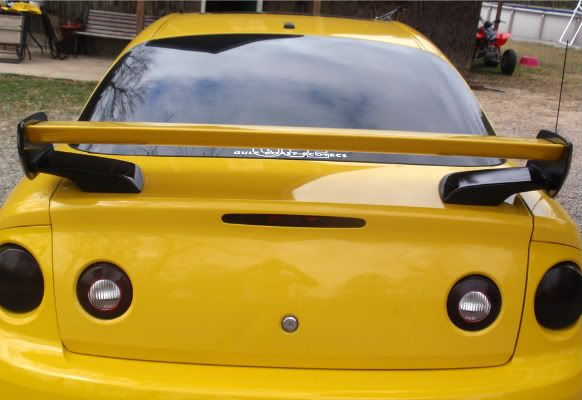
I took everyone's advice, and twisted it a little bit. I haven't saw anybody do this to their wing yet, so hopefully I'm the first. Correct me if I'm wrong though. I'm proud to admit that I, along with some help from my good friend Rusty, painted this. Why pay someone to do something that you can do yourself?
List of materials used:
Duplicolor Black sandable primer
Duplicolor Acrylic Enamel gloss black
Duplicolor Acrylic Enamel clear coat
150 grit, 300 grit, 800 grit (wet sand), and 2000 grit (wet sand) sand paper
Paint thinner
3M Super Strength Molding Tape
^^^All of this can be bought at your local advanced auto parts/o'riellys.
Those were arrival blue. Rusty had an extra set laying around so we decided why not use them? In case we messed up we could throw the yellow ones back on.
Thanks for looking and helping me decide! Feel free to post your wing pictures here also!


Senior Member
Joined: 05-18-08
Posts: 2,495
Likes: 0
From: louisville k.y
Okay so I had a thread a few weeks ago with a poll where everyone voted on which type of wing should go on my car. High rise, low rise, or no rise? Well, the majority voted for me to keep the high rise, but paint it black. The runner up was to go wingless. Well... I'll let you see for yourself.
I took everyone's advice, and twisted it a little bit. I haven't saw anybody do this to their wing yet, so hopefully I'm the first. Correct me if I'm wrong though. I'm proud to admit that I, along with some help from my good friend Rusty, painted this. Why pay someone to do something that you can do yourself?
List of materials used:
Duplicolor Black sandable primer
Duplicolor Acrylic Enamel gloss black
Duplicolor Acrylic Enamel clear coat
150 grit, 300 grit, 800 grit (wet sand), and 2000 grit (wet sand) sand paper
Paint thinner
3M Super Strength Molding Tape
^^^All of this can be bought at your local advanced auto parts/o'riellys.
Those were arrival blue. Rusty had an extra set laying around so we decided why not use them? In case we messed up we could throw the yellow ones back on.
Thanks for looking and helping me decide! Feel free to post your wing pictures here also!

Thread Starter
Senior Member
iTrader: (4)
Joined: 10-19-07
Posts: 2,805
Likes: 2
From: South Mississippi


Thread Starter
Senior Member
iTrader: (4)
Joined: 10-19-07
Posts: 2,805
Likes: 2
From: South Mississippi
My friend and I sanded it pretty good with 150 grit. We didn't sand all of the paint off, but we got the entire surface roughed up pretty well.
Step 2:
After wiping the pieces off with a rag and paint thinner, we sprayed on a heavy coat of sandable primer. We then let it dry.
Step 3:
Once the primer was dry, we sanded the surface smooth with 300 grit. Again, we wiped the surface with the paint thinner and rag.
Step 4:
We applied 2 even coats of gloss black. We then let it dry.
Step 5:
We corrected any runs/bubbles in the paint by wet sanding with the 300 grit. Once those were sanded down smooth, we wet sanded the entire surface with 800 grit. Once the water dried, we wiped it with a rag dampened with paint thinner and sprayed another layer of gloss black. We then let it dry. Repeat this step if runs/bubbles/imperfections continue to appear. If they continue to appear, you either need to step back from it and take a break for a while, or you don't need to be painting.
Step 6:
Let the paint sit for a few hours. We let these pieces dry over night. If you're in no rush, then I'd advise you do this. If you're kinda in a hurry, then a few hours will do. Just make sure it isn't too humid or cold outside to be painting.
Step 7:
Wipe the pieces with a rag dampened with paint thinner. It will dry rather quickly. Then apply the first layer of clear evenly as possible. Allow for it to dry. If imperfections are in the clear once it's dry, wet sand with 800 grit, then 2000 grit, let dry, and reapply with another layer of clear. Continue until perfect!
Step 8:
Like the paint, allow plenty of time for the clear to dry. I'll pass on a bit of knowledge that Rusty told me. "It's better to do it right instead of doing it right now."
I used the 3M tape to reapply the end caps on to the wing.
I hope this helps everyone! I wish I had pictures during the install, but all I have is the finished product! Thanks again!


^i think it looks good but you need a pinstripe IMO. The body of the car is just too yellow and needs something to break it up
maybe a badge in the corner or something. i dunno. just a suggestion
maybe a badge in the corner or something. i dunno. just a suggestion
 get that **** outta here.

