


Paint experts in here please!


Thread Starter
Senior Member
Joined: 02-22-07
Posts: 3,673
Likes: 0
From: Elmira,ON, Canada
Paint experts in here please!
I'm picking up a SOM wingless trunk that I will be painting LBM. I have lots of experience working with an HVLP spray gun, but I have never used automotive paints, so I have a few questions.
1) What grits of paper should I buy for sanding?
2) Do I need to prime it or just sand it and then paint it and clear coat it? I have a deep scratch on one of my rear quarter panels that needs fixing, so I will probably buy some primer anyway.
3)What PSI should I use for spraying?
4)Should I get my LBM paint from a GM dealer or will any auto body supply shop be able to match the color for me?
Any advice you can provide would be appreciated!
1) What grits of paper should I buy for sanding?
2) Do I need to prime it or just sand it and then paint it and clear coat it? I have a deep scratch on one of my rear quarter panels that needs fixing, so I will probably buy some primer anyway.
3)What PSI should I use for spraying?
4)Should I get my LBM paint from a GM dealer or will any auto body supply shop be able to match the color for me?
Any advice you can provide would be appreciated!


If your trying to do a show finish on the car that your painting, you will want to sand it by hand with water running on it all the time.
You need to pay close attention to detail on this part of the paint job, the better you sand it, the better it will look. I usually start with 320 grit wet paper on a medium hard block, this grit is good for getting the guide coat smoothed out, their will most likely be some small low spots that will require either spot filler or more primer. This is one of those areas where you need to pay a little attention to detail, here you will need to look at the depth of the low spot and think about it, how low is it will primer alone fill it, or will it take spot filler and then primer.
Since you've finished that part it's time to move on to the next grit of paper, I usually move to 400 grit on a medium- hard sanding block from here, you don't want to move up to far because it can leave scratches form the previous grit of paper, so a word to the wise, don't get in a hurry and move up to far a once this will leave seeable scratches in your work. After you've sanded the whole car with the 400 grit wet paper then inspect it for bare metal and guide coat still there.
The whole idea with sanding is to make the primer look the way that you want the paint to look, I sand my primer until it has a smooth shiny finish on it, as if it were the paint on the car.
You need to have a vision of how you want it to look, the one thing that you need to know is, the better you want it to look, the more you will pay for materials. Just a word of caution cheap paint materials are just exactly that cheap!!!!! and don't use them if you want a nice paint job.
You might save some money but you will not save the agony of a crappy looking paint job. Think about this before you go and buy cheap primers and paints, do I love my car or is it just some turd to push me to work and the old ladies and back, if you love your car then don't put cheap crap on it.
Now that I'm through with my little lecture on low quality products, it's time to move on to the next sanding step. From 400 grit I usually move up to 600 grit wet paper, this is where I usually stop unless requested to go one more step, this is really as far as you need to go with the sanding. After you finish with the 600 grit do one final inspection of the work before cleaning it.
Recommended Air Pressure At Gun Head. Paint Mix Ratios. Paint Product.
25-40 PSI Mix 4:1:1 Base Coat
25-40 PSI Mix 4:1:1 Sealer
25-40 PSI Mix 4:1:1 Clear Coat
25-40 PSI Mix 2:1:1 Primer Coat
The paint it self you could get from GM, Dupont, PPG, House of Kolor.
You need to pay close attention to detail on this part of the paint job, the better you sand it, the better it will look. I usually start with 320 grit wet paper on a medium hard block, this grit is good for getting the guide coat smoothed out, their will most likely be some small low spots that will require either spot filler or more primer. This is one of those areas where you need to pay a little attention to detail, here you will need to look at the depth of the low spot and think about it, how low is it will primer alone fill it, or will it take spot filler and then primer.
Since you've finished that part it's time to move on to the next grit of paper, I usually move to 400 grit on a medium- hard sanding block from here, you don't want to move up to far because it can leave scratches form the previous grit of paper, so a word to the wise, don't get in a hurry and move up to far a once this will leave seeable scratches in your work. After you've sanded the whole car with the 400 grit wet paper then inspect it for bare metal and guide coat still there.
The whole idea with sanding is to make the primer look the way that you want the paint to look, I sand my primer until it has a smooth shiny finish on it, as if it were the paint on the car.
You need to have a vision of how you want it to look, the one thing that you need to know is, the better you want it to look, the more you will pay for materials. Just a word of caution cheap paint materials are just exactly that cheap!!!!! and don't use them if you want a nice paint job.
You might save some money but you will not save the agony of a crappy looking paint job. Think about this before you go and buy cheap primers and paints, do I love my car or is it just some turd to push me to work and the old ladies and back, if you love your car then don't put cheap crap on it.
Now that I'm through with my little lecture on low quality products, it's time to move on to the next sanding step. From 400 grit I usually move up to 600 grit wet paper, this is where I usually stop unless requested to go one more step, this is really as far as you need to go with the sanding. After you finish with the 600 grit do one final inspection of the work before cleaning it.
Recommended Air Pressure At Gun Head. Paint Mix Ratios. Paint Product.
25-40 PSI Mix 4:1:1 Base Coat
25-40 PSI Mix 4:1:1 Sealer
25-40 PSI Mix 4:1:1 Clear Coat
25-40 PSI Mix 2:1:1 Primer Coat
The paint it self you could get from GM, Dupont, PPG, House of Kolor.
Last edited by xodus; Jun 18, 2010 at 09:38 PM. Reason: Automerged Doublepost
Thread Starter
Senior Member
Joined: 02-22-07
Posts: 3,673
Likes: 0
From: Elmira,ON, Canada
Thanks Xodus! I won't buy cheap paint products. I have a few more questions.
1) What size tip should I use in the gun? The gun I have has a 1.4mm tip, which I am assuming is too big for automotive paints?
2) What do I mix the paint with for thinning purposes?
3) How many coats each of base color and clear should I do?
1) What size tip should I use in the gun? The gun I have has a 1.4mm tip, which I am assuming is too big for automotive paints?
2) What do I mix the paint with for thinning purposes?
3) How many coats each of base color and clear should I do?
for the thinner , you can use lacquer thinner,
a 1.4 tip will be fine,
primer-3 coats 10 min flash time
for the base i would do 2 coats, with 15 minute flash time, and
clear i would do 3 medium wet coats 10-15 in flash time
a 1.4 tip will be fine,
primer-3 coats 10 min flash time
for the base i would do 2 coats, with 15 minute flash time, and
clear i would do 3 medium wet coats 10-15 in flash time
Thread Starter
Senior Member
Joined: 02-22-07
Posts: 3,673
Likes: 0
From: Elmira,ON, Canada

Thanks!
So the idea is to do another coat before the previous coat is completely dry?
Thread Starter
Senior Member
Joined: 02-22-07
Posts: 3,673
Likes: 0
From: Elmira,ON, Canada

New Member
Joined: 11-28-09
Posts: 41
Likes: 0
From: Old Saybrook
wow i wouldnt take any of his advice well actually maybe 10% of what he said! you deff want to use a 1.3 tip and you deff want to let the first coat of base dry otherwise it will wrinkle up on you cause your not letting the first coat flash off aka dry and dont use laquer thinner use paint reducer the same brand as your base coat it will say the mixing ratio on the can one quart will be plenty for a trunk I would recommend 28 psi with 1.3 tip trust me I paint all the corvettes for whelen motorsports been painting cars for almost 10 years now check out the vette pics!
Thread Starter
Senior Member
Joined: 02-22-07
Posts: 3,673
Likes: 0
From: Elmira,ON, Canada
wow i wouldnt take any of his advice well actually maybe 10% of what he said! you deff want to use a 1.3 tip and you deff want to let the first coat of base dry otherwise it will wrinkle up on you cause your not letting the first coat flash off aka dry and dont use laquer thinner use paint reducer the same brand as your base coat it will say the mixing ratio on the can one quart will be plenty for a trunk I would recommend 28 psi with 1.3 tip trust me I paint all the corvettes for whelen motorsports been painting cars for almost 10 years now check out the vette pics!


Banned
Joined: 02-19-09
Posts: 3,818
Likes: 0
From: Carol Stream
I'm picking up a SOM wingless trunk that I will be painting LBM. I have lots of experience working with an HVLP spray gun, but I have never used automotive paints, so I have a few questions.
1) What grits of paper should I buy for sanding?
first thing you need to address and ask yourself......is there any damage to either the inside out outside of my trunk? specify the damage. dents, chips, poor paintjob, etc etc. now if you dont have any damage i normally try to seal used parts. so i would normally finish the parts in 400 grit and a red scotch brite pad. i use 400 wet because it leaves a nicer finish and then flip it and reverse the process inside with the 400 grit getting what you can and then a scotch bright for the rest. you want to try and leave no shiney spots or you are prone for the paint to fail later down the line.
2) Do I need to prime it or just sand it and then paint it and clear coat it? I have a deep scratch on one of my rear quarter panels that needs fixing, so I will probably buy some primer anyway.
if you dont fix any damage in the trunk you are just taking an extra unnessicary step. normally when i get used parts that have a lot of chips or have some dents ill sand the whole trunk with 180 grit feathering out any chips and prime the entire outside to get any small scratches or anything that might have been missed. then i will block everything out with 220 and 400 dry and then follow with 600 and 800 wet to finish it off. if you only have some chips on the edges and maybe a dent or 2 just spot prime the dents and finish the chips with a step process using 400-600-800 and you can paint right over where the where.
3)What PSI should I use for spraying?
depends on your gun, paint, mix ratios etc etc. for my lines of paint such as spies and hekker and i was previously on standox(switched shops) i would normally for....
Clear - 27psi with a 1.3mm sata 3000 2:1:1 - usually put 2-4 coats depending on the job and customer. 2 for standard jobs and 4 for anything show car or custom
Base Coat - 25-27psi depending on how much im spraying with a 1.3mm sata 3000 1:60%
Sealer - 25-27psi with a 1.4mm sata 3000 2:1-4 coats usually unless the colors transparent and requires more - usually you only put 1 coat
Primer - anywhere from 10psi to 25 psi changing the fluid and fan pattern for the area im spraying in out a 1.7mm sata primer gun. 4:1 - 4-5 coats is the usually but if you are paranoid of your body work only put 5-6. remember dont primer all the way to the paper. you want to fan out your primer so you dont leave a hardline.
4)Should I get my LBM paint from a GM dealer or will any auto body supply shop be able to match the color for me?
have a supply shop tint the color as best as they can to the color of your car. also ask them if they can give you some blending solvent aswell that you would spray down on your quarter panel to help the metallics set in with your blend on the quarter panel. also when doing a blend from say the rear of the quarter to the door remember you need to space out your coats. ill usually get complete coverage over my area of repair while fanning the paint down the quarter a little bit. DO NOT STOP IN A STRAIGHT LINE WITH THE GUN OR YOU WILL LEAVE A LINE OF COLOR THAT WILL SHOW LATER. usually after the primered area is covered ill go 2 extra coats with the base reduced 1:1 to make it more transparent and extend my coats a little bit closer to the door leaving a blend that you will not notice to the eye at all.
best paint recommendations would be rm which is now basf, standox, spies and hekker. dupont and ppg blow.
Any advice you can provide would be appreciated!
1) What grits of paper should I buy for sanding?
first thing you need to address and ask yourself......is there any damage to either the inside out outside of my trunk? specify the damage. dents, chips, poor paintjob, etc etc. now if you dont have any damage i normally try to seal used parts. so i would normally finish the parts in 400 grit and a red scotch brite pad. i use 400 wet because it leaves a nicer finish and then flip it and reverse the process inside with the 400 grit getting what you can and then a scotch bright for the rest. you want to try and leave no shiney spots or you are prone for the paint to fail later down the line.
2) Do I need to prime it or just sand it and then paint it and clear coat it? I have a deep scratch on one of my rear quarter panels that needs fixing, so I will probably buy some primer anyway.
if you dont fix any damage in the trunk you are just taking an extra unnessicary step. normally when i get used parts that have a lot of chips or have some dents ill sand the whole trunk with 180 grit feathering out any chips and prime the entire outside to get any small scratches or anything that might have been missed. then i will block everything out with 220 and 400 dry and then follow with 600 and 800 wet to finish it off. if you only have some chips on the edges and maybe a dent or 2 just spot prime the dents and finish the chips with a step process using 400-600-800 and you can paint right over where the where.
3)What PSI should I use for spraying?
depends on your gun, paint, mix ratios etc etc. for my lines of paint such as spies and hekker and i was previously on standox(switched shops) i would normally for....
Clear - 27psi with a 1.3mm sata 3000 2:1:1 - usually put 2-4 coats depending on the job and customer. 2 for standard jobs and 4 for anything show car or custom
Base Coat - 25-27psi depending on how much im spraying with a 1.3mm sata 3000 1:60%
Sealer - 25-27psi with a 1.4mm sata 3000 2:1-4 coats usually unless the colors transparent and requires more - usually you only put 1 coat
Primer - anywhere from 10psi to 25 psi changing the fluid and fan pattern for the area im spraying in out a 1.7mm sata primer gun. 4:1 - 4-5 coats is the usually but if you are paranoid of your body work only put 5-6. remember dont primer all the way to the paper. you want to fan out your primer so you dont leave a hardline.
4)Should I get my LBM paint from a GM dealer or will any auto body supply shop be able to match the color for me?
have a supply shop tint the color as best as they can to the color of your car. also ask them if they can give you some blending solvent aswell that you would spray down on your quarter panel to help the metallics set in with your blend on the quarter panel. also when doing a blend from say the rear of the quarter to the door remember you need to space out your coats. ill usually get complete coverage over my area of repair while fanning the paint down the quarter a little bit. DO NOT STOP IN A STRAIGHT LINE WITH THE GUN OR YOU WILL LEAVE A LINE OF COLOR THAT WILL SHOW LATER. usually after the primered area is covered ill go 2 extra coats with the base reduced 1:1 to make it more transparent and extend my coats a little bit closer to the door leaving a blend that you will not notice to the eye at all.
best paint recommendations would be rm which is now basf, standox, spies and hekker. dupont and ppg blow.
Any advice you can provide would be appreciated!
OK. Thanks for your input! How much of a difference will that .1mm make? If I use a little higher PSI (~30) and keep the paint flow down with the 1.4mm tip, will I get close to the same finish as with a 1.3mm tip? I don't want the trunk to look smoother than the factory paint!
heres a few pics of tail lights i just did. you can see how smooth the clear layed down minus the crap cel phone pics.


Last edited by Boosted_Cobalt09; Jun 19, 2010 at 11:02 AM. Reason: Automerged Doublepost
Thread Starter
Senior Member
Joined: 02-22-07
Posts: 3,673
Likes: 0
From: Elmira,ON, Canada
Thanks for the EPIC post! What filters do you have on your compressor? We have a water separator on the one in our shop, but I'm not sure if it catches oil or not. I spray mostly latex semi-gloss in approx. a 2:1 mix with water and it usually turns out really smooth and contaminant free. I am extremely fussy and although I may not achieve a professional quality finish, I WILL put in the time to make it as good as possible. If I can get an orange peel free finish with latex paints, automotive paints shouldn't be a problem! lol
Thread Starter
Senior Member
Joined: 02-22-07
Posts: 3,673
Likes: 0
From: Elmira,ON, Canada
Bump for more opinions/suggestions. I'm starting to get my materials list together. Here's what I have so far:
- 1 quart each of primer (brand suggestions?), base color, and clear.
- paint reducer
- filler for small imperfections (suggestions?)
- HVLP gun with 1.2mm needle (I have a 1.4mm, but have been told that may be a bit big for automotive paints?)
- 320, 400, and 600 grit paper
- hard rubber sanding block
Let me know if I am missing anything! Thanks!
- 1 quart each of primer (brand suggestions?), base color, and clear.
- paint reducer
- filler for small imperfections (suggestions?)
- HVLP gun with 1.2mm needle (I have a 1.4mm, but have been told that may be a bit big for automotive paints?)
- 320, 400, and 600 grit paper
- hard rubber sanding block
Let me know if I am missing anything! Thanks!

New Member
Joined: 06-13-10
Posts: 35
Likes: 0
From: Ohio
ok there is alot of good and some misinformation in this thread.
i use PPG product everyday at work and will tell you how I personally would go about doing this. whether or not you use this product is completely up to you!
The industry standard way to do this is to remove all trim, your rear bumper, taillights, rocker skirt, rear quarter glass, front and rear windsheild, ( unless lifting tape can be used ) and front door.
when you reclearcoat the quarter panel unless you want a line where the clear ends in the jamb area then the ENTIRE jamb needs to be recleared.
the areas that need painted can be sanded with 400 grit. all areas that are being blended into wetsand with 1000 grit.
PPG makes a sealer NCS2005 which is black, and NCS2004 which is Gray. NCX2200 is the sealer catylist, and DT885 or DT895 is the reducer, depending on the temperature at which your spraying is.
ratio is 2 parts sealer 1 part catylist, and 1 part reducer.
To achieve the best possible coverage for that color, i would use the black and gray sealers and mix them so you end up with a Dark Gray. You dont want black by itself it would be too dark, and the light gray by itself is too light.
Spray all the areas that you sanded with 400 grit with the sealer.
clean gun out.
take Dbc500 color blender, ( mixed 1:1 with dt885 reducer ) and spray it on all the areas that have been wetsanded and are not sealed.
pour out the excess, but you dont have to clean the gun out as when you pour the color in, the small bit of dbc500 left in the gun will not affect the paint in any way.
take your premixed paint, and spray your first coat fairly good over the sealed areas just a little past where the sealer ends.
let it flash for a few moments
spray the second coat and step it out farther from the first coat, eyeball your work at all angles and if need be spray out another coat until full coverage is achieved and your blend is complete.
clean out the gun again.
now its time for clearcoat. there are infinite types of clearcoat you can use... i wont pick one out for you but it is smart to keep with a PPG clear when using PPG product.
clear is thin and you should always be watching your work and your overlap. you dont want to move too fast and put it on dry, but you dont want to move too slow and put too much product on at one time. This is a skill that must be learned by repitition and feel.
i recommend 2-3 coats of clear.
after the clear has cured, it is time to wetsand and buff the finish.
2000 grit the panels removing all the specs of dust until the dulled clear is uniform all over.
When buffing i use 3M rubbing compound first, with a wool pad, then i use 3m Dark swirl mark remover with a Black foam waffle pad. Finally i use a special blue waffle pad with the 3m Blue ultrafine compound to get the final smooth glazed finish. after buffing i wipe up with a clean microfiber towel.
after your done buffing make sure you clean all excess compound from the vehicle and wash the vehicle. then you can reinstall your glass, trim, bumpers, lights and everything you took off, then enjoy!
( i use a 1.4 Tip for spraying basecoat AND clearcoat everyday at work. ) if you are worried about spraying too much paint, simply turn the fluid control down on the gun, and uh learn how to paint.
i wouldnt use anything larger that this for spraying paint or clear.
15 minutes flash is a long time for basecoat... if you run your basecoat.. put the gun down. take your car to a shop.,
i use PPG product everyday at work and will tell you how I personally would go about doing this. whether or not you use this product is completely up to you!
The industry standard way to do this is to remove all trim, your rear bumper, taillights, rocker skirt, rear quarter glass, front and rear windsheild, ( unless lifting tape can be used ) and front door.
when you reclearcoat the quarter panel unless you want a line where the clear ends in the jamb area then the ENTIRE jamb needs to be recleared.
the areas that need painted can be sanded with 400 grit. all areas that are being blended into wetsand with 1000 grit.
PPG makes a sealer NCS2005 which is black, and NCS2004 which is Gray. NCX2200 is the sealer catylist, and DT885 or DT895 is the reducer, depending on the temperature at which your spraying is.
ratio is 2 parts sealer 1 part catylist, and 1 part reducer.
To achieve the best possible coverage for that color, i would use the black and gray sealers and mix them so you end up with a Dark Gray. You dont want black by itself it would be too dark, and the light gray by itself is too light.
Spray all the areas that you sanded with 400 grit with the sealer.
clean gun out.
take Dbc500 color blender, ( mixed 1:1 with dt885 reducer ) and spray it on all the areas that have been wetsanded and are not sealed.
pour out the excess, but you dont have to clean the gun out as when you pour the color in, the small bit of dbc500 left in the gun will not affect the paint in any way.
take your premixed paint, and spray your first coat fairly good over the sealed areas just a little past where the sealer ends.
let it flash for a few moments
spray the second coat and step it out farther from the first coat, eyeball your work at all angles and if need be spray out another coat until full coverage is achieved and your blend is complete.
clean out the gun again.
now its time for clearcoat. there are infinite types of clearcoat you can use... i wont pick one out for you but it is smart to keep with a PPG clear when using PPG product.
clear is thin and you should always be watching your work and your overlap. you dont want to move too fast and put it on dry, but you dont want to move too slow and put too much product on at one time. This is a skill that must be learned by repitition and feel.
i recommend 2-3 coats of clear.
after the clear has cured, it is time to wetsand and buff the finish.
2000 grit the panels removing all the specs of dust until the dulled clear is uniform all over.
When buffing i use 3M rubbing compound first, with a wool pad, then i use 3m Dark swirl mark remover with a Black foam waffle pad. Finally i use a special blue waffle pad with the 3m Blue ultrafine compound to get the final smooth glazed finish. after buffing i wipe up with a clean microfiber towel.
after your done buffing make sure you clean all excess compound from the vehicle and wash the vehicle. then you can reinstall your glass, trim, bumpers, lights and everything you took off, then enjoy!
( i use a 1.4 Tip for spraying basecoat AND clearcoat everyday at work. ) if you are worried about spraying too much paint, simply turn the fluid control down on the gun, and uh learn how to paint.
i wouldnt use anything larger that this for spraying paint or clear.
15 minutes flash is a long time for basecoat... if you run your basecoat.. put the gun down. take your car to a shop.,
Last edited by Orangecrushpgt; Jul 29, 2010 at 06:29 PM. Reason: Automerged Doublepost

everybody paints and does things differently. All that matters is if you get the same outcome.
Heres a quick summary of what i did when i sprayed my car. DA'd (airsander) car with 400. Feather'd out rock chips with on DA with 180. Spot primed those areas. Then blocked and handsanded them smooth with 400. then wetsanded the primer spots with 600. Fixed soft dents by scuffing area with 180 grit and applying Self leveling Glazing putty and blocking with 180 and spot priming. If i sand with 180, i always apply more primer, id never keep increase sand paper in incriments hoping to get rid of all the 180 scratches, i just mix up more primer, hit it again, and then im on the final sanding with my 400-600 to get ready for base.
Materials is all up to you and your price range and whats available to you. If your painting an all over then you dont need to worry about blending. If your only painting a part and u have a metallic paintjob you need to get the metallics to match. What airpressure and how its sprayed will all change the way the metallics settle and change the shade a bit, so youll want to sand the adjacent panels, spray them with clear basecoat, or whatever people want to call it, its just a basecoat thats clear to fill in the sanding scratches so ur metallics dont settle funny on angles in them and change the look, well spray it with clear base then apply your color to your primary part and then slowly fan out over the adjacent panel. If you dont know how to blend then look it up online casue its hard to describe it. Its just applying more material close to the part you painted and gradually stepping it out and misting it over the panel so the other end of the panel still has the OEM paint on it so its a nice transition that no1 will ever see.
Apply like 2-3 coats of basecoat and a mist coat (higher airpressure and spray it at different angles to get the metallics even) just to get it covered. Then 2-3 coats of clear. Its simple really. I dont get into specifics about fluid needles and air caps and all. But im not spraying monday - friday 40+ hours a week either. But to me, i make what i have in my hand work. The sizes listed in posts above is the sizes you need. Base and clear are thin materials so you need smaller fluid needles and air caps where primer is ******* huge globs to build the surface. Pretty much how it works.
Ill let the other guys give u numbers and brands and whatnot. When it comes to buying materials I go to the paintstore and talk with the people and get it sorted out for the price range I want and the feedback they have gotten off of it. Iv never sprayed somethign i didnt like yet. Iv sprayed Wanda, Upol, Utech, Diamont, PPG, and SEM
Heres a quick summary of what i did when i sprayed my car. DA'd (airsander) car with 400. Feather'd out rock chips with on DA with 180. Spot primed those areas. Then blocked and handsanded them smooth with 400. then wetsanded the primer spots with 600. Fixed soft dents by scuffing area with 180 grit and applying Self leveling Glazing putty and blocking with 180 and spot priming. If i sand with 180, i always apply more primer, id never keep increase sand paper in incriments hoping to get rid of all the 180 scratches, i just mix up more primer, hit it again, and then im on the final sanding with my 400-600 to get ready for base.
Materials is all up to you and your price range and whats available to you. If your painting an all over then you dont need to worry about blending. If your only painting a part and u have a metallic paintjob you need to get the metallics to match. What airpressure and how its sprayed will all change the way the metallics settle and change the shade a bit, so youll want to sand the adjacent panels, spray them with clear basecoat, or whatever people want to call it, its just a basecoat thats clear to fill in the sanding scratches so ur metallics dont settle funny on angles in them and change the look, well spray it with clear base then apply your color to your primary part and then slowly fan out over the adjacent panel. If you dont know how to blend then look it up online casue its hard to describe it. Its just applying more material close to the part you painted and gradually stepping it out and misting it over the panel so the other end of the panel still has the OEM paint on it so its a nice transition that no1 will ever see.
Apply like 2-3 coats of basecoat and a mist coat (higher airpressure and spray it at different angles to get the metallics even) just to get it covered. Then 2-3 coats of clear. Its simple really. I dont get into specifics about fluid needles and air caps and all. But im not spraying monday - friday 40+ hours a week either. But to me, i make what i have in my hand work. The sizes listed in posts above is the sizes you need. Base and clear are thin materials so you need smaller fluid needles and air caps where primer is ******* huge globs to build the surface. Pretty much how it works.
Ill let the other guys give u numbers and brands and whatnot. When it comes to buying materials I go to the paintstore and talk with the people and get it sorted out for the price range I want and the feedback they have gotten off of it. Iv never sprayed somethign i didnt like yet. Iv sprayed Wanda, Upol, Utech, Diamont, PPG, and SEM
Thread Starter
Senior Member
Joined: 02-22-07
Posts: 3,673
Likes: 0
From: Elmira,ON, Canada
Thanks for the info guys! Some of it is a little more serious than I want to get maybe, but there are a few things that I wouldn't have known to do, such as having to clear the entire quarter panel. I would have just tried to blend it in! lol. I have an airbrush, so I think I may use that for blending in the base color around my quarter panel scratch repair.
The girl at the auto body supply store that I went to told me I don't need to prime the entire trunk lid, just the areas where I do any filling or excessive sanding. Is she right, or no? She said urethane primer is a bitch to sand. Is there another type of primer that would be easier to work with? She sold me a spray can of a special primer for the bare metal areas.
Does the filler/finishing putty go directly on the bare metal or should I spot prime first?
The girl at the auto body supply store that I went to told me I don't need to prime the entire trunk lid, just the areas where I do any filling or excessive sanding. Is she right, or no? She said urethane primer is a bitch to sand. Is there another type of primer that would be easier to work with? She sold me a spray can of a special primer for the bare metal areas.
Does the filler/finishing putty go directly on the bare metal or should I spot prime first?
Last edited by Bumpin Balt; Jul 29, 2010 at 08:55 PM. Reason: Automerged Doublepost

I wouldn't recommend painting anything yourself unless your a professional or underneath a professionals wing. It will turn out fail and takes a lot of trial and error to turn out OEM if you have no previous schooling. Especially on such a big project for your first go. Do some test panels for practice, pick up a few fenders at a junk yard before u give it a rip.
Just my .2 cents, dont want u to waste ur money on something that people will walk up and be like "ewww wtf happened there"
Just my .2 cents, dont want u to waste ur money on something that people will walk up and be like "ewww wtf happened there"
Thread Starter
Senior Member
Joined: 02-22-07
Posts: 3,673
Likes: 0
From: Elmira,ON, Canada
I wouldn't recommend painting anything yourself unless your a professional or underneath a professionals wing. It will turn out fail and takes a lot of trial and error to turn out OEM if you have no previous schooling. Especially on such a big project for your first go. Do some test panels for practice, pick up a few fenders at a junk yard before u give it a rip.
Just my .2 cents, dont want u to waste ur money on something that people will walk up and be like "ewww wtf happened there"
Just my .2 cents, dont want u to waste ur money on something that people will walk up and be like "ewww wtf happened there"
As I stated in my first post, I have a lot of experience with an HVLP gun. I can spray latex paints with almost zero orange peel. If you can get latex to lay flat, automotive paints should be a cake walk. I am definitely doing some practice pieces first to get a feel for how thin/heavy auto paints should be laid down. I AM a perfectionist and I fully expect the results to reflect that! 
Thread Starter
Senior Member
Joined: 02-22-07
Posts: 3,673
Likes: 0
From: Elmira,ON, Canada
Some people seem to think it is!I just picked up the rest of my materials. The damage was ~$175CDN.
What do you think about using etch primer between the old paint and the new LBM base coat
Gestapo? I was told just to spot prime, but I would rather be safe than sorry.
Last edited by Bumpin Balt; Jul 30, 2010 at 03:32 PM.
etch primer is only used on bare metal. dont put it over a painted surface. spot priming where you create low spots from sanding is perfectly fine man. Just prime that spot, dont mask up around it cause youll create a hard line, you can back mask an area but if you dont know how to do it dont bother, just build up primer in the spots that nead it, let the overspray get over the trunk. Then get guide coat, spray it down, and block it. Itll level the highs and show any low spots if there are any. Once it looks level, its good to wetsand it to make sure theres no deeper scratches in it. Then take a scotch bright pad to the areas that sandpaper is being a bitch to get into. I like to wash the panel with a scotch bright pad too. Like when i sprayed my car, i would sand it, and then every morning i would take it outside, get soap and water, wash teh car but instead of a sponge i used a red scotch bright to scrub it down. Puts like 500 grit scratches in it which is perfect for basecoat. Doesnt remove texture though only scuffs for adhesion
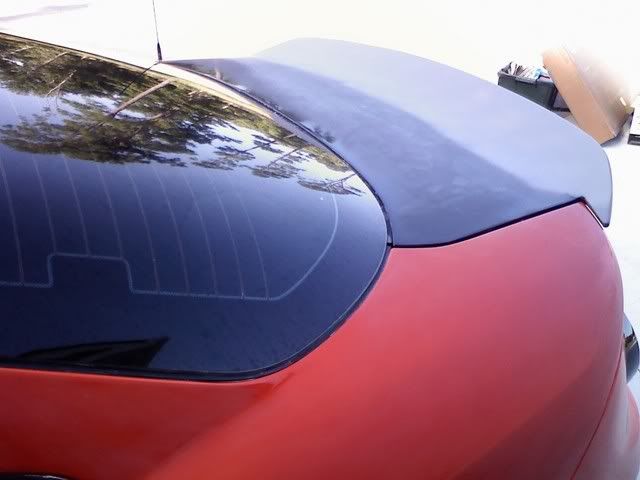
My spoiler i just redid, i just used rattle can UPOL primer on it to fill in my 180 scratches then i wetsanded with 600 and basecoated it. Only primed the spoiler, not the whole trunk
here, heres some pics that you can do what u want with:
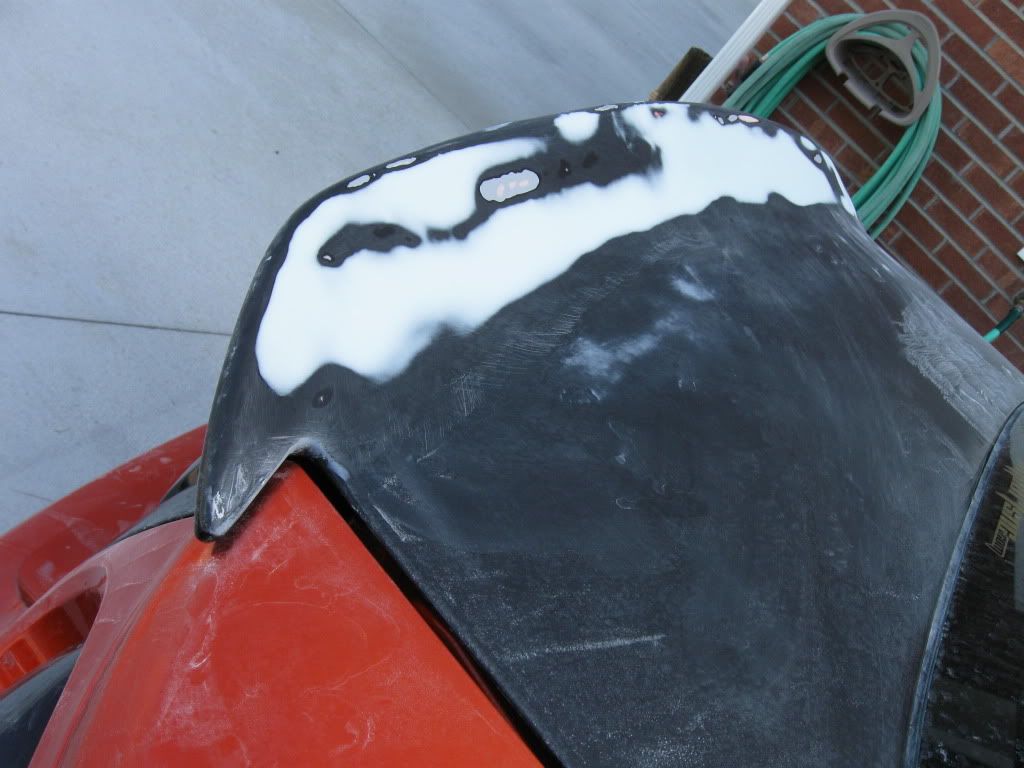


^see where the primer is still a bit wet, thats cause i just shot extra primer in those areas casue i knew the spots were low


^theres still a low spot int eh filler, i scuffed this and put glazing putty over this just never took a pic of that


My spoiler i just redid, i just used rattle can UPOL primer on it to fill in my 180 scratches then i wetsanded with 600 and basecoated it. Only primed the spoiler, not the whole trunk
here, heres some pics that you can do what u want with:
^see where the primer is still a bit wet, thats cause i just shot extra primer in those areas casue i knew the spots were low
^theres still a low spot int eh filler, i scuffed this and put glazing putty over this just never took a pic of that
Last edited by Gestapo007; Jul 30, 2010 at 03:12 PM. Reason: Automerged Doublepost
New Member
Joined: 06-13-10
Posts: 35
Likes: 0
From: Ohio
i wouldnt assume that if you can spray latex paint you can spray automotive paint...
the blue pearl that is in your paint color is going to make it tricky to spray. you have to make the pearl lay out even and not be splotchy and you have to have good consistant overlap so you dont have tigerstripes.
i agree i wouldnt take this project on yourself if you have zero experience.
take it to a shop for piece of mind.
the blue pearl that is in your paint color is going to make it tricky to spray. you have to make the pearl lay out even and not be splotchy and you have to have good consistant overlap so you dont have tigerstripes.
i agree i wouldnt take this project on yourself if you have zero experience.
take it to a shop for piece of mind.