
Painted Headlights.....

Thread Starter
Senior Member
Joined: 04-23-05
Posts: 954
Likes: 0
From: Delaware
Painted Headlights.....
Well, I know many people have done this but of course I will still post...
It took me about 2 hours to do both headlamps and I DID use my stock headlights and I didn't not have any problems. If you take your time no need to get that extra set of headlights...
Headlight on the left complete and right untouched:

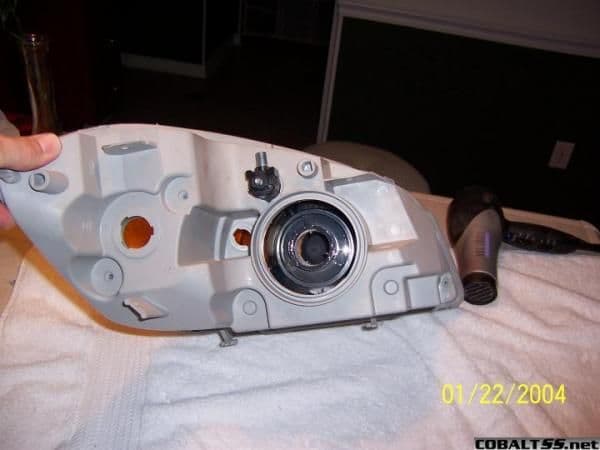
Removing the 3 screws in back of headlight:

Removing bulbs and harness:

Removing the boot:

Everything removed:
Now here comes the fun part.....waiting....
Bake the headlight for 20 minutes at 100 degrees, on my oven was the warm setting...
After baking the headlamp its time to pull apart the lens and housing with a flat-head screw driver and a butter knief, sorry no pics...
Headlamp pulled apart:

Removing side markers:

Last pic before painting:
Paint I used, I thought high temp would work well:

It took me about 2 hours to do both headlamps and I DID use my stock headlights and I didn't not have any problems. If you take your time no need to get that extra set of headlights...
Headlight on the left complete and right untouched:
Removing the 3 screws in back of headlight:
Removing bulbs and harness:
Removing the boot:
Everything removed:
Now here comes the fun part.....waiting....
Bake the headlight for 20 minutes at 100 degrees, on my oven was the warm setting...
After baking the headlamp its time to pull apart the lens and housing with a flat-head screw driver and a butter knief, sorry no pics...
Headlamp pulled apart:
Removing side markers:
Last pic before painting:
Paint I used, I thought high temp would work well:
Thread Starter
Senior Member
Joined: 04-23-05
Posts: 954
Likes: 0
From: Delaware
Painting the insert...
First spray the insert with a VERY light coat and yes it will look like ****! And bake in the oven at 200 degrees for 5 min..
After that spray the second coat...This time get all of the crevices and cover all surfaces with paint...Bake for 5 min at 200 degrees
Finally, spray the third coat...Make sure everything is painted and covered and it looks good... Bake in oven for 10 min at 200 degrees....
Also, I just painted the over the amber plastic...
Painted:

Removing amber plastic from parking lamp:

Before reassembly:

Snapping side marker into place:

Reassembly is just reverse of unassembly...
Reassembly:

Time to bake again... Bake the lens and headlamp assembly in the oven at 100 degrees for 20 minutes...
After baking, at pep-boys I found some silicone sealant to use, I also used the glue that was already on the headlamp. BUT there will be some spaces where the glue came out, fill in those spaces with the silicone sealant...
NOW! Press the lens on the headlamp assembly and make sure all the snaps are clicked into place...
After all of that you will be left with:

For the parking light/ DRL's and turn signals, since stock the bulbs are clear and with removing the amber plastic, there could be some issues there...
So, I had a set of Sylavnia Silverstar parking bulbs left over from my 03' Sunfire. I looked at the stock bulb and the Silverstar bulb from my Sunfire and they were the SAME! Just different numbers.... Also, they do not make parking/turn bulbs for the cobalts....So this is what we can use when removing the amber plastic from the parking/turn...
Our stock bulbs are: 3157
Silverstar Bulbs from 03' Sunfire: 3057
Pics of the car now:


I guess this is kind of a how-to now...
First spray the insert with a VERY light coat and yes it will look like ****! And bake in the oven at 200 degrees for 5 min..
After that spray the second coat...This time get all of the crevices and cover all surfaces with paint...Bake for 5 min at 200 degrees
Finally, spray the third coat...Make sure everything is painted and covered and it looks good... Bake in oven for 10 min at 200 degrees....
Also, I just painted the over the amber plastic...
Painted:
Removing amber plastic from parking lamp:
Before reassembly:
Snapping side marker into place:
Reassembly is just reverse of unassembly...
Reassembly:
Time to bake again... Bake the lens and headlamp assembly in the oven at 100 degrees for 20 minutes...
After baking, at pep-boys I found some silicone sealant to use, I also used the glue that was already on the headlamp. BUT there will be some spaces where the glue came out, fill in those spaces with the silicone sealant...
NOW! Press the lens on the headlamp assembly and make sure all the snaps are clicked into place...
After all of that you will be left with:
For the parking light/ DRL's and turn signals, since stock the bulbs are clear and with removing the amber plastic, there could be some issues there...
So, I had a set of Sylavnia Silverstar parking bulbs left over from my 03' Sunfire. I looked at the stock bulb and the Silverstar bulb from my Sunfire and they were the SAME! Just different numbers.... Also, they do not make parking/turn bulbs for the cobalts....So this is what we can use when removing the amber plastic from the parking/turn...
Our stock bulbs are: 3157
Silverstar Bulbs from 03' Sunfire: 3057
Pics of the car now:
I guess this is kind of a how-to now...


Senior Member
Joined: 03-27-05
Posts: 590
Likes: 0
From: Flint Michigan/So Cal in winter
Very nice job, and pics. I want to do this to mine as well but im scared to mess my lights up, anyone in michigan want to give me a hand? 
Keep up the good work bro car looks nice.
Keep up the good work bro car looks nice.


 up. looking good too man. later


Thread Starter
Senior Member
Joined: 04-23-05
Posts: 954
Likes: 0
From: Delaware
Thanks Everyone!!!! I am happy how they turned out it makes the car look totally different and there's not any leaks, which was my main concern....
Since I took out the amber lens I replaced the stock bulbs with amber bulbs so no problems with the law.....
Since I took out the amber lens I replaced the stock bulbs with amber bulbs so no problems with the law.....
Senior Member
Joined: 09-01-05
Posts: 2,382
Likes: 0
From: Delaware
That looks very nice man, I am going to be tackling this pretty soon, IM just waiting for it to warm up a bit
EDIT: **** you and Merc both live in Delaware, how dare you both do this without me! Bah!
EDIT: **** you and Merc both live in Delaware, how dare you both do this without me! Bah!
Thread Starter
Senior Member
Joined: 04-23-05
Posts: 954
Likes: 0
From: Delaware
Originally Posted by Xenozx
That looks very nice man, I am going to be tackling this pretty soon, IM just waiting for it to warm up a bit
EDIT: **** you and Merc both live in Delaware, how dare you both do this without me! Bah!
EDIT: **** you and Merc both live in Delaware, how dare you both do this without me! Bah!

Senior Member
Joined: 12-03-05
Posts: 1,540
Likes: 0
From: Louisville, Ky
I really like it! My oven will not go down as low as 100. 175 is the lowest temp it will let me set it on. Also, how do you get the headlights out of the car? What did you cover the yellow turn signal section up with?