
Tinted my tail lights professionally!! Lots of pics!! (56k = death)


Thread Starter
Senior Member
Joined: 09-17-07
Posts: 2,078
Likes: 0
From: PHOENIX
Ok guys, before i get started, I just want to send a sincere thank you to my gf's brother-in-law, Robert, for taking the time outa his saturday to professionally tint my tail lights... for free 
i know its "just tinting tail lights" but my buddy Robert gave me a great behind the scenes look at how he tints tail lights professionally.
hes been painting cars for 10+ so he knows what hes doing. Its awesome that he did mine for free, i really appreciated that man!!
We painted the tail lights at a Chevy Dealer (where he works at), and I used my Sidekick Slide to take the pics so bare with me everyone.. (MORE PICS ON PAGE 2, POST #27 AND PAGE 3, POST #48.)
Ok, now that i got that outta the way, lets get on to the pics!!
So heres what the before pic of my tails look like: (no big whoop, and yes, my trunk was open as i was about to remove them)

After removing 2 screws, and 1 bolt, i was able to unplug the harness and remove the tail lights.. no biggie (pic came out blue for some reason though.. eh whatever)

So then i head out to Mesa.. once at the shop, Robert said we needed to "lightly scuff" the tail lights with a wet scotch pad, and some of this DuPont Sanding Paste... together, its equivalent to using ~2500grit sandpaper.

After we scuffed the surface of the lights, we then cleaned them off and began to tape them up and placed them inside of the painting booth...


Once we got them inside the painting booth, we cleaned off the surface of the lights with an alcohol cloth to remove any residue and grime.... after that, we used a "tack cloth" that felt sticky... it removes any static (which can ruin a paint job), and leftover debris.

After that, Robert then taped off the reverse lights.. i wanted to leave em unpainted. And then cleaned them again with a new alcohol cloth and new "tack cloth."


Now they were finally ready for paint!!
We chose Jet Black... but because it was too dark, Robert added some kind of clear liquid to it to make it lighter, and translucent. I cant recall what it was though.

Before applying the first layer or paint, he applied a clear coat of some kind of compound that makes the paint stick to the plastic effectively.. especially here in AZ when summers can get to 110 degrees.
Here are a few pics in the paint booth when 2 coats have been applied...


In the end, i had him do 3 coats of the Jet Black, and 2 coats of clear coat... after all that, we let it bake for 15 minutes at 150 degrees.
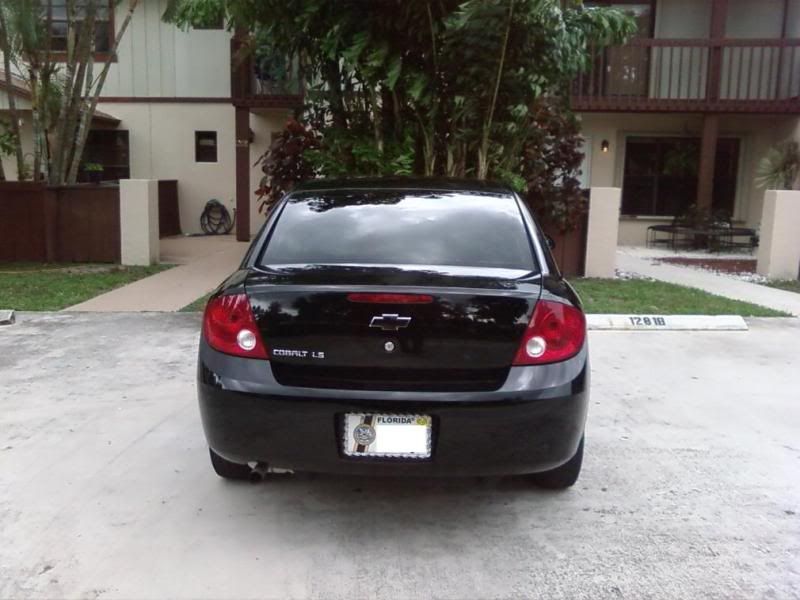
Heres what they looked like once we brought them out into direct sunlight... i love how they came out. I didnt want to make them TOO dark, i wanted to avoid the risk of the car getting rear-ended by another driver cuz they were to dark. Ppl drive crazy here in Phoenix, ask anyone who lives in this state


And the final product!! 
And yes, i know im riding on a donut right now.. i had a flat tire last nite lol
lol


Thanks for looking everyone!!
i am sooooo glad i didnt use nightshades, or any other rattle can product cuz i woulda messed everything up... and it wouldnt have came out as nice.
So there ya have it, my newly tinted tails!!
i know its "just tinting tail lights" but my buddy Robert gave me a great behind the scenes look at how he tints tail lights professionally.
hes been painting cars for 10+ so he knows what hes doing. Its awesome that he did mine for free, i really appreciated that man!!
We painted the tail lights at a Chevy Dealer (where he works at), and I used my Sidekick Slide to take the pics so bare with me everyone.. (MORE PICS ON PAGE 2, POST #27 AND PAGE 3, POST #48.)
Ok, now that i got that outta the way, lets get on to the pics!!
So heres what the before pic of my tails look like: (no big whoop, and yes, my trunk was open as i was about to remove them)
After removing 2 screws, and 1 bolt, i was able to unplug the harness and remove the tail lights.. no biggie (pic came out blue for some reason though.. eh whatever)
So then i head out to Mesa.. once at the shop, Robert said we needed to "lightly scuff" the tail lights with a wet scotch pad, and some of this DuPont Sanding Paste... together, its equivalent to using ~2500grit sandpaper.
After we scuffed the surface of the lights, we then cleaned them off and began to tape them up and placed them inside of the painting booth...
Once we got them inside the painting booth, we cleaned off the surface of the lights with an alcohol cloth to remove any residue and grime.... after that, we used a "tack cloth" that felt sticky... it removes any static (which can ruin a paint job), and leftover debris.
After that, Robert then taped off the reverse lights.. i wanted to leave em unpainted. And then cleaned them again with a new alcohol cloth and new "tack cloth."
Now they were finally ready for paint!!
We chose Jet Black... but because it was too dark, Robert added some kind of clear liquid to it to make it lighter, and translucent. I cant recall what it was though.
Before applying the first layer or paint, he applied a clear coat of some kind of compound that makes the paint stick to the plastic effectively.. especially here in AZ when summers can get to 110 degrees.
Here are a few pics in the paint booth when 2 coats have been applied...
In the end, i had him do 3 coats of the Jet Black, and 2 coats of clear coat... after all that, we let it bake for 15 minutes at 150 degrees.
Heres what they looked like once we brought them out into direct sunlight... i love how they came out. I didnt want to make them TOO dark, i wanted to avoid the risk of the car getting rear-ended by another driver cuz they were to dark. Ppl drive crazy here in Phoenix, ask anyone who lives in this state
And the final product!!
And yes, i know im riding on a donut right now.. i had a flat tire last nite
lolThanks for looking everyone!!
i am sooooo glad i didnt use nightshades, or any other rattle can product cuz i woulda messed everything up... and it wouldnt have came out as nice.
So there ya have it, my newly tinted tails!!
Last edited by cobaltguy88; Sep 14, 2008 at 10:23 AM.
Senior Member
Joined: 03-10-08
Posts: 1,243
Likes: 0
From: FL
wow I like!! where did you have it done? I called a body shop and they said NO it illegal then hung up on me! I want them, professionally done thou!!! I want a high quality smoked job done for my taillights.
red stand out too damn much on black!
red stand out too damn much on black!
Thread Starter
Senior Member
Joined: 09-17-07
Posts: 2,078
Likes: 0
From: PHOENIX

Thread Starter
Senior Member
Joined: 09-17-07
Posts: 2,078
Likes: 0
From: PHOENIX
Senior Member
Joined: 03-10-08
Posts: 1,243
Likes: 0
From: FL
you taillights look so much better then nightshade!!!
and the clear coat came out grate!!!!!!!!! I seen people nightshade then clear and still dont look as good as your clear coating!

Thread Starter
Senior Member
Joined: 09-17-07
Posts: 2,078
Likes: 0
From: PHOENIX

Thread Starter
Senior Member
Joined: 09-17-07
Posts: 2,078
Likes: 0
From: PHOENIX
yea my spelling sucks ftw, damn bro your so lucky but I REALLY dont want to nightshade them my self if I dont have too but If I cant find no one im going say **** it and do it my self with nightshade!
you taillights look so much better then nightshade!!!
and the clear coat came out grate!!!!!!!!! I seen people nightshade then clear and still dont look as good as your clear coating!
you taillights look so much better then nightshade!!!
and the clear coat came out grate!!!!!!!!! I seen people nightshade then clear and still dont look as good as your clear coating!
and yeah, i love the clear coat.. it looks factory!
he says their dealership is always trashing parts that the insurance companies dont want to pay for so i told him to keep an eye out on an SS bumper.. if he can get a hold of one, wer guna paint it to match my car and put it on.. but thats another project, for another day.
Last edited by cobaltguy88; Sep 13, 2008 at 08:55 PM. Reason: Automerged Doublepost
Senior Member
Joined: 03-10-08
Posts: 1,243
Likes: 0
From: FL
yeah just the tail lights, and the 3rd brake light above... i got 3 coats of Jet Black (which was made translucent), and 2 coats of clear coat. 
i know what you mean man, i really didnt wana nightshade mine either so i asked around and my gf is like, "hey my brother in law does automotive paint.. " So i was like, i might as well ask him... and i got lucky i guess
and yeah, i love the clear coat.. it looks factory!
he says their dealership is always trashing parts that the insurance companies dont want to pay for so i told him to keep an eye out on an SS bumper.. if he can get a hold of one, wer guna paint it to match my car and put it on.. but thats another project, for another day.
Thread Starter
Senior Member
Joined: 09-17-07
Posts: 2,078
Likes: 0
From: PHOENIX
dont get the SS bumper with out the side skirts or it will look funky I herd. the SS bumper is lower then LS bumper. If you get the skirts at the same time it will match the bumper and wont look like the bumper lower then rest of your car. I plan on doing the same when I got the money for a SS kit.
since hes been working there soo long, they let him bring parts home that arent useful to the dealer... hes always coming up on some random parts. lol

Senior Member
Joined: 08-03-06
Posts: 671
Likes: 0
From: montreal
[QUOTE=cobaltguy88;2879879]yeah just the tail lights, and the 3rd brake light above... i got 3 coats of Jet Black (which was made translucent), and 2 coats of clear coat. QUOTE]
i guess 2 coats of clear should work, i had 3 coats put on, i buff em once a year that extra clear comes in handy
just make sure you wax your tail lights soon, if you wanna keep the shine in them, you got car paint and clear on them now, take good care of them
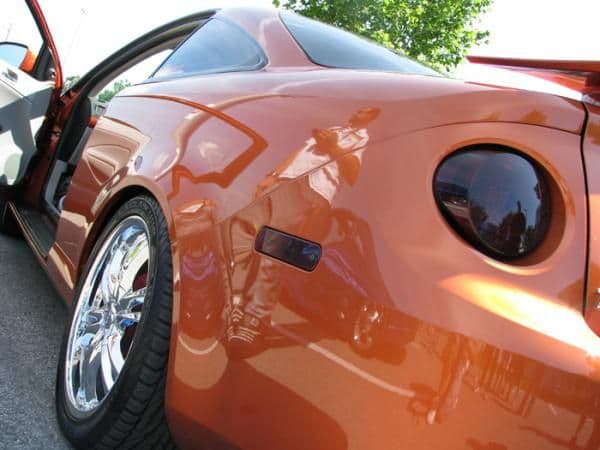
these are mine
i guess 2 coats of clear should work, i had 3 coats put on, i buff em once a year that extra clear comes in handy
just make sure you wax your tail lights soon, if you wanna keep the shine in them, you got car paint and clear on them now, take good care of them
these are mine

Thread Starter
Senior Member
Joined: 09-17-07
Posts: 2,078
Likes: 0
From: PHOENIX
[QUOTE=twofknloud;2879923]
Sweet ride man.. your tail lights came out awesome as well.
and yeah, the 1st coat of clear coat went on normally, then the 2nd coat was a bit heavier for a little more protection.
once we took em out the oven from baking, we let them cool... then he buffed em out for me to give em that nice, factory look... he recommended i wax them also, so im definately guna keep that in mind.
yeah just the tail lights, and the 3rd brake light above... i got 3 coats of Jet Black (which was made translucent), and 2 coats of clear coat. QUOTE]
i guess 2 coats of clear should work, i had 3 coats put on, i buff em once a year that extra clear comes in handy
just make sure you wax your tail lights soon, if you wanna keep the shine in them, you got car paint and clear on them now, take good care of them
these are mine
i guess 2 coats of clear should work, i had 3 coats put on, i buff em once a year that extra clear comes in handy
just make sure you wax your tail lights soon, if you wanna keep the shine in them, you got car paint and clear on them now, take good care of them
these are mine
and yeah, the 1st coat of clear coat went on normally, then the 2nd coat was a bit heavier for a little more protection.
once we took em out the oven from baking, we let them cool... then he buffed em out for me to give em that nice, factory look... he recommended i wax them also, so im definately guna keep that in mind.

Thread Starter
Senior Member
Joined: 09-17-07
Posts: 2,078
Likes: 0
From: PHOENIX
im surprised they came out this great, and he did them for free.. i appreciate his work so much because of that.
Senior Member
Joined: 03-10-08
Posts: 1,243
Likes: 0
From: FL
If i still lived in Cail I would drive Arizona just have your guy do my lights!! but I'm in FL now
Thread Starter
Senior Member
Joined: 09-17-07
Posts: 2,078
Likes: 0
From: PHOENIX
but yeah, painting cars is his passion.. the dude loves what he does, his work proves it
once again everyone, i apologize for the crappy pic quality, they dont do justice to his work.
and yeah, FL is on the other side of the country.. maybe ul get lucky too and find a great painter as well
Last edited by cobaltguy88; Sep 13, 2008 at 09:13 PM. Reason: Automerged Doublepost