Who has taped off the Clear Reverse Light Circle on the Tail Lights for Tail Tinting?
 08-10-2008, 12:14 AM
#1
New Member
Thread Starter

Join Date: 01-26-08
Location: Florida
Posts: 123
Likes: 0
Received 0 Likes
on
0 Posts
Who has taped off the Clear Reverse Light Circle on the Tail Lights for Tail Tinting?
Who has taped off the clear reverse light part of the two tail lights and successfully tinting only all the red part around the clear and leaving the clear part perfect as it was. And im talking about like a perfectly tinted tail light where there is not a messy tinted paint edge around the clear circle. If anyone has which i know there are some cuz ive seen pics from google, Who has, and How did you do it??? Did you just use tape, did u use a razor blade? Did you mask the entire clear part and then cut with a razor blade around the circle perfectly? Im attempting this some how tomorrow and have a good idea of what im gona do, but just curious as to what everyone else did.


 08-10-2008, 12:23 AM
#4
New Member
Thread Starter
Join Date: 01-26-08
Location: Florida
Posts: 123
Likes: 0
Received 0 Likes
on
0 Posts

 08-10-2008, 12:26 AM
#5
Senior Member

Join Date: 10-27-07
Location: Maryland
Posts: 534
Likes: 0
Received 0 Likes
on
0 Posts
sounds sweet. mine are scheduled to get done at this local place next saturday. 5 on the back and 10 on the sides..cant wait. and when spring time comes i can finally put my black rims back on..but they have a chrome lip thats why i wanna leave the reverse part clear to kinda match it..otherwise it looks like i fucked up on the murdered out part..lol
08-10-2008, 12:28 AM
#6
Senior Member
Join Date: 08-29-06
Location: Winnipeg
Posts: 4,132
Likes: 0
Received 0 Likes
on
0 Posts
I did mine that way....just rip paint tape into small pieces and go around the reverse marker outline with the edge of the ripped tape...then tape the middle off and paint
08-10-2008, 12:31 AM
#8
Senior Member
Join Date: 08-29-06
Location: Winnipeg
Posts: 4,132
Likes: 0
Received 0 Likes
on
0 Posts
08-10-2008, 12:34 AM
#11
Senior Member

Join Date: 01-23-08
Location: Cape Coral, FL
Posts: 2,920
Likes: 0
Received 0 Likes
on
0 Posts
i took a soup can about the same size and had a square piece of tape and traced it and used that, the cirlce was like 1/16" smaller so it was perfect
08-10-2008, 12:37 AM
#13
Banned

Join Date: 04-23-08
Location: USA
Posts: 138
Likes: 0
Received 0 Likes
on
0 Posts
Ok,
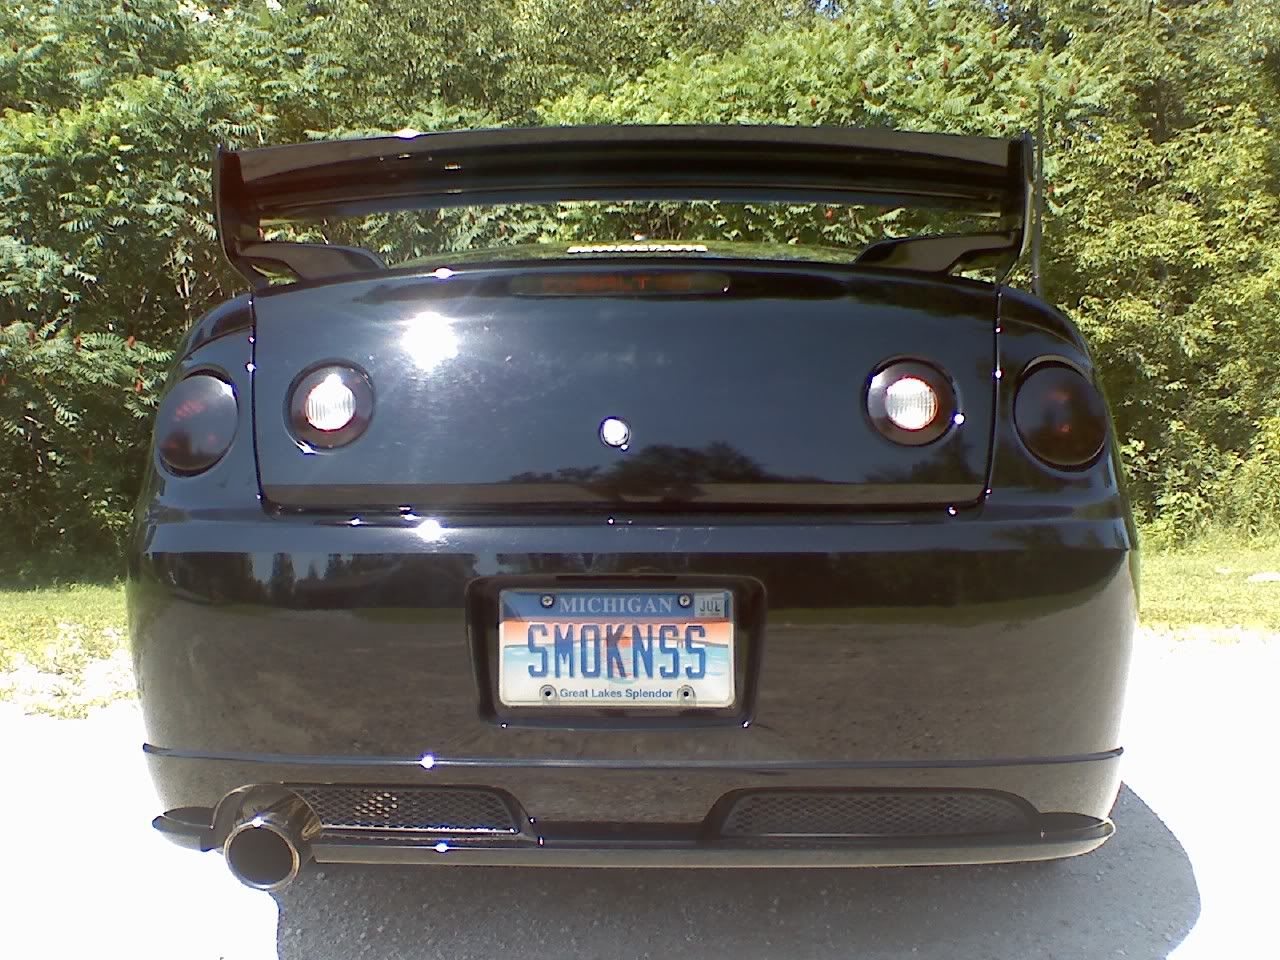
I did mine. I masked off the whole light with masking tape. Then there is a slight edge around the white reverse light. Take a new razor blade and with slight pressure follow it around the reverse part of the tail light. Mine can out amazing and I love em.
Here is a pic of mine all done. If you have any more questions or I can help in any way just let me know.
08-10-2008, 12:39 AM
#14
Senior Member
Join Date: 10-27-07
Location: Maryland
Posts: 534
Likes: 0
Received 0 Likes
on
0 Posts
MoneyPit..thats exactly how i want mine to look but just a smidge darker..i love that look..i also wanna take the SS off the trunk and put it on the front where the bowtie is..
i dont mean to change subjects but how does one go about doing that? i read it involved something with plugging the holes from the front mounted chevy symbol..
i dont mean to change subjects but how does one go about doing that? i read it involved something with plugging the holes from the front mounted chevy symbol..
 08-10-2008, 12:57 AM
#16
Banned
Join Date: 04-23-08
Location: USA
Posts: 138
Likes: 0
Received 0 Likes
on
0 Posts
HA, If you place the SS on the front correctly it will hide the wholes and you will never see them. There is no need to plug the holes. thats just stupid lol. But for removing things off the bag, there is a write up here about how to do it, but i did mine differently.
You can use a heat gun and a bondo spreader, then cleaned up the car with goo gone and applied some wax.. that's what i used. Just be careful with the amount of heat you put on the paint, because it will mess up the clear coat.
You can use a heat gun and a bondo spreader, then cleaned up the car with goo gone and applied some wax.. that's what i used. Just be careful with the amount of heat you put on the paint, because it will mess up the clear coat.
08-10-2008, 12:58 AM
#17
New Member
Thread Starter
Join Date: 01-26-08
Location: Florida
Posts: 123
Likes: 0
Received 0 Likes
on
0 Posts
If you want to get it online, go to ebay. They got it. If not, some stores might have it. Most probably dont. Depends. Also, im not using Nightshades to spray mine. I think nightshades is over rated and pricey. I'll be using RC Hobby Car Tint Spray. Made by Pactra. Theres another one that is said to be very good for tinting tails which is made by Tamiya. There all sold in 3oz cans. Like 4 bucks a piece. Cheap and gets the job done great from what read. Most of all, i plan on spraying with either one of those brands and then im having a friend of mine use actual car paint clear coat and spray the tails with the clear using his spray gun and compressor hes got. That way ill get the real deal clear coat finish just as any car's paint would. So really, as long as i can get the desired tint level done properly in black, Him spraying that clear will seal the deal for that sick finish. Ill take pics tomorrow when the damage is done.
08-10-2008, 12:59 AM
#19
New Member
Thread Starter
Join Date: 01-26-08
Location: Florida
Posts: 123
Likes: 0
Received 0 Likes
on
0 Posts
[QUOTE=MoneyPit;2715167]Ok,
I did mine. I masked off the whole light with masking tape. Then there is a slight edge around the white reverse light. Take a new razor blade and with slight pressure follow it around the reverse part of the tail light. Mine can out amazing and I love em.
Here is a pic of mine all done. If you have any more questions or I can help in any way just let me know.
BANGA! Thats what im talkin about. Thats exactly the same idea that i had. Cuz i noticed there is a fine thin edge that i could probably trace around with a sharp razor blade. This is going to be interesting.
 08-10-2008, 01:04 AM
#21
Banned
Join Date: 04-23-08
Location: USA
Posts: 138
Likes: 0
Received 0 Likes
on
0 Posts
Over rated and pricey??? Come on its like 13 bucks a can or something... thats not bad at all. And you can order it a summitracing. You will get it really fast and a good price.
Using car paint is fine it would be a mixture of 10% black. But that right there would get very pricey if you didn't already have the supplies....which im sure he doesnt. Car clear coat is really pricey just for the use of tinting tail lights. You can pick up clear coat out of a spray can for a local auto parts store for 6 bucks and put about 5 coats and last forever! Mine were done two years ago and still look awesome.
Hey man if you werent so far away id just do em for you lol
Last edited by MoneyPit; 08-10-2008 at 01:04 AM. Reason: Automerged Doublepost
08-10-2008, 01:43 AM
#23
Banned
Join Date: 04-23-08
Location: USA
Posts: 138
Likes: 0
Received 0 Likes
on
0 Posts
Sweet man, You came in to this thread to say that?? Are you really that pathetic that you have to cut someone down instead of trying to help?? Real mature dude, i can already see your age by the way you talk.
Last edited by MoneyPit; 08-10-2008 at 01:58 AM.
08-10-2008, 11:08 AM
#24
New Member

Join Date: 04-13-08
Location: Quebec Canada
Posts: 117
Likes: 0
Received 0 Likes
on
0 Posts