
2.0 LSJ Engine: How To install Cobra Heat Exchanger! 56K=DEATH

Thread Starter
Senior Member
Joined: 04-03-06
Posts: 7,570
Likes: 0
From: Mesa, AZ
How To install Cobra Heat Exchanger! 56K=DEATH
Ok, well this is my first write up EVER! I'm going to tell you how to install a Cobra heat exchanger in a Cobalt SS S/C. Its a fairly long and difficult project, but I got through the entire project and spent less than $100!!!
Things you will need:
- Cobra Heat Exchanger (DUH)
- 4 Metal "L" brackets, 2 long and 2 short
- Hack saw
- Drill
- 6 self drilling sheet metal screws (or other mounting hardware)
- 4 small bolt/nuts
- Lots of zip-ties
- 8 Hose clamps
- A good length of 3/4" heater hose (8-10 feet)
- Pliers
- A set of tools (wrenches/sockets)
- A jack and 2 jack stands
- A person to help you
- A clear head & lots of patience
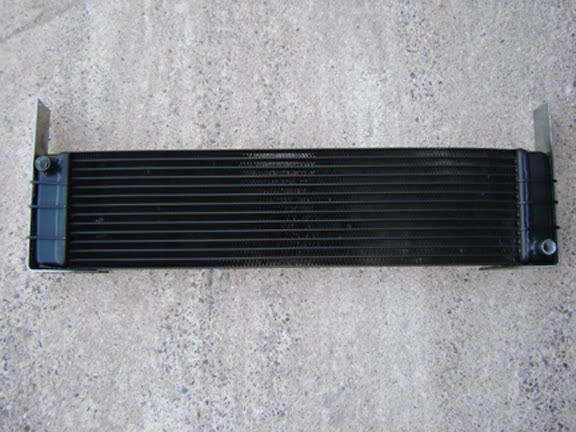
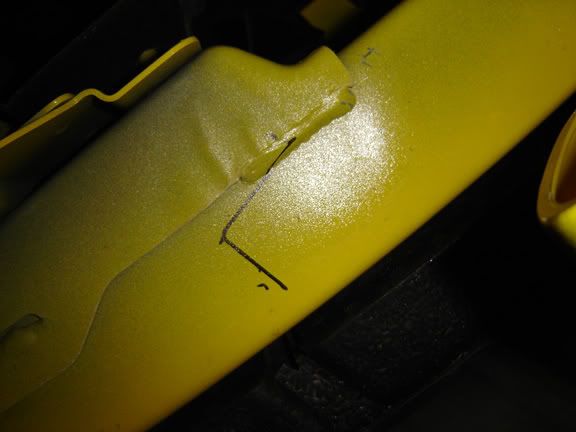
Heres the heat exchanger, your going to cradle the heat exchanger with the 2 large L brackets, and secure it to the heat exchanger via 6 zip-ties. Then your going to cut the long L bracket so that the top of the bracket only sticks about 1/2" to 3/4" above the top of the heat exchanger. Then just cut a little bit off the small bracket so that it doesn't touch the zip-ties.
Then your going to take the brackets off, and line them up ready to drill the holes.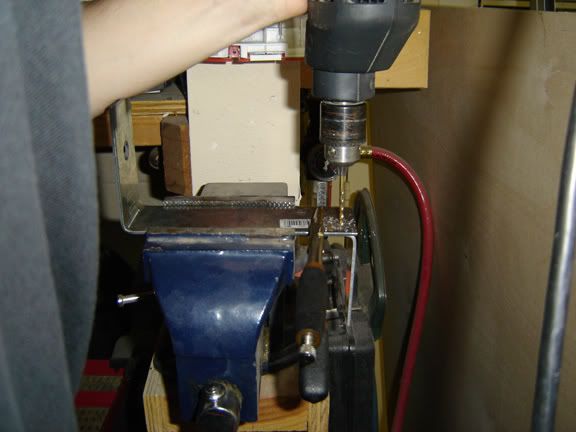
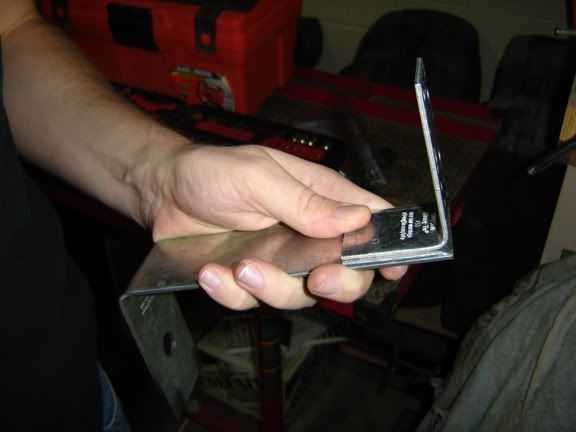
Your going to drill 2 holes near the top of the bracket. After you've done that, secure the brackets together with 2 bolt/nut assemblies. It should look like this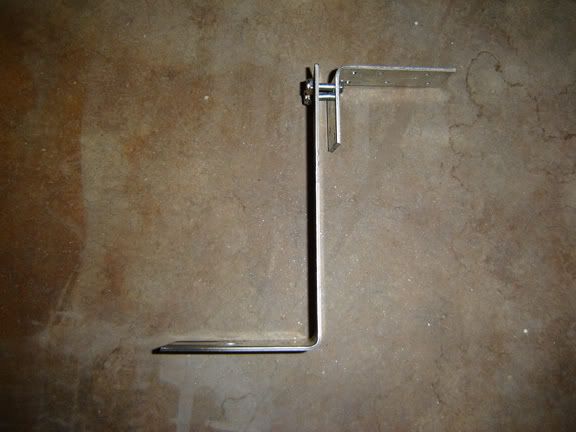
Once again secure the new bracket to the heat exchanger via zip-ties.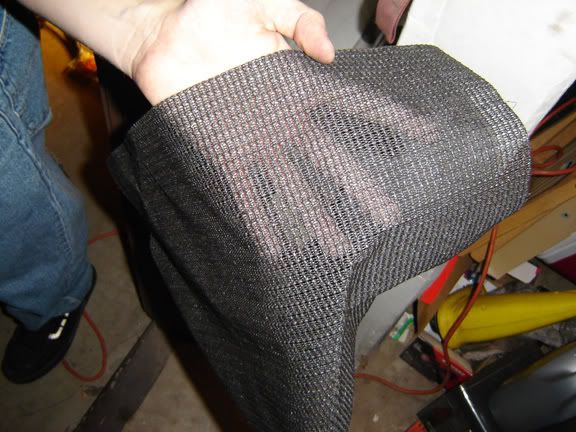
Due to metal to metal contact, we used this cloth stuff (not sure what its called) to place between the heat exchanger and the brackets, it helped prevent rattling and made a tighter fit. At this point your heat exchanger should look like this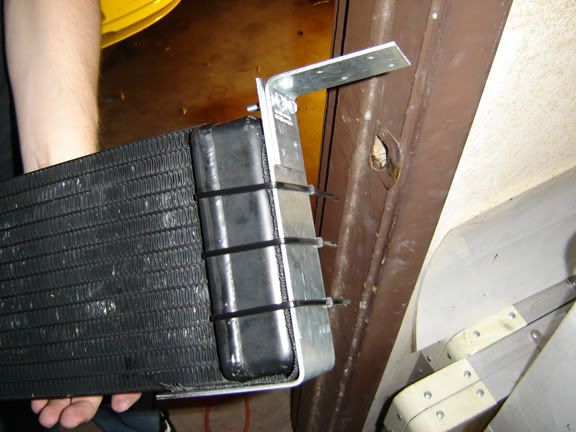
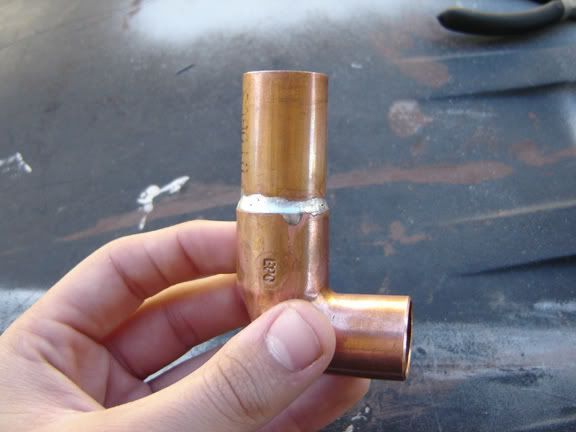
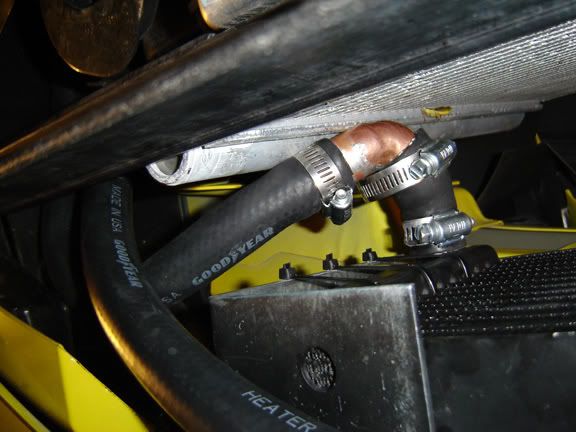
Now that the brackets are out of the way, we can focus on hose fittings. Due the lack of space, we had to use 2, 3/4" 90 degree elbows, we soldered two pieces together for ours, I'm sure you could find a single piece fitting somewhere.
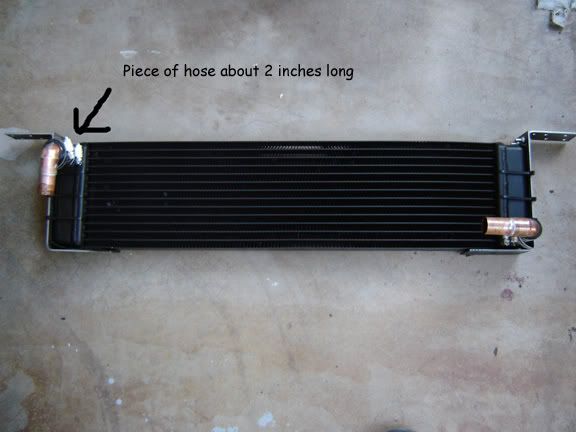
We then cut a piece of hose to about 2" in length, we put one end on the heat exchanger fitting, and one end on the elbow fitting. The piece of hose should be just long enough to keep the two fittings from touching. Then use 4 hose clamps to secure the two fitting together.
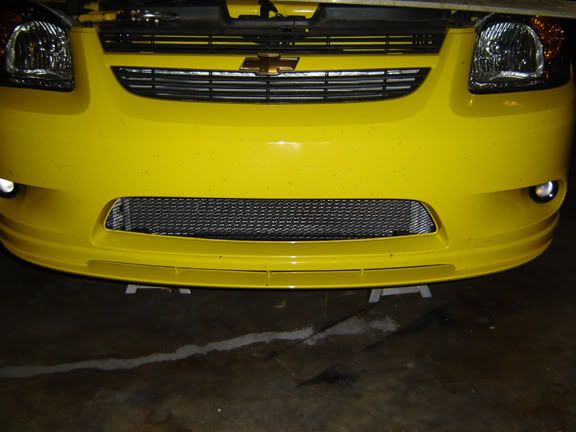
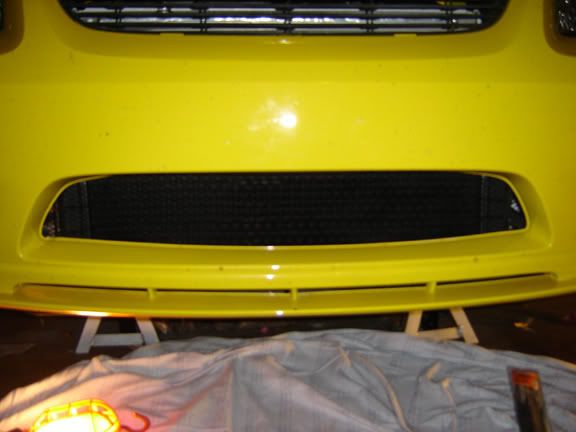
Since the heat exchanger will sit so close to the front of the vehicle and to the air flow, I decided to do a lower mesh grill to protect the heat exchanger from flying debris. If you want to learn how to put a lower mesh grill on, Click Here
This concludes part one of the install.
Things you will need:
- Cobra Heat Exchanger (DUH)
- 4 Metal "L" brackets, 2 long and 2 short
- Hack saw
- Drill
- 6 self drilling sheet metal screws (or other mounting hardware)
- 4 small bolt/nuts
- Lots of zip-ties
- 8 Hose clamps
- A good length of 3/4" heater hose (8-10 feet)
- Pliers
- A set of tools (wrenches/sockets)
- A jack and 2 jack stands
- A person to help you
- A clear head & lots of patience
Heres the heat exchanger, your going to cradle the heat exchanger with the 2 large L brackets, and secure it to the heat exchanger via 6 zip-ties. Then your going to cut the long L bracket so that the top of the bracket only sticks about 1/2" to 3/4" above the top of the heat exchanger. Then just cut a little bit off the small bracket so that it doesn't touch the zip-ties.
Then your going to take the brackets off, and line them up ready to drill the holes.
Your going to drill 2 holes near the top of the bracket. After you've done that, secure the brackets together with 2 bolt/nut assemblies. It should look like this
Once again secure the new bracket to the heat exchanger via zip-ties.
Due to metal to metal contact, we used this cloth stuff (not sure what its called) to place between the heat exchanger and the brackets, it helped prevent rattling and made a tighter fit. At this point your heat exchanger should look like this
Now that the brackets are out of the way, we can focus on hose fittings. Due the lack of space, we had to use 2, 3/4" 90 degree elbows, we soldered two pieces together for ours, I'm sure you could find a single piece fitting somewhere.
We then cut a piece of hose to about 2" in length, we put one end on the heat exchanger fitting, and one end on the elbow fitting. The piece of hose should be just long enough to keep the two fittings from touching. Then use 4 hose clamps to secure the two fitting together.
Since the heat exchanger will sit so close to the front of the vehicle and to the air flow, I decided to do a lower mesh grill to protect the heat exchanger from flying debris. If you want to learn how to put a lower mesh grill on, Click Here
This concludes part one of the install.
Last edited by TommyP; May 17, 2012 at 09:27 PM.
Thread Starter
Senior Member
Joined: 04-03-06
Posts: 7,570
Likes: 0
From: Mesa, AZ
At this point we lifted the heat exchanger in place and made marks where the brackets were.
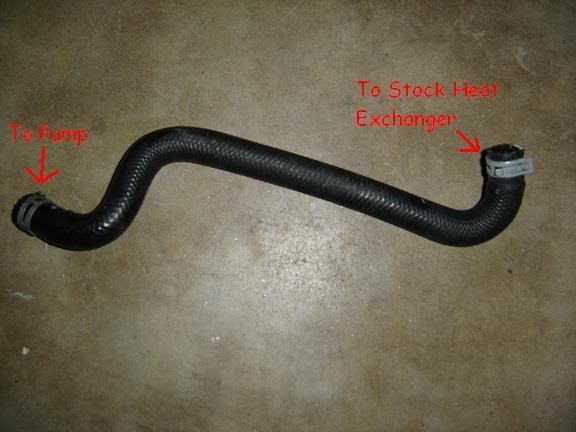
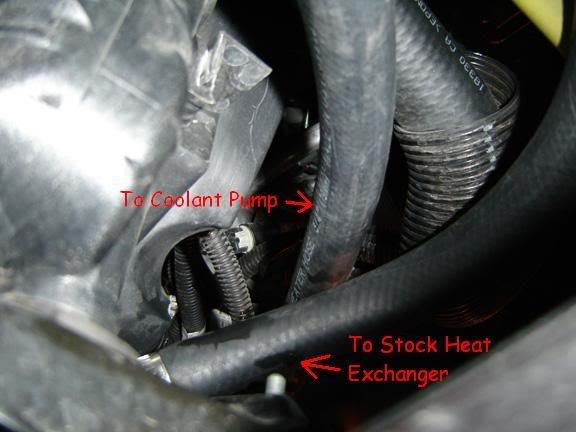
Now comes the messy/difficult part. Removing the stock coolant line. Your going to remove the stock return line from the stock heat exchanger to the pump, and put the new lines in place to plumb in the new heat exchanger.
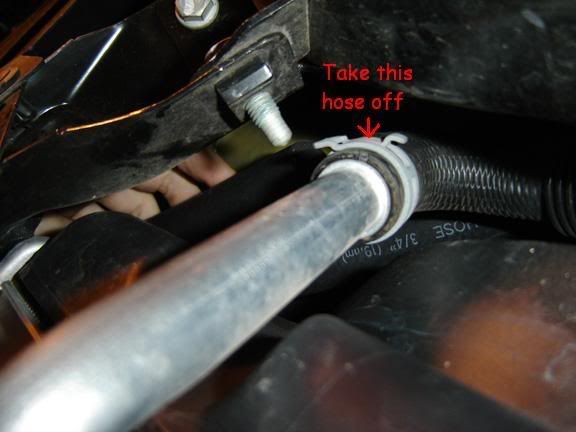
This is the line you need to remove
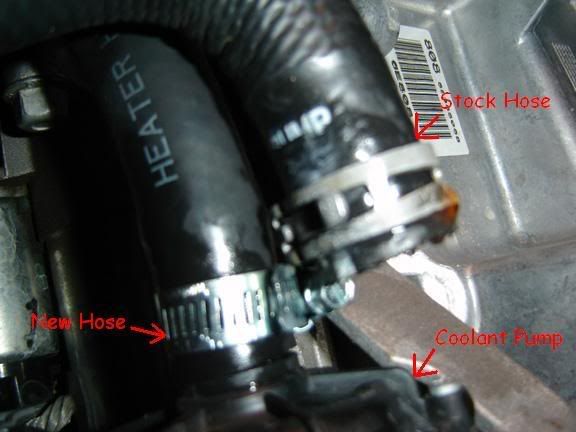
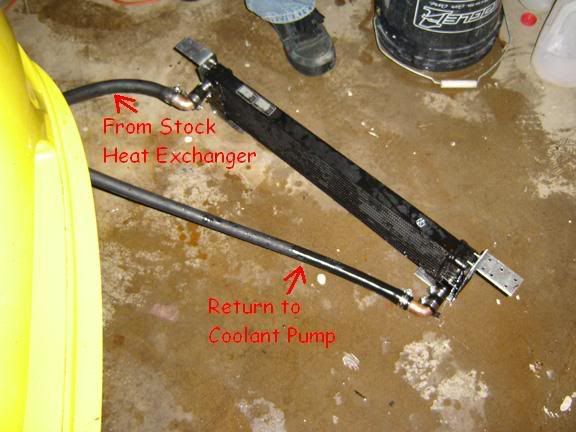
Then connect the new hoses and route them out through the driver side front fender
Now cut the hoses to length and connect them to the heat exchanger
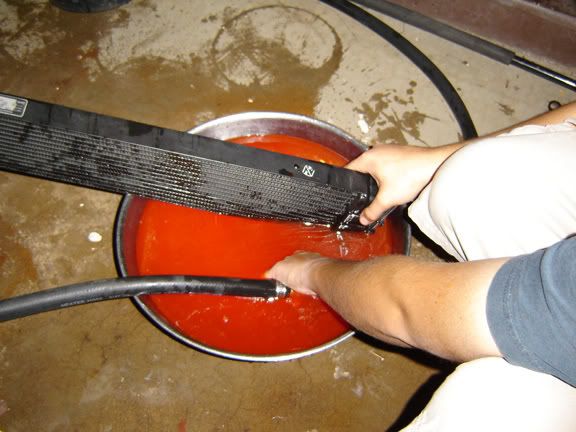
This is where it may get difficult, due the fact that there are now air pockets in the system, you need to bleed the system. We simply submerged the heat exchanger and return line (disconnected) in dex cool, and turned the pump on. It bled its self out and we re-connected the return line while submerge to eliminate exposure to air. It took a few tries but we got all the air bled from the system.
Now that the system is bled, place the heat exchanger in place and line it up with the marks you made earlier. Its a pretty tight fit, but if done right it shouldn't touch the a/c condenser
Now drill small pilot holes for the 6 self tapping screws. Then use an extension on the drill for sockets and drill in the screws

Now secure the return line with zip-ties so that it doesn't hang lower than the front bumper, or touch the a/c condenser. Now your done, lower the car from the jack stands and go for a test drive!
I want to give a HUUUUUUGGGGGGGEEEEEEE thanks to George (Cobalt_Supercharged) for all the help and support! I owe you one!!!
Now comes the messy/difficult part. Removing the stock coolant line. Your going to remove the stock return line from the stock heat exchanger to the pump, and put the new lines in place to plumb in the new heat exchanger.
This is the line you need to remove
Then connect the new hoses and route them out through the driver side front fender
Now cut the hoses to length and connect them to the heat exchanger
This is where it may get difficult, due the fact that there are now air pockets in the system, you need to bleed the system. We simply submerged the heat exchanger and return line (disconnected) in dex cool, and turned the pump on. It bled its self out and we re-connected the return line while submerge to eliminate exposure to air. It took a few tries but we got all the air bled from the system.
Now that the system is bled, place the heat exchanger in place and line it up with the marks you made earlier. Its a pretty tight fit, but if done right it shouldn't touch the a/c condenser
Now drill small pilot holes for the 6 self tapping screws. Then use an extension on the drill for sockets and drill in the screws
Now secure the return line with zip-ties so that it doesn't hang lower than the front bumper, or touch the a/c condenser. Now your done, lower the car from the jack stands and go for a test drive!
I want to give a HUUUUUUGGGGGGGEEEEEEE thanks to George (Cobalt_Supercharged) for all the help and support! I owe you one!!!


Thread Starter
Senior Member
Joined: 04-03-06
Posts: 7,570
Likes: 0
From: Mesa, AZ
Originally Posted by srt-killer
Congrats on the install! So did you notice any performance difference?


Senior Member
Joined: 04-26-06
Posts: 790
Likes: 0
From: Arizona
Originally Posted by Blown 4-banger
I took it out last night, and did some hard runs on the freeway at full boost (18 psi) for a while, then pulled off the freeway and felt the heat exchanger which was only slightly warm to the touch

Senior Member
Joined: 09-05-05
Posts: 645
Likes: 0
From: Toledo, Ohio
Nice Write-up!
Your most likely not going to feel much of a power gain from a mod like this, unless you add a ice-box into the system and add timing. This mod will help delay the effects of heatsoak on the engine.
Your most likely not going to feel much of a power gain from a mod like this, unless you add a ice-box into the system and add timing. This mod will help delay the effects of heatsoak on the engine.
Thread Starter
Senior Member
Joined: 04-03-06
Posts: 7,570
Likes: 0
From: Mesa, AZ
Originally Posted by 05_Blue_B10WN_SS
Nice Write-up!
Your most likely not going to feel much of a power gain from a mod like this, unless you add a ice-box into the system and add timing. This mod will help delay the effects of heatsoak on the engine.
Your most likely not going to feel much of a power gain from a mod like this, unless you add a ice-box into the system and add timing. This mod will help delay the effects of heatsoak on the engine.
I also opened up a perfect place for a CryO2 HE sprayer 
Senior Member
Joined: 09-01-05
Posts: 2,382
Likes: 0
From: Delaware
IM thinking about doing it. If I can find a Cobra HE for under 100, I can take it and get it done for me cheap. I would also have to buy the B woody brackets or what not, but for 150 install and bleeded out sounds really good.
Senior Member
Joined: 03-26-06
Posts: 2,271
Likes: 0
From: Michigan
Originally Posted by Blown 4-banger
Who else has done a cobra HE? I know a lot of redlines do it, but I haven't heard of many cobalts doing it.
and ENUFPWR is running a 2nd stock HE
awesome write up though
, I'm sure I'll do this before next season
Senior Member
Joined: 10-08-05
Posts: 5,295
Likes: 0
From: AZ
That was a real task getting that done. I have to admit that preformed lines would have made that a lot nicer. We spent half the day trying to find something that would work with what little space we had to work with.
Some of the dimensions and details were left out:
The "cloth stuff" is a rubberized foam commonly used in kitchen cabinets as a non-slip padding for dishes and glasses.
The 4 machine screws and lock nuts holding the brackets together are all 10-32 x 3/4". The self drilling sheet metal screws are #10 x 3/4.
The copper 90� elbows were 3/4" 90� street elbows with 2" of 3/4" copper pipe soldered in. Not sure if lead from solder would have ill any effects on the system so we used lead free plumbing solder. I was thinking today that if you can weld aluminum or know someone that can, you might save your self the trouble and weld a new end with a 90� bend on the HE itself. That would also give you a little more room to work with come time to mount the HE in the bumper. Or even better go to NAPA and have the 2 ends that connect to the HE preformed in a 90� bend.
For bleeding the IC system, I would reccomend either using HP Tuners to turn on the IC pump when the ignition is on (thanks to PsykoStevo for that one) or create jumpers for inplace of the relay as shown here. IC pump & cooling fan override courtesy of WopOnTour. I think the best way to prime the sytem would be to use a hand syphoning pump, similar to this, and feed it from you tub of coolant to the pump. Once there is a continuous flow of coolant to the IC pump, it will take over from there.


Senior Member
Joined: 10-08-05
Posts: 5,295
Likes: 0
From: AZ
Yeah it's still held together. If you get the right ones they will last longer. Look for the black ones that say they are UV resistant and meet military specs. In all honestly I would use some "L" brackets to secure it rather than zip tie it. Blown 4-banger didn't want to over engineer it. ")

Banned
Joined: 03-30-05
Posts: 6,980
Likes: 0
Yeah it's still held together. If you get the right ones they will last longer. Look for the black ones that say they are UV resistant and meet military specs. In all honestly I would use some "L" brackets to secure it rather than zip tie it. Blown 4-banger didn't want to over engineer it.

