
2.0 LSJ Engine: How to Install CX Racing H/E w/ no fabrications


Thread Starter
Senior Member
Joined: 03-09-08
Posts: 1,934
Likes: 0
From: Brandon, Florida
How to Install CX Racing H/E w/ no fabrications
POST NUMBER 13 HAS THE HOW TO
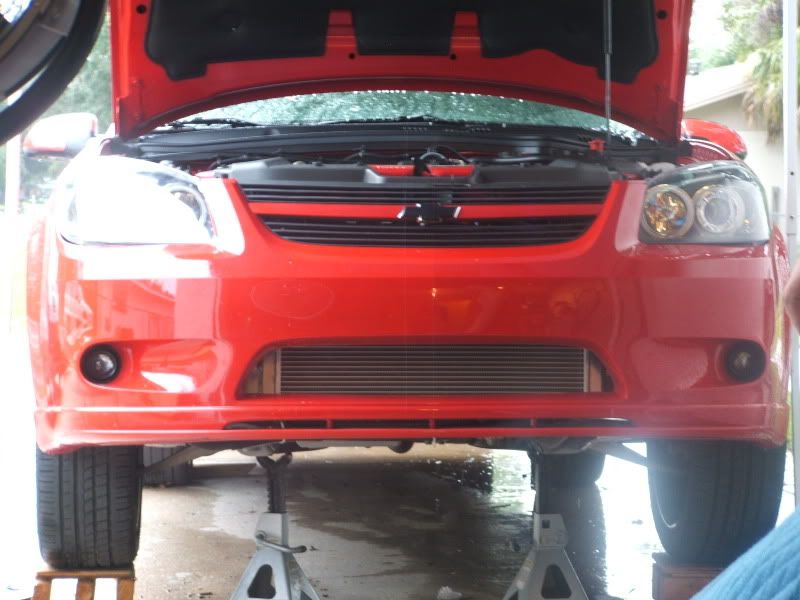
Ok, thanks to Bansheet, I decided to install my CX racing Heat Exchanger(the big one) a little different than most people. I was hesitant about cutting the crash bar and did not want to go through the trouble of making my own brackets...so i removed the stock H/E and moved the ac condensor back to where the stock h/e was. I then mounted the CXR h/e and used a longer bolt to go through both the CXR h/e and ac condensor. It turned out really well. Feel free to ask any questions about it.
Ok, thanks to Bansheet, I decided to install my CX racing Heat Exchanger(the big one) a little different than most people. I was hesitant about cutting the crash bar and did not want to go through the trouble of making my own brackets...so i removed the stock H/E and moved the ac condensor back to where the stock h/e was. I then mounted the CXR h/e and used a longer bolt to go through both the CXR h/e and ac condensor. It turned out really well. Feel free to ask any questions about it.
Last edited by flash13brandon; Aug 7, 2008 at 12:19 AM.

Senior Member
Joined: 11-24-07
Posts: 1,762
Likes: 0
From: Griffith, Indiana
Looks good, nice job. Thought that was the smaller one because I just installed the same one this weekend. I didnt need to do any cutting whatsoever, made my own brackets and it fits fine.


Thread Starter
Senior Member
Joined: 03-09-08
Posts: 1,934
Likes: 0
From: Brandon, Florida
How to Install CX Racing H/E w/ no fabrications
Alright, I thought this how to could help alot of people and save alot of unnecessary fabricatiotns. I am not the first to do it this way but I suppose im the first to make a how-to like this. Thanks to Bodnar, Bansheet, Hungryhip, and Ecotecon18s, they helped me out with this.
Tools needed
1. 10 mm socket
2. 7 mm socket
3. 2 bolts- 2 and 3/8" long M6 x 1.0 (thats metric in case you dont know)
4. 2- 1 inch spacers
5. 4 washers to fit the bolts.
6. 1 Gallon of Dexcool( Water Wetter or Distilled water is optional)
7. 4- 3/4" clamps
8. 8-10 feet of 3/4" heater hose
9. about 3-6 inches of 1/4" hose for purge nipple ( optional)
1. The first step is obvously to take off the front bumper and crash bar. ( This is probably the most time consuming part) There is a How-To on front bumper removal.
2. The next thing is to take out the stock H/E. To do this, you need to unbolt the AC condensor. 1 bolt on each side of it.( Sorry i didnt plan on making a how to so i dont have pics). It would be really helpful to have someone support the condensor while you do the next steps because you do not want to kink any lines.
3. Once you have the Condensor unbolted, the H/E is right behind it. It is held on by two black brackets which need to be taken out. The H/E just comes out with the brackets.
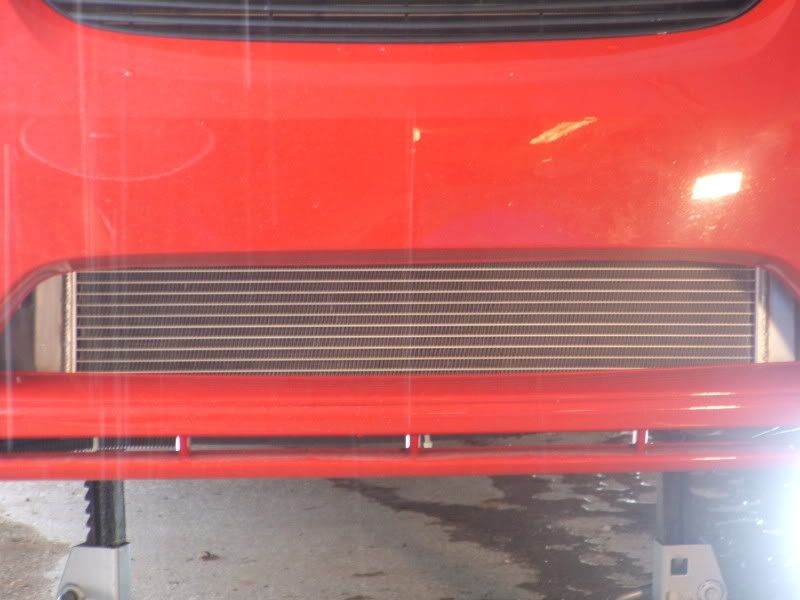
4. Now you are ready to start messing with the CX h/e. There are no pre drilled holes in the flanges so this is the only cuts you have to make and ITS NOT ON YOUR CAR so thats always good. I would strongly advise you to measure where you are going to cut and using a level. The left side bolt is going to be higher than the right side as you can see in this picture.
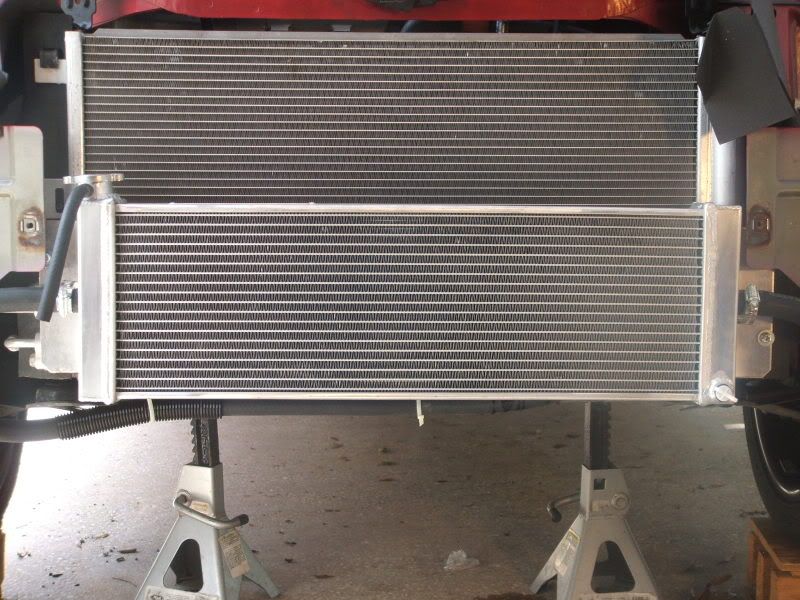
5. Now you have to bolt them in. The reason for the long bolt is because it goes thought both the condensor and h/e. It just bolts right in where the stock one was. The spacer goes on the bolt in between the condensor and h/e. I used 1 washer on each side of the h/e because the hole for the bolts are so close to the edge as you can see in the above pic.
6. Now its time to run the hoses. Thanks to Bodnar for the schematic(sp?). I used about 9-10 feet of the heater hose to make sure there were no kinks. For the purge nipple, you can either plug it or use 1/4" hose like I did.
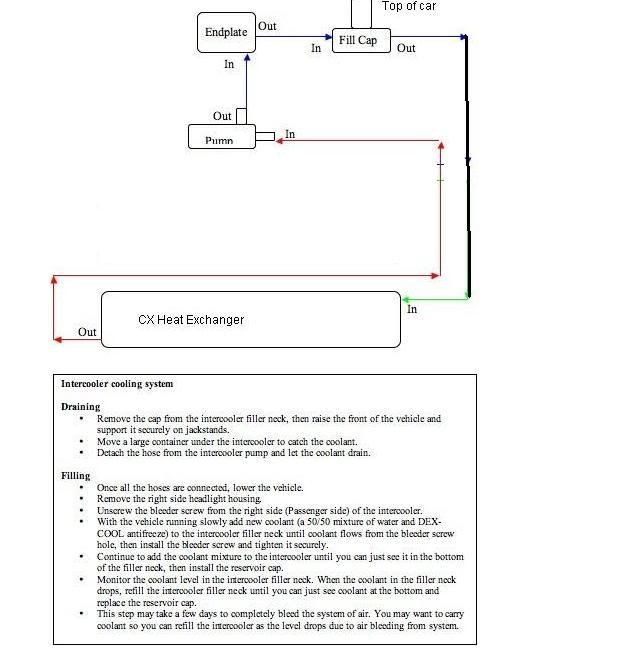
7. Now you are ready to fill the h/e up with the dexcool and/or water wetter/ distilled water. After filling it up, then proceed to fill up the filler neck. Have the car running, it will bleed all the air out of the system. Monitor the filler neck and fill it up as necessary.
8. You are done and ready to re-install everything.
Hope this is a Help!
-Brandon
Tools needed
1. 10 mm socket
2. 7 mm socket
3. 2 bolts- 2 and 3/8" long M6 x 1.0 (thats metric in case you dont know)
4. 2- 1 inch spacers
5. 4 washers to fit the bolts.
6. 1 Gallon of Dexcool( Water Wetter or Distilled water is optional)
7. 4- 3/4" clamps
8. 8-10 feet of 3/4" heater hose
9. about 3-6 inches of 1/4" hose for purge nipple ( optional)
1. The first step is obvously to take off the front bumper and crash bar. ( This is probably the most time consuming part) There is a How-To on front bumper removal.
2. The next thing is to take out the stock H/E. To do this, you need to unbolt the AC condensor. 1 bolt on each side of it.( Sorry i didnt plan on making a how to so i dont have pics). It would be really helpful to have someone support the condensor while you do the next steps because you do not want to kink any lines.
3. Once you have the Condensor unbolted, the H/E is right behind it. It is held on by two black brackets which need to be taken out. The H/E just comes out with the brackets.
4. Now you are ready to start messing with the CX h/e. There are no pre drilled holes in the flanges so this is the only cuts you have to make and ITS NOT ON YOUR CAR so thats always good.
I would strongly advise you to measure where you are going to cut and using a level. The left side bolt is going to be higher than the right side as you can see in this picture. 5. Now you have to bolt them in. The reason for the long bolt is because it goes thought both the condensor and h/e. It just bolts right in where the stock one was. The spacer goes on the bolt in between the condensor and h/e. I used 1 washer on each side of the h/e because the hole for the bolts are so close to the edge as you can see in the above pic.
6. Now its time to run the hoses. Thanks to Bodnar for the schematic(sp?). I used about 9-10 feet of the heater hose to make sure there were no kinks. For the purge nipple, you can either plug it or use 1/4" hose like I did.
7. Now you are ready to fill the h/e up with the dexcool and/or water wetter/ distilled water. After filling it up, then proceed to fill up the filler neck. Have the car running, it will bleed all the air out of the system. Monitor the filler neck and fill it up as necessary.
8. You are done and ready to re-install everything.
Hope this is a Help!
-Brandon


Senior Member
Joined: 04-29-06
Posts: 2,977
Likes: 0
From: Mulberry, Florida
After lots of research and discussion it was decided to run just the larger H/E out front to get everything away from other heat sources, i.e. radiator, ac condensor.
