
Interior: How to: Install subs and amps with original H/U (with pics)

Thread Starter
New Member
Joined: 01-24-08
Posts: 5
Likes: 0
From: Massachusetts
How to: Install subs and amps with original H/U (with pics)
Ok, so you want to install aftermarket subwoofers and an amplifier on your Chevy Cobalt. I will first give you a little background on my Cobalt, and then I will show with pictures what I did to bring everything together. My Cobalt is a 2008, LT/SC in black. I do not have the premium Pioneer system. Beginning this project, everything about the car was bone stock, and the kick from the 4 stock speakers wasn�t even enough to keep me awake while driving.
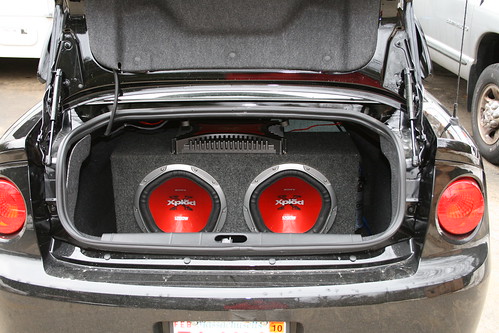
What I put in my Cobalt so far is 2 12� Sony Xplod Subwoofers, and a Sony Xplod 2 Channel Amp. (Not the greatest system, but an upgrade is coming).
12� may be a little bit of overkill, because I definitely had a difficult time squeezing the box into the trunk. (Actually had to drop the back seats and slide it in that way�still was a very tight fit. So measure first!)
Another goal that I wanted to reach out of this project was not tapping into the factory harness at all, and still gain control to turn my amp on and off with ease.
NOTE: BEFORE MESSING AROUND WITH ANY ELECTRICAL ON THE CAR, PLEASE REMEMBER TO REMOVE THE POSITVE (RED) TERMINAL SO ANY ELECTRICAL MISTAKES WILL NOT FRY YOUR CAR!
So, I started off with the two subs already wired and installed into an enclosed box. I found that putting the subs in first before anything else was the easiest way for me to go about it (you will see why). As I said early, the subs had to be slid in through the back seat. Next, I used self tapping screws to securely fasten the amplifier on the top of the box (again, check measurements and make sure you have enough clearance under the rear deck. If not, maybe another mounting location will be acceptable).
Now, obviously the stock radio does not have RCA jacks, so I did a little homework and purchased a line output converter from Crutchfield. It was a $20 dollar item that was well worth it. Now, if you look at the way the LOC is, I did tap into the rear speakers to make a set of RCA jacks available to put into the amp.
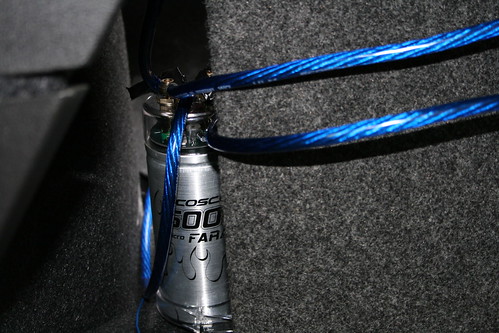
Next I picked up a just a simple amp wiring set from Wal*Mart that had a 500k farad capacitor in it. I mounted the capacitor on the right side of the box (originally on the left, but found that it would be more difficult to run the power and ground from that side).
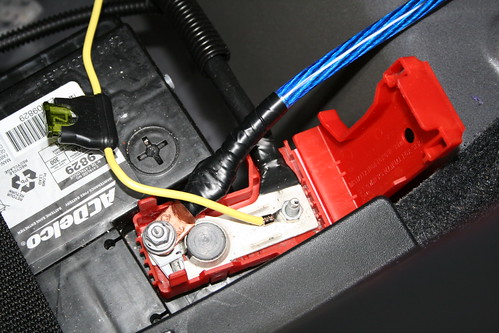
Next was wiring up the amp for juice. The amp kit came included with everything that I needed, including the inline fuse. The only thing that didn�t work from the kit was the massive terminal to connect onto the positive terminal (as GM has engineered a brilliant terminal�). So instead of using the kit�s terminal, I just took a standard battery terminal that would accept a 4 gauge wire, and crimped it on with vice grips, solder, and then electrical tape. I then placed the terminal over the post that lay on the battery terminal.
From here, I ran the wire under the carpet, looped it in the capacitor and then placed it on the amp. (The terminal for the amp�s ground and power were minorly customed also. They needed to be ground down a little bit to fit in the designated spot). When doing this, only use the amount of wire that you need to make it from battery to capacitor to amp. Extra wire can result in loss of sound quality. And remember the good rule of thumb, measure twice, cut once.
From here, I found a good ground on the rear deck of the car.

I mounted the ground wire, looped it through the capacitor and into the amplifier. (Same applies as above. Only use what you need)
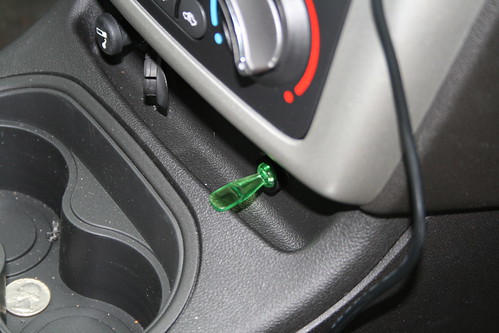
From here I just made simple connections from the amp to the subwoofers to power the speakers. I still had to get a way to get the amp to power on. This is where I got a little creative. I from here ran another 16 gauge wire (with a 15 amp inline fuse) under the carpets and kick panels all the way to the front of the car where I had drilled a small hole to mount a switch under the heater controls (if you are going to do this, be very conscience about drilling the right spot or you will hit something that isn�t meant to be drilled into). Ran the wire back again into the amplifier. With the flick of a switch, the amps turn on and you don�t have to chop your harness at all!
Total completion time: 1-2 hours
Pros: I really like the factory H/U in the Cobalts. XM Radio, AUX input, 36 presets�can�t go wrong. My reason for doing it this way was to keep the factory look, and if I ever had any problems and needed a warranty service, then the items can be just as easily removed. I never tapped into the harness (only the rear speaker wire�and who is really going to notice that). Great sound, even with budget friendly equipment.
Cons: The pros definitely outweigh the cons. The only con that I really had was losing the ability to control the amp from the H/U. But once I tuned the amp, and the LOC, the sound is great and I rarely find myself tinkering with it at all. The only other thing that I felt was a pain was that I do have to remember to hit the switch every time I leave to the car or it will drain the battery. So I ended up buying a lighted switch ($2.50) so it will actually light up when the switch is on.
Just a few tips for little problems I ran into. On my car, the positive and negative wires were not labeled on the speaker wires. I did some investigation, and found that on the left rear speaker, the positive is the brown (looks almost black) with the yellow being the negative. On the right speaker, the dark blue is the positive, and the light blue is the negative.
Any questions? Feel free to ask me, and I will do the best that I can to answer them. As soon as I receive my new speakers, I will put up a (hopefully) much shorter How To on the speaker installation of both front and rear speakers, including door panel removal.
What I put in my Cobalt so far is 2 12� Sony Xplod Subwoofers, and a Sony Xplod 2 Channel Amp. (Not the greatest system, but an upgrade is coming).
12� may be a little bit of overkill, because I definitely had a difficult time squeezing the box into the trunk. (Actually had to drop the back seats and slide it in that way�still was a very tight fit. So measure first!)
Another goal that I wanted to reach out of this project was not tapping into the factory harness at all, and still gain control to turn my amp on and off with ease.
NOTE: BEFORE MESSING AROUND WITH ANY ELECTRICAL ON THE CAR, PLEASE REMEMBER TO REMOVE THE POSITVE (RED) TERMINAL SO ANY ELECTRICAL MISTAKES WILL NOT FRY YOUR CAR!
So, I started off with the two subs already wired and installed into an enclosed box. I found that putting the subs in first before anything else was the easiest way for me to go about it (you will see why). As I said early, the subs had to be slid in through the back seat. Next, I used self tapping screws to securely fasten the amplifier on the top of the box (again, check measurements and make sure you have enough clearance under the rear deck. If not, maybe another mounting location will be acceptable).
Now, obviously the stock radio does not have RCA jacks, so I did a little homework and purchased a line output converter from Crutchfield. It was a $20 dollar item that was well worth it. Now, if you look at the way the LOC is, I did tap into the rear speakers to make a set of RCA jacks available to put into the amp.
Next I picked up a just a simple amp wiring set from Wal*Mart that had a 500k farad capacitor in it. I mounted the capacitor on the right side of the box (originally on the left, but found that it would be more difficult to run the power and ground from that side).
Next was wiring up the amp for juice. The amp kit came included with everything that I needed, including the inline fuse. The only thing that didn�t work from the kit was the massive terminal to connect onto the positive terminal (as GM has engineered a brilliant terminal�). So instead of using the kit�s terminal, I just took a standard battery terminal that would accept a 4 gauge wire, and crimped it on with vice grips, solder, and then electrical tape. I then placed the terminal over the post that lay on the battery terminal.
From here, I ran the wire under the carpet, looped it in the capacitor and then placed it on the amp. (The terminal for the amp�s ground and power were minorly customed also. They needed to be ground down a little bit to fit in the designated spot). When doing this, only use the amount of wire that you need to make it from battery to capacitor to amp. Extra wire can result in loss of sound quality. And remember the good rule of thumb, measure twice, cut once.
From here, I found a good ground on the rear deck of the car.
I mounted the ground wire, looped it through the capacitor and into the amplifier. (Same applies as above. Only use what you need)
From here I just made simple connections from the amp to the subwoofers to power the speakers. I still had to get a way to get the amp to power on. This is where I got a little creative. I from here ran another 16 gauge wire (with a 15 amp inline fuse) under the carpets and kick panels all the way to the front of the car where I had drilled a small hole to mount a switch under the heater controls (if you are going to do this, be very conscience about drilling the right spot or you will hit something that isn�t meant to be drilled into). Ran the wire back again into the amplifier. With the flick of a switch, the amps turn on and you don�t have to chop your harness at all!
Total completion time: 1-2 hours
Pros: I really like the factory H/U in the Cobalts. XM Radio, AUX input, 36 presets�can�t go wrong. My reason for doing it this way was to keep the factory look, and if I ever had any problems and needed a warranty service, then the items can be just as easily removed. I never tapped into the harness (only the rear speaker wire�and who is really going to notice that). Great sound, even with budget friendly equipment.
Cons: The pros definitely outweigh the cons. The only con that I really had was losing the ability to control the amp from the H/U. But once I tuned the amp, and the LOC, the sound is great and I rarely find myself tinkering with it at all. The only other thing that I felt was a pain was that I do have to remember to hit the switch every time I leave to the car or it will drain the battery. So I ended up buying a lighted switch ($2.50) so it will actually light up when the switch is on.
Just a few tips for little problems I ran into. On my car, the positive and negative wires were not labeled on the speaker wires. I did some investigation, and found that on the left rear speaker, the positive is the brown (looks almost black) with the yellow being the negative. On the right speaker, the dark blue is the positive, and the light blue is the negative.
Any questions? Feel free to ask me, and I will do the best that I can to answer them. As soon as I receive my new speakers, I will put up a (hopefully) much shorter How To on the speaker installation of both front and rear speakers, including door panel removal.
Last edited by TommyP; Oct 6, 2012 at 09:23 AM.

Senior Member
Joined: 01-23-08
Posts: 2,920
Likes: 0
From: Cape Coral, FL
if any one has more details about this, please pm me, im curious about the switch, i want a system but if mom gets in the car i dont want her to go crazy so could i run the remote wire for the amp to a fuse that turns on with the car (wipers, no sunroof) and then the fuse to a switch and from the switch to the battery?????????????

Senior Member
Joined: 02-21-07
Posts: 16,180
Likes: 1
From: Calgary, Alberta
if any one has more details about this, please pm me, im curious about the switch, i want a system but if mom gets in the car i dont want her to go crazy so could i run the remote wire for the amp to a fuse that turns on with the car (wipers, no sunroof) and then the fuse to a switch and from the switch to the battery?????????????
if any one has more details about this, please pm me, im curious about the switch, i want a system but if mom gets in the car i dont want her to go crazy so could i run the remote wire for the amp to a fuse that turns on with the car (wipers, no sunroof) and then the fuse to a switch and from the switch to the battery?????????????

yeah about the switch, i have two kenwood 12"s in my sister's ls, yes the box was a super tight fit, went in through the seats. but yeah i just opened the fuse box on the pass. side and used a multimeter along with turning the key to the "on" possition to find a spot where there was current only when the car was on. i used that as that starting point for my remote wire, and then put a switch in the dash and then had it go back to the amp.
oh and i also only used a fues on the power wire from the battery. no other wires
oh and i also only used a fues on the power wire from the battery. no other wires
Last edited by EXsoccer1921; Jun 24, 2008 at 02:04 AM. Reason: Automerged Doublepost
Senior Member
Joined: 01-23-08
Posts: 2,920
Likes: 0
From: Cape Coral, FL
use a Mini Add a fuse and plug it in your wiper fuse spot. use the line coming out of the mini add a fuse and put in the remote wire. now from the remote wire run it to a switch, and from the switch to the amp. your wipers are only on when the car is on so when the car is off your amp will not receive power, even when the switch is set to send signal. basically the switch is just a kill switch so your mom would be able to turn it off whenever she wants to
Thread Starter
New Member
Joined: 01-24-08
Posts: 5
Likes: 0
From: Massachusetts
Sorry not to get back to you sooner, but what I did is run a smaller 16 gauge wire with an inline fuse from the battery, to the acc spot on the switch. Then a new wire from the switch to the REM port on the back of the amp. There was also a ground wire from the back of the switch, but that is only for illumination of the switch. The only reason I did this was because where I parked my car in school was a real rough neighborhood, so I didn't want them to know I had that in the trunk =D
Currently, I do not have this system anymore because I traded my first Cobalt for another one with the Pioneer system. So currently, the system is "stock", but I will be possibly upgrading the built in 10", and maybe retrofitting another sub box on the other side of the trunk. If you have any questions though, feel free to either post here or send me a PM.
Currently, I do not have this system anymore because I traded my first Cobalt for another one with the Pioneer system. So currently, the system is "stock", but I will be possibly upgrading the built in 10", and maybe retrofitting another sub box on the other side of the trunk. If you have any questions though, feel free to either post here or send me a PM.
Member
Joined: 10-16-08
Posts: 253
Likes: 0
From: Langley BC Canada
Is there anything different you have to do if you do have the premium Pioneer system? I have a Sony Xplod 500 amp and a couple of 10" MTX from my old car that I want to use but I still want to keep the stock H/U.

New Member
Joined: 08-26-08
Posts: 26
Likes: 0
From: Newark, DE
need a little clarification on the rca's... just got some rockford fosgate subs and kenwood amp and what not...but the headunit isnt working so i gotta use the stock headunit and im not sure if i really understood what you did to link the rca's into the stock headunit

New Member
Joined: 01-26-07
Posts: 42
Likes: 0
From: Wisconsin

New Member
Joined: 07-29-08
Posts: 69
Likes: 0
From: Michigan
Just to add to this thread: With the cobalts i've found its always best to run the ground directly to the battery ground avoiding any ground loops and such. I know ground wires should be short, but its only a few feet to the grounding spot. If you use at least 4g wire, you shouldn't have a problem. I would stay away from a using switched rem setup. A) Its more complex than it has to be and only adds to the amount of wires running through your car. B) I like the stock look, but a bright red, blue or green switch looks anything but stock on my yellow car. Instead, use fuse spot 18 in the passenger side fuse box. Its a spare fuse location that has 12v in acc and run positions. I used an add-a-fuse or something like that. It plugs into the fuse spot and then has two fuse spots on top: 1 for the original fuse to be put into and the other for the desired fuse for the extra circuit. it has a power wire coming off the extra fuse that you will run to you amp. very clean, no holes in the trunk from ground wires, and extremely easy.

not true.
There is no reason why a ground loop should occur if your ground is clean and short. the amp could be under the front seat 10 feet away from the battery, it's still fine to ground to the chassis. if the wire is longer than it has to be, you may run the risk of exposing the ground close to a power wire, or even worse an RCA, which would then induce a ground loop, defeating the point. nothing beats a clean, short ground. there is a reason why most reputable stereo companies recommend upon installation that grounds be no longer than 18" it's because grounding back to source (battery) is unnecessary.
New Member
Joined: 07-29-08
Posts: 69
Likes: 0
From: Michigan
[QUOTE=SprChrg4Life;3701118]There is no reason why a ground loop should occur if your ground is clean and short. the amp could be under the front seat 10 feet away from the battery, it's still fine to ground to the chassis. if the wire is longer than it has to be, you may run the risk of exposing the ground close to a power wire, or even worse an RCA, which would then induce a ground loop, defeating the point. nothing beats a clean, short ground. there is a reason why most reputable stereo companies recommend upon installation that grounds be no longer than 18" it's because grounding back to source (battery) is unnecessary.[/QUOTE
Thats true, All i'm saying is that, for the cobalts, its extremely convenient to run it an additional foot or so directly to the battery ground point. Avoid the chance of your ground not making good contact because of paint etc. If i understood that picture correctly, it looked like his ground point was closer to his loc than his battery, but its hard to tell. And ground loops occur when a voltage potential exists between two grounds, or there being any non-zero resistances between two or more wiring paths(battery and amp). basically a .01ohm resisitance caused by a faulty crimp connection on the gronud wire or paint being in the way or it being loose can develop a .5volt drop which could cause a source for system noise. Not trying to hate, just pointing out some things (imo)that people running higher power systems might want to do differently.
Thats true, All i'm saying is that, for the cobalts, its extremely convenient to run it an additional foot or so directly to the battery ground point. Avoid the chance of your ground not making good contact because of paint etc. If i understood that picture correctly, it looked like his ground point was closer to his loc than his battery, but its hard to tell. And ground loops occur when a voltage potential exists between two grounds, or there being any non-zero resistances between two or more wiring paths(battery and amp). basically a .01ohm resisitance caused by a faulty crimp connection on the gronud wire or paint being in the way or it being loose can develop a .5volt drop which could cause a source for system noise. Not trying to hate, just pointing out some things (imo)that people running higher power systems might want to do differently.

Member
Joined: 11-05-08
Posts: 358
Likes: 0
From: Burnaby
do you have to add the switch?
i got two jl audio 12" subs and a 600W amp already on the side of the box
i have the 10" pioneer already in there, is there anyway i can run the wires from that to my sub?
i got two jl audio 12" subs and a 600W amp already on the side of the box
i have the 10" pioneer already in there, is there anyway i can run the wires from that to my sub?

Member
Joined: 12-05-07
Posts: 249
Likes: 0
From: Saskatchewan
Member
Joined: 12-05-07
Posts: 249
Likes: 0
From: Saskatchewan

New Member
Joined: 06-21-07
Posts: 106
Likes: 0
From: Sioux Falls, South Dakota
That would be why I bought another stock sub off of ebay and gutted that one. Then I can easily bolt in the stocker if I need to. You are going to have to tap into the stock sub wiring anyway so why not do a clean setup that doesn't hog your trunk space.
New Member
Joined: 07-29-08
Posts: 69
Likes: 0
From: Michigan
I saw this asked somewhere, but DO NOT run wires from your stock sub to your new ones You will most likey overload your amp unless you happen to know the resistance of the stock sub and just happen to wire the 3 subs together to match that same resisitance, even then the factory amp is not very powerful at all, just run a new setup. its not very hard to undo assuming you do it right lol and they're are plenty of how to's to help you along.

New Member
Joined: 06-21-07
Posts: 106
Likes: 0
From: Sioux Falls, South Dakota
I saw this asked somewhere, but DO NOT run wires from your stock sub to your new ones You will most likey overload your amp unless you happen to know the resistance of the stock sub and just happen to wire the 3 subs together to match that same resisitance, even then the factory amp is not very powerful at all, just run a new setup. its not very hard to undo assuming you do it right lol and they're are plenty of how to's to help you along.
That is why the best thing to do is run the stock sub signal left and right into an amp with hi level inputs like I did. Saves you the need to get a hi level to low level converter and has less things to go wrong.


