
Electrical: How-To: Oil Pressure Install on 2006 Cobalt LS

Thread Starter
Senior Member
Joined: 05-17-06
Posts: 7,283
Likes: 0
From: Ft. Eustis, VA
How-To: Oil Pressure Install on 2006 Cobalt LS
Vehicles covered by this write-up: 2005-2006 Cobalt LS
Installation Duration: 1 hour
Skills needed(1 being least and 10 being expert): 3
Parts you need to purchase:
Some sort of gauge pod(your preference)
Oil Pressure Gauge - Summit Racing Brand (Summit Racing Part # SUM-G2985)
Oil Pressure Sender - Summit Racing Brand (Summit Racing Part # SUM-G2987)
Autometer Adapter (Summit Racing Part # - ATM-2278)
Wire
Crimps
Tools:
Clothes hanger
Wire cutters and strippers
Crimpers
Vice Grips
Teflon Tape
14mm Open-end wrench(can't use a boxed-in)
19mm Wrench
10mm socket & ratchet
Directions:
1) Disconnect battery(located in trunk)
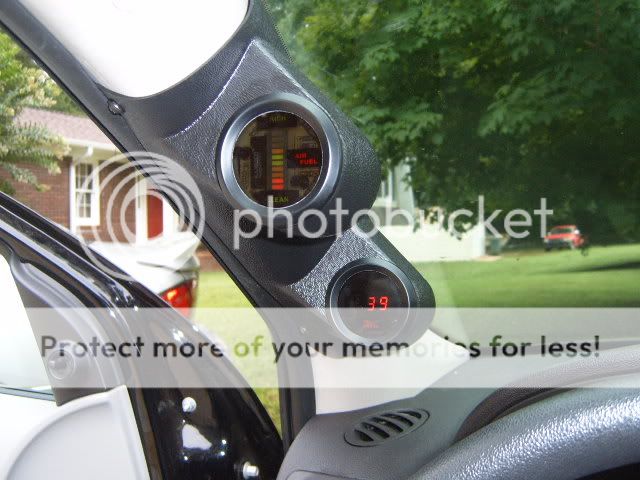
2) Install gauge pod onto A-pillar or whereever following their instructions. I used a a-pillar gauge pod and had to attach it with four screws and drill a hole for the wires as I'm going more for function right now.
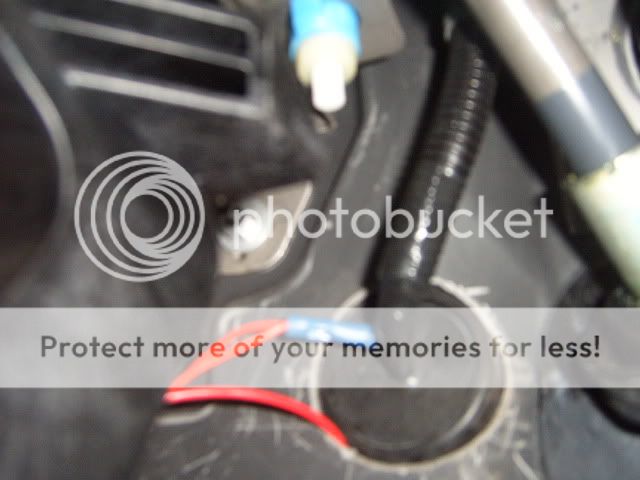
3) Remove rubber plug on firewall located as shown. Slide clothes hanger through hole and find in the engine bay. Attach two wires to it and pull back through. This is your power wire and A/F signal wire. Mark them to keep them seperated.
4) Hooking up the power wire - using a crimp put the red wire(power) and crimp it into one side. The power wire you ran through the firewall will be connected to the other side using the same method.
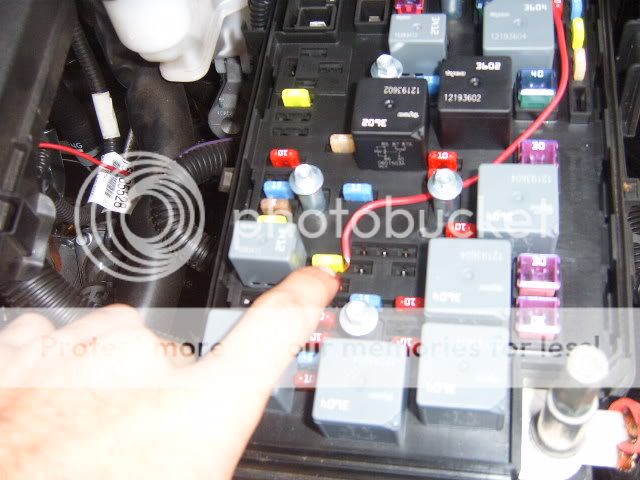
5) Now adding power - Take off the fuse box cover and find the IP Ign fuse. A mini green 20A fuse. Strip off some of the wire and put this on ONE side of the fuse and re-insert fuse. Congrats-You have power now.
6) Hooking up the ground - Anywhere will be great, but I used the metal bracket that supports my clutch pedal. Just removed one bolt put the black wire there and bolted it back down.
7) Prepping Sensor for installation - Clean the threads thoroughly. Wrap a little teflon tape around the threads. Screw the adapter into place. Holding the sensor(be careful it will crush like a oil filter) place the 14mm on the provided area and with your 19mm securely tighten the adapter down into place. DO NOT OVERTIGHTEN. Now add some teflon tape to the adapter threads like you did the sensor threads. Place the copper crush ring in place that is provided with the adapter.
(no picture since I did not have my camera with me at work)
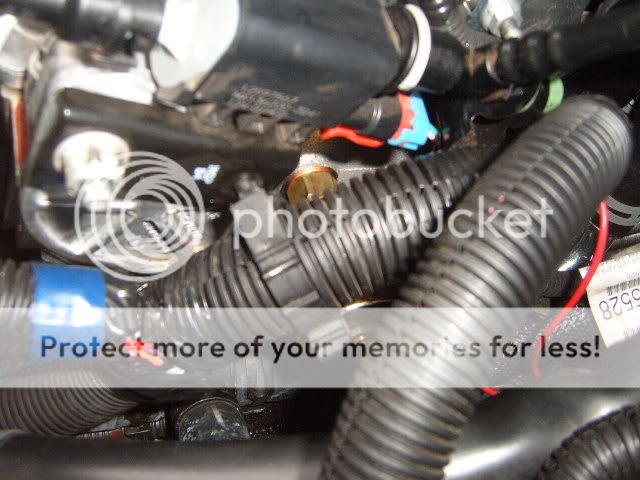
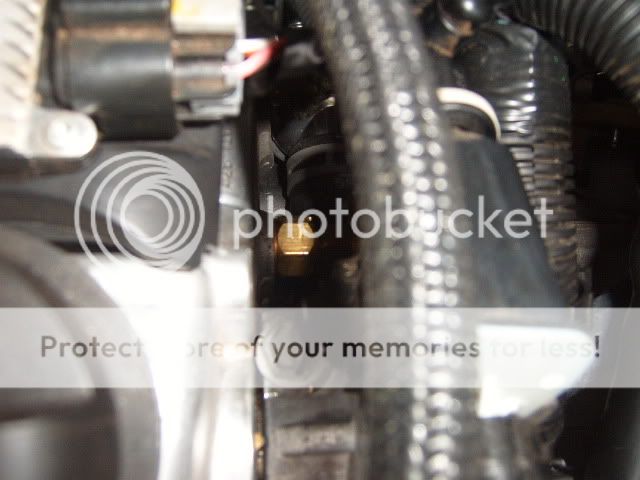
8- Removing the head plug. I tried to use a allen wrench as that is what you are suppose to use, yet the 7/32" was too small and the 1/4" was too big. As was the 5.5mm and 6mm. Take the vice grips and SECURELY get it on the plug. You will have to move some wires and all out of your way. And just break it loose as it is securely in place. I had trouble and I only have 10,000miles on my vehicle. Get the senser ready as you should have it already assembled as when you remove the plug you will lose some oil. Screw in the assembly and tighten down with your 19mm wrench. Make sure you crush the copper ring FLAT and do not overtighten as well.
Picture of finished product:
Picture of adapter:
TIP: Remove the center plug as it will give you the most room.
9) Hooking sensor to gauge(orange) - Now that you have the sensor securely installed. Run yet another wire from inside to the engine bay. This will be your signal wire for the oil pressure. Crimp a O connecter on the end going to the sensor and install with the provided hardware. Crimp the other end to your orange wire leading up to the gauge.
10) Reconnect battery and double check all wires.
11) Crank up engine and watch the pressure.
My car showed the following:
Idle: 30s
Normal driving: 50s
WOT Conditions: 60s
Disclaimer: Do not put gauge where it will affect your night time driving. I am under no reason responsible for where you install it. Please drive safely & responsible.
Installation Duration: 1 hour
Skills needed(1 being least and 10 being expert): 3
Parts you need to purchase:
Some sort of gauge pod(your preference)
Oil Pressure Gauge - Summit Racing Brand (Summit Racing Part # SUM-G2985)
Oil Pressure Sender - Summit Racing Brand (Summit Racing Part # SUM-G2987)
Autometer Adapter (Summit Racing Part # - ATM-2278)
Wire
Crimps
Tools:
Clothes hanger
Wire cutters and strippers
Crimpers
Vice Grips
Teflon Tape
14mm Open-end wrench(can't use a boxed-in)
19mm Wrench
10mm socket & ratchet
Directions:
1) Disconnect battery(located in trunk)
2) Install gauge pod onto A-pillar or whereever following their instructions. I used a a-pillar gauge pod and had to attach it with four screws and drill a hole for the wires as I'm going more for function right now.
3) Remove rubber plug on firewall located as shown. Slide clothes hanger through hole and find in the engine bay. Attach two wires to it and pull back through. This is your power wire and A/F signal wire. Mark them to keep them seperated.
4) Hooking up the power wire - using a crimp put the red wire(power) and crimp it into one side. The power wire you ran through the firewall will be connected to the other side using the same method.
5) Now adding power - Take off the fuse box cover and find the IP Ign fuse. A mini green 20A fuse. Strip off some of the wire and put this on ONE side of the fuse and re-insert fuse. Congrats-You have power now.
6) Hooking up the ground - Anywhere will be great, but I used the metal bracket that supports my clutch pedal. Just removed one bolt put the black wire there and bolted it back down.
7) Prepping Sensor for installation - Clean the threads thoroughly. Wrap a little teflon tape around the threads. Screw the adapter into place. Holding the sensor(be careful it will crush like a oil filter) place the 14mm on the provided area and with your 19mm securely tighten the adapter down into place. DO NOT OVERTIGHTEN. Now add some teflon tape to the adapter threads like you did the sensor threads. Place the copper crush ring in place that is provided with the adapter.
(no picture since I did not have my camera with me at work)
8- Removing the head plug. I tried to use a allen wrench as that is what you are suppose to use, yet the 7/32" was too small and the 1/4" was too big. As was the 5.5mm and 6mm. Take the vice grips and SECURELY get it on the plug. You will have to move some wires and all out of your way. And just break it loose as it is securely in place. I had trouble and I only have 10,000miles on my vehicle. Get the senser ready as you should have it already assembled as when you remove the plug you will lose some oil. Screw in the assembly and tighten down with your 19mm wrench. Make sure you crush the copper ring FLAT and do not overtighten as well.
Picture of finished product:
Picture of adapter:
TIP: Remove the center plug as it will give you the most room.
9) Hooking sensor to gauge(orange) - Now that you have the sensor securely installed. Run yet another wire from inside to the engine bay. This will be your signal wire for the oil pressure. Crimp a O connecter on the end going to the sensor and install with the provided hardware. Crimp the other end to your orange wire leading up to the gauge.
10) Reconnect battery and double check all wires.
11) Crank up engine and watch the pressure.
My car showed the following:
Idle: 30s
Normal driving: 50s
WOT Conditions: 60s
Disclaimer: Do not put gauge where it will affect your night time driving. I am under no reason responsible for where you install it. Please drive safely & responsible.
Last edited by TommyP; Oct 3, 2012 at 10:22 AM.
Senior Member
Joined: 05-29-06
Posts: 1,519
Likes: 1
From: Glen Ellyn, Illinois
Cool mod. Why they thought the Cobalt shouldn't have proper gauges is beyond me.
Maybe a temp gauge should be next? (Yes I know its available in the DIC but I'd much rather have a gauge)
Maybe a temp gauge should be next? (Yes I know its available in the DIC but I'd much rather have a gauge)

Member
Joined: 06-09-06
Posts: 387
Likes: 0
From: Lyons
Teflon tape? Why not use RTV form a gasket? Just askin, not bashin. I've always believed that teflon will break down eventually and one leak, but two a piece of that swimming around in your oil *shudders*.
I'm old school
Joined: 02-16-05
Posts: 6,905
Likes: 3
From: Nashville
When selecting a power source by tapping an existing circuit, know what you are doing. One side of the terminal is hot. If is tap that side, you are not fuse protected unless you use a separate in line fuse. Also, be sure you select a properly switched circuit (one that turns off with the key).
Thread Starter
Senior Member
Joined: 05-17-06
Posts: 7,283
Likes: 0
From: Ft. Eustis, VA
Originally Posted by Halfcent
When selecting a power source by tapping an existing circuit, know what you are doing. One side of the terminal is hot. If is tap that side, you are not fuse protected unless you use a separate in line fuse. Also, be sure you select a properly switched circuit (one that turns off with the key).
Thread Starter
Senior Member
Joined: 05-17-06
Posts: 7,283
Likes: 0
From: Ft. Eustis, VA
Originally Posted by SpecialK
Teflon tape? Why not use RTV form a gasket? Just askin, not bashin. I've always believed that teflon will break down eventually and one leak, but two a piece of that swimming around in your oil *shudders*.
Oh yeah another tip leave the first few(that start) threads clean of the stuff. I do it so much I guess out of habit it doesn't even register.


Member
Joined: 09-05-06
Posts: 353
Likes: 0
From: DA BURGH
same with me...i think it's the drivers side of the motorbetween the motor and the computer. i think i found the plug BUT there is no possable way i can get a pair of pliers there to get that plug off. i think i might try and use a "T" joint off of my stock location. which you basically need to be Hudini to get to (it's under the supercharger and just to the bottom left of the oil filter and you can't see it and can barely touch it from the top). i think i have a plan of attack...i'm going to remove the starter to get a clear shot at it (i hope). i'm doing this on saturday so i'll let you guys know how it goes!
Senior Member
Joined: 05-21-06
Posts: 5,577
Likes: 3
From: Gainesville, FL
Originally Posted by cobalt06ss_sc
same with me...i think it's the drivers side of the motorbetween the motor and the computer. i think i found the plug BUT there is no possable way i can get a pair of pliers there to get that plug off. i think i might try and use a "T" joint off of my stock location. which you basically need to be Hudini to get to (it's under the supercharger and just to the bottom left of the oil filter and you can't see it and can barely touch it from the top). i think i have a plan of attack...i'm going to remove the starter to get a clear shot at it (i hope). i'm doing this on saturday so i'll let you guys know how it goes!
i would agree... if you look in the fusebox pic, you can see the red wire off to the side and it running down to the engine.
Senior Member
Joined: 05-29-06
Posts: 1,519
Likes: 1
From: Glen Ellyn, Illinois
Originally Posted by Forseti
I have a tough time getting my bearings on the last two pics....like where in the engine it is...
Any way someone could post another pic that provides a better point of reference....?
Any way someone could post another pic that provides a better point of reference....?

Thread Starter
Senior Member
Joined: 05-17-06
Posts: 7,283
Likes: 0
From: Ft. Eustis, VA
Originally Posted by copson
Do you think that the oil pressure sending unit is the same at the 2.2L
This How-To and pictures were made referring to the 2.2L. I own a 2.2L.

Thread Starter
Senior Member
Joined: 05-17-06
Posts: 7,283
Likes: 0
From: Ft. Eustis, VA
Originally Posted by Brenn8402
would this be the same for a 2.4?? and also what is the diff between mechanical and electrical and do they both work the same for the oil pressure gauge? thnx for the help!
Senior Member
Joined: 08-30-05
Posts: 1,741
Likes: 0
From: Delaware
I got the Autometer Sportline gauge from summit (ATM-3327) But the biger adapter on the sender it too big. Wtf I need help i don't understand this. I beleive its 1/8 inch going to 1/4 inch. but the threading in the sender is just a litttttle too big. Help please.

Im doing my own install and I thought I could get some more pictures for those who want to do this themselves. Im waiting on my gauge pod from CA, but I have just received all my parts from Summit racing. Im installing a digital voltage and oil pressure gauge. (By the way, these gauges are like $30 each, and appear to be great quality. If you want to get gauges go with these summit gauges, they are great digital gauges.)

As you can see in this picture, the 2 gauges, the oil pressure sending unit, and the Autometer adapter you need. Ill post more pictures when I install it and try to get a better angle of the sending unit installed.
As you can see in this picture, the 2 gauges, the oil pressure sending unit, and the Autometer adapter you need. Ill post more pictures when I install it and try to get a better angle of the sending unit installed.

i just installed my oil pressure gauge from this how-to. It was a very good how-to. as for gauges i went with autometer shortsweep c2 electric. i went with oil pressure volts and water temp. got them on ebay for about 50$ each.

Member
Joined: 09-25-06
Posts: 209
Likes: 0
From: castle rock, co
i have the autometer mechanical....im sure someone else here does too....
the adapter on the sender appears to be to small i havent tried it yet but thought i would ask before i tried.
So....
1. i would assume but i should install my mechanical sender in the same place right?
2. does the autometer mechanical adapter fit that spot?
i dont know where else i would/could install it anyways.
thanks for the help...
