
Interior: How to relocate usb port on factory Headunit 08+ Cobalt


Thread Starter
Joined: 07-14-08
Posts: 12,039
Likes: 156
From: canada
How to relocate usb port on factory Headunit 08+ Cobalt
Ok some people wanna know how to relocate or rather add a usb port to the factory head unit so u can place the port anywhere u want, well i went out and did it so here is how to do it.
things u will need.
-socket or hand held socket driver
-dont remember the size of socket, but thats not hard to figure out, just see what ones fit.
-electrical tape, (dont need it but ill tell u later what i used it for)
-utility knife or equivalent
-male to female usb cable (do not use repeter cable or usb hub, they wont work)
-wire stripper (teeth or nail works to lol)
-small side cutters
-soldering iron
-flux core solder (1.6mm or a bit smaller, dont go bigger, u can but the iron grabs to much at a time)
-lead free thinning flux (to clean the contacts and wires)
-1 small zip tie
Ok here we go
1. First of course u gotta take ur headunit out, this is very east, i wont really get into detail on removing all the trim u need, watch this video it will show u
How to: Remove Interior Trim in a Cobalt. - YouTube
Once u have the trim around the head unit and environmetal controls taken out, there are 4 bolts that hold in the head unit, just remove those 4, carful the headunit usually falls. pull out the head unit, and remove the antenna and the other 2 plugs from the back. very easy.
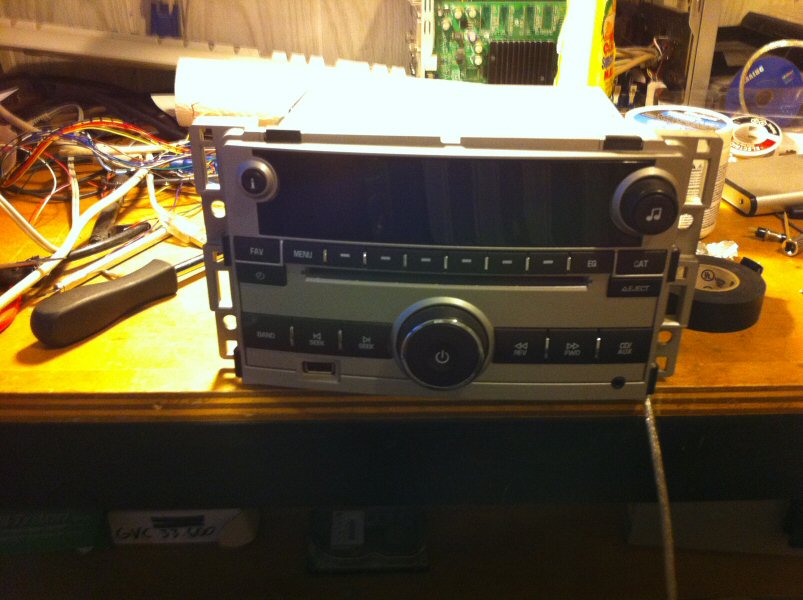
Then here is where we are at
2. turn the head unit on its side and remove the 4 small bolts, 2 on each side
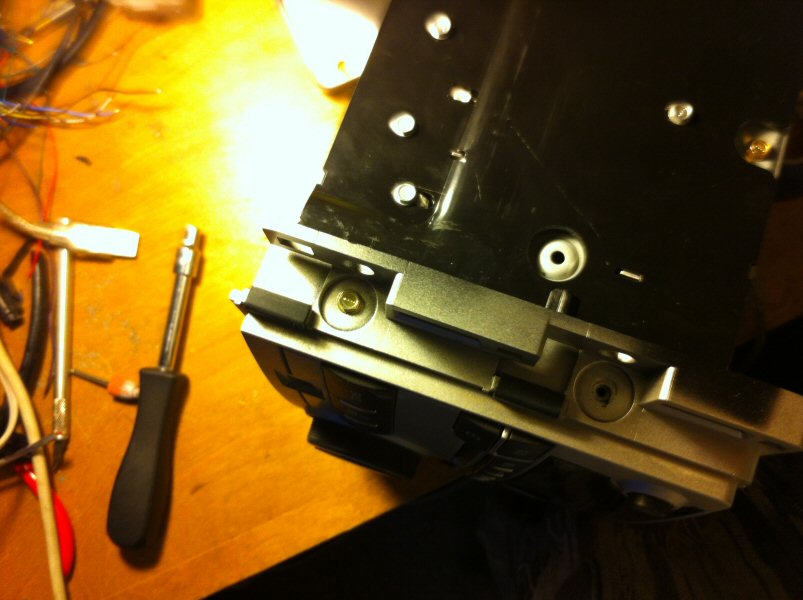
once those are removed there are 2 clips on top and 2 on bottom that u can lift with ur finger to remove the faceplace.
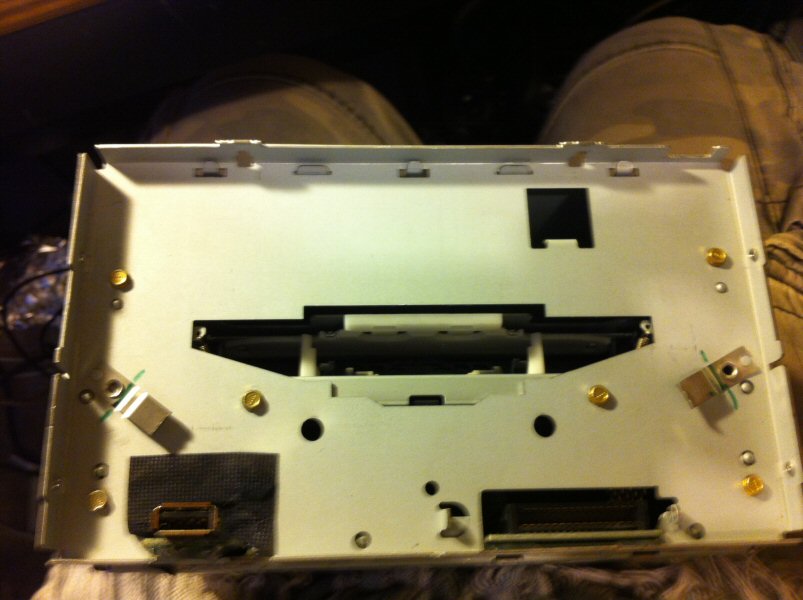
3. after faceplate is removed, remove the metal plate that hides the inside of the head unit
there are 6 small bolts.
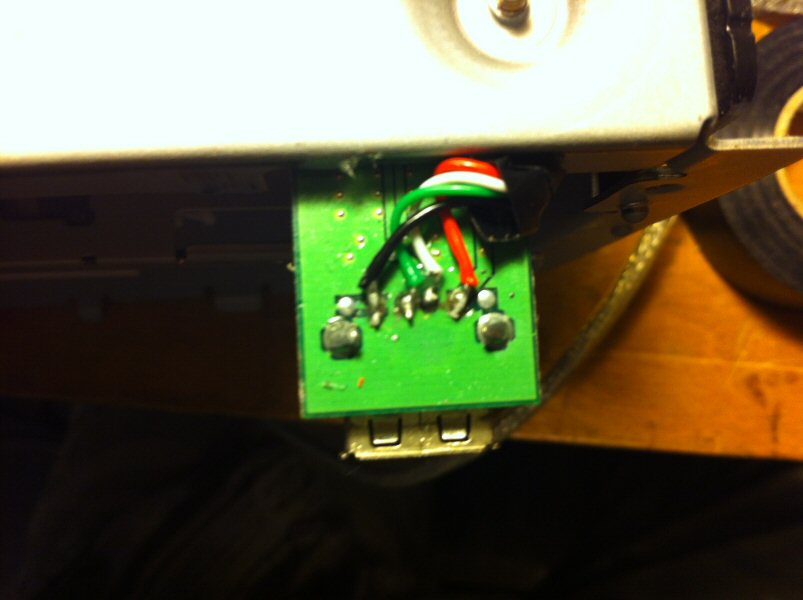
4. cut the male end of the usb cable off with side cutters, cut open cable and expose the 4 wires inside. black,geen,white,red. every usb cable except for maybe usb 3.0 cable will have the same color wires inside.

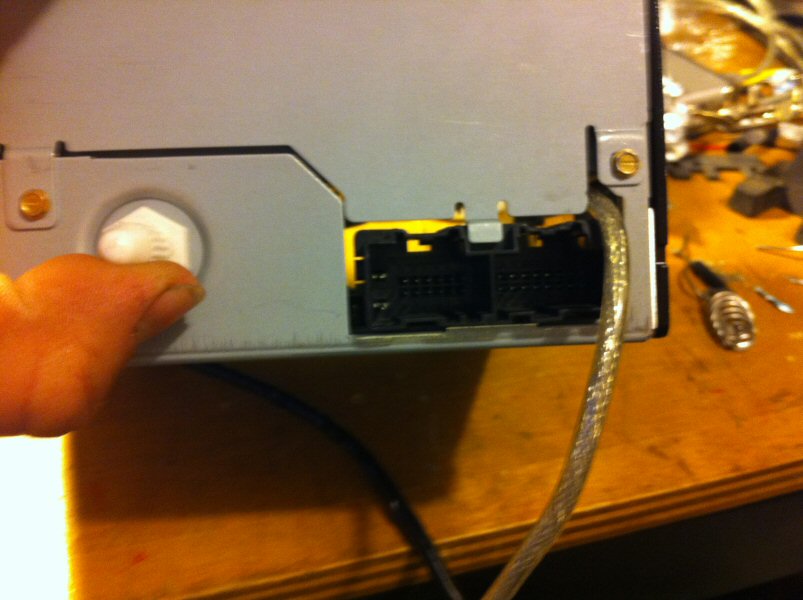
5. Run the cable into the box in following location.
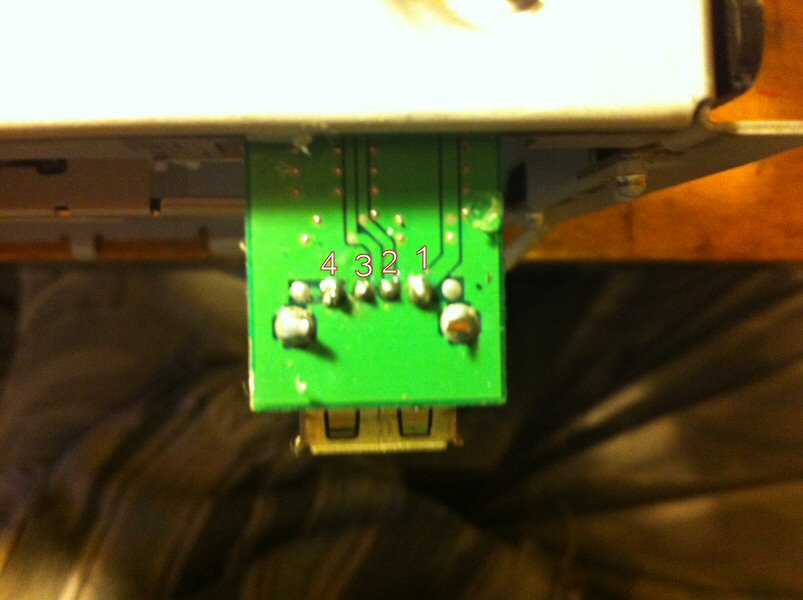
6. pull it threw to the front and flip the head unit upside down so u can see the bottom of the usb circuit board. U will see 4 solder points, well 6, but all u need is the 4 on the pic labled in the correct pin number sequence.
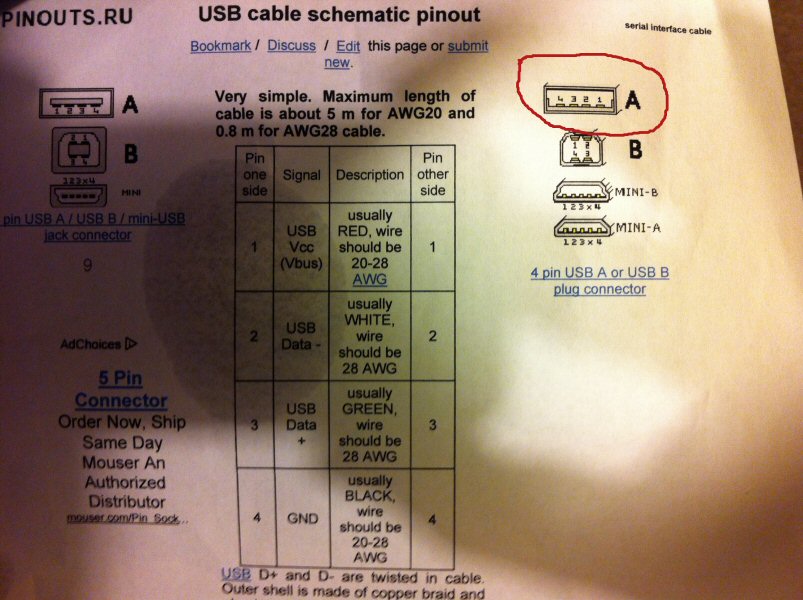
7. use the following diagram to show u what wires are soldered where. Make sure u put thinning flux on the wires and on the solder point, if u dont it will not clean the solder point and the solder will not bind with the solder point correctly and ur wire will easily break off.
this is what it should look like
8. ok ur done the hardest part. next, ( this is what i did, dont know if u have to but just to be safe) i pushed the cable threw the unit till i had alot of slack and i wrapped electrical tape around the part of the cable that will be inside the head unit, it gets hot in there. then i pulled it out the back, make sure u leave some slack inside as to not put strain on the solder points. make sure u make the wires as low profile as possible when they run from the usb into the box, like i had in the pic, if u dont the metal and faceplate will squish them and possibly damage them. i put a little peice of electrical tape over the solder points as well just for a little protection, also make sure the cable running inside the unit is away from the side wall, it gets pretty hot there so just to be safe.
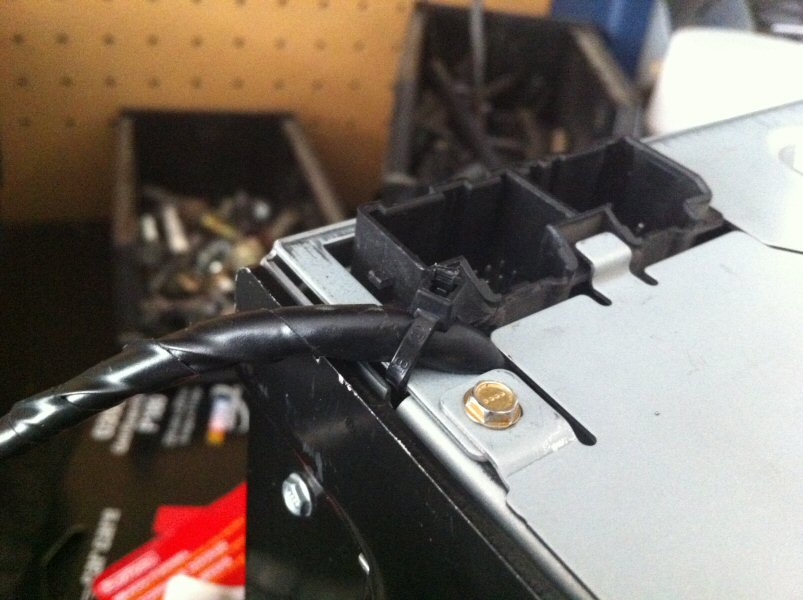
9. lastly, turn the unit to the backside and ziptie the cable like show, so it cant move inside the unit and possibly break ur work.
10. put the unit back together, install back into car, and enjoy ur new relocated usb port. Just dont try plugging in 2 things at once, the factory port on the unit itself seems to always take over if u do.
Enjoy (sorry for the spelling mistake )
)
things u will need.
-socket or hand held socket driver
-dont remember the size of socket, but thats not hard to figure out, just see what ones fit.
-electrical tape, (dont need it but ill tell u later what i used it for)
-utility knife or equivalent
-male to female usb cable (do not use repeter cable or usb hub, they wont work)
-wire stripper (teeth or nail works to lol)
-small side cutters
-soldering iron
-flux core solder (1.6mm or a bit smaller, dont go bigger, u can but the iron grabs to much at a time)
-lead free thinning flux (to clean the contacts and wires)
-1 small zip tie
Ok here we go
1. First of course u gotta take ur headunit out, this is very east, i wont really get into detail on removing all the trim u need, watch this video it will show u
How to: Remove Interior Trim in a Cobalt. - YouTube
Once u have the trim around the head unit and environmetal controls taken out, there are 4 bolts that hold in the head unit, just remove those 4, carful the headunit usually falls. pull out the head unit, and remove the antenna and the other 2 plugs from the back. very easy.
Then here is where we are at
2. turn the head unit on its side and remove the 4 small bolts, 2 on each side
once those are removed there are 2 clips on top and 2 on bottom that u can lift with ur finger to remove the faceplace.
3. after faceplate is removed, remove the metal plate that hides the inside of the head unit
there are 6 small bolts.
4. cut the male end of the usb cable off with side cutters, cut open cable and expose the 4 wires inside. black,geen,white,red. every usb cable except for maybe usb 3.0 cable will have the same color wires inside.
5. Run the cable into the box in following location.
6. pull it threw to the front and flip the head unit upside down so u can see the bottom of the usb circuit board. U will see 4 solder points, well 6, but all u need is the 4 on the pic labled in the correct pin number sequence.
7. use the following diagram to show u what wires are soldered where. Make sure u put thinning flux on the wires and on the solder point, if u dont it will not clean the solder point and the solder will not bind with the solder point correctly and ur wire will easily break off.
this is what it should look like
8. ok ur done the hardest part. next, ( this is what i did, dont know if u have to but just to be safe) i pushed the cable threw the unit till i had alot of slack and i wrapped electrical tape around the part of the cable that will be inside the head unit, it gets hot in there. then i pulled it out the back, make sure u leave some slack inside as to not put strain on the solder points. make sure u make the wires as low profile as possible when they run from the usb into the box, like i had in the pic, if u dont the metal and faceplate will squish them and possibly damage them. i put a little peice of electrical tape over the solder points as well just for a little protection, also make sure the cable running inside the unit is away from the side wall, it gets pretty hot there so just to be safe.
9. lastly, turn the unit to the backside and ziptie the cable like show, so it cant move inside the unit and possibly break ur work.
10. put the unit back together, install back into car, and enjoy ur new relocated usb port. Just dont try plugging in 2 things at once, the factory port on the unit itself seems to always take over if u do.
Enjoy (sorry for the spelling mistake
)
Last edited by TommyP; Oct 6, 2012 at 09:21 AM.

Thread Starter
Joined: 07-14-08
Posts: 12,039
Likes: 156
From: canada
yes actually it would work of any deck with usb, every usb pin payout is the same. pin one is always on the right if u are looking at it correctly, then just solder on the wires and it should work.

Member
Joined: 11-04-08
Posts: 241
Likes: 1
From: Castro Valley, CA
Nice write up. What good timing, too, as my car Cobalt window was just smashed and all the thieves took was the easily visible mp3 player... Going to try and run my USB over to the little hidden compartment on the drivers side so that what ever is connected to is out of eye site. Thanks!

New Member
Joined: 02-19-12
Posts: 70
Likes: 0
From: Fairfield county, ct
Great write up. I'm going to give this a shot next weekend. A bit nervous since last time i soldered was 10 years ago. lol
Any idea what length USB extension is best for the driver side cubby? I dont want to have to ravel up extra feet of USB if i dont have too.
Any idea what length USB extension is best for the driver side cubby? I dont want to have to ravel up extra feet of USB if i dont have too.
Thread Starter
Joined: 07-14-08
Posts: 12,039
Likes: 156
From: canada
take a string, run it from back of head unit to where u want the usb, then add the lenghth of the head unit to that, measure with tape measure, give urself like 4,5 inches just in case, and there u have it

New Member
Joined: 02-19-12
Posts: 70
Likes: 0
From: Fairfield county, ct

tried this on the weekend.. didnt work out too well for me i must not have much skill in soldering
Any tips and tricks would be appreciated.
Thread Starter
Joined: 07-14-08
Posts: 12,039
Likes: 156
From: canada
its a very good idea to have a thin soldering tip, and make sure u put flux on the solder point and on wire. put wire onto the solder point and heat it for a second, should stick, u can add a little solder ontop of it. if u want u can even take the usb port out, gives ur wires more clearence. can always put a non usb faceplate on it. remember, u give it to much heat and u will destroy the circuit path.
oh ya, steady hand help a whole lot. take ur time
oh ya, steady hand help a whole lot. take ur time
Last edited by tomj77; Sep 13, 2012 at 07:44 PM. Reason: Automerged Doublepost


can the aux jack be relocated too? if so, you could run it down and through the console and put one of these
in that flat area just in front of the change organizer beside the handbrake.
Thread Starter
Joined: 07-14-08
Posts: 12,039
Likes: 156
From: canada
That's pretty cool, ya anything electrical can be relocated, just solder the wire to the correct pins. Shouldn't be to hard. If I still had factory deck I'd totally do this

New Member
Joined: 04-12-14
Posts: 6
Likes: 0
From: Canada
So tried this... iPhone says "This accessory may not be supported" and stops charging after a few mins, music still plays. I'm guessing it's the cable I have plugged into the one coming out of this mod. So I'll try getting a new one. But! When I connect an USB drive to the front port with nothing connected to to mod, it works like normal. If I connect my iPhone directly though, I get no recognition on the iPhone, and the radio says it can't connect... So direct iPhone connection is broken now....
Thread Starter
Joined: 07-14-08
Posts: 12,039
Likes: 156
From: canada
So tried this... iPhone says "This accessory may not be supported" and stops charging after a few mins, music still plays. I'm guessing it's the cable I have plugged into the one coming out of this mod. So I'll try getting a new one. But! When I connect an USB drive to the front port with nothing connected to to mod, it works like normal. If I connect my iPhone directly though, I get no recognition on the iPhone, and the radio says it can't connect... So direct iPhone connection is broken now....
New Member
Joined: 04-12-14
Posts: 6
Likes: 0
From: Canada
Ok yea, I have an iPhone 5, but it's been working ever since I got it. The setup I have is this mod ending in a female usb connector. Then there's a cheapo micro-usb cable plugged into that, and that goes into my iPhone through the micro-usb lightning adaptor from apple. That's where there's problems, as I tried using my lighting cable directly to the female usb end. No message popped up on my
phone and it seemed to be charging. So I'll replace the micro-usb. What's weird is, if I have nothing connected to the female end of the mod, and I try to use the original faceplate port, a stick works, but my iPhone won't.
phone and it seemed to be charging. So I'll replace the micro-usb. What's weird is, if I have nothing connected to the female end of the mod, and I try to use the original faceplate port, a stick works, but my iPhone won't.
Thread Starter
Joined: 07-14-08
Posts: 12,039
Likes: 156
From: canada
Ya gotta be carful with what cords u buy aftermarket, some are only wired to charge, some are just bad quality. Cellphoneshop.net has good ones for cheap. As for ur other issue, idk. If the mod works just plug it into there. Or Do like I did and run the wire behind my apiller and up at the top of the windshield and have a iPhone holder with sucktion cup mount there. Nice and clean and out of the way. If sucktion cup don't hold to long like mine, little but of clear silicon works well to keep it up there, and easy to clean if u take it down.
New Member
Joined: 04-12-14
Posts: 6
Likes: 0
From: Canada
Hmm yea it wasn't the cable. I took everything out again and re-soldered the leads. When I put things back temporarily both ports worked and my iPhone didn't throw any warnings. So I put everything back properly and did some driving. When I got to my destination the iPhone had the accessory warning again and had stopped charging. And now the front USB port charges the phone but constantly skips forward on all the songs so nothing plays. It's becoming a hassle.. Might just take everything out and give up.

Thread Starter
Joined: 07-14-08
Posts: 12,039
Likes: 156
From: canada
Hmm yea it wasn't the cable. I took everything out again and re-soldered the leads. When I put things back temporarily both ports worked and my iPhone didn't throw any warnings. So I put everything back properly and did some driving. When I got to my destination the iPhone had the accessory warning again and had stopped charging. And now the front USB port charges the phone but constantly skips forward on all the songs so nothing plays. It's becoming a hassle.. Might just take everything out and give up.
u dont
Last edited by tomj77; Apr 13, 2014 at 01:00 AM. Reason: Automerged Doublepost