2.0 LNF Engine: How To: Remove SS/TC bumper and install MPx Intercooler
 09-28-2010, 02:49 AM
#1
Junior Member
Thread Starter
Join Date: 03-03-09
Location: Northern Kentucky/ Cincinnati
Posts: 457
Likes: 0
Received 0 Likes
on
0 Posts
How To: Remove SS/TC bumper and install MPx Intercooler
All procedure stated below is in what I personally feel is the easiest order. You can go about the task in any order, but the end result will be the same.
Feel free to PM me with any questions, or to correct any mistakes I make, and I will do my best to help/correct.
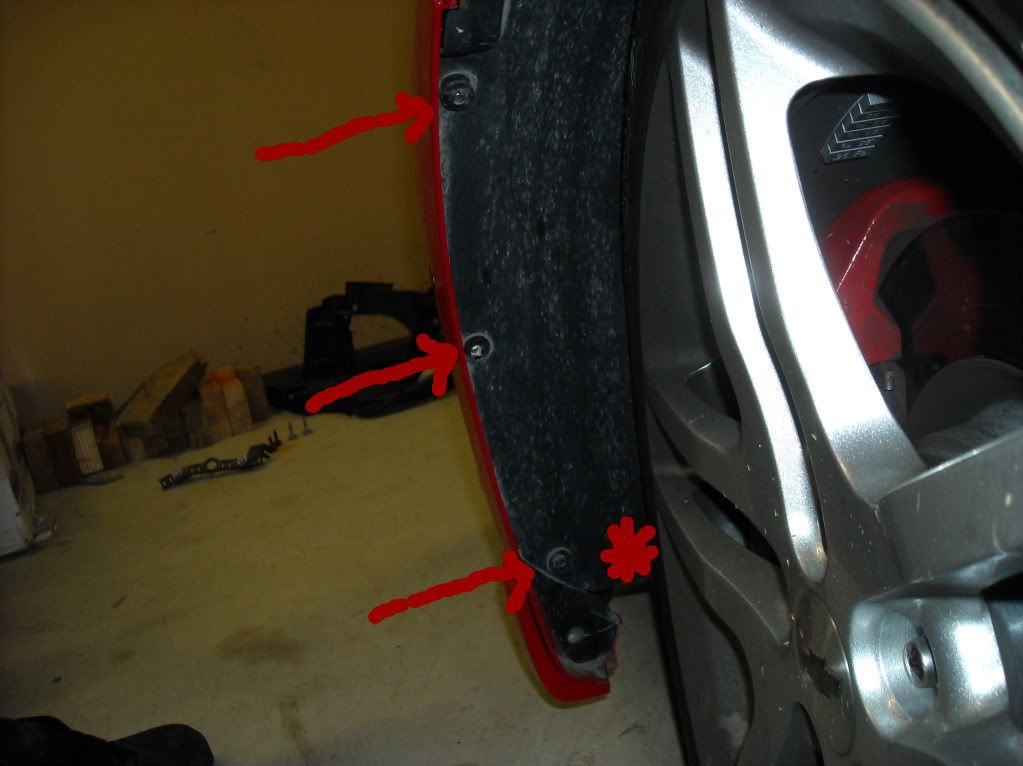
Remove the screws inside the fender liner on each side. Most of the bolts that connect the fender and underbody linings are 7mm, but the screw starred here is a phillips, and was actually quite difficult to remove. I suggest either removing the wheels or turning as shown in this picture. Make sure to use the proper screw driver, because it is tight until it is fully backed off, and was begging to strip.
There is also an additional 2 or 3 screws under the bumper, that connect the bumper to plastic underbody panels. No picture really accented any of these bolts, but I am sure you can solve that one on your own.
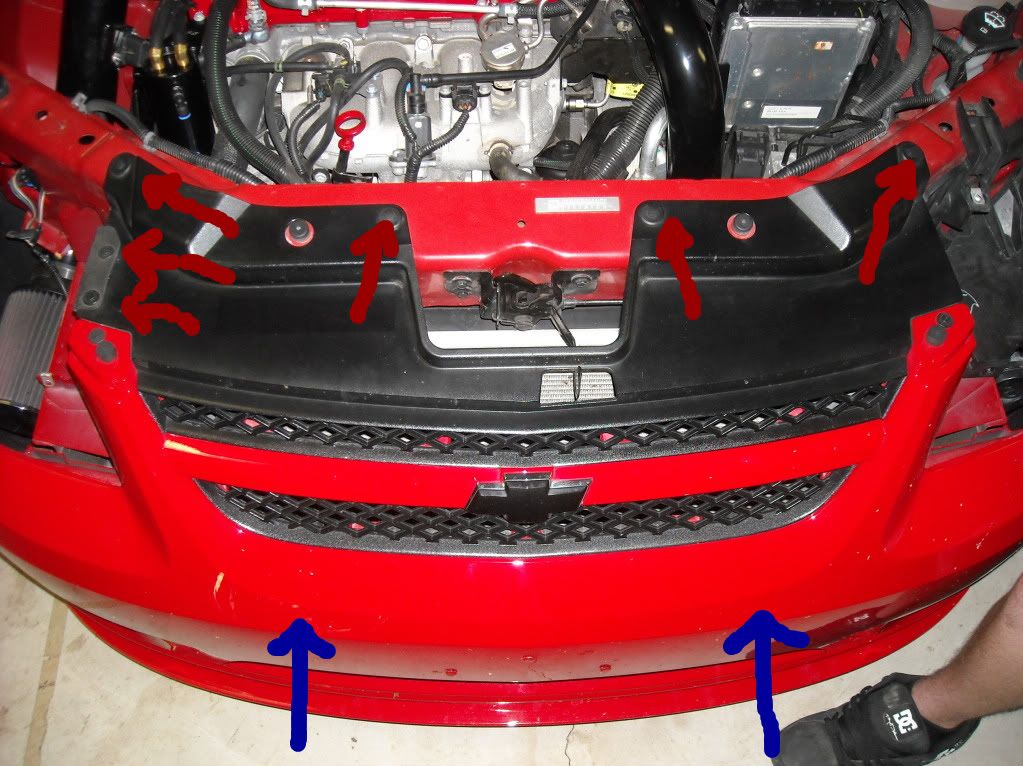
Remove all the tabs pointed out in red. They are all the same style, and can be easily removed with a flat screw driver and your hands or with your plier of choice. The tabs pointed out in blue are a little tricky. If you have your intercooler grille removed, they are quite easy. If not, you can remove them in several ways. You can either remove the grille to get easy access to them or you can shove your arm up there, pop the tab out through the grille with a screw driver, and remove them with your hands. I chose the latter, because there are too many clips for the grille. This should loosen the entire center of the bumper.
It is now time to remove the last bolts from the bumper. To remove the bumper you must also remove the headlights. A good writeup already exists for this, so I will just leave a link:
https://www.cobaltss.net/forums/how-...alt-g5-156822/
After the lights are out, you must remove the light holsters. The removal is pretty self-explanatory. Four bolts in plain view. Just make sure to note where the wires are routed, so that you can route them the same way on reassembly.
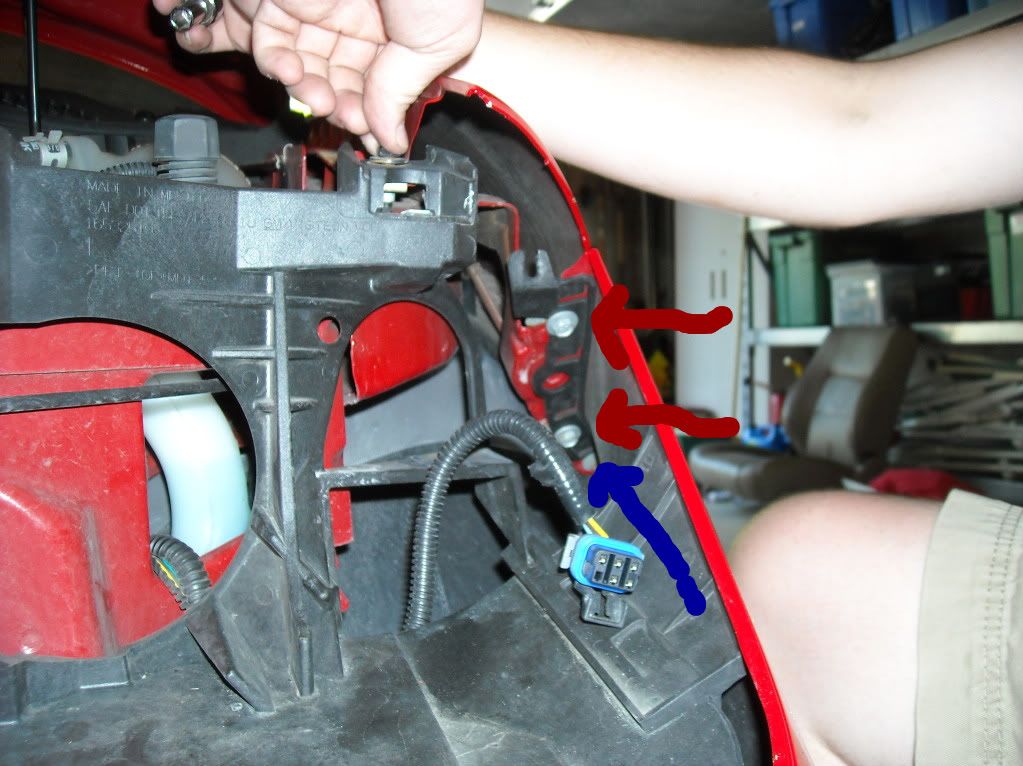
Now, you can loosen the 2 bolts pointed at in red, on each side. I removed the brackets, but that is not necessary, because the bumper simply slides into the bracket, and the 2 screws just make it tight. The screw pointed at in blue however, must be fully removed. Once this is completed on both sides, the bumper should be free from the car, with the exception of the fog lights, which you must disconnect based on your style of lighting.
Now for the intercooler:
While the IC is secure, I suggest removing the cold and hot side piping bolts.
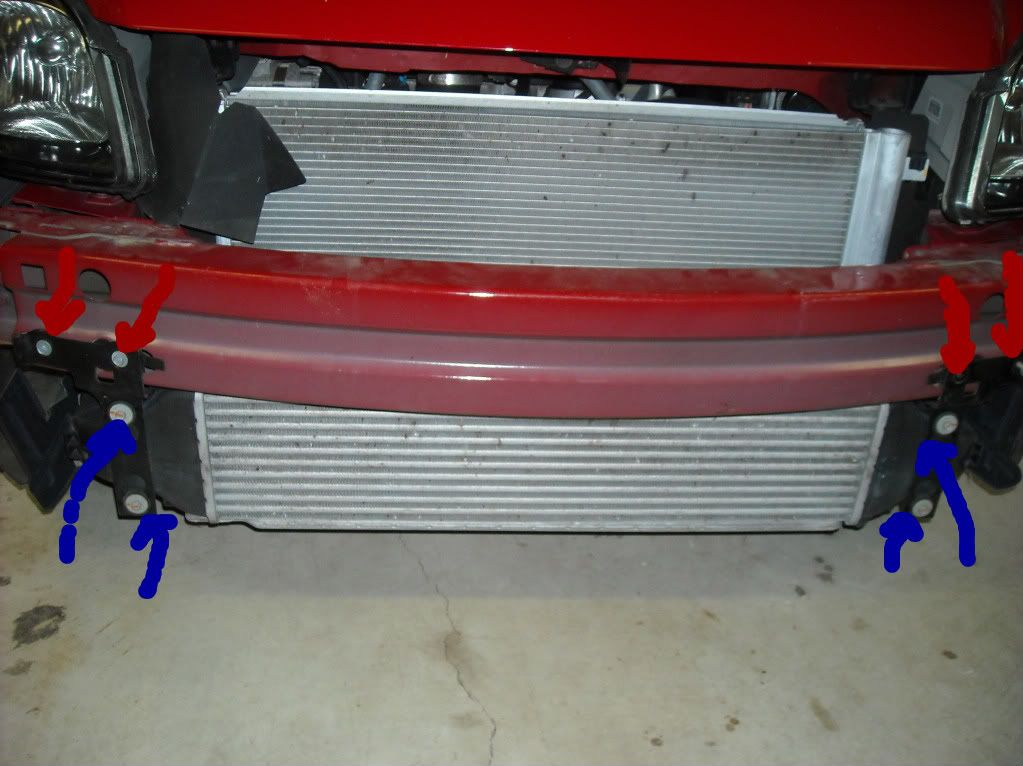
Then, remove all four bolts pointed out in red. Don't worry, the IC will not fall off when the bolts are removed. The bracket is held on by a drop tab, so you must lift upward to remove. Once, the stock IC is off, also remove the brackets from the end tanks. Take 2 of the bolts pointed out in blue and set them aside. These are the bolts I used to mount the new IC. Due to concern from other members, I applied bushings on both sides of the mounting tab to allow movement, so the longer bolt with larger washers from the end tanks was required. I looked at a variety of store for proper bushings, and bought a few, but none provided the strength needed to still be mounted tightly, but not be fully depressed. The bushings I ended up using were also from the stock end tank brackets. I removed the metal insert from the bushing to allow it to be squeezed, but a whole one would not fit on both sides. To solve this, I cut one bushing in half. I then used one full size bushings on the rear of the mounting tab (touching the core support) and used the half bushing for the front (bolt side). I tightened the bolts to comfort tight, which can be seen in the picture below
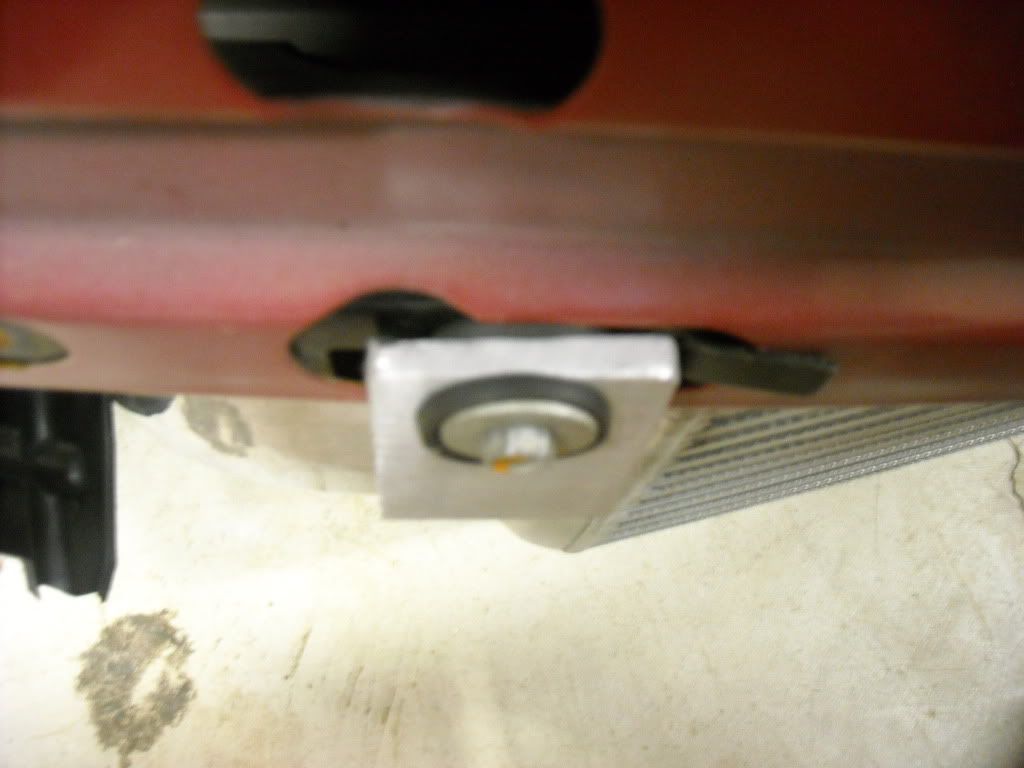
This allowed the intercooler to be solidly mounted, but to still allow some movement. ALthough the bushings pushed the IC forward, I experienced no bumper reattachment issues, and no shaving was required
Reassembly is simply the reverse process, so I feel that no additional write up is needed.
Thanks for reading!
Feel free to PM me with any questions, or to correct any mistakes I make, and I will do my best to help/correct.
Remove the screws inside the fender liner on each side. Most of the bolts that connect the fender and underbody linings are 7mm, but the screw starred here is a phillips, and was actually quite difficult to remove. I suggest either removing the wheels or turning as shown in this picture. Make sure to use the proper screw driver, because it is tight until it is fully backed off, and was begging to strip.
There is also an additional 2 or 3 screws under the bumper, that connect the bumper to plastic underbody panels. No picture really accented any of these bolts, but I am sure you can solve that one on your own.
Remove all the tabs pointed out in red. They are all the same style, and can be easily removed with a flat screw driver and your hands or with your plier of choice. The tabs pointed out in blue are a little tricky. If you have your intercooler grille removed, they are quite easy. If not, you can remove them in several ways. You can either remove the grille to get easy access to them or you can shove your arm up there, pop the tab out through the grille with a screw driver, and remove them with your hands. I chose the latter, because there are too many clips for the grille. This should loosen the entire center of the bumper.
It is now time to remove the last bolts from the bumper. To remove the bumper you must also remove the headlights. A good writeup already exists for this, so I will just leave a link:
https://www.cobaltss.net/forums/how-...alt-g5-156822/
After the lights are out, you must remove the light holsters. The removal is pretty self-explanatory. Four bolts in plain view. Just make sure to note where the wires are routed, so that you can route them the same way on reassembly.
Now, you can loosen the 2 bolts pointed at in red, on each side. I removed the brackets, but that is not necessary, because the bumper simply slides into the bracket, and the 2 screws just make it tight. The screw pointed at in blue however, must be fully removed. Once this is completed on both sides, the bumper should be free from the car, with the exception of the fog lights, which you must disconnect based on your style of lighting.
Now for the intercooler:
While the IC is secure, I suggest removing the cold and hot side piping bolts.
Then, remove all four bolts pointed out in red. Don't worry, the IC will not fall off when the bolts are removed. The bracket is held on by a drop tab, so you must lift upward to remove. Once, the stock IC is off, also remove the brackets from the end tanks. Take 2 of the bolts pointed out in blue and set them aside. These are the bolts I used to mount the new IC. Due to concern from other members, I applied bushings on both sides of the mounting tab to allow movement, so the longer bolt with larger washers from the end tanks was required. I looked at a variety of store for proper bushings, and bought a few, but none provided the strength needed to still be mounted tightly, but not be fully depressed. The bushings I ended up using were also from the stock end tank brackets. I removed the metal insert from the bushing to allow it to be squeezed, but a whole one would not fit on both sides. To solve this, I cut one bushing in half. I then used one full size bushings on the rear of the mounting tab (touching the core support) and used the half bushing for the front (bolt side). I tightened the bolts to comfort tight, which can be seen in the picture below
This allowed the intercooler to be solidly mounted, but to still allow some movement. ALthough the bushings pushed the IC forward, I experienced no bumper reattachment issues, and no shaving was required
Reassembly is simply the reverse process, so I feel that no additional write up is needed.
Thanks for reading!

 01-22-2011, 06:52 PM
#6
Senior Member

Join Date: 10-31-09
Location: the darkness
Posts: 2,652
Likes: 0
Received 0 Likes
on
0 Posts
because people dont know that it doesnt ahve to be gone....it started along time ago where one dude said you need to remove it....im the first one to my knowledge on this board(when i was boosted_cobalt09) that started proving everyone wrong and people still try to test me on this...ill make a damn video lol.
01-22-2011, 07:04 PM
#8
Senior Member
Join Date: 10-31-09
Location: the darkness
Posts: 2,652
Likes: 0
Received 0 Likes
on
0 Posts
i come from the muscle car world i bought this car souly to drive daily and it turned into another porject hahahahahaha. but yeah im a verterened body tech so that was a given how to take it off.
01-23-2011, 12:41 AM
#10
Junior Member
Thread Starter
Join Date: 03-03-09
Location: Northern Kentucky/ Cincinnati
Posts: 457
Likes: 0
Received 0 Likes
on
0 Posts
01-23-2011, 01:45 AM
#11
Senior Member
Join Date: 10-31-09
Location: the darkness
Posts: 2,652
Likes: 0
Received 0 Likes
on
0 Posts
gotcha but i mean remove the last bolt and just give the bumper a little yank on each side and it comes right off. just thought it woul dbe know. people go nuts removing the bracket and everything..makes it more of a pain in the butt.
12-17-2011, 10:47 AM
#12
New Member

Join Date: 03-12-11
Location: Detroit, MI
Posts: 36
Likes: 0
Received 0 Likes
on
0 Posts
I am trying to get the new ZZP intercooler back on and can't get the rubber piping around it. Does anyone know how to do this? It seems impossible...bunch of stuff in the way.
03-04-2012, 01:35 AM
#14
Senior Member

Read up a few posts above, Whyyoumadson and DartSI both agree you DO NOT have to remove the headlights. Of course, it's your option to do so, but personally I will be taking their advice when I install my new intercooler. As you've stated, headlight removal is a PITA and if I don't absolutely need to remove them, I won't.
04-23-2012, 08:27 PM
#16
Senior Member
iTrader: (3)

Join Date: 07-24-11
Location: Bradenton, FL.
Posts: 2,983
Likes: 0
Received 0 Likes
on
0 Posts
oh, so you DON'T have to remove the headlights?
Why do people do it then?
i didnt see anyone reply to the comment on having a hard time putting the factory rubber hose back on either.
Why do people do it then?
i didnt see anyone reply to the comment on having a hard time putting the factory rubber hose back on either.
Last edited by AARON-SS-TC; 04-23-2012 at 08:44 PM.
07-19-2012, 12:01 PM
#17
Member

Join Date: 03-08-11
Location: Los Angeles
Posts: 251
Likes: 0
Received 0 Likes
on
0 Posts
Just took everything off too investigate a cracked IC....was wondering why the headlights "had" to come off but I did it anyways since I didn't want to have to go back and do it. Yea, you DONT have to take them off lol
Awesome write up though, got the whole assembly off in about 45 minutes!
Awesome write up though, got the whole assembly off in about 45 minutes!
 01-06-2013, 11:13 PM
#20
New Member

Join Date: 07-22-12
Location: Las Vegas, NV
Posts: 18
Likes: 0
Received 0 Likes
on
0 Posts
Thanks for the thread and posts! IC is finally in and working great! couldnt have done it without this thread it only took me like 6 hours lol not bad for my first car project

 09-02-2013, 09:57 AM
#23

My Haynes manual says to remove the headlights as well as a bunch of poppers and screws on the underside splash guards. Made for much more pain and was unnecessary. Although to get the bracket bolts tight on the sides I feel have the headlight off is easier.
12-01-2013, 03:43 PM
#24
Senior Member

Join Date: 01-25-06
Location: Maryland
Posts: 4,499
Likes: 0
Received 0 Likes
on
0 Posts
For those having trouble getting the stock couplers on the new intercooler end tanks, take some pledge house hold duster spray a small amount inside the stock coupler and it will go on way smoother.
